If you just started a blog on WordPress, the temptation to make it perfect is strong. You want to try all the beautiful WordPress themes, experiment with all the useful plugins and test all the features of WordPress out.
But doing that directly on your website would be bad. Here’s why. When you are experimenting, things tend to break. You wouldn’t want to break your blog, right? So how are you supposed to work on your blog?
The answer is to install WordPress locally. Replicating the conditions of your hosting environment, you can install WordPress on your Windows or MAC computer.
Think of it like this. You wouldn’t try to use a new move in a championship game, right? You would test it out in the playground, perfect it and then use it in a match.
A local WordPress install is your playground where you test changes, features, and plugins for a real site. Once you perfect it, you can then replicate the changes to your actual site. Working with WordPress locally has many other advantages as well.
- You can experiment without worries. Even if you break something, your real website is not affected.
- You can try out different themes for your website without annoying your visitors. Only you can see the changes you make.
- You can work much faster with a local install. If you make any code changes, you can view them instantly on your computer.
- It’s cheaper. Since you are using your computer, you are not paying for hosting or bandwidth. You can work on a local install for as long as you like.
- There’s no downside. Even if you break anything beyond repair, you can scrap the complete setup and start again.
- You can also use the local WordPress for writing. You can create the perfect layout and formatting at your ease and copy the article to your main site.
Let’s look at some of the major points that we would be covering in this detailed post.
Table Of Contents
- 1. How Do Websites Work
- 2. Creating The Same Environment On Your Computer
- 3. Choosing A Software For The Tech Stack
- 4. Installing WordPress locally with WAMP
- 5. Installing WordPress locally with XAMPP
- 6. Installing WordPress Locally with DevKinsta
- 7. Installing WordPress Locally By Using Local By Flywheel
- 8. A Common Issue With Local
- 9. Conclusion
1 How Do Websites Work
When we access a website, we rarely think about how we see the page we see. Behind the scenes, multiple technologies work together to show you the page that you just visited.
The combination of these technologies is referred to as a technology stack or tech stack. A common tech stack that is used for websites is called the LAMP stack. Here is what it means.
- L: Linux. It is a popular operating system used on servers
- A: Apache. It is a popular web server. A web server is what you engage with when you open any website
- M: MySQL. It is a popular database management system. MySQL helps store and retrieve the actual information that you see on your screen. Even this text that you are reading is stored in a MySQL database
- P: Commonly stands for PHP. PHP is a scripting language in which WordPress and many other programs are written in
2 Creating The Same Environment On Your Computer
To install WordPress locally on your Windows PC or Mac, you have to create the same technology stack on your computer. Once you have the technology stack installed, all you have to do is install WordPress.
Don’t let the technical terms scare you. It’s not as complicated as it sounds. Think of it like this. Any standard piece of software that you use on Windows or Mac computer is complex under the hood. But installing it and using it isn’t hard.
A modern car is made up of thousands of components working together. That doesn’t mean driving it around is difficult. Installing and using a LAMP stack is very similar.
3 Choosing A Software For The Tech Stack
The good news is that you don’t have to set up your tech stack individually. There are some bundled software that you can use to install the technology stack on your computer. These software are available for the PC and Mac as well.
We will look at 3 of the most popular software to set up WordPress locally on your Windows or Mac Computer.
- WAMP (Difficult)
- XAMPP (Easier)
- Local by Flywheel (Easiest)
4 Installing WordPress locally with WAMP
WAMP stands for Windows, Apache, MySQL, and PHP. It is similar to the LAMP stack we discussed above.
The only difference is that WAMP is made for Windows. Since we use Windows instead of Linux, the stack changes from LAMP to WAMP. We hope that makes sense.
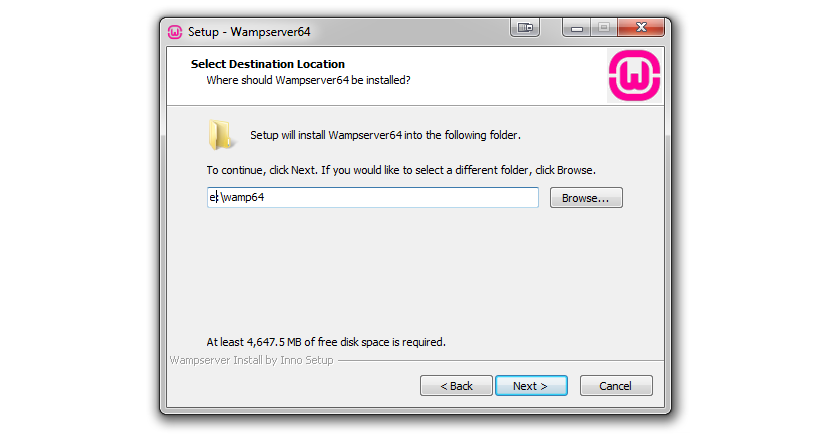
To install WAMP, visit their website and download a copy of the installer. It’s available for both 32 bit and 64 bit systems, so download the one that is compatible with your Windows machine.
Once downloaded, start the install. Most of the steps are simple and don’t need any technical explanation. We will discuss the steps that need any attention.
After a couple of steps, you will need to specify an installation directory. It is recommended that you install WAMP in the root directory of a drive. Have a look at the screenshot below.
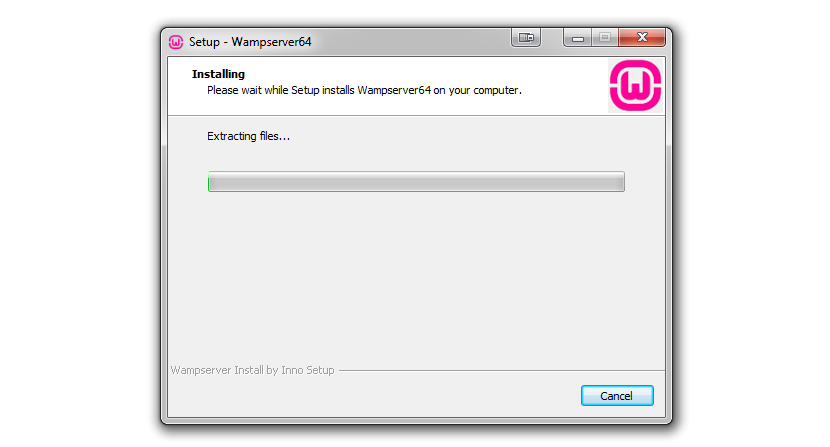
The next few steps are self-explanatory. Once you reach the final step, WAMP server will start installing on your computer. It usually takes a couple of minutes to install completely.
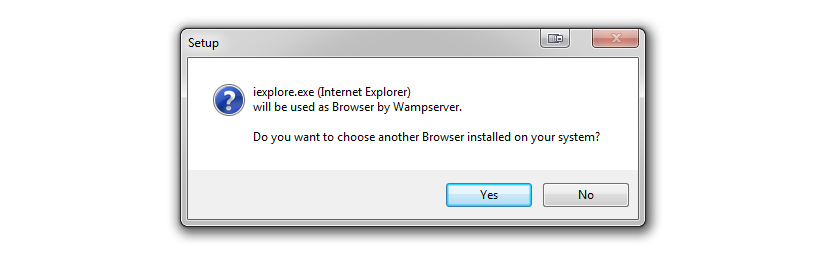
At the end of the install, WAMP server will ask for your default browser that you want to use to preview your work. Choose the one that you frequently use.
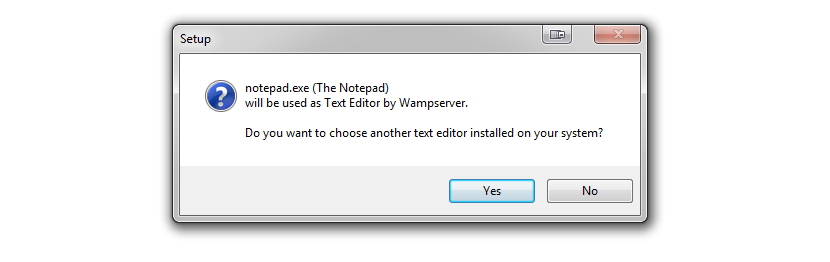
After you choose your default browser, the next thing WAMP confirms is if you want to use your default text editor or change it. A text editor is useful for viewing logs, configurations, etc. Choose the one that you like and proceed.
Finish the installation and run the WAMP server. If all goes well, you should see the green icon for WAMP server in your system tray.
![]()
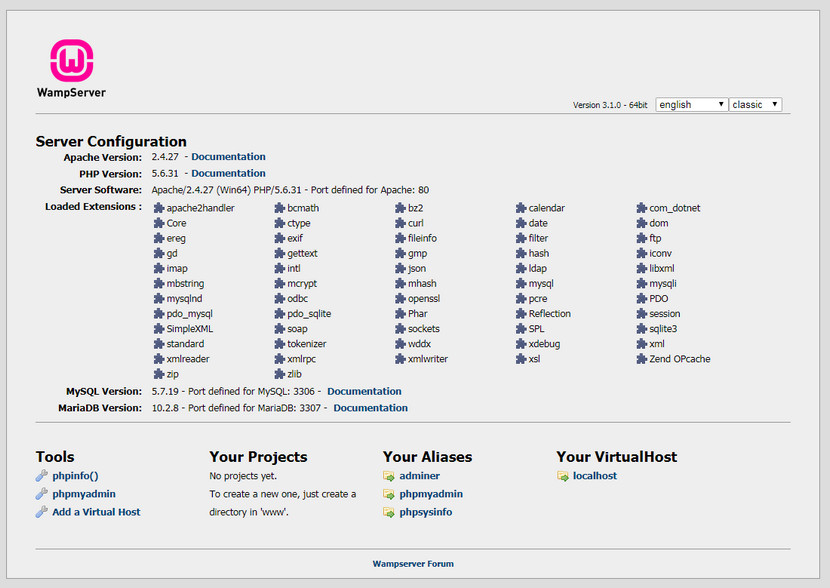
To manually confirm, you can also go to your browser and type “localhost” (without the quotes) and click go.
If you are greeted with the following screen, congratulations, you have successfully installed the WAMP server on your Windows PC.
4.1 Installing WordPress On Your WAMP Server
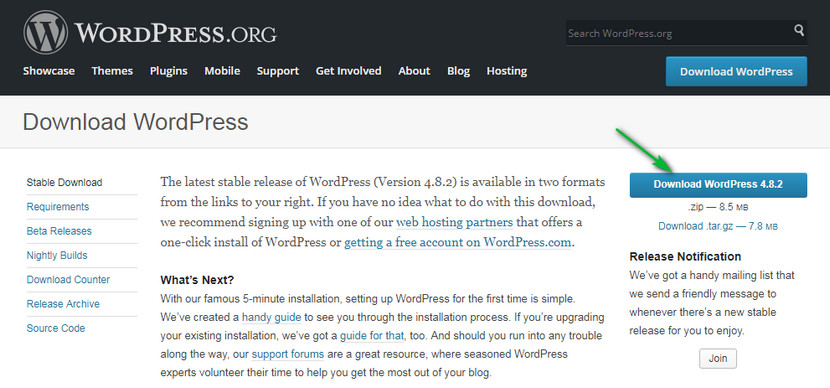
The next step is to install WordPress on your server. If you had no trouble installing WAMP, then you will have no trouble installing WordPress as well. The first step is to download WordPress. As of this writing, the current version is 4.8.2.
You will get a zip file which will contain the installation files. Extract the files and keep it inside a directory.
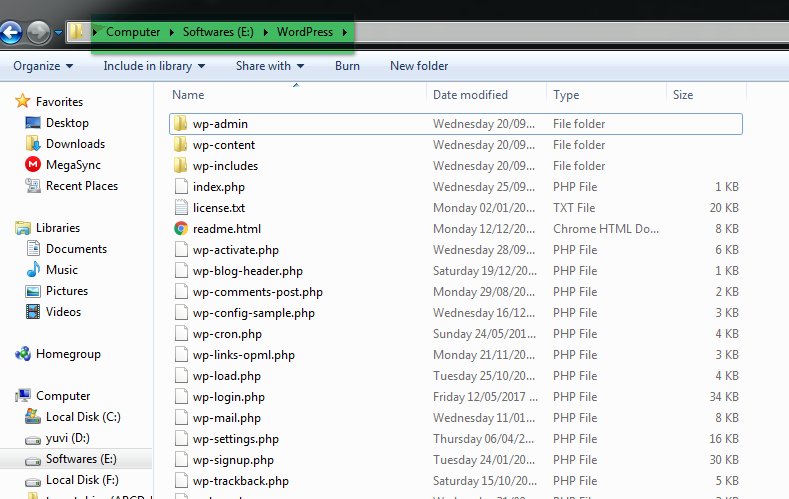
Now you have to make a choice. You can install WordPress in the root directory or a separate directory.
- If you install WordPress in the root directory, you will access WordPress at- localhost
- If you install WordPress in a custom directory, you will access WordPress at- localhost/<custom directory name>
To install Wordpress in the root directory, copy the contents of the WordPress directory to Wamp Installation -> www directory
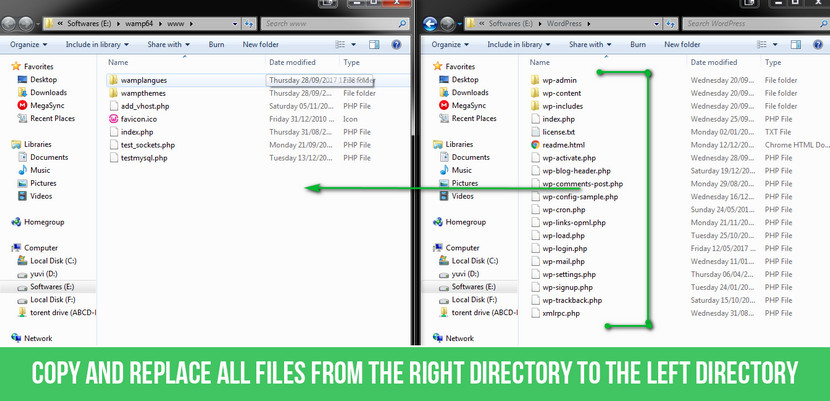
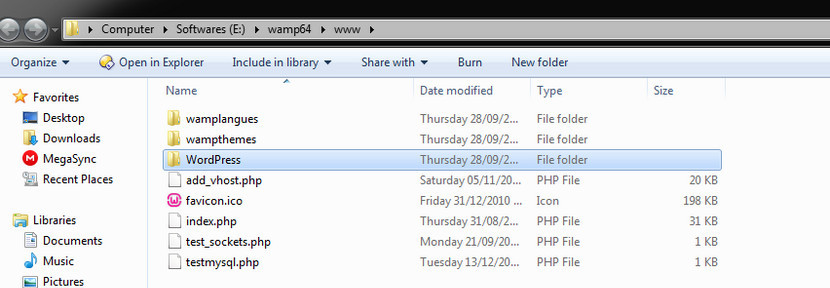
To install WordPress in a separate directory, create a new directory and copy all the WordPress installation files inside that directory. In the image below, we have copied all the WordPress setup files in the directory named WordPress.
For the rest of the tutorial, we will continue with installing WordPress inside a separate directory.
The only difference will be how you will access the setup and WordPress after install. Rest of the setup and use of WordPress will remain the same. You can follow along based on which option you chose.
4.2 Creating a Database
Before we setup WordPress, we need to create a database. The database is where WordPress saves all of your pages, posts, and other information.
To create a database, you have to navigate to localhost/phpmyadmin. You will reach the login page.
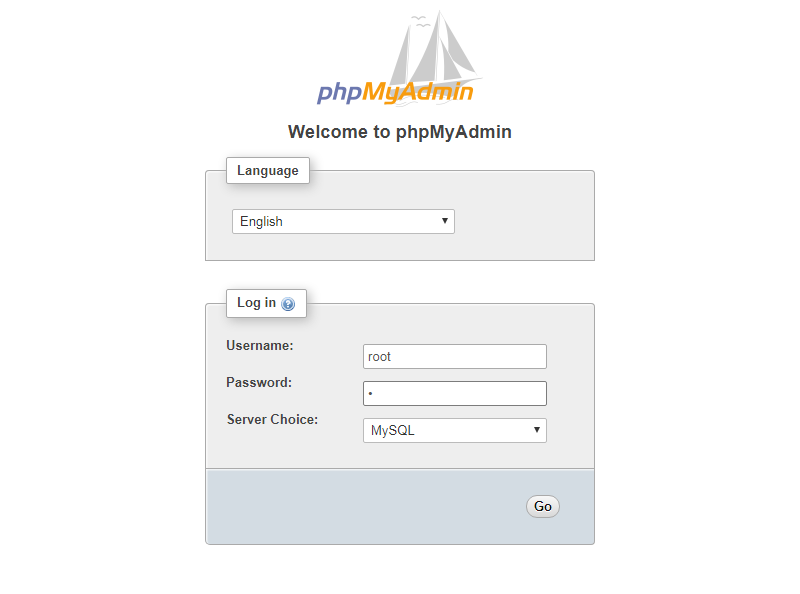
The default credentials are:
- Username: root
- Password: (Leave Blank)
After logging in, navigate to Databases. In the create database field, enter any name for the database and click create. Have a look at this animation to understand the process better.
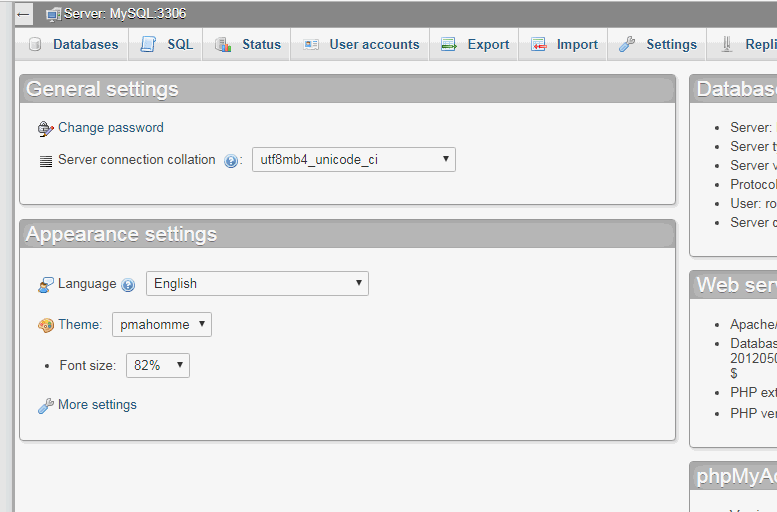
Now just remember the name of the database that you just created.
4.3 Installing WordPress
We hope you have already copied the WordPress setup files in the appropriate folder as we mentioned in the steps above.
To start the installation, navigate to the appropriate address. Since we are installing WordPress in the “WordPress” directory, we will navigate to http://localhost/wordpress.
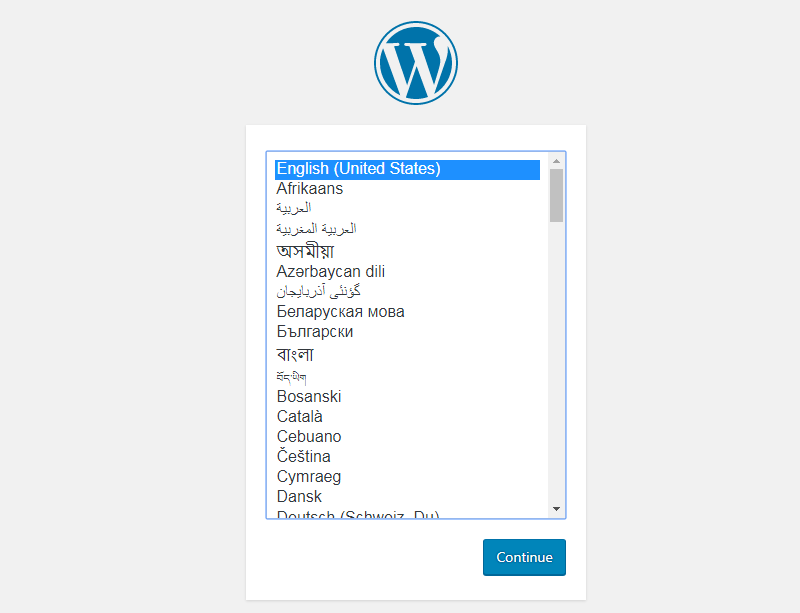
You will be greeted with the WordPress installation page. Let us take you through the installation step by step.
On the first page, choose the language you want WordPress installed in and click continue.
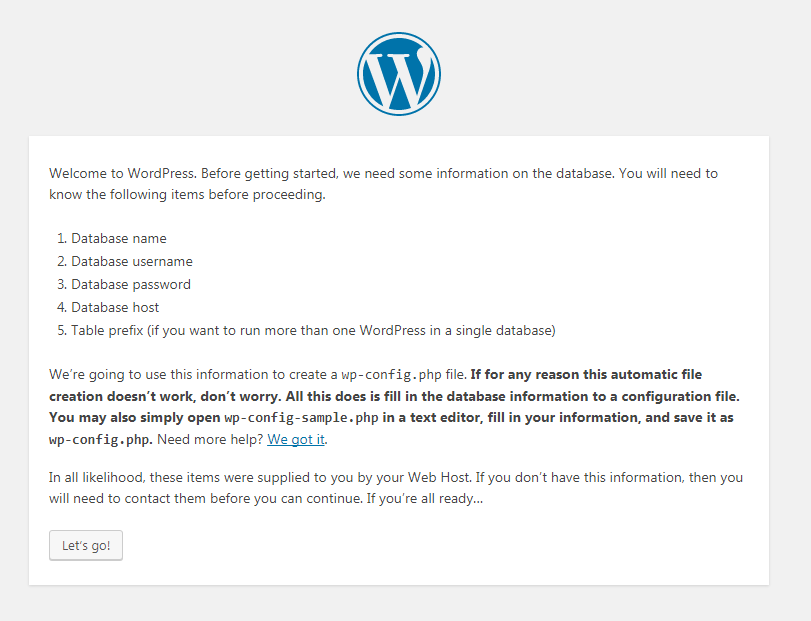
Next, WordPress will remind you to keep the following information ready. All you have to do is enter the database name, and the rest will be default values. Refer to the following values.
- Database Name : mythemeshop (in our case)
- Database username : root
- Database password : (leave blank)
- Database host : localhost
- Table Prefix : wp_
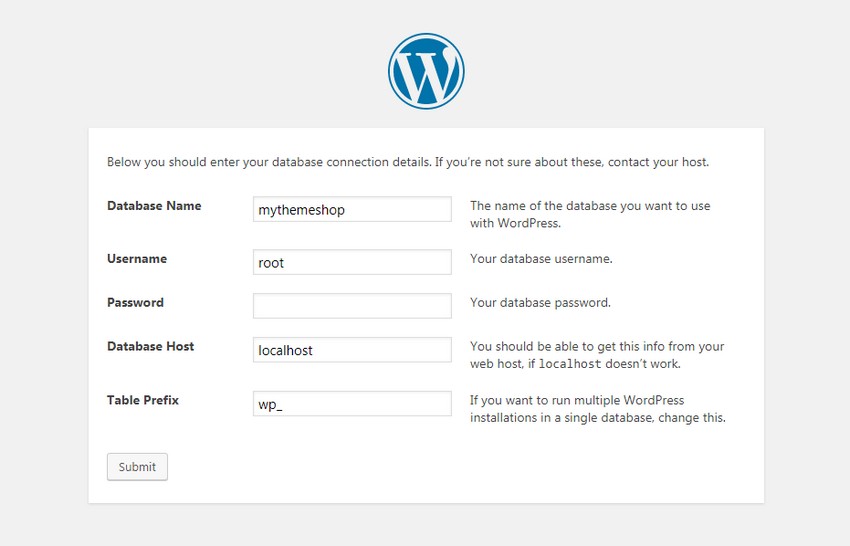
After putting in these values hit submit. You should see the following screen.
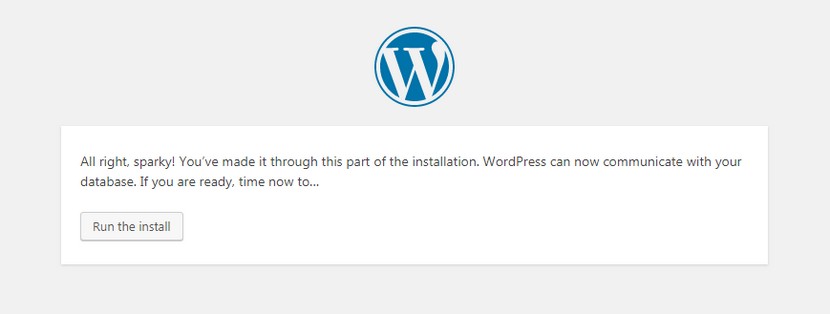
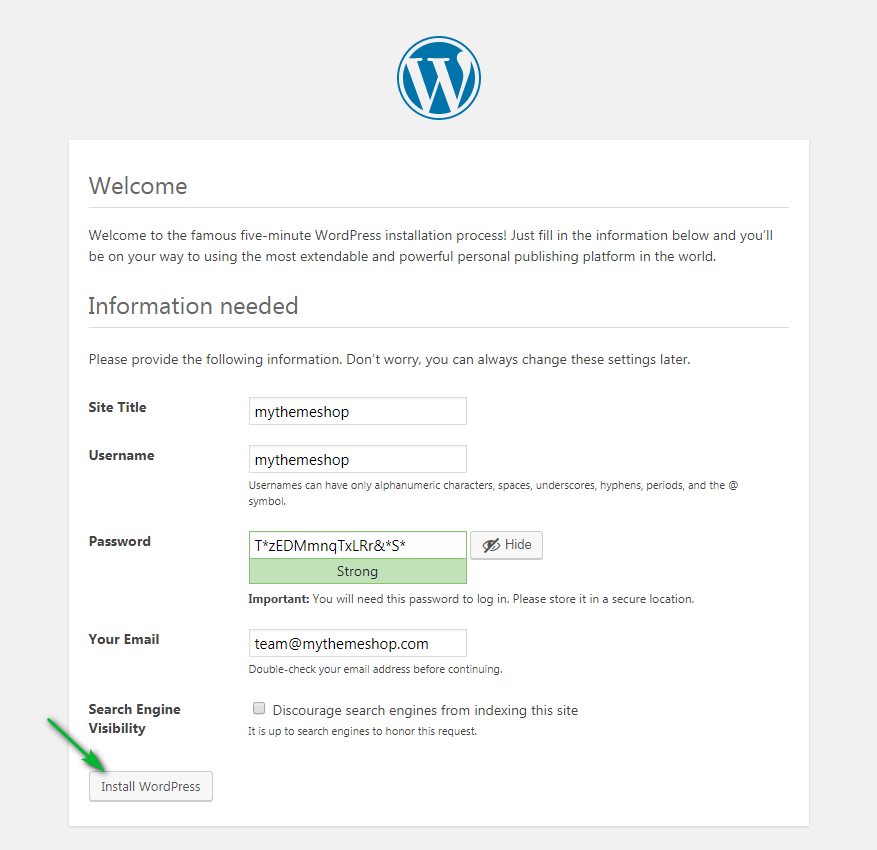
Click “Run the install.” You will see the setup page where you will configure your WordPress install with some basic information. You will have to enter the following information.
- Site Title : What you would like your website to be called
- Username : Enter a username that you will use to login to your site. This will also be publicly visible in comments and authors, so choose a good one.
- Password : You can use the suggested password or enter a new one. Make sure to memorize it or save it in a safe space
- Your email : Enter a valid email that you have access to. This email will be used for any password recovery attempts in the future.
- Search Engine Visibility : Since we are installing WordPress locally, it does not matter if it is selected or not.
After filling in the information, click “Install WordPress”.
In a jiffy, WordPress should be installed. You should see the following screen.
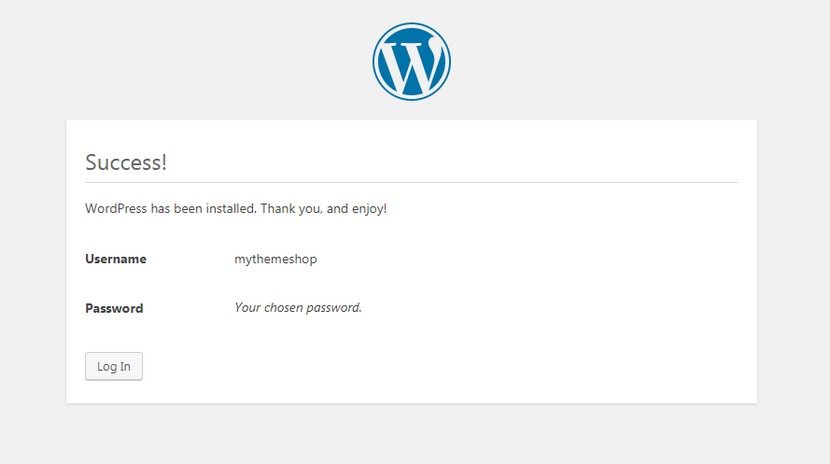
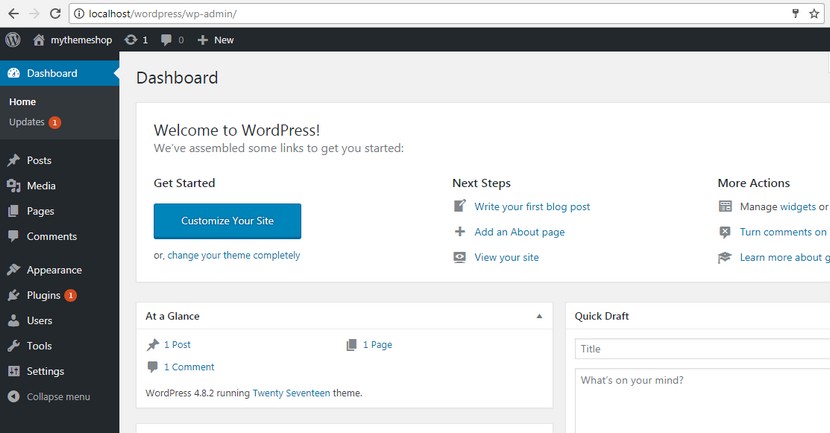
Hit Login and use the username and password combination to log in. Voila, you just installed WordPress locally on your PC with WAMP.
5 Installing WordPress locally with XAMPP
As we mentioned, WAMP is available only for Windows. To install WordPress locally on your MAC, XAMPP is a great alternative.
XAMPP is available for MAC, Windows, and Linux as well.
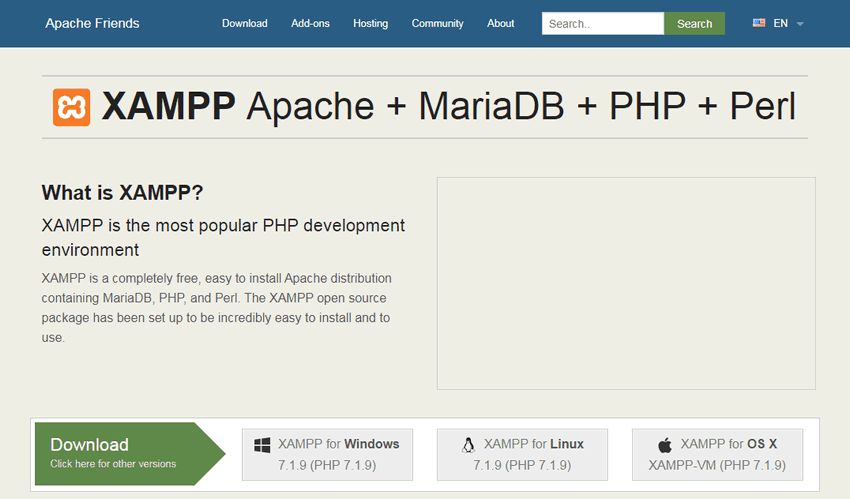
To download XAMPP, visit their website. Choose the platform of your choice and download the installer.
Start the install and proceed until you reach the following screen.
On this page, you can leave the default settings and click next. On the next page, choose the directory you would like to install XAMPP and click next. XAMPP should now start installing. It takes a few minutes to install completely.
After XAMPP has installed, leave the default options on and click finish. XAMPP should run automatically.
When XAMPP starts, you will see language selection box. Choose the language you prefer and click save. You will then be greeted with this screen.
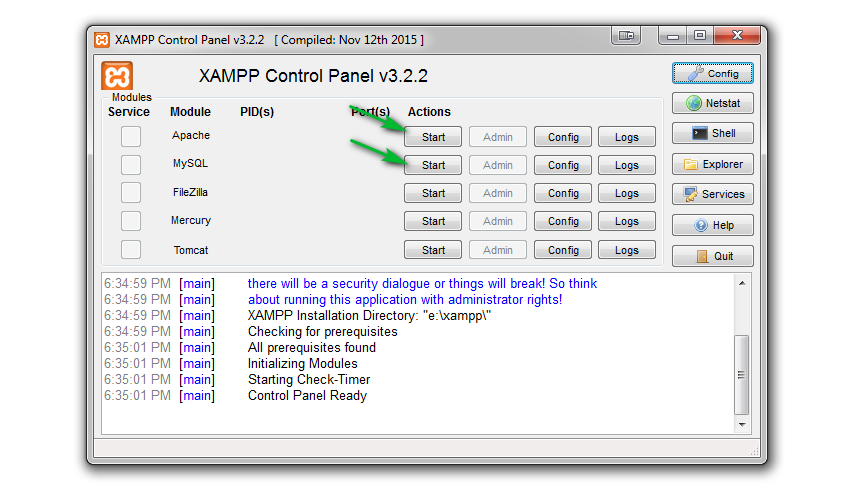
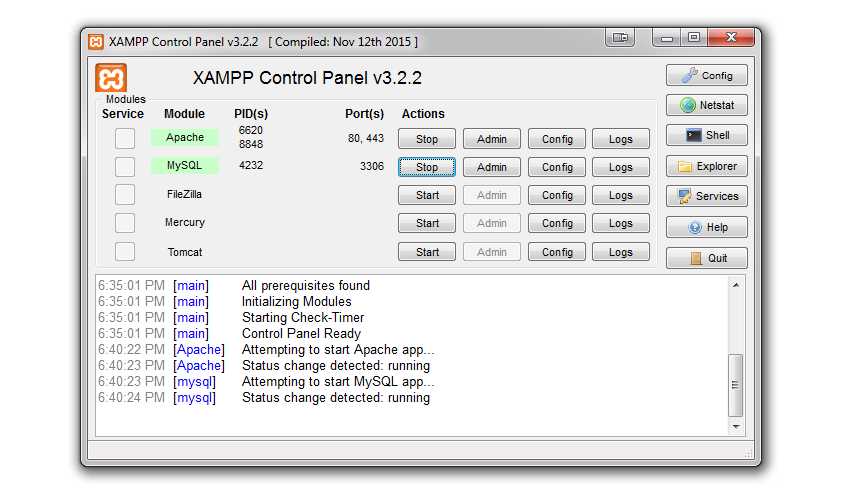
If you notice, none of the services are running. We would recommend that you start the Apache and MySQL service.
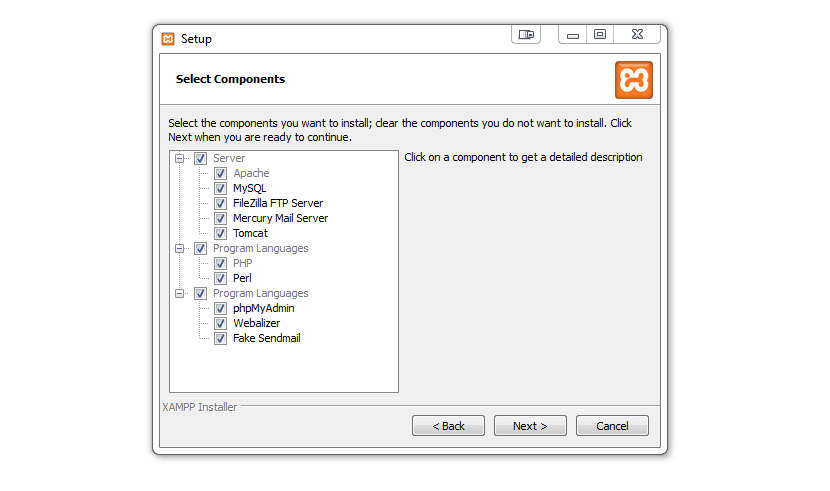
Once you have reached this step, then the next step is to install WordPress. With XAMPP, there are two ways in which you can install WordPress on your MAC or PC.
- Easy Way or the Automatic Setup
- Not So Easy way or the manual way
We have already covered the manual way when we installed WordPress using WAMP.
The process of manually installing WordPress using XAMPP is the same. If you want to install WordPress manually, scroll up, and follow the instructions from the WAMP section. If you face any trouble, let us know in the comments, and we will help you out.
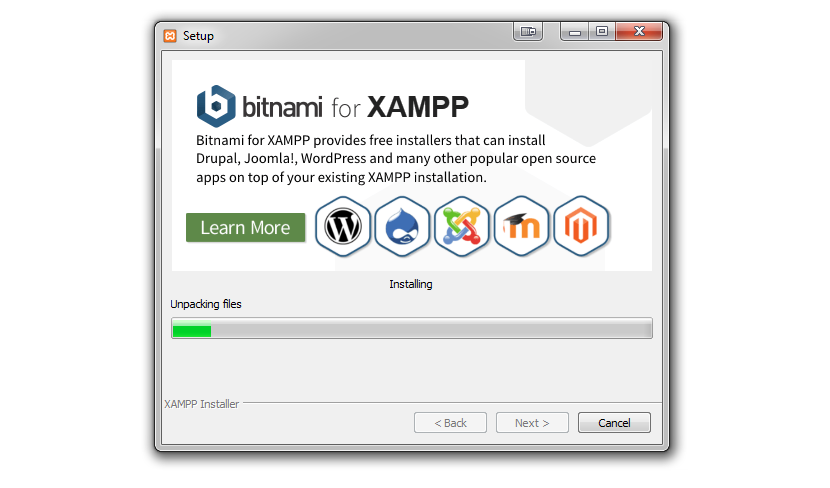
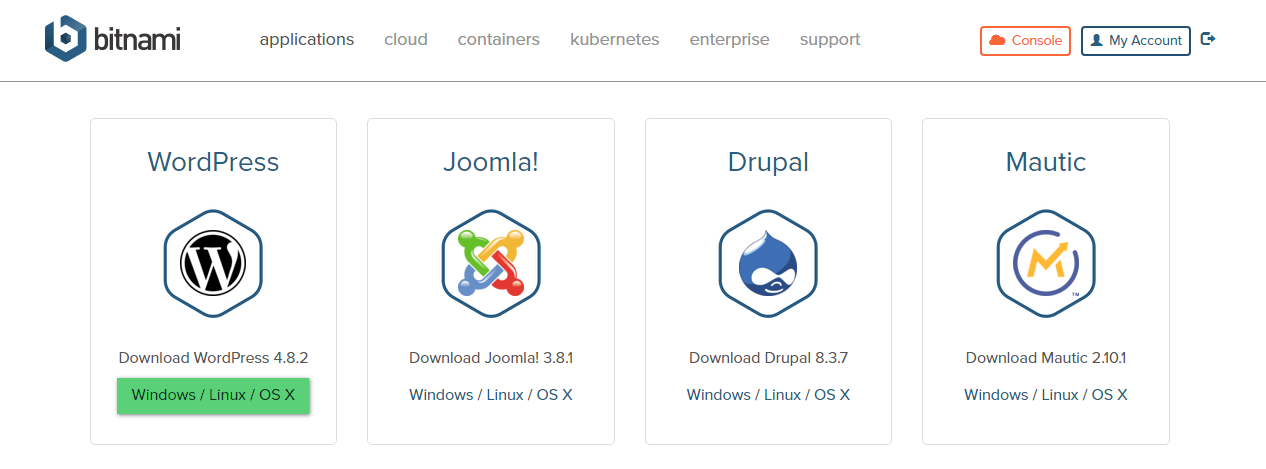
Since we have covered the manual installation in detail already, we will cover the easy installation in detail. To easily install WordPress on a XAMPP server, all you have to do is download a pre-compiled module and install it.
A trusted company that provides these modules is Bitnami. Visit the XAMPP page on the Bitnami website and download the WordPress Module. The module is also available for Windows, MAC, and Linux.
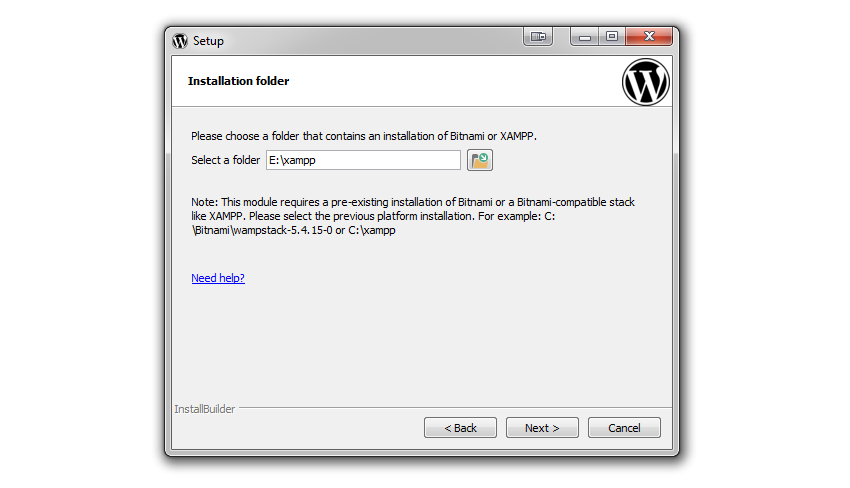
After the download, start installing the module. The first few steps of the setup are self-explanatory. To avoid any issues, make sure that on the setup screen the directory path is correct. It should point to the path where you originally installed XAMPP.
If the path is correct, hit next. You should see a setup screen which will ask for some information. If you note, these are the exact settings that you chose when you installed WordPress using WAMPP.
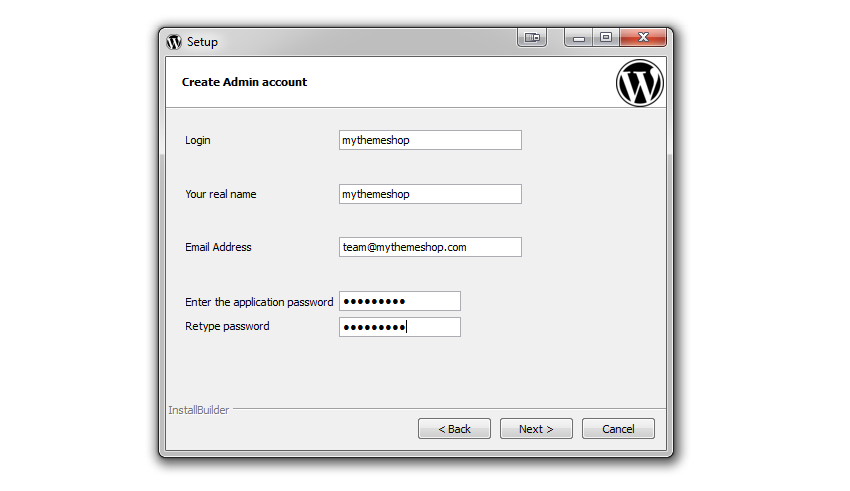
The page looks different as this time the setup is performed by the bitnami module, not WordPress. Just to refresh your memory, this is what the settings mean.
- Login : A name that you will use to login into WordPress
- Your Real Name : Your actual name
- Email Adress : Enter a valid email address that you have access to
- Enter the Application Password : Type in the password you want to use to login into WordPress
- Re-type Password : Confirm the password by entering it again in this field.
When you fill the form completely, it should look something like the image below.
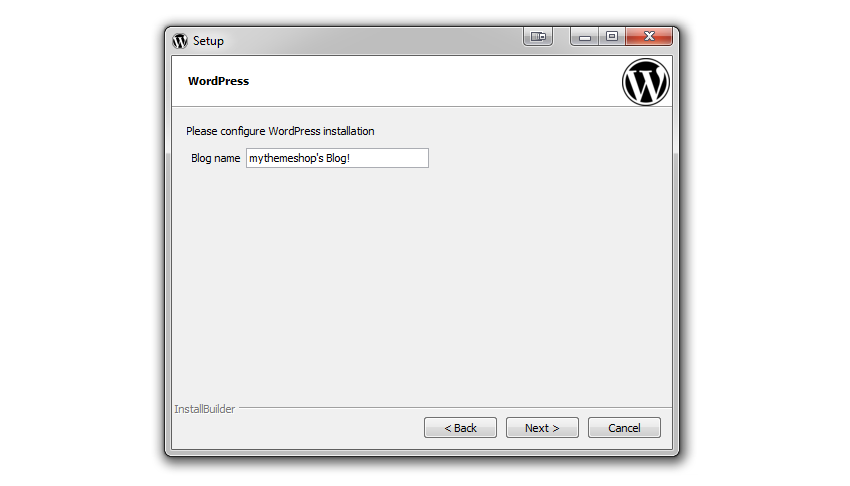
Hit next to proceed with the setup. The next screen would ask you to choose your blog name. Enter the name you would like your blog to be known as and hit next.
The Bitnami module will start installing. It takes a few minutes to install. The next two screens are self-explanatory, but for the sake of simplicity, you can un-check the fields in both the pages to simplify the installation.
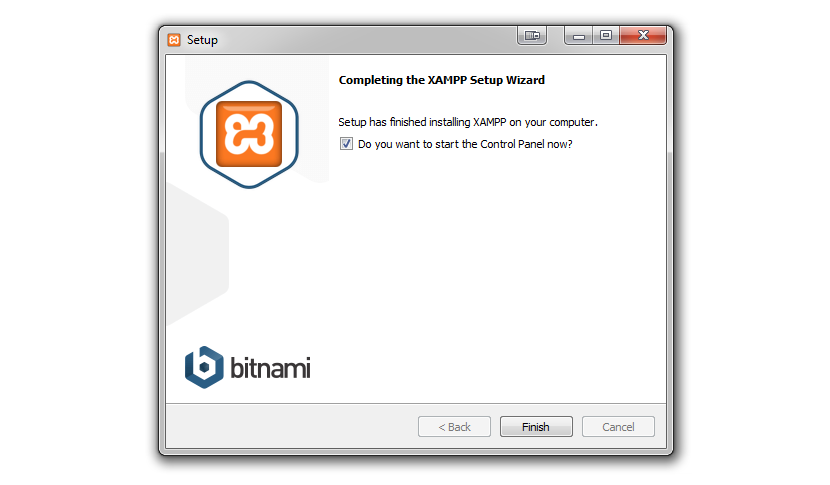
Once the setup has finished, hit Finish and XAMPP will open your blog’s front page automatically.
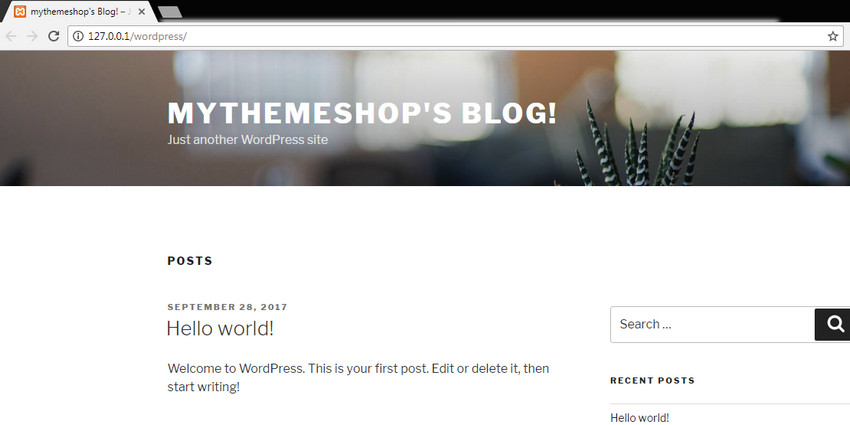
Please note that when using the automatic installation by Bitnami, WordPress is installed into a “WordPress” directory and not the root folder.
We hope that the option to choose the directory comes in the future versions of the installer. That’s it. You have successfully installed WordPress on your MAC/PC. To access the admin area, navigate to http://127.0.0.1/wordpress/wp-admin/ or http://localhost/wordpress/wp-admin and use the credentials that you set during the setup process.
6 Installing WordPress Locally with DevKinsta
DevKinsta is an easy alternative way to set up a local WordPress site on your Windows or Mac.
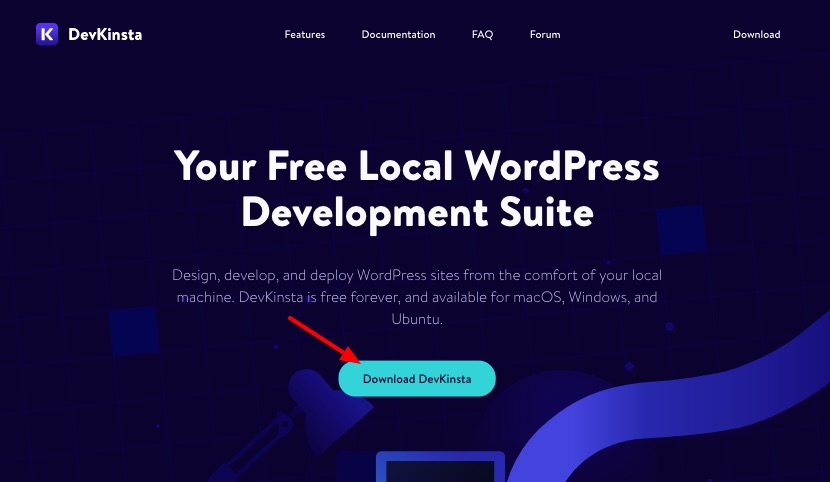
First, head over to the DevKinsta website and download the setup file. Once the download is complete, proceed with the installation.
Once the DevKinsta installation is complete, you’ll be greeted with a Create new Site screen, as shown below.
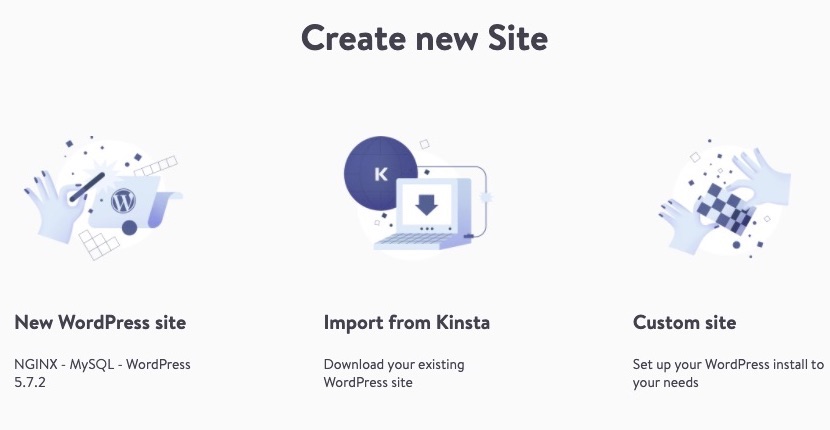
In most cases, a local website with a predefined configuration will be suitable. But, If you wish to have a custom configuration, choose “Custom site” and set up the configurations as you need.
If your website is hosted at Kinsta, you can set up a local copy of your exact live WordPress website, by logging in to your Kinsta account. You can also push any local changes to your staging environment with just a click which is extremely convenient for people who rely on Kinsta’s managed WordPress hosting for their websites.
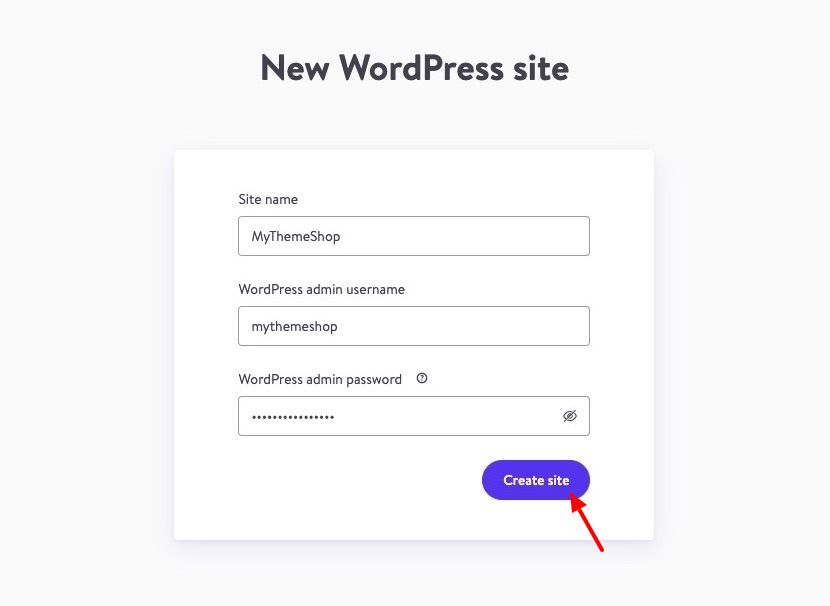
To set up a local site with predefined configurations, choose “New WordPress Site”. In the next screen, enter all the required details as we did for the previous installations; only the user interface looks different. For your reference:
- Site name: Type your local website’s name
- WordPress admin username: Type the username for your account
- WordPress admin password: Use the suggested password or type your own password, which you’ll need for logging into your account
The completed form will look like this, and then click “Create Site”.
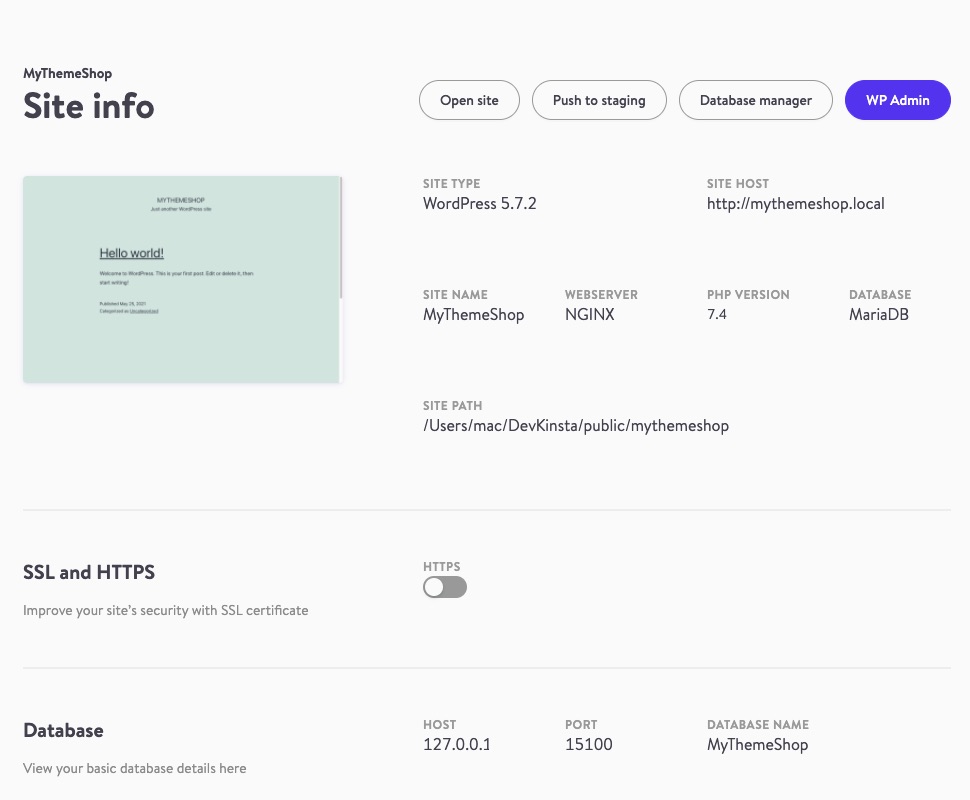
It takes only a couple of minutes for the local WordPress site to be installed. Once the installation is complete, you can visit your site by clicking on the “Open site” button or to the WordPress dashboard by clicking on the “WP Admin” button.
6 Installing WordPress Locally By Using Local By Flywheel
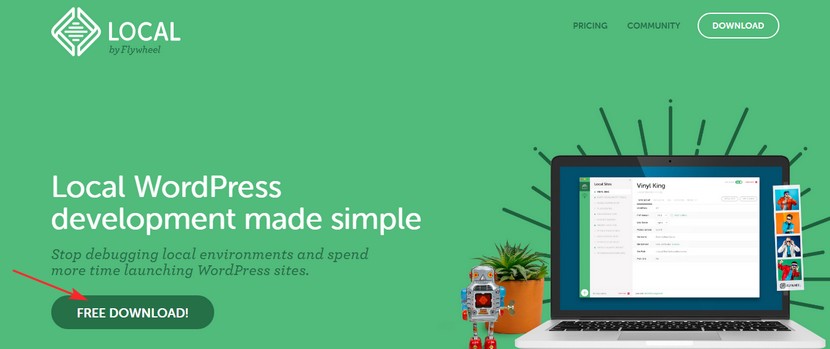
Local by Flywheel is one of the easiest ways to setup WordPress on your PC or Mac computer. Unlike the other methods, you only have to download one setup file which will you can use to setup WordPress easily.
Head to the Local by Flywheel website and download the setup. It’s over 500 MB so keep that in mind.
Once the download is complete, start the install, and Local will set up the necessary files.

Once the install is complete, you will see the welcome screen. Hit install to install the VirtualBox, Host Machine, and the Local Image.
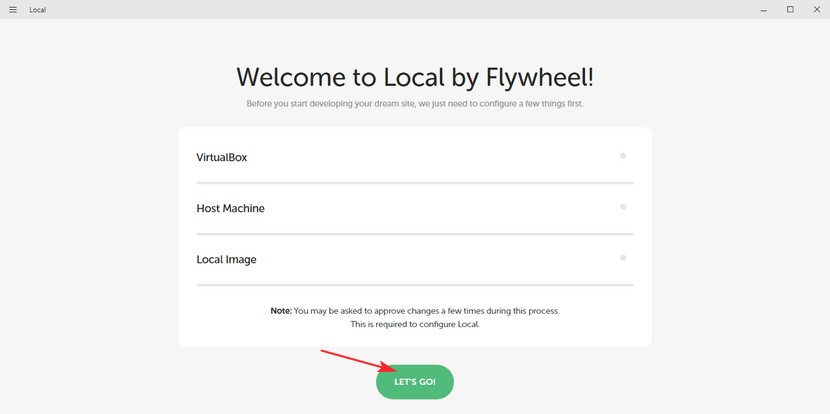
Installing the three components takes around three to five minutes.
If you got a copy from a friend or a co-worker, the Local might prompt you and update the local image. This takes a few minutes as well.
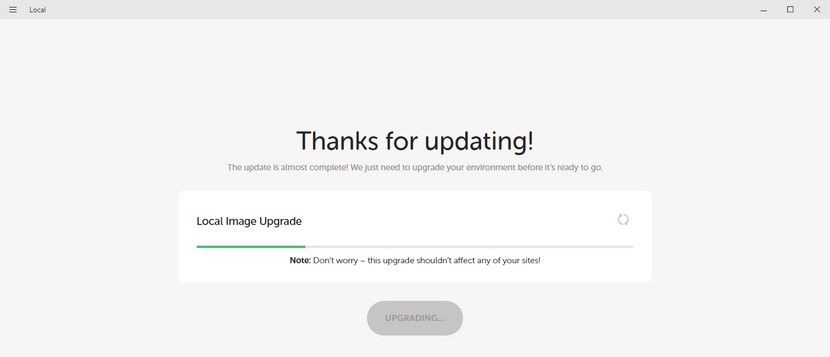
Once the update is complete, you will see Local’s default screen. Click “Create a new site” to start creating your first site.

On the next page, you select your site’s name. If you click the advanced options, you will see additional information about how your site will be structured. Let us explain the options.
- Local site domain : Unlike the other tools that we used where you accessed your local WordPress by accessing “Localhost”, Local configures your local WordPress site in a way that it can be accessed via a domain name. The local site domain represents that.
- Local site path : This refers to the folder under which your local website will be saved.
- Create site from Blueprint? : You can save blueprints (templates) to create sites with similar configurations. You could select a blueprint if you created one.

After you entered your desired settings, click continue.
Local will ask you to choose your environment. An environment refers to the tech stack with a specific configuration. By default, Local uses the Nginx web server with Varnish for caching, PHP 7.1.7 (as of this writing) on the server and MySQL 5.6.
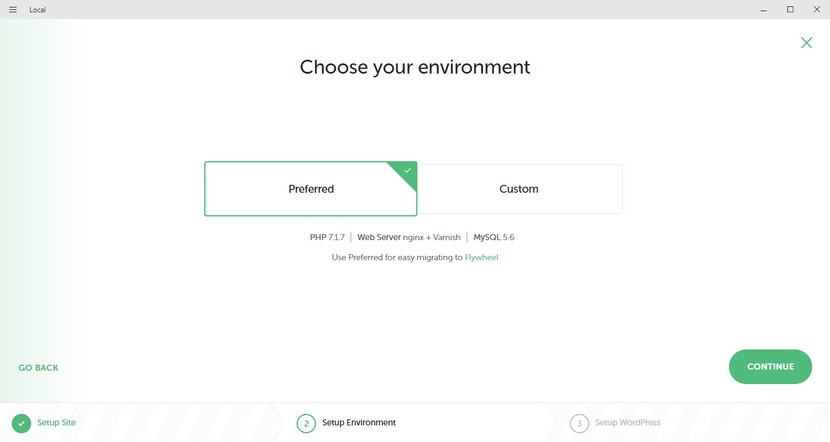
Unless you are a developer or you want to have the exact environment as your host, you can leave use the preferred environment.
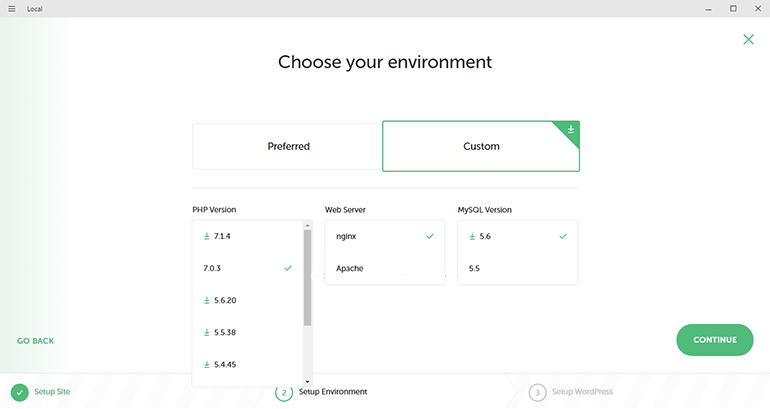
If you choose to customize, you will have the following options. Local will download some additional data to create the custom environment.
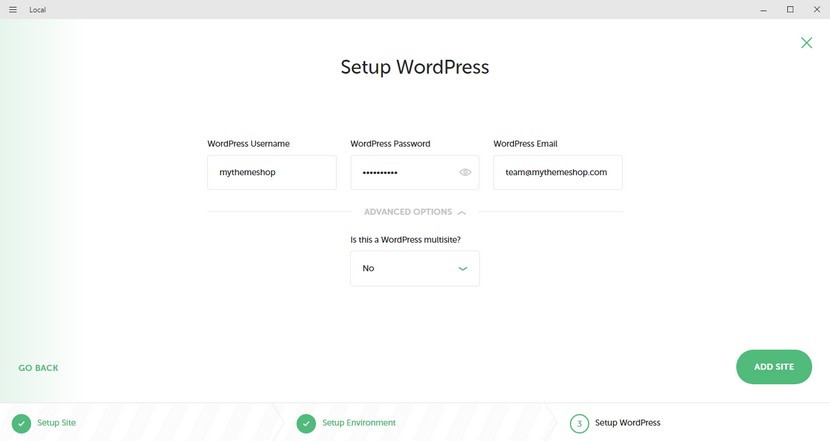
On the next page, you will setup WordPress. You only need to fill in three fields. Your WordPress username, the password you want to use with that username and the email you want to associate with the username.
In the advanced settings of this page, you can set if you want to create the WordPress installation as multisite setup as well.
Click “Add site” and local will download and setup WordPress for you.
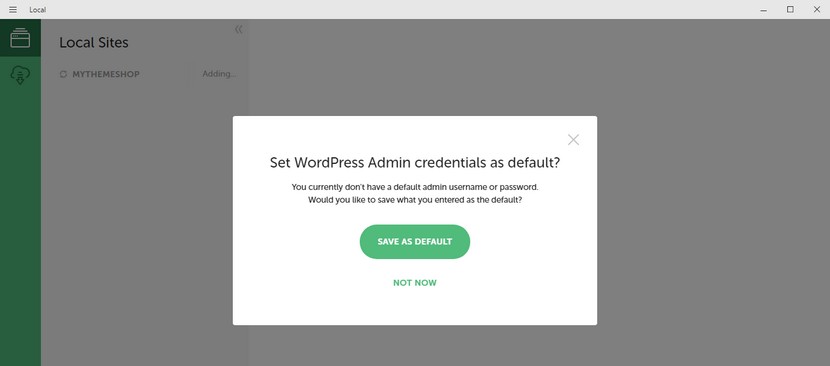
A dialogue box will appear asking if you want to save your credentials as default. If you choose the save as default option, all new website you create with local will have the same credentials as you created just now.
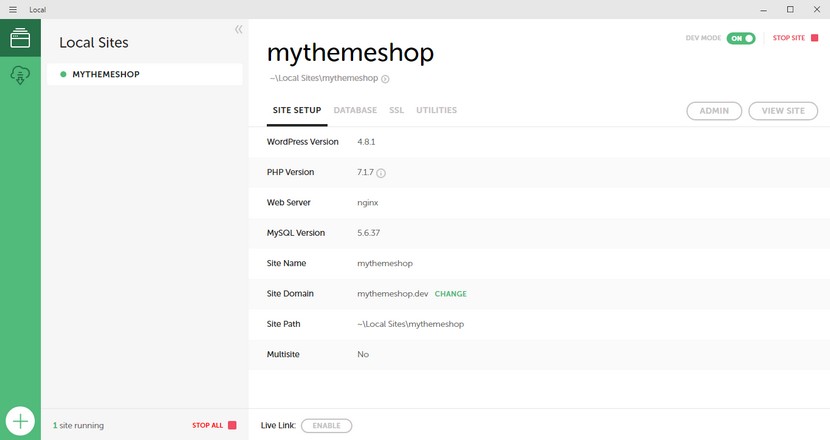
Once the setup is complete, Local will present you with some information about the environment. To launch your website, click the “Admin” or “View Site” buttons to open them in your browser.
7 A Common Issue With Local
If you use local for the first time, then you might run into a common issue. If you open the admin or the site that you just created, you might see this error.

This problem occurs because the default TLD in local is “.dev”. This became an issue recently as the .dev extension is now used for real sites.
Local sites cannot use a domain name of an actual website for obvious reasons.
To solve this problem, change the site domain for your Local website and use a TLD that is not used for a real website.
A common TLD used for local sites is .local. After making the change, wait a couple of seconds for Local to update the settings. You might get a security confirmation. Confirm for Local to make the necessary changes.
That’s all. Local is one of the easiest ways to setup a WordPress site locally. It’s free, it’s available for Windows and Mac and it’s super easy to use.
8 Conclusion
We hope that now you are confident in installing WordPress on your computer. We know that there are many steps to follow, but you need not worry.
If you make any mistakes, you can always start over. When you are ready to start a real WordPress blog, remember that MyThemeShop has you covered.
Read about some good hosting reviews on our blog, choose an excellent WordPress theme and show your blog to the world. We are here to help on every step. As always, if you have any questions regarding the above tutorial, hit us in the comments.