In this article, we are going to take a deep dive into WP Review Pro. Specifically, we are going to see how to create reviews with WP Review Pro. Note that we are not going to talk about the different features in detail, rather see them in action.
If this is the first article you are reading about WP Review Pro, we suggest that you also read our guide on how to configure WP Review Pro. There we go into much more detail about each of the settings and configurations, and it will be very helpful to understand the plugin thoroughly.
Let’s start by installing WP Review Pro on your website.
Log into your MyThemeShop account, and download the zip file for WP Review Pro on your computer.
After that, log into your WordPress admin area, head over to Plugins -> Add New.
On the next page, click the ‘Upload Plugin’ button at the top of the screen.
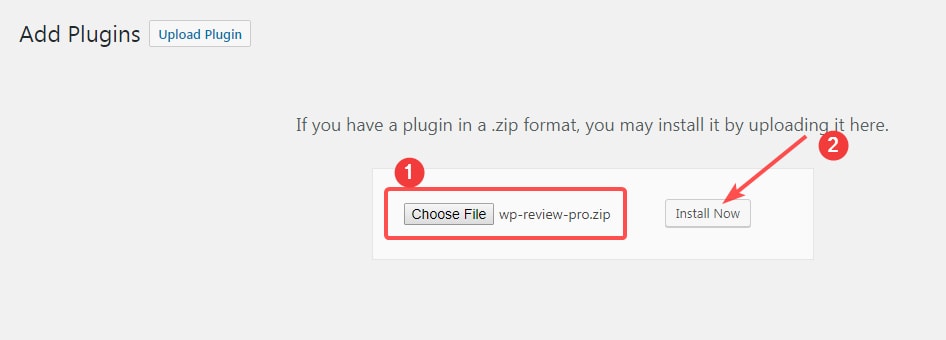
Click the ‘Choose file’ button, locate the zip file that you downloaded from MyThemeShop, then click upload.
Once the plugin is installed, activate the plugin.

You should see a notification confirming that the plugin was activated.

Now that you’ve installed WP Review Pro let’s start by understanding the various settings that create a review.
Open a new page or a post in WordPress. We will use a page for this example.
Once the page editor is loaded, scroll past the text area. You will find all the additions that WP Review Pro has made there.
Here is an image that shows all the different settings that should be available.
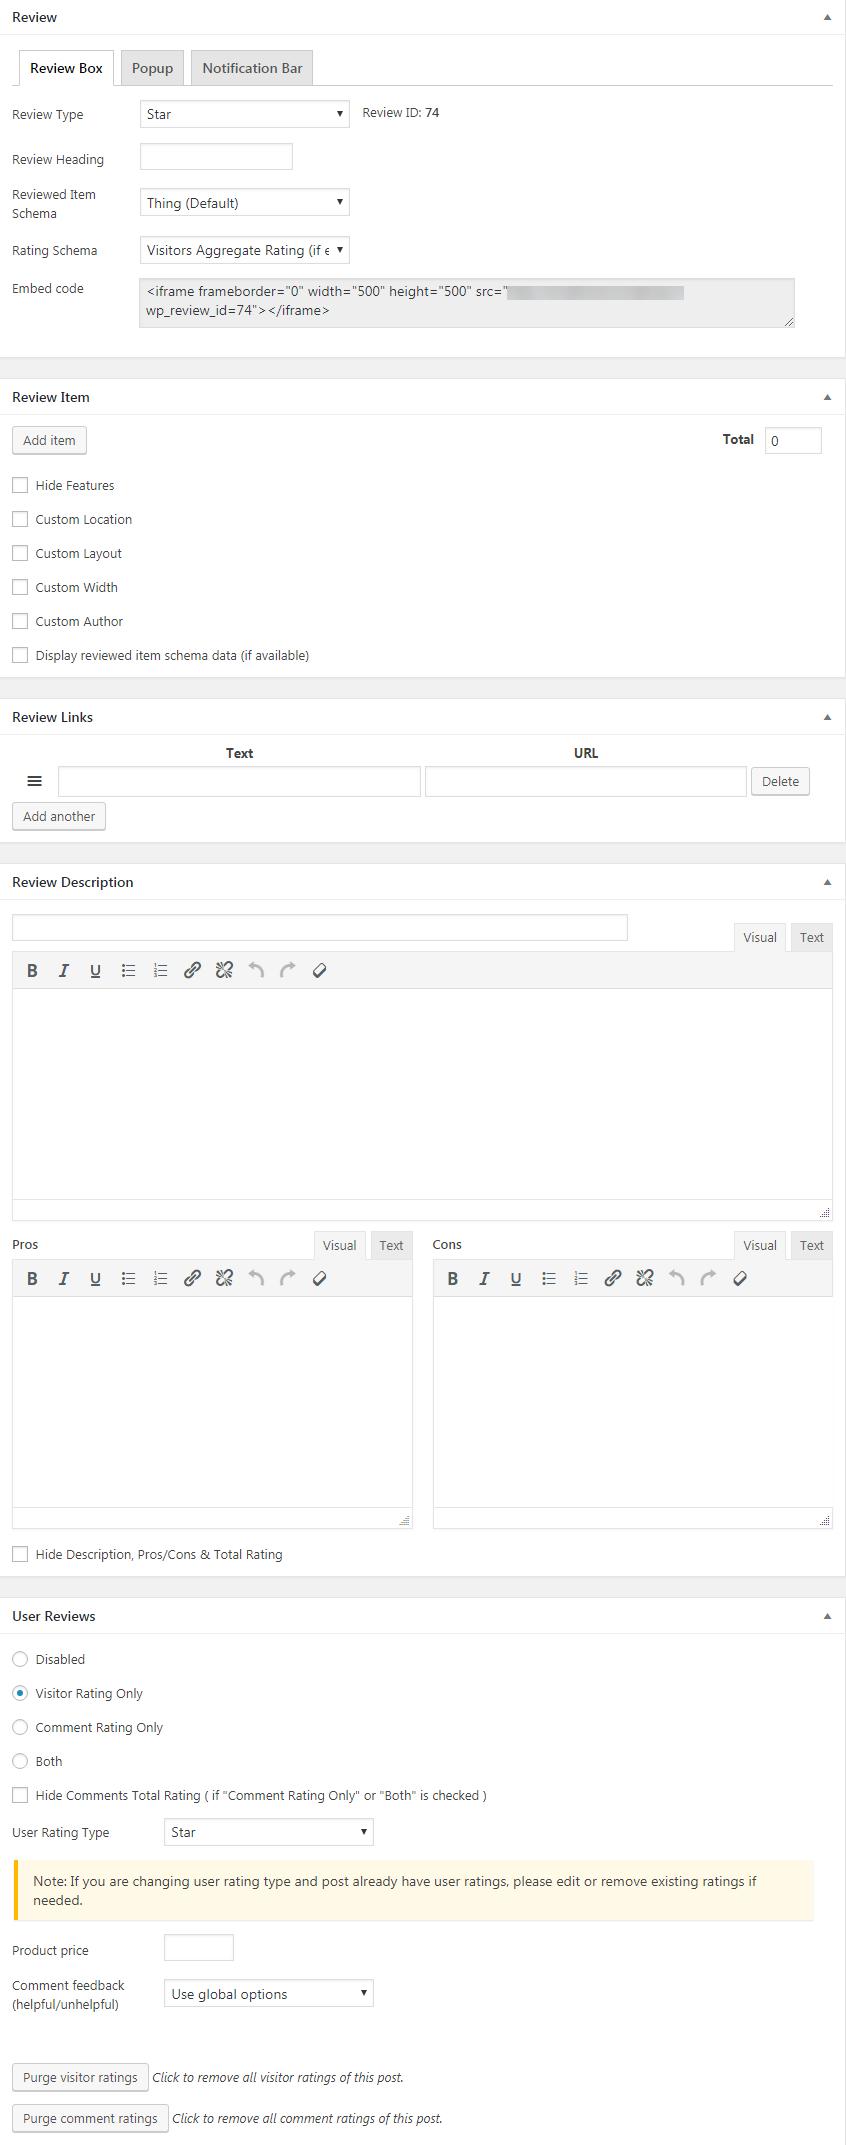
As you see, there are a lot of options to be configured. But you need not worry, as once we explain each of the settings, you will understand that creating a review is pretty simple and straightforward.
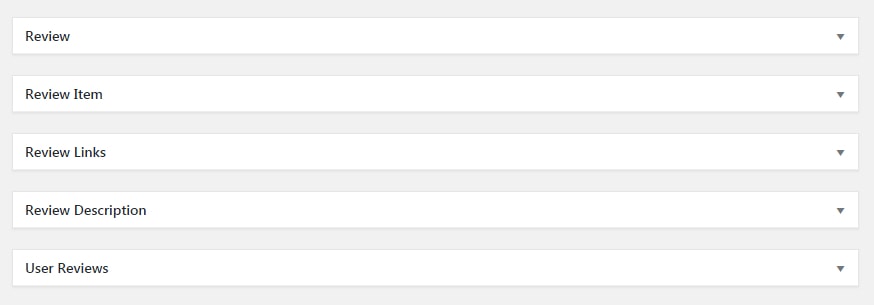
To simplify the use of WP Review Pro, we have also categorized the settings into 5 distinct sections. Here they are.
Before we start explaining the settings in detail, it is important for you to know that the settings that we will configure here are local settings. That means that they will only affect the review on this specific page/post.
If you want to configure the global settings, they are located in Settings -> WP Review Pro. All the global settings and configurations are explained in detail in our article on how to configure WP Review Pro.
Now that you understand that, let’s start with all the settings each of these sections has to offer.
First, we will talk about the review section.

Once you open the review section, you will see 3 tabs. The first tab affects the review box, while the other two affect other functions of the review.
Let us start with the ‘Review Box’ tab.

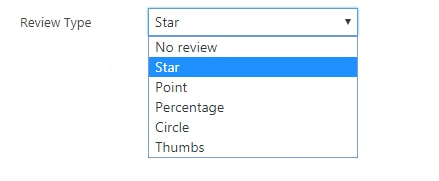
Review Type
![]()
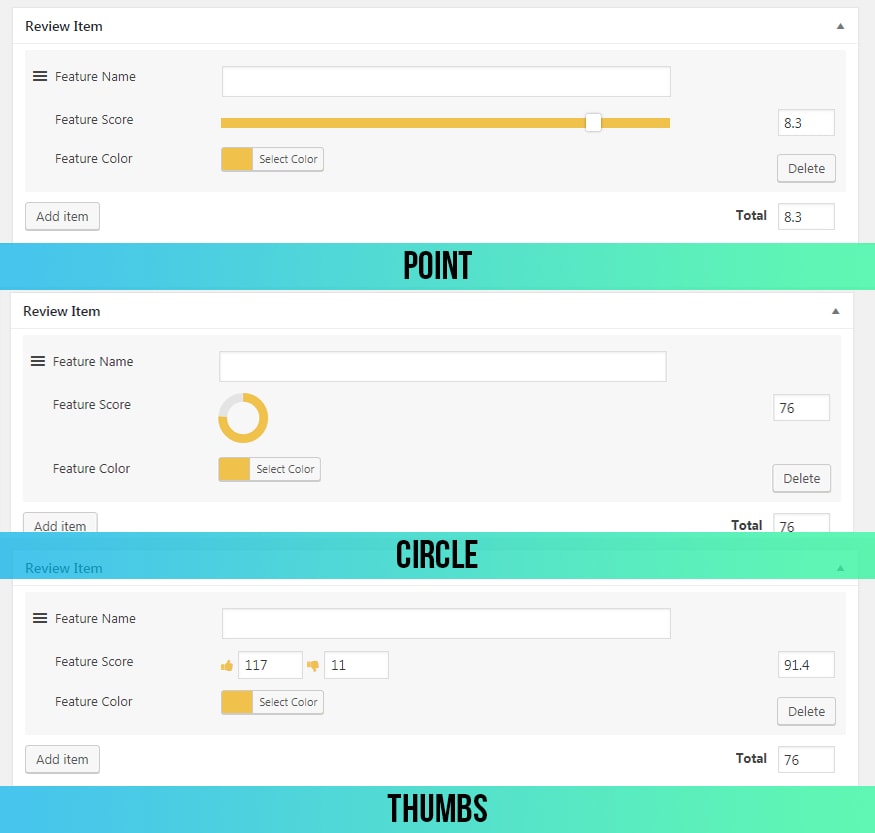
There are many ways to rate a product. You can give it points out of 10, give it a thumbs up, or give it stars. Every product is different and requires different ways of rating. We built WP Review Pro with many options for review types. Here is a list of all the review types supported.
- No Review – This setting disables the review completely
- Star
- Point
- Percentage
- Circle
- Thumbs
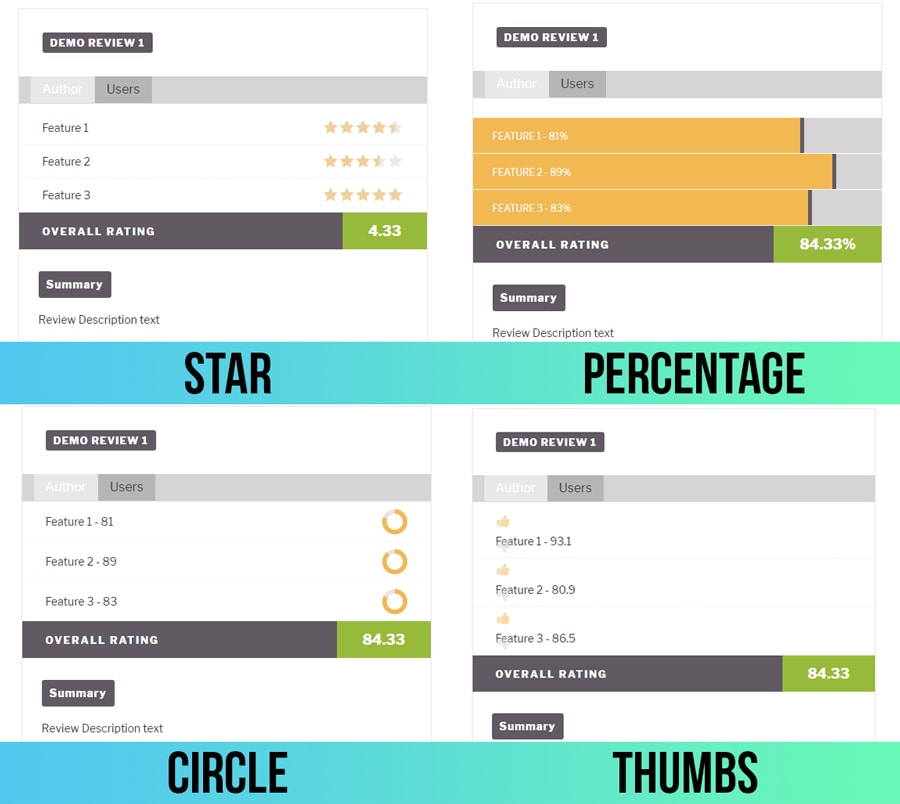
You should choose the review type based on the type of product you plan to review. Just to share how each of the reviews look, here is an image that shows the different types of reviews.
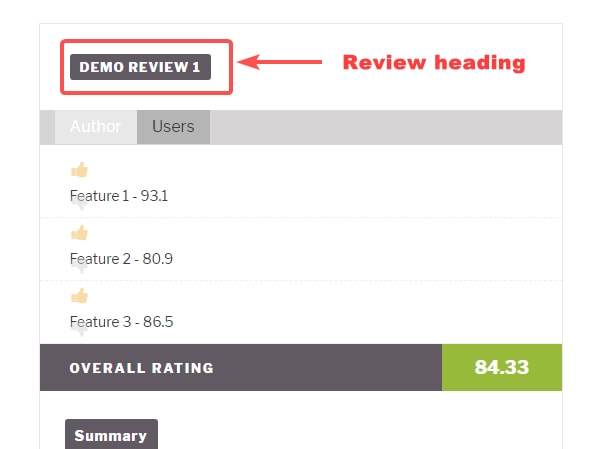
Review Heading
![]()
This is the setting where you set up the heading of the review, which appears at the top of the review box. Here is how the review heading looks on our demo review.
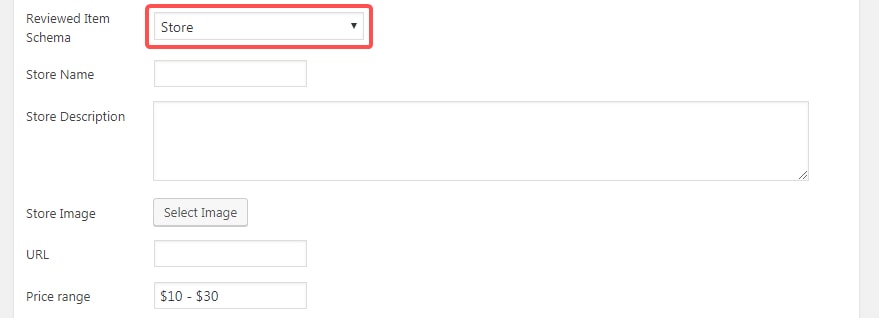
Review Item Schema
![]()
WP Review Pro lets you add the relevant schema data on your page by selecting the correct Schema Item. A total of 14 types of item schemas are supported. Check out the image below for a complete list.
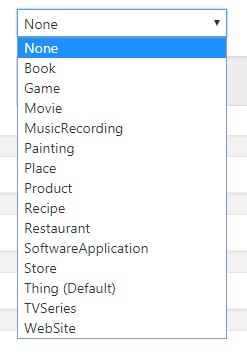
For people who prefer text, here is the list in text form.
- None – Disables the schema completely
- Book
- Game
- Movie
- MusicRecording
- Painting
- Place
- Product
- Recipe
- Restaraunt
- SoftwareApplication
- Store
- Thing (This is the default setting)
- TVSeries
- WebSite
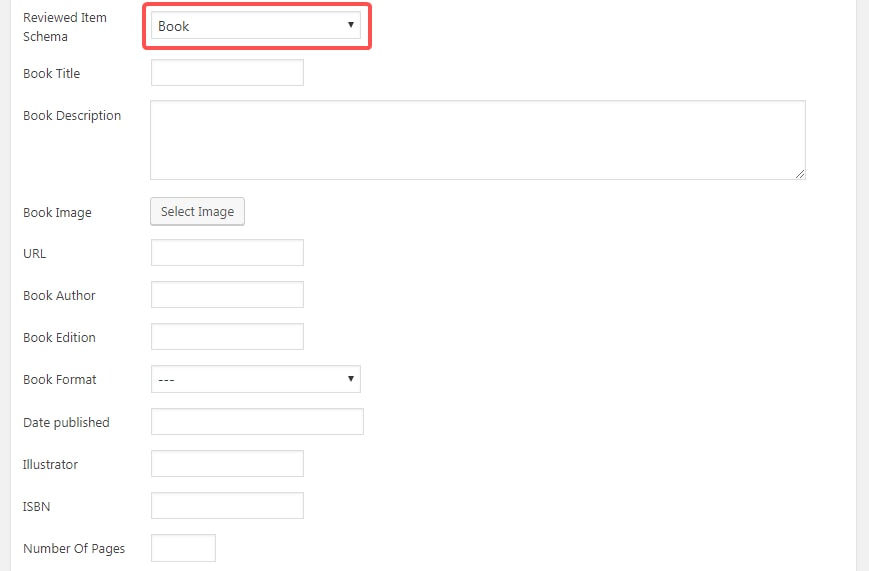
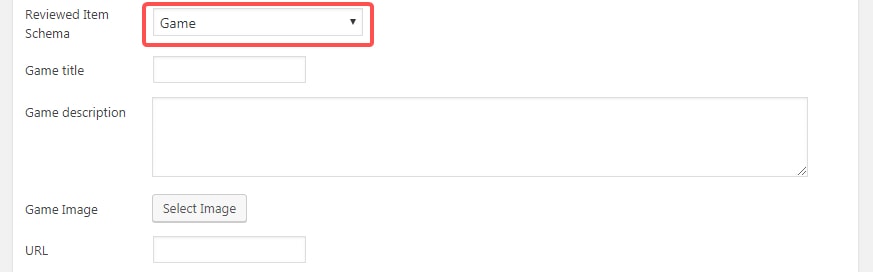
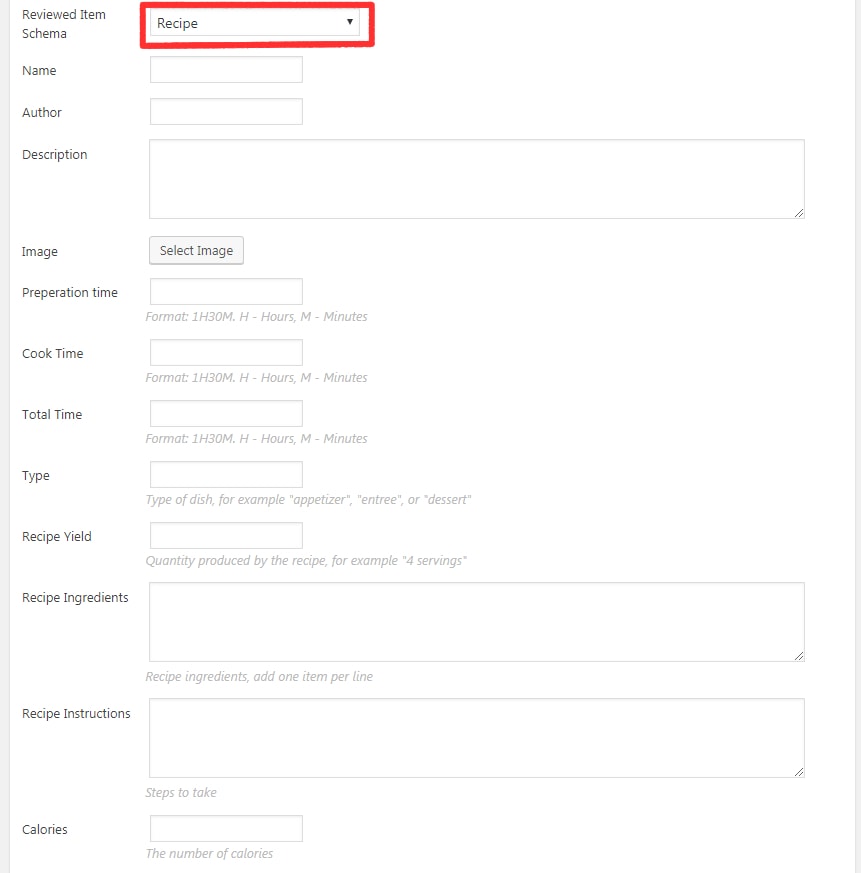
Once you select any of the schema items, WP Review Pro creates the fields for that respective schema type. Look at the images below for some examples.


To use the schema, select the appropriate Item Schema and fill in the necessary information. WP Review Pro will automatically add the relevant schema code to your page.
Embed Code

This area is non-editable and contains the embed code that you can use to embed this review on any other website. Based on your settings, this code will also show up in your review box.
Now, let’s discuss the next tab, the Popup Tab.
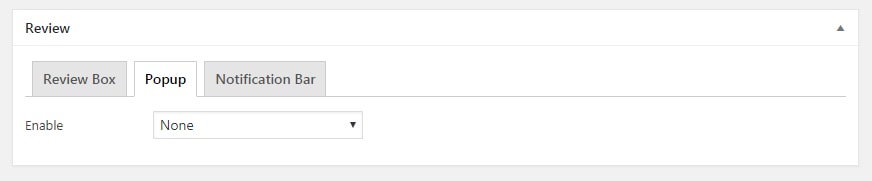
Popup Tab

The popup is a unique feature of WP Review Pro. When enabled, it displays a popup on exit intent, i.e., when the user is about to leave your website. WP Review Pro detects this automatically and shows the popup. Here is an example of a popup in action.

The popup offers 3 options to choose from which are listed below:
- None – Disables the popup on this page
- Use Global Options – The popup will use the global settings set for popup
- Use Custom Options – You can set custom options for the popup on this page
The first 2 are self-explanatory. ‘None’ disables the popup on this page, while ‘Use Global Options’ uses the global options set for the plugin. The global options are defined in WordPress -> Settings -> WP Review Pro.
The custom options tab is worth discussing. When you use custom options, you can create customized settings of the popup that appears on this page. Selecting the custom options reveals the various settings, which are shown in the image below.
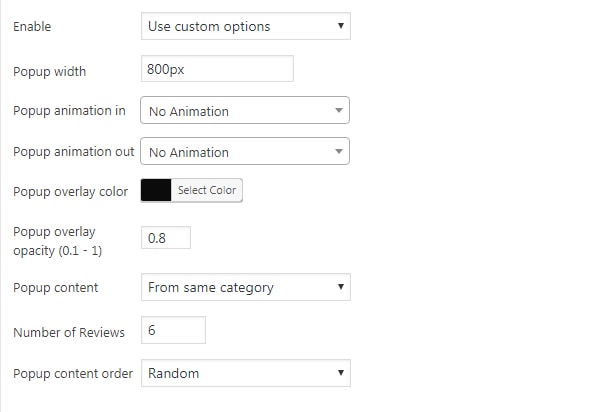
We have discussed each of these settings in the article about popups, but here is a brief explanation.
- Popup Width – Defines the width of the popup. The reviews on the popup are dynamically resized to fit the new width
- Popup Animation In – Here you can choose from the many animations which will be used when the popup comes in view
- Popup Animation Out – Here you can choose from the many animations which will be used when the popup goes out of view
- Popup Overlay Color – When the popup appears, it darkens the background by using an overlay. Here you choose the color of the overlay.
- Popup Overlay Opacity – Here you choose the opacity of the background overlay
- Popup Content – The popup can display reviews only from certain taxonomies if you want. Here you can select categories, tags, or reviews types, and the reviews on the popup will be chosen from those.
- Number of Reviews – Here you can control the number of reviews to be displayed on the popup.
- Popup Content Order – Here you can select the method in which the popups will be ordered. You can choose from random, most popular, and most rated.
This concludes the popups tab. Let us now talk about the Notification bar.
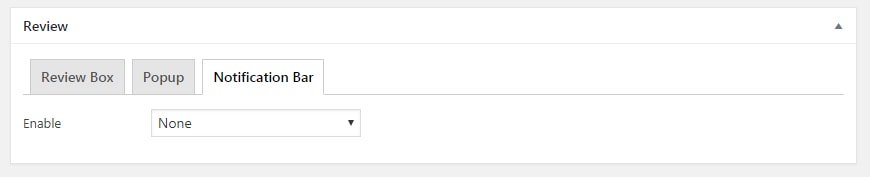
Notification Bar

The notification bar is another unique feature in WP Review Pro. It creates a bar on top of the page, similar to a notification. Here you can promote any blog post, internal products, or even affiliate products. Here is an image that shows how the notification bar looks.

The notification bar lists 3 options, similar to the popup.
- None – This option turns off the notification bar on this page only
- Use Global Options – Using this setting means that the popup will use the global settings configured for the notification bar
- Use Custom Options – This allows you to select a custom set of settings just for this page/post
The first two settings are easy to understand and we won’t explain them further.
If you select the ‘custom options’, WP Review Pro will open up a new set of options for you. Here is how it looks.
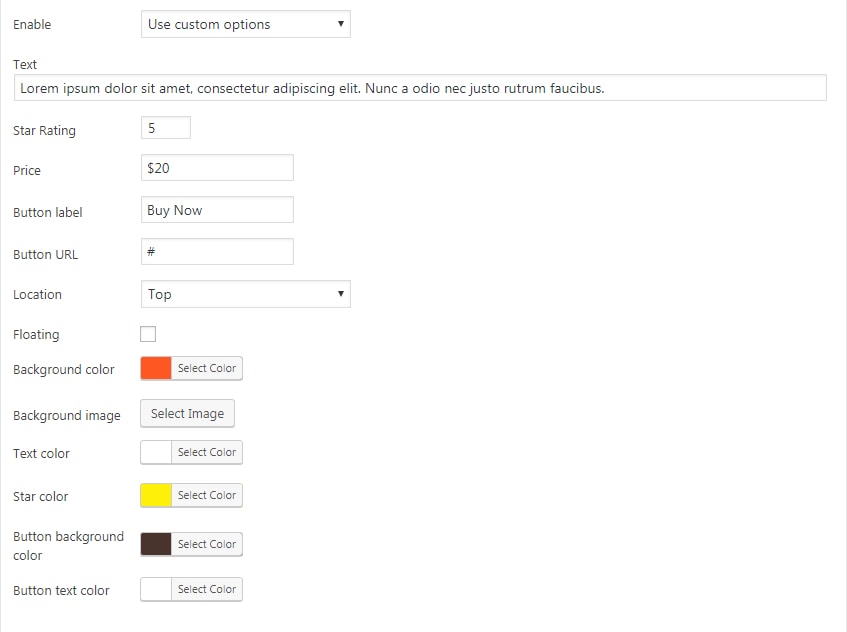
By customizing these settings, you can create a custom notification bar just for this page or post. If you would like to read more details about the notification bar, we recommend that you read our dedicated post on the notification bar.
This concludes all the settings in the Review section. Let us move on to the Review Item section.

When you open up the review item section for the first time, it will look something like this.

This section primarily accomplishes two things.
- Add the features that would show up on the review box
- Customize other settings about how the review box is displayed
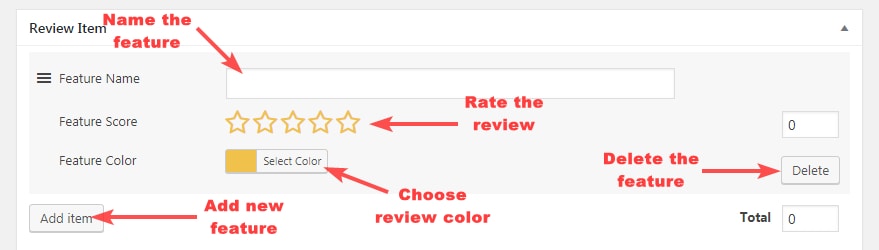
Let us see how we add new features.
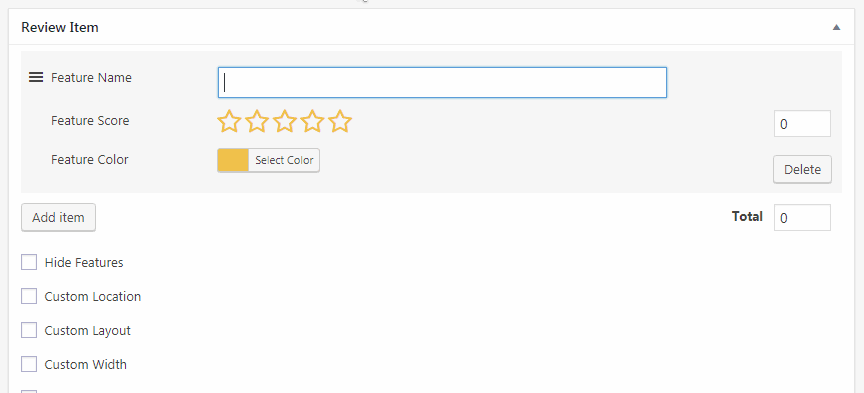
To add a feature, you click the ‘Add Item’ button. Once you click it, another section opens up where you can enter some details about the feature.
The feature score is dependent on the review type you select in the review section. In the screenshot above, you saw the star review type. Here is how the other options will appear.
Regardless of the review type you select, you can do the following.
- Name the feature
- Add any number of features
- Assign a score to the feature (the type of score depends on the review type)
- Customize the feature color
- Reorder the features
Check out all these features in the animation below.
But there is one thing you cannot do. You cannot have more than 1 review type in the same review. All the features you add will use the same review type. In the example above, we used the star review type.
Now let us check out the other options in the review item section.
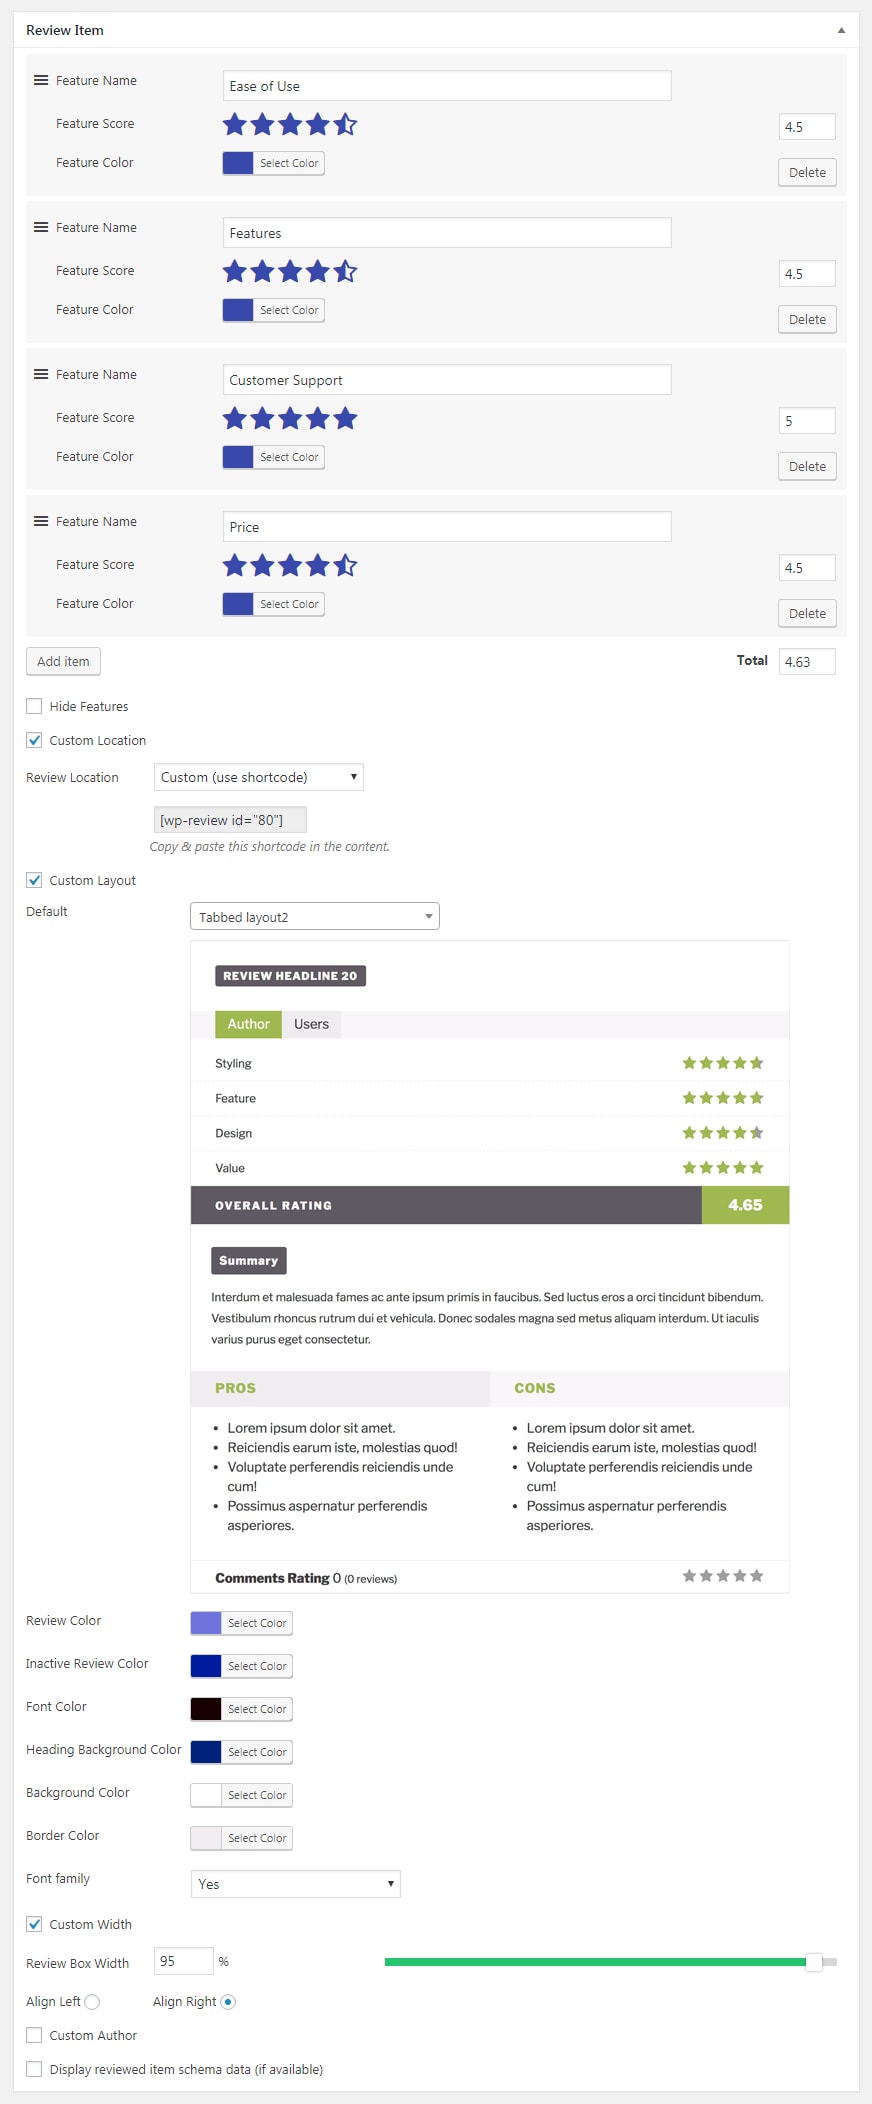
Hide Features
![]()
When enabled, the hide features option will hide the specific features of the product. That means all the features that we discussed in the section above will be hidden from the review.
This is useful for scenarios where the product being reviewed doesn’t have many features, or they are not relevant to the review. For example, a song. A song does have many features, but you don’t rate a song based on them. While reviewing similar products, you can enable this feature to hide the features of the product.
Custom Location
![]()
By default, WP Review Pro can be configured to insert your review box either at the beginning of your article or the end of your article. This can be set in the global settings
By enabling custom location, you can insert the review box in a different location than what is defined in the global settings.
Once you enable custom location, the review location setting will appear, and you can choose the custom location of your review box there.

If you use the ‘custom (use shortcode)’ option, WP Review Pro will show you the shortcode for the review box. You may then insert the shortcode anywhere on the page to have the review box appear there.
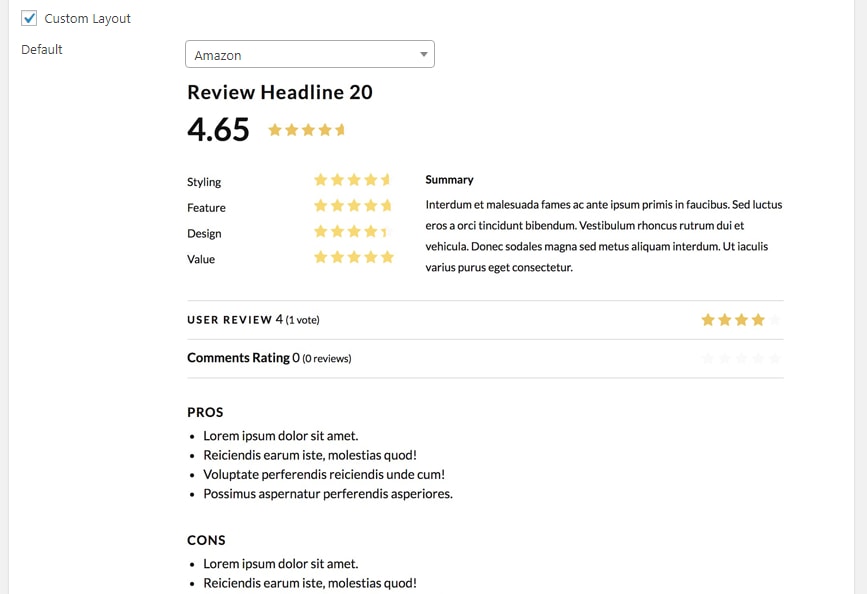
Custom Layout
![]()
This setting configures the template that your review box uses.
By default, the review you create will use the template that has been configured in the global settings. But, you can override this and choose a custom template for each review.
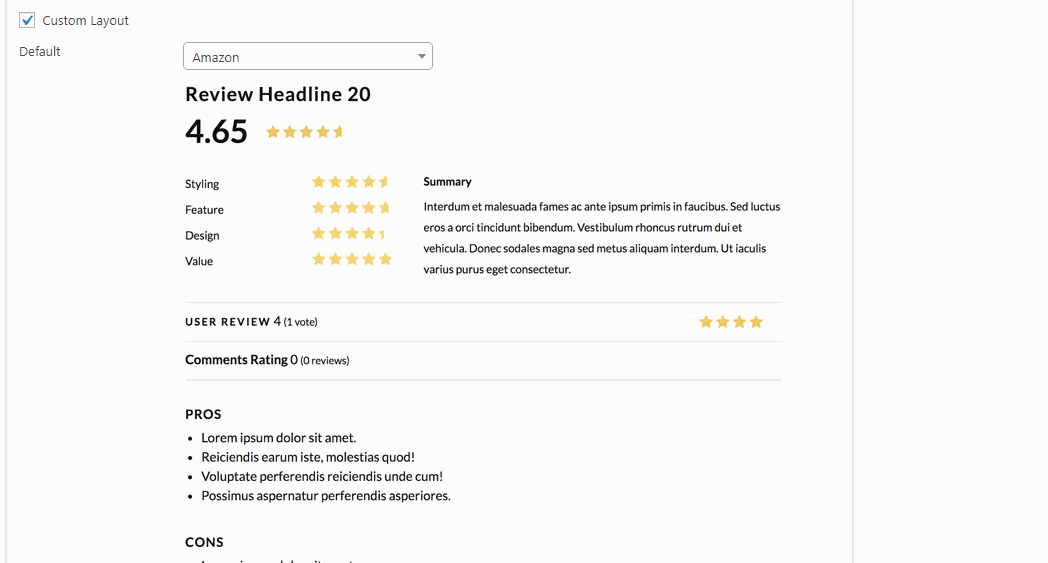
Once you enable this feature, you will have the option to choose from all of the custom-made templates that are bundled with WP Review Pro. Here is how the option looks.
You can choose a template from the drop-down menu, and as you hover over each of the templates, a demo image will show you how the template looks. This helps you choose a template faster.
You can also search for the template name directly in the search field to save even more time.
Custom Width
![]()
The custom width setting lets you select a max width for your review box. You can define the width as a percentage of the total width of the page.

Cutom Author
![]()
The custom author functionality lets you credit the review to a custom author instead of the default author of the page. Once you enable the checkbox, a new text field is created where you can enter the name of the review author you want to credit the review to.

Display review item schema data (if available)
![]()
Enabling this option displays the schema data alongside the review. Enabling this is optional, and we would recommend that you enable it only when the schema information is informative or valuable to the viewer as well.
This concludes everything in the review item section. Let us now check out the Review Links Section.

The review links section helps create and customize your CTAs. Once you open up the review links section, you will see the following screen.

Currently, the links are empty, but you can configure global links that will appear here by default.
To add a link manually, add the text in the text area and the URL in the URL area. The text will act as the anchor text for the link.
You can also add another link by clicking the ‘Add Another’ button, and reorder the links by dragging the re-order icon.
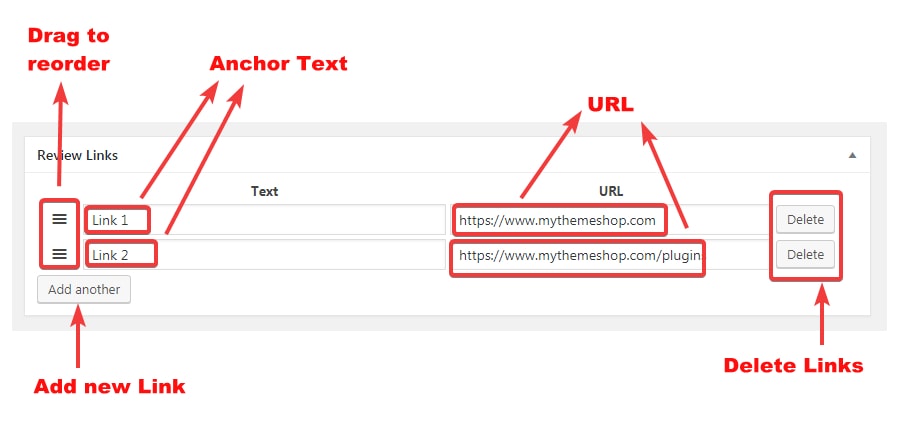
Here is how the created link looks like on the review.

This finishes the review links section. Next up is the review description section.
Review Description

The review description setting helps set up all the text that appears on the review box. There are 3 fields that you can place text in.
- Review Description Heading
- Review Description
- Pros and Cons
Here is an image that shows these sections.
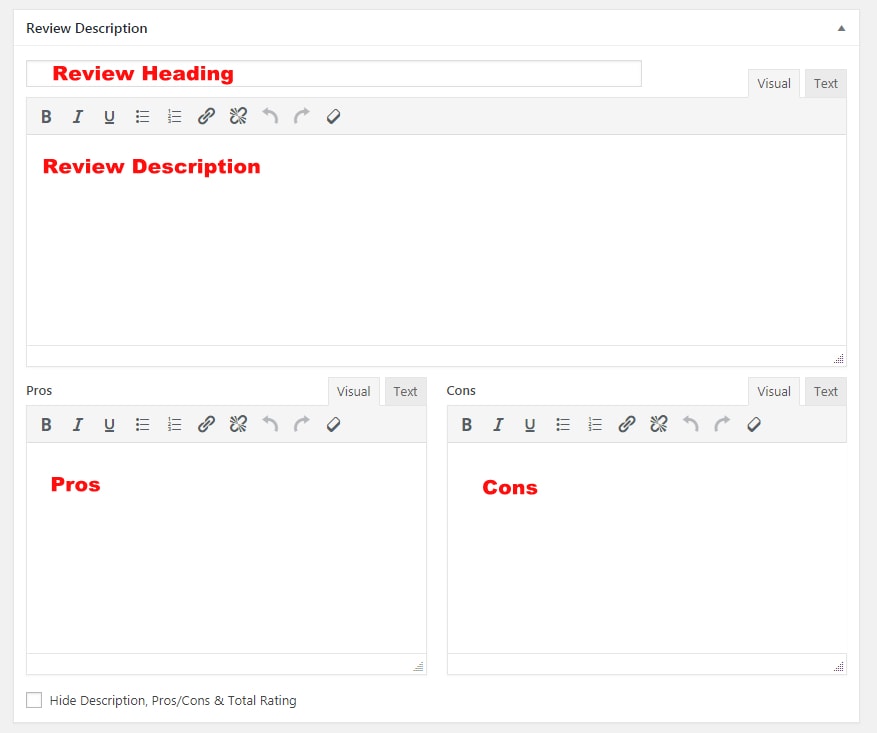
The review description heading creates a small heading that goes on top of the review description.
The review description is the actual text you want to place in the review box. This should be a summary of your entire review article and compel the users to click your CTA.
The pros and cons list serves as a simple way to list the product’s pros and cons.
You can style the review description and pro-con field with stylized text, but it is not mandatory. The text in these fields will automatically be styled based on the review template you choose.
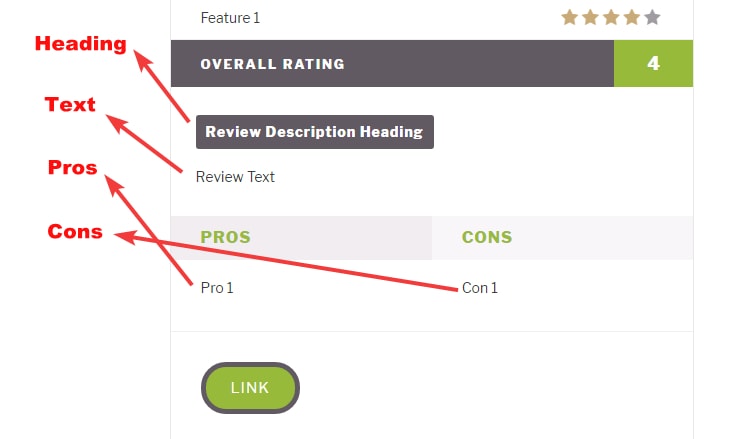
Here is how the output of these fields looks on the review box.
If for some reason you want to hide this entire section from the review, you can check the ‘Hide description, Pros/Cons & total Rating’ option which is located just at the end of the section.

This concludes the review description section. Let us move to the next and final section, user reviews.
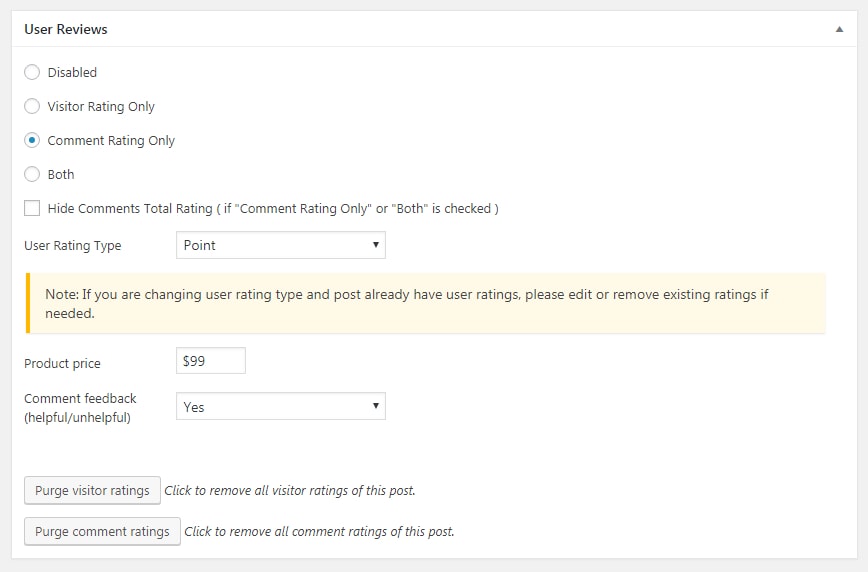
User Reviews

The user reviews section deals with all the options of user reviews. If you didn’t know, WP Review Pro allows users to participate in the review by adding their reviews as well.
The user reviews can be added in 2 places.
- Below the features’ ratings
- In the comments
You can either disable user reviews, enable reviews in a single location, or enable reviews in both the locations. Just select the appropriate radio button from the listed options.
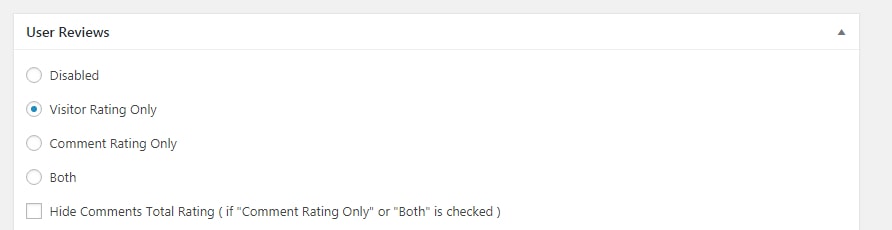
Here is what each of the radio boxes does.
- Disabled – This option disables the user ratings completely
- Visitor Rating Only – Visitors will only be able to rate the features of the product
- Comment Ratings Only – Visitors will be able to write reviews in the comments and rate the features there
- Both – Visitors will be able to rate features and write reviews in the comments
By default, the user reviews affect the overall rating of the product. If you want to disable this, but still let users leave reviews, then you can check the last option just below the radio buttons. Please note that this setting will be applicable only if ‘comment rating’ or ‘both’ option is selected.
User Rating Type
![]()
When you allow users to rate products, by default, they will use the same rating type as your review. However, you can change this behavior and let the users use a different type of rating.
In the drop-down menu, simply select the type of rating you want your users to use, and save your settings. Users will now use the new type of rating.
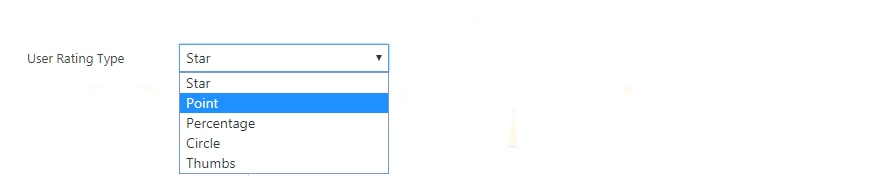
We suggest that you configure this setting before publishing your review. This is because if you change the user rating type after you already have a few reviews set up, you will have to delete those ratings. That is why it is better that you set this up before your review is published, or when your review has very little ratings, which you can afford to delete.
Comment feedback
![]()
WP Review Pro also has the functionality where users can rate other users’ comments as helpful or not helpful. In this setting, you can enable or disable this behavior. There are 3 options to choose from.

- Use Global Options – Use the settings as defined in the Global Settings of WP Review Pro
- Yes – Enable this feature
- No – Disable this feature
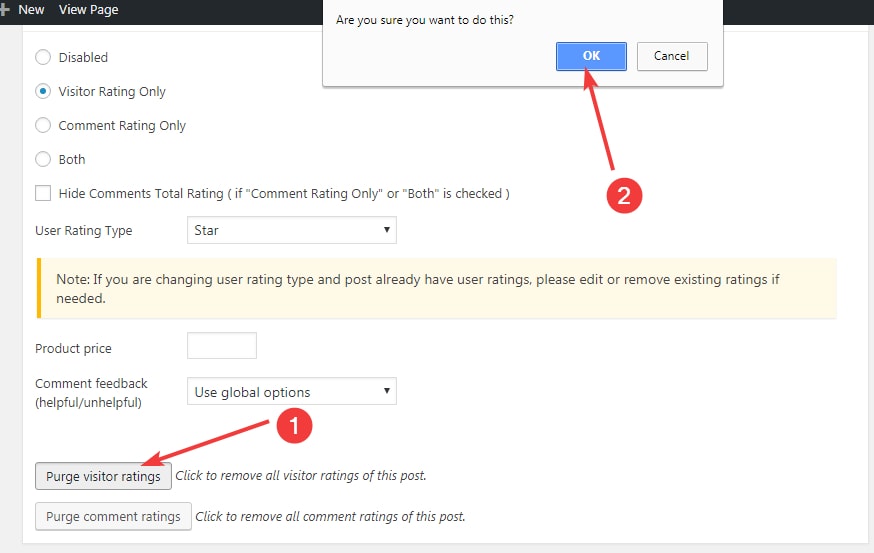
Purge Visitor Ratings & Purge Comment Ratings

Using these buttons will erase the visitor ratings and comment ratings respectively. This is useful in many cases, some examples that come to mind are:
- You get a lot of spam ratings which looks bad for the overall review
- You want to change the rating type for the visitors
- You were testing out the user reviews before publishing and want to clean the slate
- You want to disable the user ratings altogether for this post
Regardless of why you want to purge the user ratings, you can do it with the click of the button. Click the button for the ratings you want to remove from the post, and click the confirmation box that appears. The ratings will be removed from your post.
Creating a review with WP Review Pro
Now that we have learned how to configure a review with WP Review Pro let us create an actual review by using WP Review Pro. For this example, we will create a new post and then create a review from scratch.
In the new post, here is what we wrote in the page title and page description.

In the Review section of WP Review Pro, we chose the following settings.

For this example, we are disabling the notification bar and the popup.
In the Review Item section, we added a few features, chose a template but customized the colors of the template.
In the Review Links Section, we created just one CTA.

Here is what we wrote in the Review Description fields.

In the User Review Section, here is what we chose.
Just a few settings, and here is how the actual review looks.
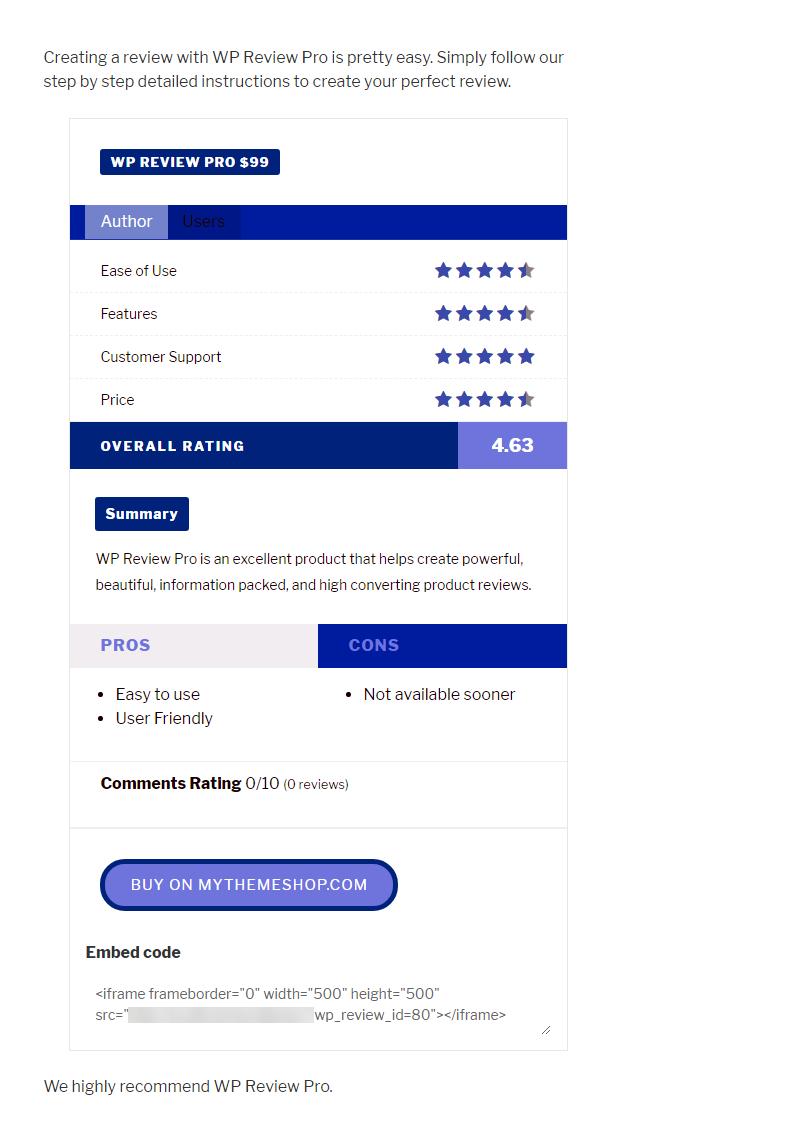
And we are done! We hope you that you enjoyed this tutorial on how to use WP Review Pro to create stunning reviews and are ready to create reviews for yourself. Let us know if you have any questions.
