Congratulations, you just installed WordPress on your server. But, are you ready to start posting content on your shiny new blog?
We don’t think so.
Even though it seems that WordPress has all the features imaginable to run and manage your blog or website, you’d be surprised at the number of things you need to do before you can call your blog “ready”.
Don’t be disheartened. You don’t have to spend countless hours searching the interwebs to determine all the things you need to do. Just follow the steps we’ve outlined in the post below, and you’ll be ready in no time.
Below, we’ve discussed and outlined 50 steps, settings, things, whatever you’d like to call them, that you should absolutely do on your website before you post anything. The steps are not exhaustive by any means, but they will give your blog a solid foundation to stand on.
The 50 steps start just below, and we’ve discussed what needs to be done, why it needs to be done, and how it should be done, for each step.
To better organize this post, we’ve divided it into 3 sections.
The basic and intermediate settings will be easy for most people, while the advanced settings might be intimidating as they usually will deal with editing theme files and adding a bunch of code to them. Follow the golden rule, if you don’t feel confident about it, don’t attempt it. Better, ask us for advice in the comments.
Also, note that we’ve just outlined the “how” part of the equation. If we included details for each step, this post would have turned into a small book—which we wanted to avoid.
With that out of the way, let us begin with the basic settings.
Basic Settings
The basic settings are the ones that you should take care of immediately after installing WordPress. These settings are simple but important. The best part is that they are easy to do, even if it is your first time using WordPress.
Table Of Contents
- 1. Reset Your Password
- 2. Clean up Your WordPress Dashboard
- 3. Setup Your Website’s Title
- 4. Setup Your Site’s Tagline
- 5. Setup your preferred URL
- 6. Restrict Membership options
- 7. Set Date and Time Settings
- 8. Setup Language Preferences
- 9. Check for WordPress Updates
- 10. Delete Dummy Content
- 11. Create Basic Site Pages
- 12. Setup Your Website’s Menu
- 13. Delete Unused Plugins and Themes
- 14. Update Existing Plugins
- 15. Setup Permalinks
- 16. Setup Media Sizes
- 17. Customize Widgets and Footers
- 18. Create Appropriate Taxonomies
- 19. Create and Connect a Google Analytics Account
- 20. Verify your website with Google Search Console
- 21. Add a Contact Form
- 22. Update Your WordPress Profile
- 23. Add Other Users on Your Website
- 24. Add a Logo and a Favicon
- 25. Setup Your Reading Settings
- 26. Change the Default Admin Username
- 27. Setup Gravatar
- 28. Install a Caching Plugin
- 29. Install a Security Plugin
- 30. Install an Anti-Spam Plugin
- 31. Install an SEO Plugin
- 32. Install Jetpack
- 33. Become GDPR Compliant
- 34. Add a comment Management Plugin
- 35. Setup a Backup Plugin
- 36. Setup a Plugin to Sell Online
- 37. Install a Broken Link Checker
- 38. Create and Submit a Google Sitemap
- 39. Verify Search Engine Visibility
- 40. Setup Discussion Settings
- 41. Install an Image Compression Plugin
- 42. Change the Default Login URL
- 43. Install a Custom Theme
- 44. Install an Optimization Plugin
- 45. Setup a Coming Soon Page
- 46. Disable Post Revisions
- 47. Block Access to WordPress folders
- 48. Stop WordPress Core Files from being Indexed
- 49. Remove Meta Information from WordPress Header
- 50. Disable HTML in WordPress Comments
- Conclusion
1 Reset Your Password
The first thing that you should do when setting up your website is that you should reset your password.
Why is it Important
Most people set passwords that are way too easy to crack by a sophisticated hacker. If your password is your name, your dog’s name, your birthday, or something similar, then we are sorry to say, but your password sucks.
For your website to stay hack-free, you should change your password to a more secure one.
How to Achieve It
The good news is that WordPress itself has a built-in tool that lets you generate strong passwords. You can access the tool by going to Users > Your Profile from the WordPress menu.

Scroll down the bottom of the page to find the Account Management section. Click on the Generate Password button to generate a strong new password.
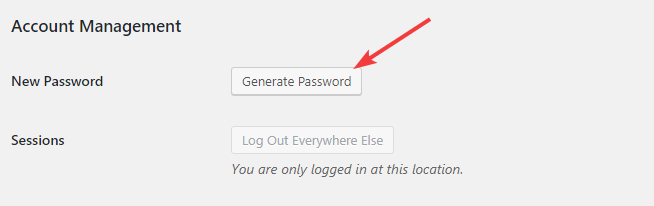
A new password will be created and made visible on the screen. Copy the password and save it in a secure place, like a password manager, then click the Update Profile button.
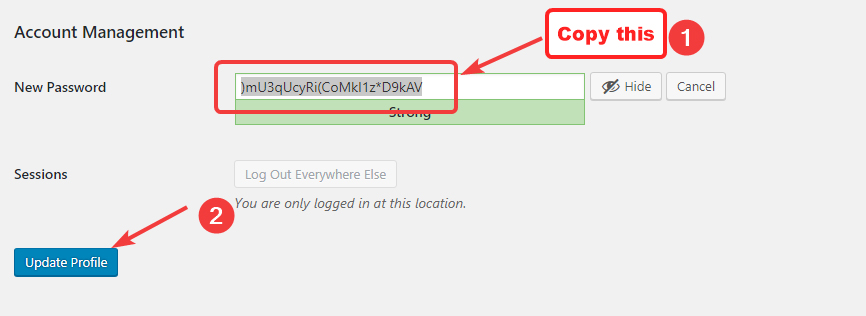
Important: Make sure to save the password somewhere before updating your profile. Once you update, you will be logged out and will have to log in using your new password. If you haven’t saved it, you won’t remember it, and end up having to reset it.
2 Clean up Your WordPress Dashboard
The WordPress dashboard is the screen you would probably see the most, as it is the first thing that you see when you log in. You should clean and optimize it to be productive.
Why is it Important
As we said, the dashboard is the first thing that will see every time you log in. Unfortunately, it isn’t very useful by default. And, the more plugins you add to it, the more cluttered it becomes. Here is how it looks like.
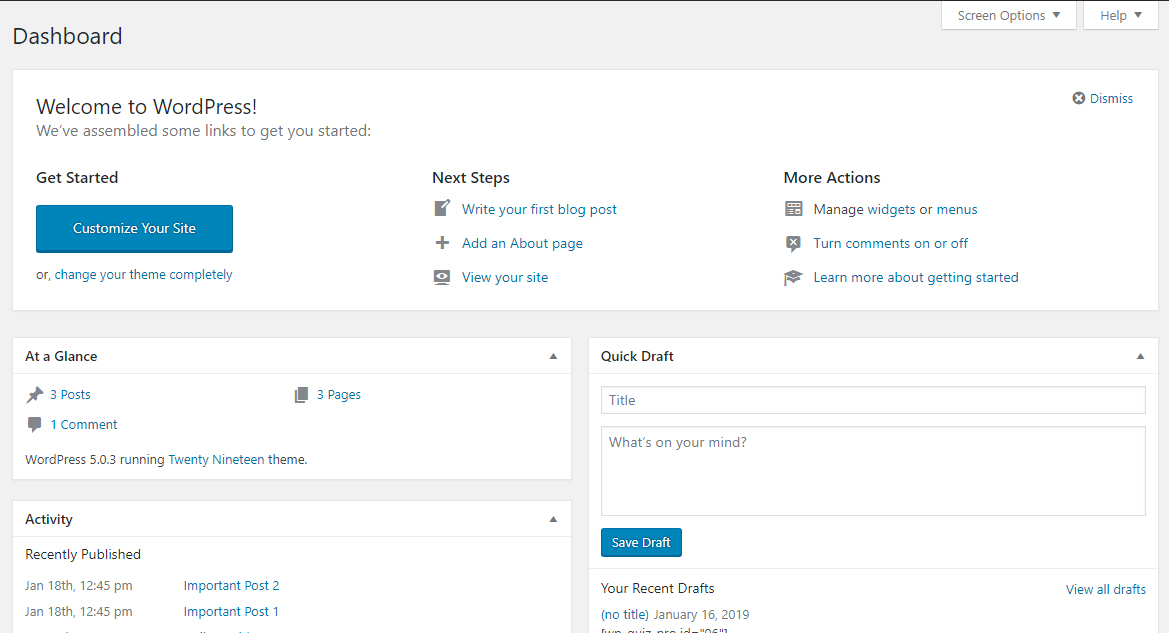
For maximum productivity, you should remove the widgets that you don’t use and add the ones that increase your productivity. If you prefer, you can also make it blank.
How to Achieve It
On the top of the dashboard, you will see Screen Options.
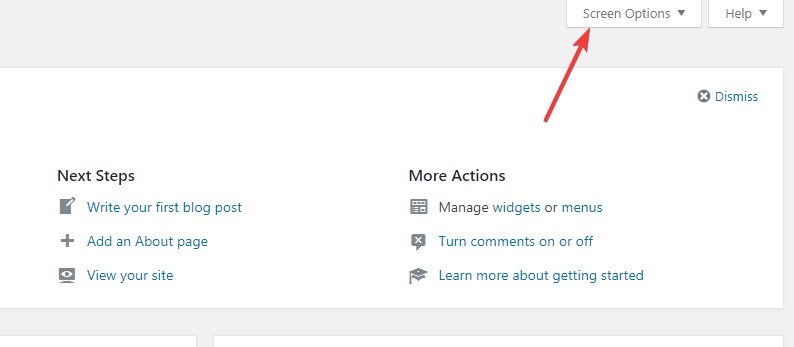
If you click it, you will see a list of all the widgets that are currently visible on the dashboard.

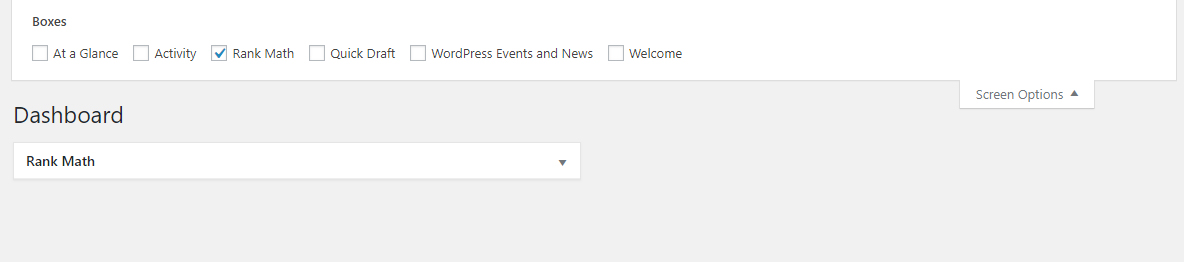
Yours might look different depending on the plugins that you have installed. To disable a widget, un-check the checkbox next to it. Here is an example:
That’s it. Clean up your dashboard and have the most important data presented to you as soon as you log in.
3 Setup Your Website’s Title
When you setup WordPress, it asks you to setup a title for your website. At that time, you might have just set a random title for your website. If you did, you should change it.
Why is it Important
The title is to your website what a book’s title is for a book, and it’s important for 2 reasons.
First, the users. Just as a book’s title has to be relevant to the subject and the contents of the book to hook readers, your website’s title has to be about the contents of your website to attract the right users.
To simplify, if we asked you this question, “What is your website about?”, what would you answer? That answer is the should be the title of the website.
The second reason is SEO. Search engines use the words in your website’s title to make a judgement about your website’s topic. If you don’t include the right words in there, you might miss out on a lot of relevant traffic.
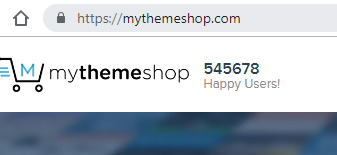
Note that a title shouldn’t be just a brand name. The title can include the brand, but shouldn’t be only the brand. There is a difference between what your website is called (your brand name) and what your website is about (your title). Just to give you an idea, here is our title.
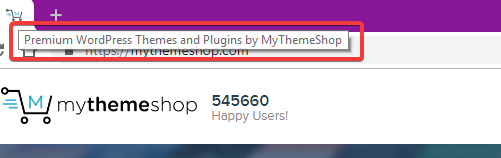
If the image is too small, here is what it reads:
Premium WordPress Themes and Plugins by MyThemeShop.
It says what our business is about, and also includes our brand name in the title—a perfect mix.
So, the ideal title is one that can please both the users and search engines. Just look at ours, it’s a great example of a title that does both really well.
How to Achieve It
There are 2 ways in which you can change your site’s title.
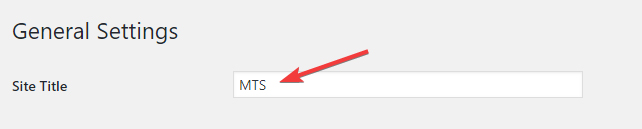
- Through Settings
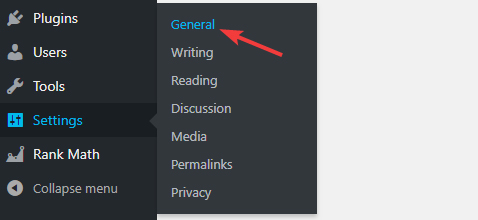
Navigate to Settings > General from your WordPress menu.
In the general settings, the first option is the Site Title setting. Ours is currently set to MTS. Change the title to the one you prefer, and then save your settings.
- Using WordPress’s customizer
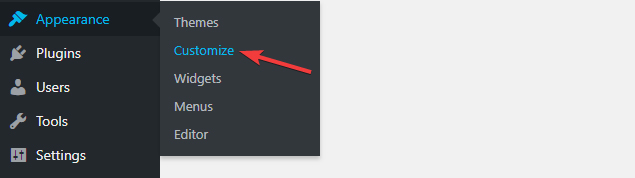
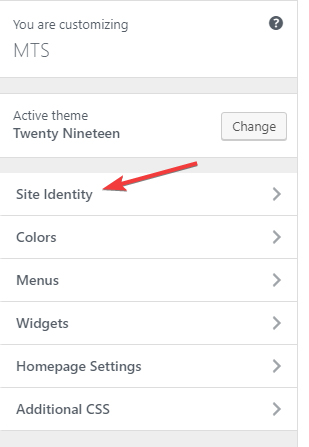
Head to Appearance > Settings from the WordPress menu.The WordPress customizer will open up. Select the Site Identity settings by clicking on them.
You will see a bunch of options, including the Site Title option. Change the title to the one you prefer, then Publish your changes by clicking the Publish button above.


- Through Settings
Navigate to Settings > General from your WordPress menu.In the general settings, the first option is the Site Title setting. Ours is currently set to MTS. Change the title to the one you prefer, and then save your settings.
- Using WordPress’s customizer
Head to Appearance > Settings from the WordPress menu.The WordPress customizer will open up. Select the Site Identity settings by clicking on them.
You will see a bunch of options, including the Site Title option. Change the title to the one you prefer, then Publish your changes by clicking the Publish button above.
4 Setup Your Site’s Tagline
The next step in setting up your website should be about customizing your website’s tagline.
Why is it Important
The tagline isn’t as powerful as the title—in most cases the user won’t even see it. But, it can be a powerful branding tool if you use it well.
Think about it. A large number of brands have taglines.
Apple – Think Different
Loreal – You’re worth it
Nike – Just Do It
and more.
Just like the brands we mentioned above, your brand’s tagline can become iconic too if you choose.
How to Achieve It
There are 2 ways to set your site’s tagline, similar to the title. In fact, it is exactly the same process.
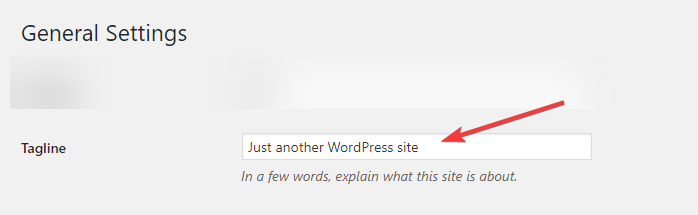
- Changing the Tagline in settingsHead to Settings > General Settings from the WordPress menuThe second option on the screen should be about the tagline. Update your tagline there, and save your settings.
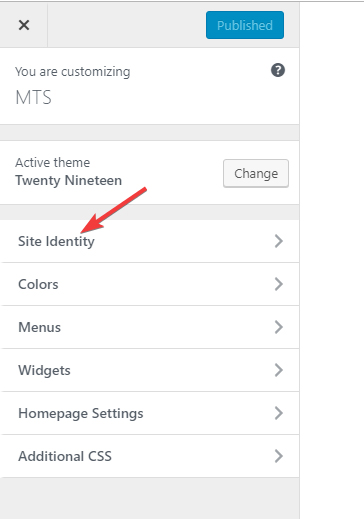
- Using WordPress CustomizerHead over to the WordPress Customizer by navigating to Appearance > Customize.The WordPress customize will open up. Click on the first option, which says Site Identity.
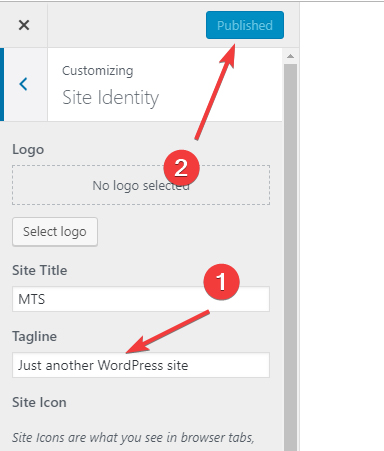
You should see the option to change your website’s tagline. Enter the new tagline, and publish your changes by clicking the Publish button on the top of the screen.
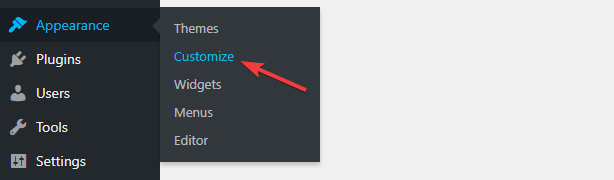 The WordPress customize will open up. Click on the first option, which says Site Identity.
5 Setup your preferred URL
You might not know, but your website can be set up in 2 ways. A “www” version and a “non-www” version. What does that mean, you ask?
It means that you can set your website’s primary URL as:
http://www.yourwebsite.com
Or…
http://yourwebsite.com
While there are some technical differences between the two, the more important thing is to choose one and stick with it. It’s largely a matter of personal preference. You’ll find popular websites using either one. Here are some examples.
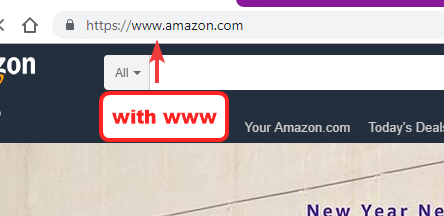
Compared to that, we don’t use www on our website.
And we’re in good company as well.
Why is it Important
As we said, it’s more of a preference thing. But, that simple preference will stick with you forever. All links, mentions, and other places that you mention your site will use the name you set. So, take some time to choose your preferred one.
How to Achieve It
You can set up this option right inside WordPress. Head over to Settings > General from the WordPress menu.
You will see the WordPress Address (URL) and Site Address (URL) just below the Tagline setting. Enter your desired name in both the fields and save your settings.
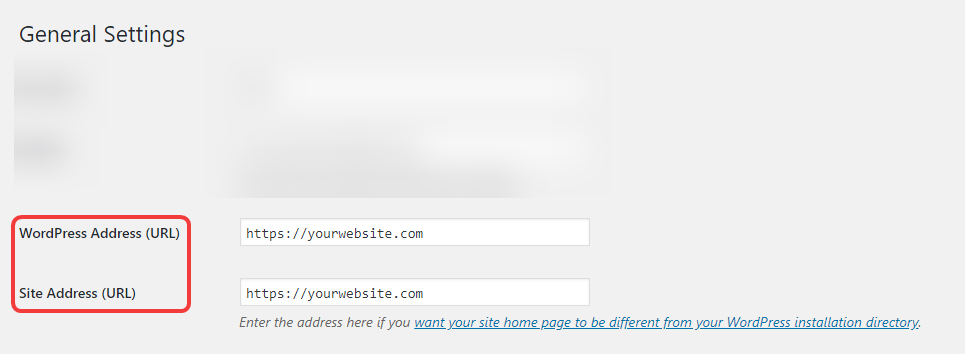
Quick Note: You should enter the same URL in the first and the second option in all cases, with one exception. That exception being the case if your homepage is different than the directory that WordPress is installed in. Meaning, that your website probably has a blog section where WordPress is used, and the rest of the website is built on something else.
There is a rare chance that your website is set up that way, but we still wanted to make it clear.
6 Restrict Membership options
WordPress allows your readers to become part of your website by letting them register on your website. Depending on your setup, this option may be open to anyone. If it is, you should disable it.
Why is it Important
Users who register on your website don’t get any powers to affect your website in any way, but it’s still best to disable the option for security purposes. If someone had access to your yard, but not to your house, it would still make you uncomfortable, right?
How to Achieve It
The membership settings are available in Settings > General.

Once you’re there, scroll down until you see the Membership option. If it is checked, uncheck it, and save your settings.

7 Set Date and Time Settings
WordPress is a global CMS, that means anyone across the globe can read content that you publish. For proper management of your blog, you should set up your date and time settings, if you haven’t done it already.
Why is it Important
Processes like cron jobs, publishing timelines, and a lot of others depend on the timezone to be set correctly. Setting up the proper time-zone and date formats will ensure that processes work without issues.
How to Achieve It
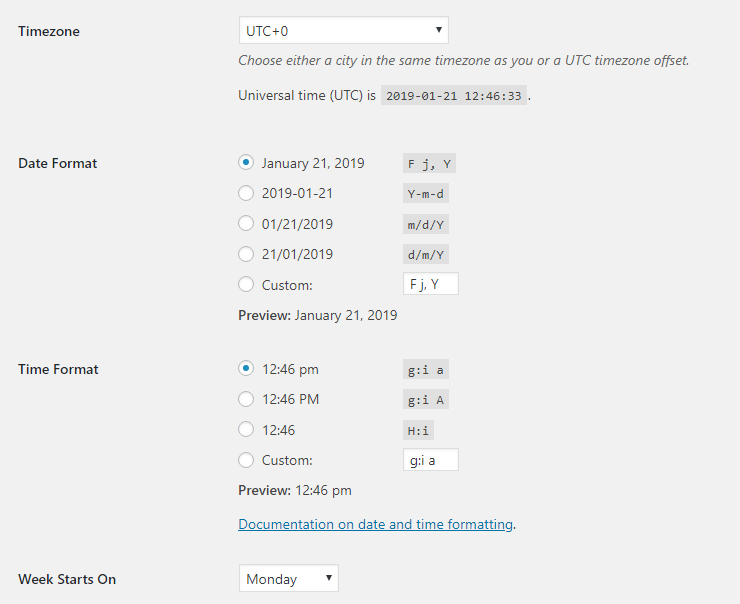
The time zone and date settings are available in the General Settings, and you can find them by navigating to Settings > General Settings.

Once you’re there, scroll down until you spot the time-zone settings and the date and time options. Configure them to your heart’s liking, then save your settings.
8 Setup Language Preferences
Being a global CMS means that WordPress supports hundreds of languages from around the world. If you prefer to use WordPress in your native language, you can change it.
Why is it Important
Not everyone is a native English speaker. Sure, many people do understand the basics, but that does not mean that they understand all the options inside the WordPress admin. If you’re one of those people, you’re in luck. You can change the admin language to the one you prefer.
You should know that translating the backend (admin area) is different from translating the frontend (the part which users read). You can have the backend translated to your language while still blogging in English, or change both the frontend and the backend language to the one you prefer. The backend can be translated from within WordPress, while for translating the frontend you can use a plugin like WP Google Translate, which will use Google’s magic to translate your blog to the language of your choice.
How to Achieve It
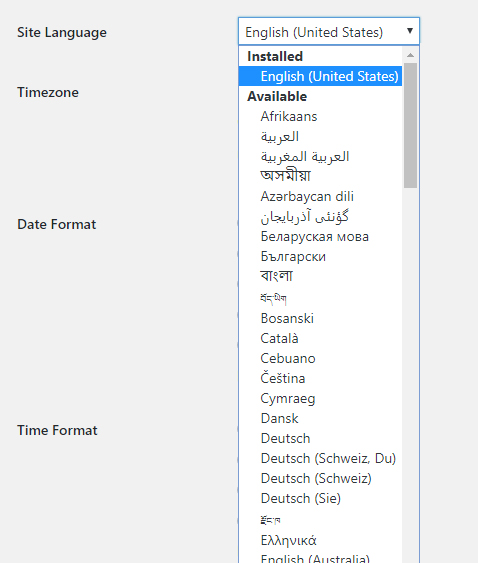
To change the language that WordPress uses, head over to Settings > General Settings.

Scroll down to find the Site Language settings. It should be present just above the time zone settings. When you see it, click the dropdown to reveal all the languages that WordPress supports. Select the language of your choice, then save your settings.
9 Check for WordPress Updates
You might not realize it, but your WordPress version might be out of date. You might wonder that you just finished installing WordPress, how can you not be on the latest version? There is a good reason why, and we’ve discussed it below.
Why is it Important
Keeping your website up to date with the latest WordPress versions is important for security, bugfixes, and getting the most up-to-date features on your website. If your host installed WordPress for you, there is a good probability that you’ll need to update WordPress.
It’s not intentional. Hosts aren’t deliberately installing older versions of WordPress for their clients. A hosting company has to deal with a lot more technical details that you can imagine — keeping up with the latest releases, training staff for them, keeping servers up to date, and a lot more. Because of all this, they are sometimes not as quick to update their WordPress setups as they’d like to be. No worries, if they didn’t install the latest version, you can update WordPress yourself.
How to Achieve It
Usually, you’d see a giant notice inside the admin window prompting you to update. But, you can also check for updates manually by visiting Dashboard > Updates.
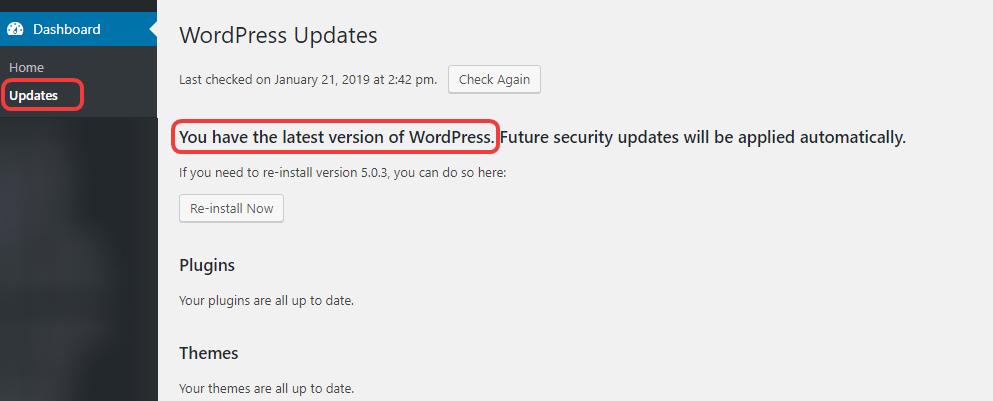
There you’ll be able to see all updates available for your website including WordPress, themes, and plugins. Just click the Update button to start the update process.
Important: We just recommended that you keep updating to the latest version of WordPress. However, there is one exception to that. We don’t recommend that you update immediately if it’s a major new release. For example, WordPress 5.0 just came out a few weeks ago (as of this writing). If you updated to it as soon as it came out, you might have broken your website.
No, WordPress is not the issue there. With every major update, themes, plugins, and other tools have to be updated and made compatible as well. If all those are not compatible with the new version, that might break the site.
Updates or no updates, the important thing to remember is to always have backups. Use a free plugin like My WP Backup to back up your website or use the Pro Version if you need more features.
10 Delete Dummy Content
When you install WordPress, it adds some dummy data to your website to give you an idea of how the content will appear when you actually use it. You should delete this dummy data.
Why is it Important
Because the dummy data adds no value. A sample post on your website isn’t going to magically teach you anything about WordPress that you couldn’t teach yourself. But, that’s not even the bigger issue. The bigger issue is that if those posts are left there, they could be indexed by search engines or viewed by users. You wouldn’t want a “sample post” appearing in the search engines from your website, would you?
How to Achieve It
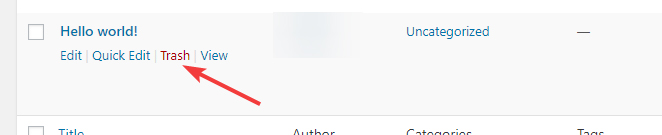
To delete the dummy post, head over to Posts > All Posts.

If you haven’t added any new content, then the “Hello World” post is going to be the first post you see. If you have added some content, scroll down to find the post. Once you find it, hover your mouse over it, then click the Trash link. This will delete the post and send it to the trash.
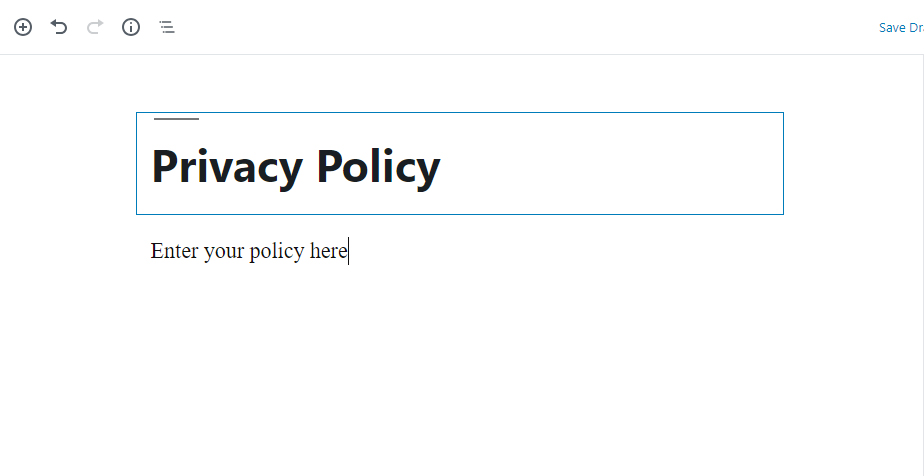
11 Create Basic Site Pages
After you’ve deleted the dummy pages off your website, it’s time to add some pages of your own—and we’re not talking about content that you would usually post on your website. We’re talking about the supplement pages that you have to add to your website.
Why is it Important
Chances are, you’ve started your website/blog with the hopes of making some money off it. Any property or asset that generates an income qualifies as a business, and businesses have to follow certain regulations.
In the website world, it’s mandatory to include a Privacy Policy on your website. It’s also wise to include a Terms and Conditions Page. If you’re promoting affiliate products, you will also need to have an affiliate disclosure on your website—it is the law!
No matter how small your website is, it is wise to create these pages. It is better to be safe than sorry.
How to Achieve It
First, you have to come up with the pages themselves and the content that you’ll add to the pages. We recommend going through a bunch of resources before deciding what to write in each of the pages.
Once you have the content ready, create a new page by going to Pages > Add New.
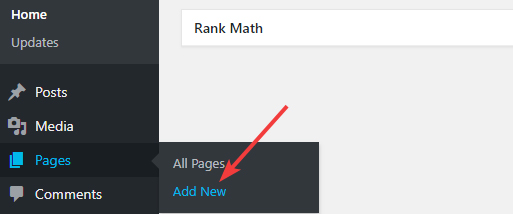
Add the content to the page, then publish it.
Repeat the process for each of the page, then add them to your website in a place where they are prominently visible to the user. The footer is a standard choice for pages like these.
12 Setup Your Website’s Menu
After creating all the relevant pages on your website, the next step you should take is to create a menu for your website.
Why is it Important
A menu is one of the most prominent places of real-estate on your website. It is the place that every user will lay their eyes on as soon as they land on your website, making it the place where you should place your most important content.
Obviously, you won’t be able to fit entire pieces of content in the menu, but you can surely squeeze a link to content in the menu. For example, here is our menu:

As you can see, we’ve added links to the 3 most important parts of our business. Our premium themes, our premium plugins, and supporting our existing customers. You should think and structure your website’s menu in the same way.
How to Achieve It
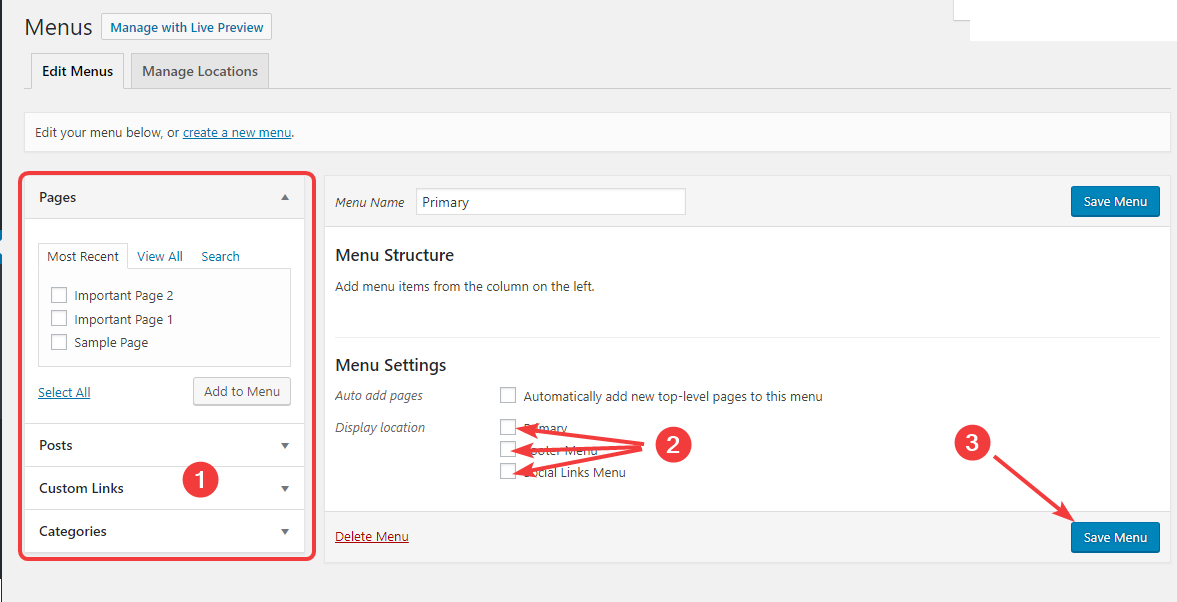
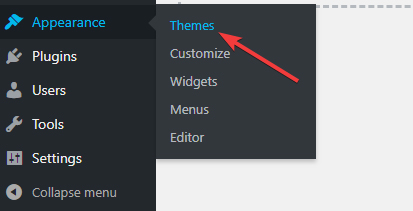
First, you have to create a menu. Head over Appearance > Menus.
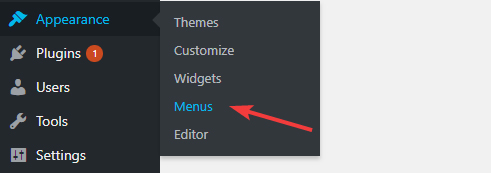
Type in a name for your menu, then click the “Create a new menu” link to create a menu.
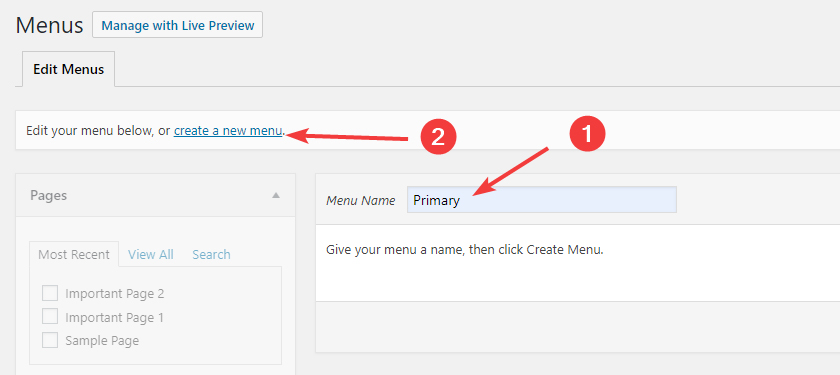
Add the relevant pages, posts, categories, or custom links to the menu using the menu to the left. Then select all the places the menu should appear—the options here will depend on your theme. Then, save your menu.
13 Delete Unused Plugins and Themes
Your WordPress installation comes with a bunch of themes and plugins installed. You should delete the ones that you don’t use.
Why is it Important
The phone that you currently use isn’t the only phone you’ve ever purchased. Chances are, you upgraded from an older one to this one, and the old one is lying around somewhere. In day to day life, do you also carry your older phone with the new one? We doubt it.
Similarly, you shouldn’t be carrying around themes and plugins that you don’t use.
How to Achieve It
The process to delete themes and plugins and different. Let us show you steps for each of them.
Deleting Themes
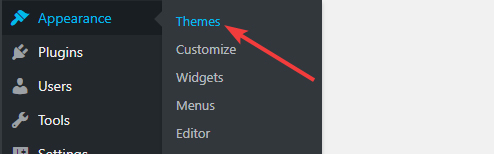
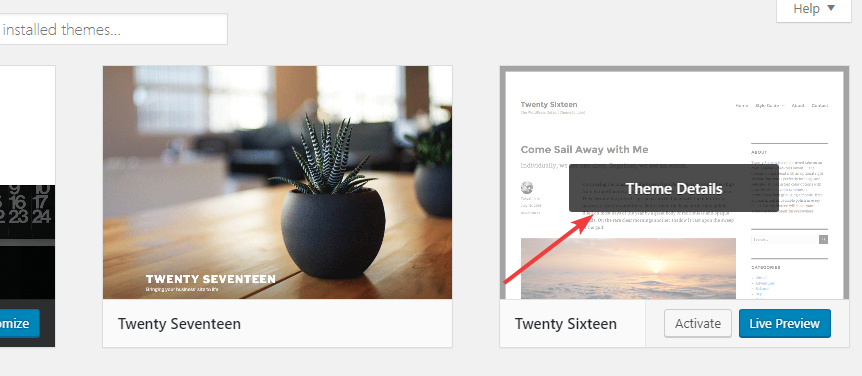
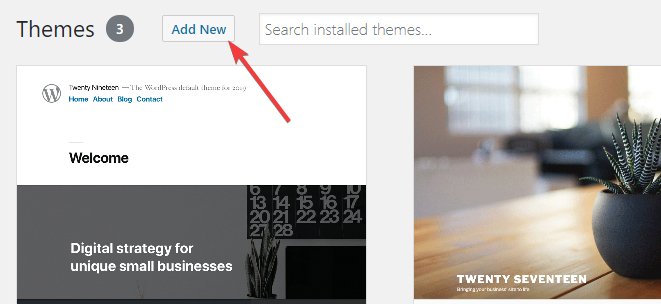
Head over to the themes page by navigating to Appearance > Themes.
You will see many themes installed, including the ones that you’ve installed yourself. Hover over one of the themes that you don’t use and click the Theme Details button.
The theme’s details page should open up. You will find the option to delete the theme in the bottom right of the window. Click the Delete link to delete the theme.
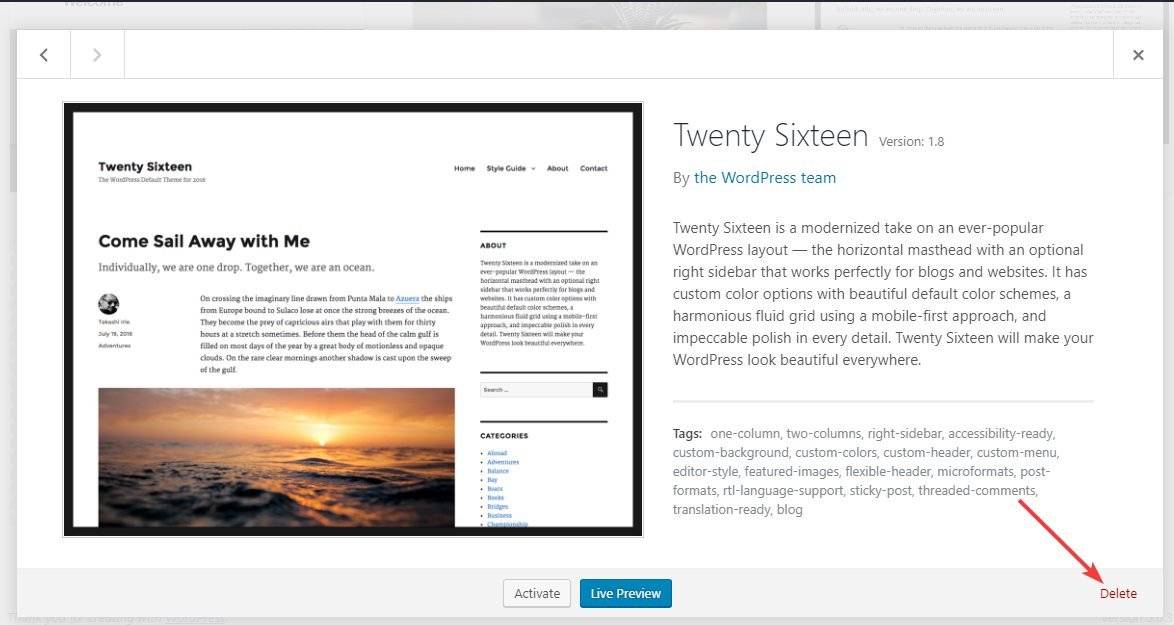
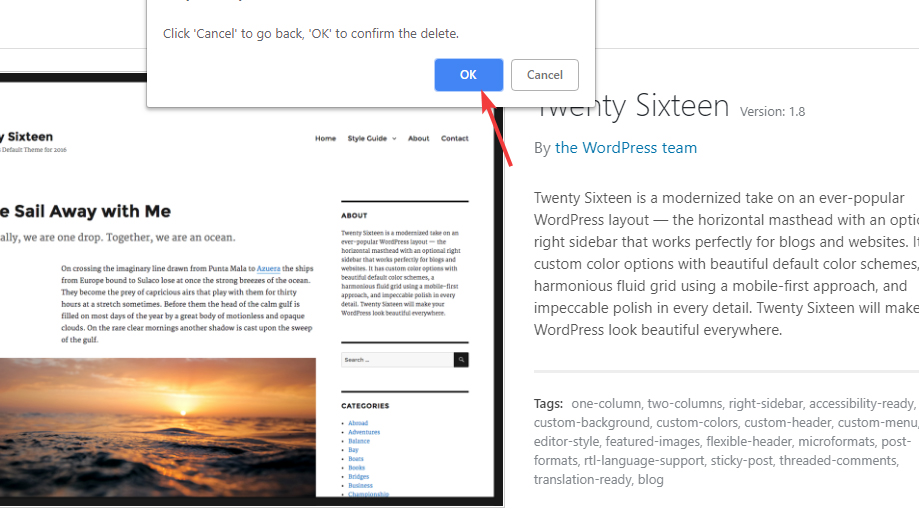
You will be asked to confirm your actions. Press Ok to delete the theme.
Important Note: Although we just recommended that you delete the themes that you don’t use, there is one exception. Do not delete the default WordPress theme. Currently, it’s the Twenty Nineteen theme.
The reason for not deleting the Twenty Nineteen theme is that it’s WordPress’s backup theme. As your website grows, you will develop customized solutions to problems that you face. Breaking your website during this process is normal. If your current theme breaks, WordPress reverts to the default theme to keep your website up and running.
If you delete the current theme, WordPress will have nothing to fall back on, and your website will crash.
Deleting Plugins
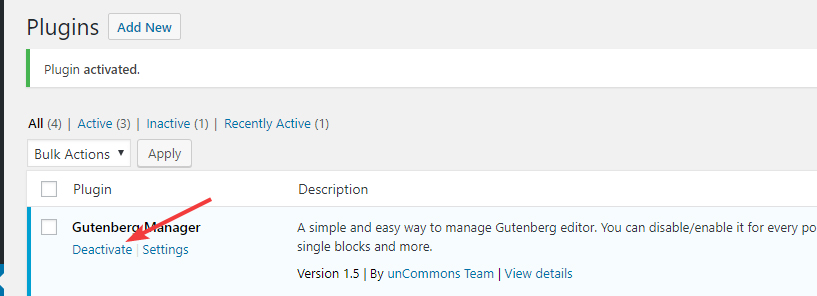
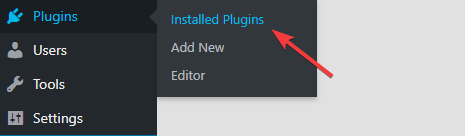
Head to the plugins page by navigating to Plugins > Installed Plugins.

You will reach the plugins page where all your website’s plugins will be visible. If a plugin that you want to delete is activated, you will have to deactivate it before deleting it. Click the Deactivate link below the plugin name to deactivate the plugin.
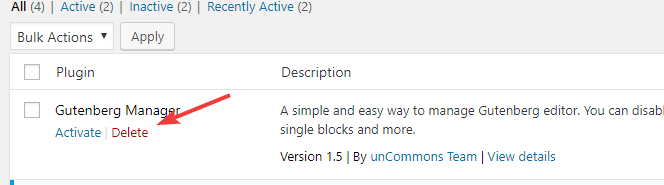
Once the plugin is deactivated, you will start seeing the Delete option below. Click the Delete link to delete the plugin from your website.
14 Update Existing Plugins
When you install WordPress, it comes with a couple of default plugins which are pre-packaged with the setup. If a 3rd party, like your host, installed WordPress for you, then they might also include additional plugins with your setup. As we mentioned above, many hosts are notorious for not updating their setup files frequently, which means that you might already have outdated plugins on your site. In this step, we check for any plugins with pending updates and update them.
Why is it important?
The reason is security and compatibility.
Older versions of plugins might have bugs or security holes which can be exploited by hackers to gain unauthorized access to your website. By keeping your plugins updated, you minimize the chances of your website getting hacked while gaining access to new features that the plugins provide.
How to Achieve It
Head over to the plugins page by navigating to Plugins > Installed Plugins.
Note: Depending on your setup, all your plugins might already be updated to the latest versions. If that is the case, then great, you don’t have to do anything else.
On the plugins page, see if any of the plugins have updates available. If they do, then click the Update link to update them.

If you don’t have any updates (like in the image above), then you can move on. But, keep regularly checking to see if you have updates available.
Intermediate Settings
15 Setup Permalinks
A permalink is a unique identifier for a post created in WordPress, and it affects the URL of the posts that you create. You can configure permalinks using templates inside WordPress, and we recommend setting them up before you start posting content.
Why is it Important
The permalink settings will affect every URL that you create on your website, ever! Since an optimized URL is a big part of SEO, having the proper permalink settings set up will ensure all your posts are created with keyword rich URLs and attract more traffic through SEO.
On many setups, the default Permalink settings inside WordPress is set to Page ID. That means that every post that you create will get a URL similar to this:
www.yourwebsite.com/?p=192
This poses many problems. It is not good to look at. It is not descriptive, so users might think twice before clicking a link like this in the search results. Since it does not communicate what the post is about, Search Engines consider it as a negative signal about the quality of the post, which is a lost opportunity to earn some more traffic. For these reasons, it is important that you change the Permalinks setting.
How To Achieve It
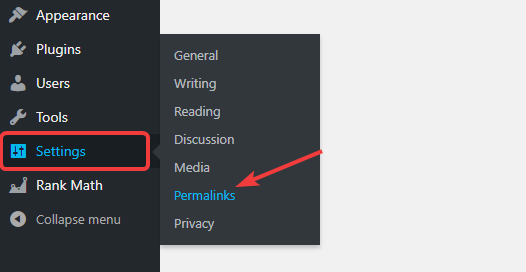
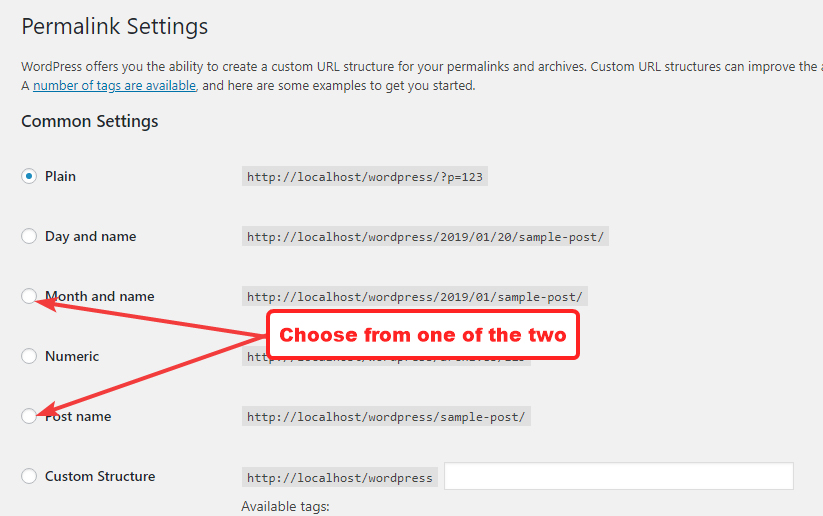
Permalink Settings can be accessed from Settings > Permalinks in the WordPress menu.
There are a number of templates available to use directly, and you can also create your own templates using variables. We would recommend choosing from these 2 options.
- Month and Name
- Post Name
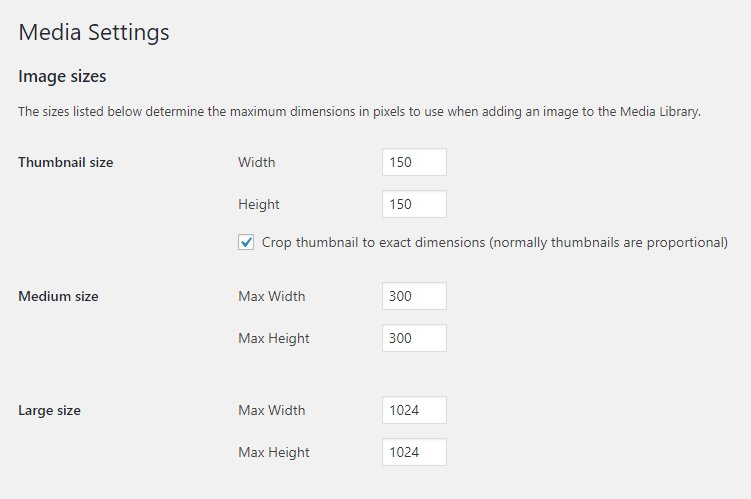
16 Setup Media Sizes
The next important step you should take in setting up your website is that you should define media sizes inside WordPress. The most common media you will be using is images, and WordPress lets you set up standard image dimensions inside its settings.
Why is it Important
Images make a post look good. They help maintain engagement, make the post readable, and prevents users from dozing off. But, images also cause additional load on your server and your load time.
The problem is exaggerated when WordPress doesn’t know what size of images to use. Imagine being at home and making food for 10 people. After you’ve chopped, diced, cooked, set up plates, and served; you realize that no-one is coming over and you just had to cook for yourself. All that effort and resources are wasted.
Similarly, you might upload a picture you took from your phone to your website. Phone cameras are insanely good and produce gigantic images (memory wise). If you don’t specify the media sizes properly, then WordPress will load the entire image with each page view, then scale the image down with code-trickery. It’s the wasted food all over again.
If you do specify the media sizes, WordPress will create multiple copies of each image, resized for devices of different sizes. Then when an image is requested, WordPress will serve the image with the exact dimensions needed, saving precious bandwidth and resources.
How to Achieve It
To set up Media sizes correctly, you need to know what size of media your theme supports. Refer to your theme’s documentation for the correct sizes. If you can’t find the information in the documentation, contact the developer. If you don’t have the correct sizes, setting this up will not be fruitful.
Once you have the actual dimensions, head over to Settings > Media from the WordPress menu.
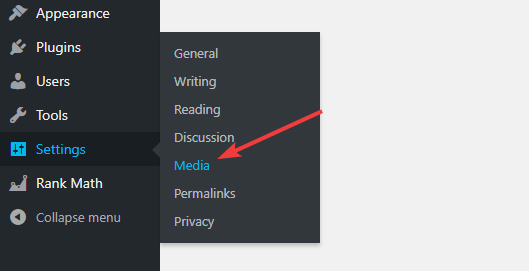
In the settings, enter the exact dimensions for thumbnails, medium images, and large images that you got from your theme’s documentation or developer, then save your settings.
17 Customize Widgets and Footers
There are many areas of your website that are “blank slates” and don’t get filled up with content that you post. In WordPress’s terminology, these areas are called widget-enabled areas. To maximize the value you derive from your website, these blank slates should be filled with appropriate content.
Why is it Important
Depending on your theme, you might have 1 or more widget-enabled areas on your website. Think of these areas as empty spaces where you can put up a variety of content. The difference between posts and widget areas is that widget areas do not change throughout your website—unless you want them to. Once you set them up, the same widgets that you set up will work throughout your website.
How to Achieve It
WordPress has a dedicated section where you can manage widgets. You can reach the section by navigating to Appearance > Widgets from the WordPress menu.
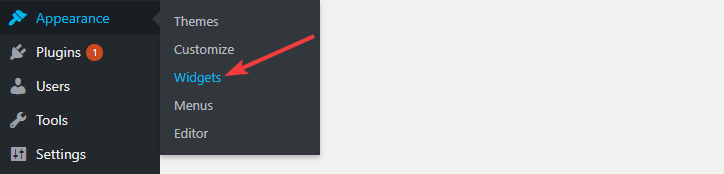
The page should be divided into 2 areas. On the right, you will see the places where you can add widgets, and on the left, you will see all the types of content you can add on to it. To add a widget to a widget enabled area, you will have to drag and drop it in the desired position.
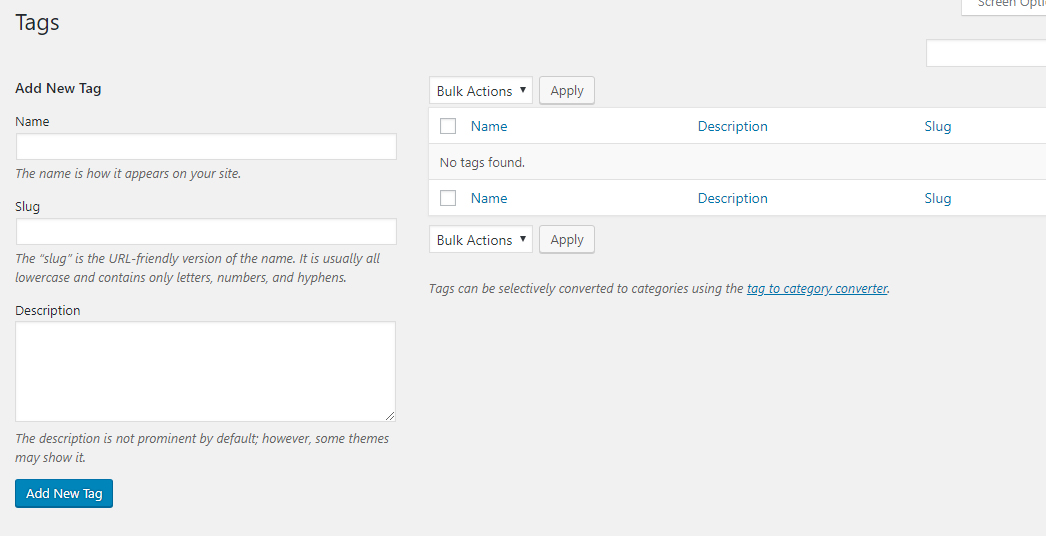
18 Create Appropriate Taxonomies
Before you post content, you should create relevant taxonomies inside your WordPress admin. Taxonomy is a broad term for categorization. In simpler terms, a category is just one type of taxonomy. Depending on the type of content, there can be more than one type of taxonomy on a website.
For example, if you had a website about restaurants, you could have a category taxonomy and a tags taxonomy for the type of food. If you had a website about books, the book category could be one taxonomy, the author could be another, year of publishing could be another, and genre could be another one.
Why is this important
Taxonomies help you organize your content and maintain sanity when publishing content. When a user lands on your website, you don’t know what type of content they want to consume. If you organize the content in an easy to access way, users will be able to find what they are looking for, and they will stick around longer.
How To Achieve It
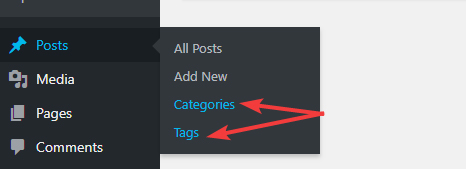
WordPress supports the Categories and Tags taxonomy by default. To create categories or tags, you can navigate to Posts > Categories or Posts > Tags from the WordPress menu.
The process of creating both is quite similar, the difference being that categories are hierarchal, while tags are not. Here are the options you’ll see when creating a category.
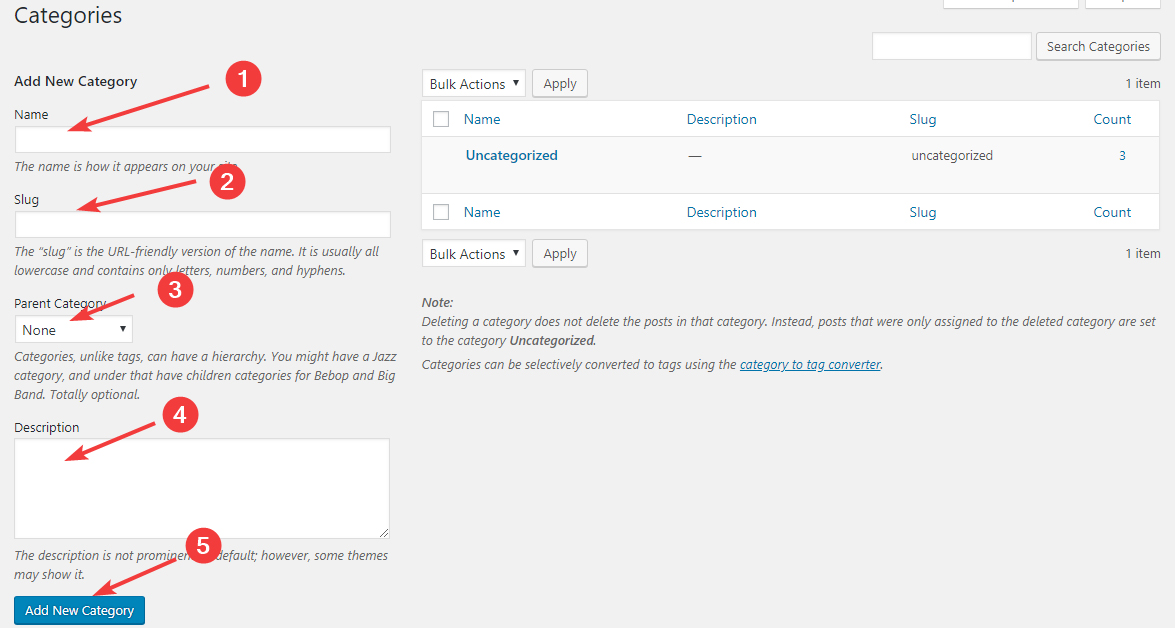
You’ll have to add a name, a slug, choose an optional parent category, and add an optional description before adding the category.
Here is the screen for adding tags. Quite similar to categories as we mentioned.
Creating custom taxonomies is also possible, although not very simple without technical skills. However, there are some great plugins out there like Custom Post Type UI that let you create custom taxonomies with ease.
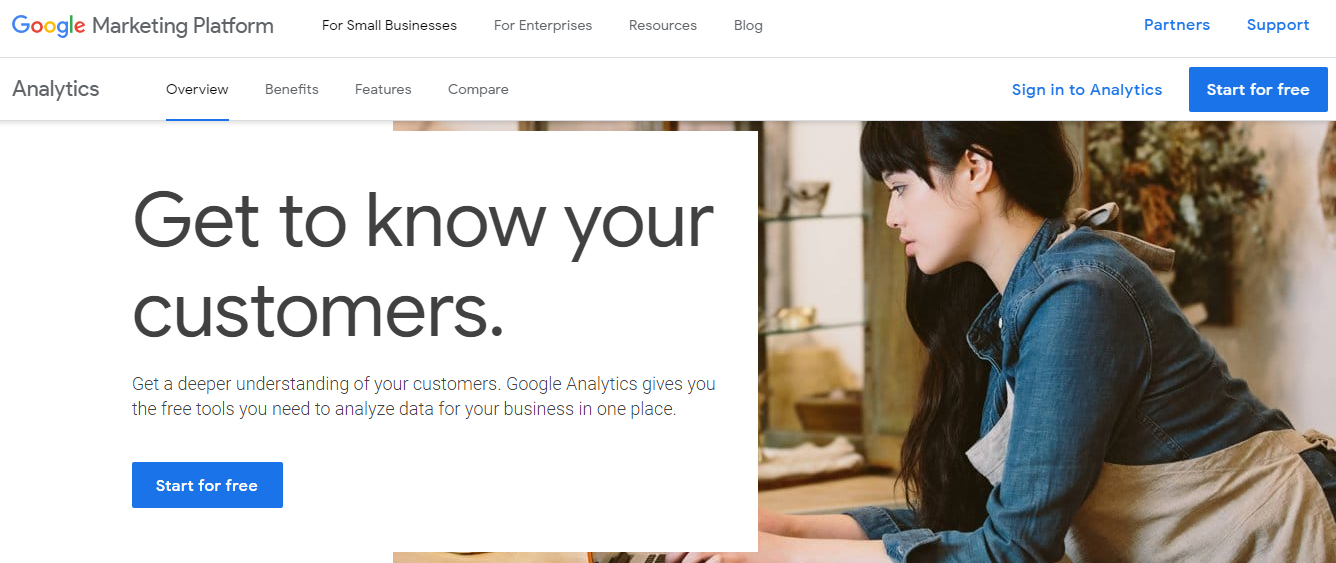
19 Create and Connect a Google Analytics Account
We recommend that you connect a Google Analytics account with your WordPress website even before you write your first post.
Why is this important
You will be at a severe disadvantage if you don’t know how many people are coming to your website and what content they are consuming.
WordPress may be a great CMS, but it offers limited analytics out of the box. To counter this, you can use Google Analytics. It’s a free service from Google which can give you tons of information about your visitors. It can tell you how many visitors you got, what pages they visited, how they interacted with the page, and much more. It’s a powerhouse of information that can open your eyes and give you a sneak peek into your visitor’s mindset.
How To Achieve It
There are 3 ways to connect Google Analytics with your website. All methods require that you either have access to the tracking code, or the tracking ID, both of which are provided by Google. If you don’t know where to find them, there are some fantastic resources available out there that will teach you how. We suggest that you do a Google Search and have the tracking ID and the tracking code handy.
Method 1 – Manual
In this method, you will need to edit your theme’s header.php file and paste the Google Analytics code in it, just below the meta tags. Usually, you need to paste the code to all the pages you want to track, but since the header.php is loaded on all pages of your website anyway, you just have to paste the code once.
Although there is little risk in the above-mentioned process, you might feel intimidated with it, especially if you haven’t done it before. If that is the case, we would recommend that you try the other method we discuss.
Method 2 – Using Theme’s Functionality
Many theme developers realize that not everyone is comfortable with editing their theme files and they include features in their themes to ease the process for users. If you’re using a MyThemeShop theme, you can use the theme’s built-in feature to install Google Analytics. All you’ll need is your Google Analytics Tracking ID.
If you’re unsure if your theme developer supports this, it is wise to contact their support team and confirm.
Method 3 – Using a Plugin
If your theme doesn’t support it, you can always use a plugin to connect your website with Google Analytics. Many plugins support this feature, but we would recommend our own plugin Rank Math. Apart from being a fantastic SEO Plugin, it also lets you connect your website with Google Analytics easily.
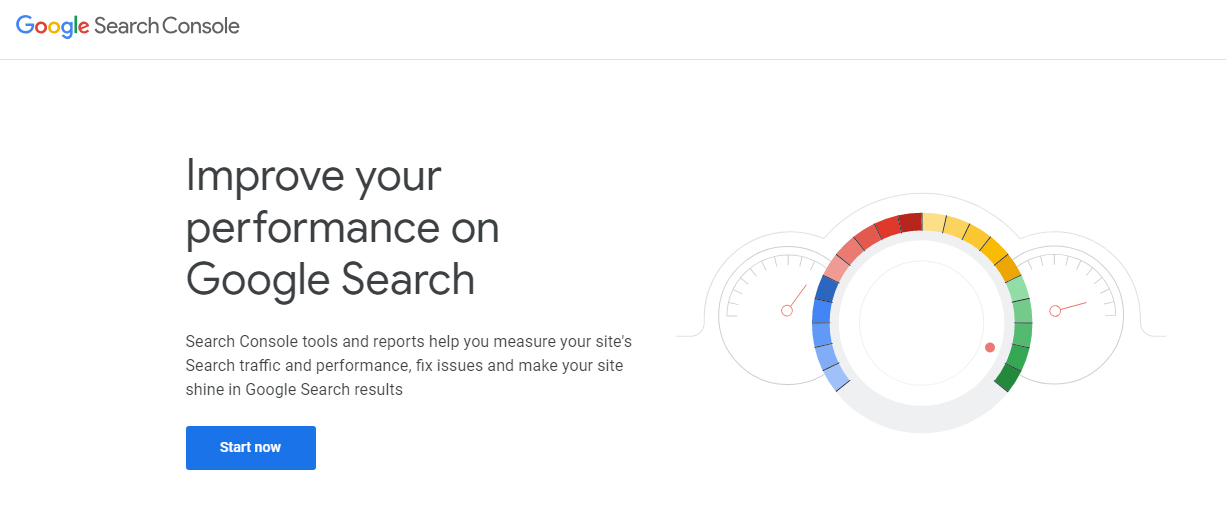
20 Verify your website with Google Search Console
Once you’ve connected your website with Google Analytics, your next step should be to verify your website with Google Search Console.
Why is it Important
Google Search Console (formerly known as Google Webmaster Tools) is a website management tool created by Google. It’s created for webmasters and website owners, and it helps them understand how Google is navigating their site. It also helps resolve indexing issues, helps submit sitemaps, and even see your current rankings in Google.
If you’re serious about growing your website, then it’s empirical that you verify your website with Google Search Console.
How to Achieve It
If you’ve already connected your website with Google Analytics, Google can use that to verify your website, and you won’t have to do anything else. If you haven’t, then you’ll need to follow the manual process similar to what we outlined when we discussed verifying your website with Google Analytics.
Instead of tracking code or tracking IDs, verifying properties in search console is done via a code-chunk. When you add your URL inside search console for verification, Google gives you a small piece of code that you have then place on your website. The process of pasting the code can be done in many ways.
Editing Files
You can edit your theme files to add the code for verification, but it’s not the easiest method and definitely not recommended for beginners.
Using a Plugin To Add Code
There are many plugins that help you add chunks of code to your website without risk. The Code Snippets Plugin is one such plugin. This is a safe option, but if you’re going to add a plugin just for verification, it is better to look at other options first.
Using Theme’s Functionality
Many themes offer a verification functionality, or functionality to add code to your website. Use the option to add the verification code to your website and avoid the manual hassle.
Rank Math
In our opinion, the easiest way to verify your website with Google Search Console is Rank Math. It has dedicated options to verify your website with Google Webmaster Tools, Bing Webmaster Tools, Pinterest, and more. What’s better is that after you’ve verified your website, Rank Math will fetch important information about your website and you’ll be able to see it right inside your admin area.
21 Add a Contact Form
We discussed in a point above about adding important pages to your website. There, we mentioned adding a Privacy Policy, Terms and Conditions, and other pages. But, another important page that you should not miss is a Contact page.
Why is it Important
Operating a website might seem like a one-way street, but it is not. Just like you have the option to express your thoughts and opinions, your readers should also have the option to respond and communicate with you.
One way they can do this is through comments. But, comments are hardly personal and are usually specific to the post they are made on. By adding a contact form on your website, you are opening up lines of communication through which your loyal readers can interact with you.
How To Achieve It
There are plenty of good plugins out there that make the process of creating and adding contact forms on your website seamless. Two of the most popular ones are Contact Form 7 and Ninja Forms. Here is a crash-course on how to set up a contact form using Ninja Forms.
- Create a new page in WordPress and call it Contact Us
- Install the Ninja Forms plugin
- Create a new contact form using their drag and drop builder
- Copy the shortcode of the form and paste it inside the Contact Us page.
- Use the shortcode on any other page or post as necessary
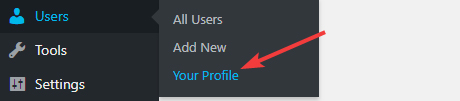
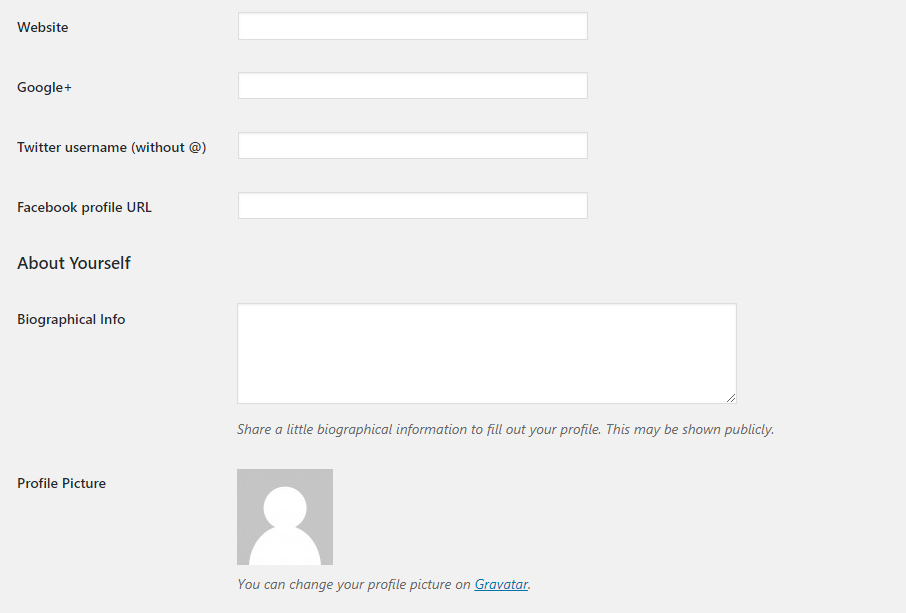
22 Update Your WordPress Profile
When you set up your website, your author profile is empty. Before you start posting content, you should update it.
Why is it Important
Your author profile is visible on each of your website’s posts. When a user reads some content that you’ve written, they might be intrigued to know more about you. The author profile is the perfect place where you can share some information about yourself, and even share your social media handles so the user can follow you instantly.
How To Achieve It
The details of your profile can be edited by navigating to Users > Your Profile from the WordPress menu.
On the profile page, you’d have to scroll down to find your profile options. Here is an image which shows all the options available. Add the relevant information in the fields and save your settings.
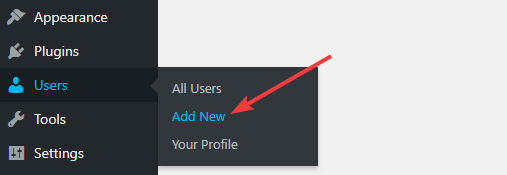
23 Add Other Users on Your Website
This is an optional step, and will only apply if you intend to have more than one person contributing to your website.
Why is it Important
If you intend to have people other than you contributing to your website, the best way to do so is to give them an author profile. Doing so will give them the freedom to write and format their posts right inside WordPress.
How To Achieve It
Addition of new users can be done inside Users > Add New from the WordPress menu.
The options on the page are pretty straightforward. Some of the fields are mandatory while some are optional. Fill the correct information in all the fields and click the “Add New User” button. Make sure to check the “Send User Notification” checkbox so that the new user gets an email about their new role.
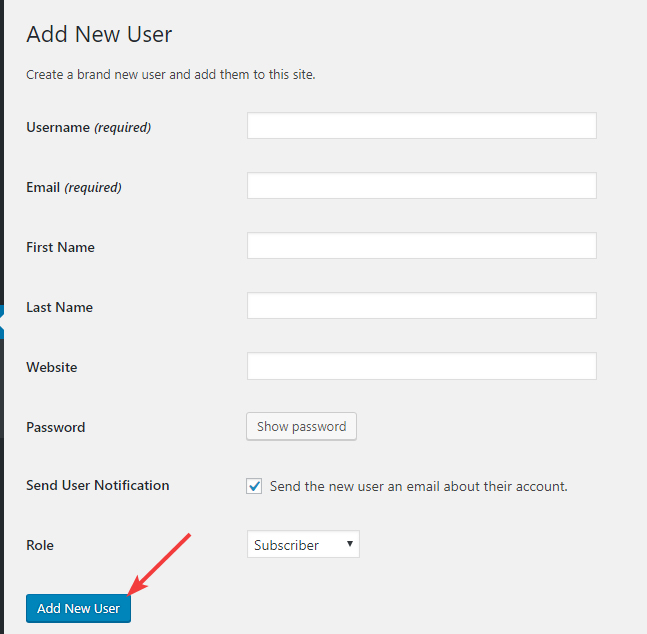
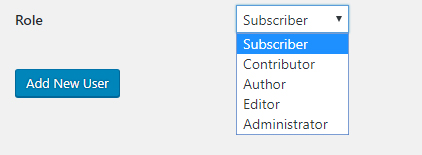
Don’t forget to choose the correct role for the new user too; otherwise, they won’t be able to do what you intended them to do.
24 Add a Logo and a Favicon
The next thing in setting up WordPress should be to upload a logo and favicon to your website.
Why is it Important
A logo is your, your website’s, and your brand’s visual identity. Just as the biggest brands in the world are instantly recognized by their logos, we hope someday yours is too. But, for that to happen, you have to upload a logo to your website.
A favicon is similar to your logo, but smaller. It is used in a couple of places, for example, in the tabs of a desktop browser.
The favicon is also used when someone is browsing your website on their mobile phone and decide to add it to their home screen.
How To Achieve It
First, make sure that you have your logo and favicons ready. Depending on the theme, you might want to prepare your logo and favicon is a variety of aspect ratios. For the uploading part, WordPress itself has built-in functionality that lets you upload your logo and favicon.
Head over to Appearance > Customize
The WordPress Customizer will open up. Click on the Site Identity option.
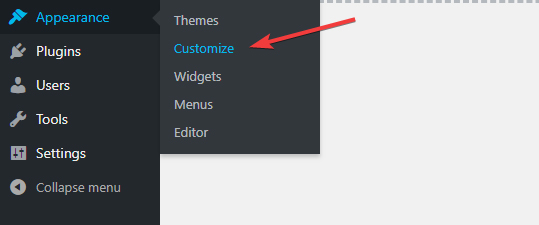
There you will see the option to upload your website logo and your favicon. Upload both the icons, then Publish the changes for the logos to be visible on your website.
![]()
25 Setup Your Reading Settings
Before your website is ready for users, you need to configure some basic reading settings that affect how your website will appear for users.
Why is it Important
When users land on your website, you’d want them to have the best experience, right? By choosing the best reading settings, you can give your users the best experience that your website has to offer.
How to Achieve It
Your reading settings are available in Settings > Reading.
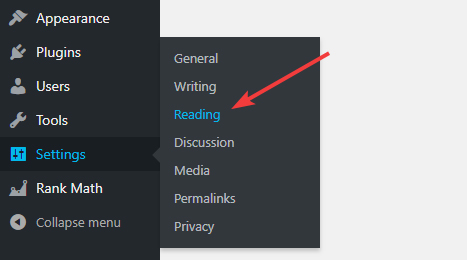
The following settings need to be configured.
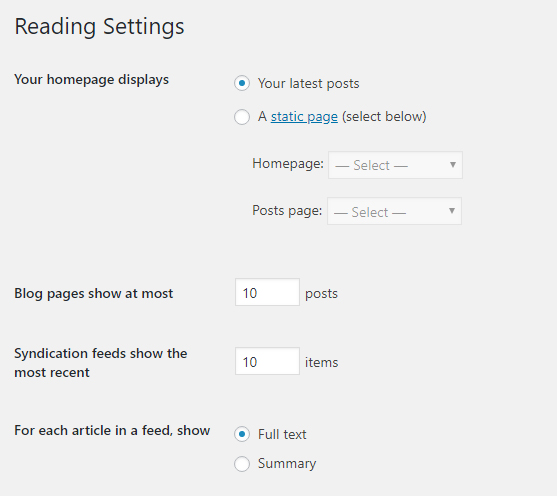
You can configure your homepage as a static page, or as a dynamic page which lists your most recent posts. In both the cases, you can change how many posts are displayed, and whether they are displayed in full or as summaries.
26 Change the Default Admin Username
When you install WordPress, the default admin username you’re assigned is, well, ‘admin’. For security reasons, you should change it.
Why is this important?
Would you share your bank account number with someone, even if they didn’t know the password? Unless they were paying you, we highly doubt it. Similarly, you wouldn’t want the world to know that your website’s login’s username is ‘admin’. It’s an unnecessary risk that you can avoid with little work.
How to Achieve It
The changing of the admin username can be done using database operations, but it is not everyone’s cup of tea. The easier way of doing that is by following these steps:
- Create a new user with another name, but with admin privileges
- Log out from your ‘admin’ account
- Log in using the new user that you just created
- Delete the old user
Pro Tip: If you have no posts on your website, this process will be easy and quick. But, if you already have a few posts up, you have to be a little careful. When you delete the original ‘admin’ account, WordPress will ask if what it should do with the posts already created by ‘admin’. There, you can attribute the posts to the new user you created. It is very important that you do so. Otherwise, all the posts created by ‘admin’ will be deleted.
27 Setup Gravatar
The next step in setting up your blog should be setting up Gravatar.
![]()
Why is it Important
People don’t connect with websites. They connect with people. If you want to make a real connection with people on your website, the least you can do is have a picture of yourself there.
Gravatar is an online avatar—a place where you can upload an image of yourself. The benefit of using Gravatar over uploading an image to your website is that Gravatars are universal, and all WordPress websites have them. That means if you comment on any other blog that uses WordPress, your Gravatar will be visible there as well. It’s a handy tool which helps you become recognized in your blogging circle.
How to Achieve It
Head over to Gravatar.com, and sign-up or sign-in. Use the same email address that you have used for your website. Otherwise, your Gravatar won’t be visible.
![]()
That’s it. When commenting on other websites, use the same email address to use your Gravatar.
Essential Plugins
The next few points that we’re going to talk about are about plugins. Plugins are like apps for your website, and they add new features to your website which add value in one way or another. Note that while we do discuss many plugins below, the list is not exhaustive by any means. Depending on how your website is set up, you might need more plugins to operate your website effectively. The ones we discuss below are just the essentials, and we recommend that you install a plugin for each point that we discuss, even if you don’t follow our exact recommendation.
28 Install a Caching Plugin
If you care about your website’s performance, then installing and configuring a caching plugin is critical.
Why is it Important
Whenever a user opens a page on your website, your server has to fetch information from many sources to re-create the page. This takes time and costs considerable resources, and is also slow. Caching speeds up the process by fetching all the resources beforehand and making a copy. When a user visits a page, he or she is served with the copy, lowering the work on your server and other resources.
If you don’t use caching, you might not notice a performance issue when you have just a few visitors. But, as your website grows and gets more visitors, the problem will compound in a very short time. Then, you’ll have to do some damage control—which might not prove enough. Setting up a caching plugin in advance is the right thing to do.
How to Achieve It
There are many caching plugins out there, and most of them do a good job as well. We recommend W3 Total Cache plugin. The plugin itself is open-source and has plenty of options to fine-tune the caching process—we highly recommend it.
Pro Tip: Once you install W3 Total Cache (or any other caching plugin), the sheer number of options you need to configure might scare you. No need to worry though. For this exact problem, we wrote an extensive guide to configuring W3 Total Cache which covers each and every setting in detail. If you couldn’t bother less about understanding the options and just want it to work, we also have our settings (that we used for testing) available to download. Just upload the configuration on your website, and you’ll be up and running in no time.
29 Install a Security Plugin
Once you’ve built something, you’ve got to protect it. Install a security plugin to protect your website from hackers and other people with malicious intent.
Why is it Important
Why is a home alarm system important? To protect your property from intruders, of course! Your website is also your property—albeit a digital one, and it also needs to be protected. A small step towards security will help you avoid a lot of trouble in the future.
How to Achieve It
There are maybe hundreds of security plugins out there, each with their own strengths. With so many options, it’s hard to decide the best one. We recommend not 1, but 2 security plugins, Sucuri and WordFence. Both have stellar reputations, have great service, and the most important, have great track records. Both of them have free plans available, and we recommend that you test both of them out before deciding on one—even if you just stay on the free plan.
30 Install an Anti-Spam Plugin
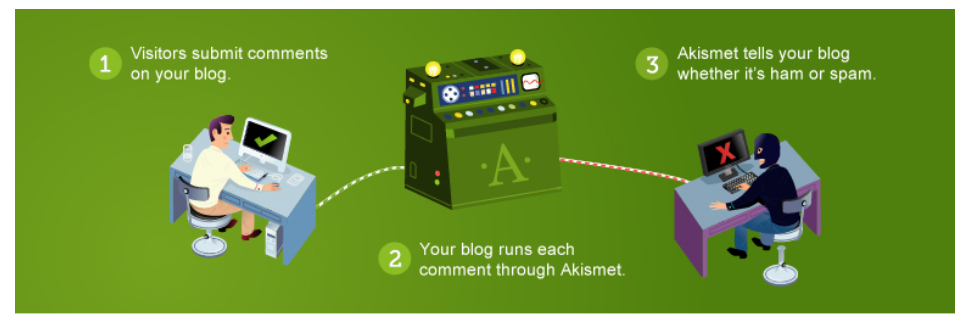
Whether you like it or not—spam is real, and it is a major problem. To save your time and energy, we recommend that you install an anti-spam plugin.
Why is this Important
Unless you have a lot of time that you can spend each day moderating your comments, an anti-spam plugin is crucial. It works by acting as a middleman between your blog and people who post comments, and automatically moderates comments to give you peace of mind.
How to Achieve It
We recommend that you install the Akismet plugin for spam protection. Now, we realize that in one of the points above, we did instruct you to delete unused plugins, and you might have deleted the pre-installed Akismet plugin then.
Not to worry, just search for the plugin and install it again. For the plugin to work, you’ll need an API key, which you can find here. It’s even free for personal sites.
31 Install an SEO Plugin
WordPress is pretty good from an SEO perspective out of the box, but it still leaves a lot to be desired. To get the maximum traffic from search engines, you should install an SEO plugin.
Why is it Important
SEO is the most consistent source of traffic that you can get. The results that you get with SEO are similar to a snowball. It might be small and slow in the beginning, but it will become massive in the future.
WordPress has good SEO out of the box, but by adding an SEO plugin, you can enhance its power and receive a lot more traffic. Better yet, a good SEO plugin will help you in managing your content, and your website better.
How to Achieve It
Since we are talking about installing an SEO plugin, the only thing to decide is which plugin to use. We might be biased, but we recommend Rank Math. Not only will Rank Math boost your SEO efforts, but it also has many other features that will make the process of managing your website a breeze.
32 Install Jetpack
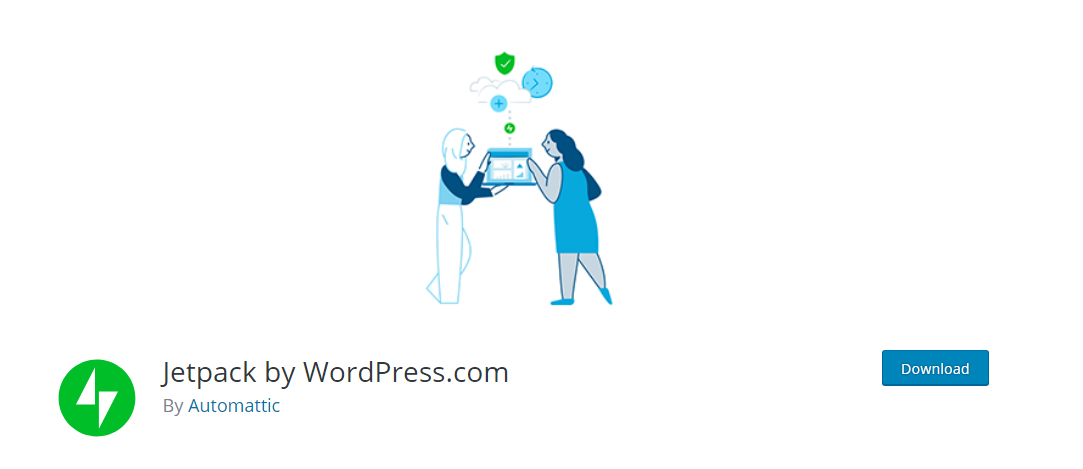
Running a blog means wearing many hats. Not only do you have to create content, but you have to promote it, watch for analytics, share your content across social, and many other tasks. The Jetpack Plugin helps you achieve many of these things easily.
Why is it Important
You can’t fix a leaky pipe with a screwdriver; you need a wrench. Similarly, having the right tool in your arsenal can make the process of managing your website easy and fun. While there are individual services you can use to accomplish many of your daily tasks, the Jetpack Plugin is an all in one tool that kills many birds with one stone. Here is a short preview of its features.
- Automatic sharing of your posts on social media
- Built-in lazy loading
- Displays your site analytics inside WordPress
- Improves your website search
- Free CDN included
- Security Features
and many more.
It is clear that Jetpack is an excellent tool that you should definitely add to your blog.
How to Achieve It
Head to your plugins menu and search for the “Jetpack” Plugin. Install the plugin and follow the instructions on your screen.
33 Become GDPR Compliant
The next step in preparing your blog for launch is to become GDPR compliant.
Why is it Important
You might be thinking, what the hell is GDPR?
It is the General Data Protection Regulation passed by the European Union, and it applies to businesses and websites worldwide, specifically to the ones that collect and store user data. In the simplest terms, the regulation states that users should be able to see and control what information you capture about them.
Even if you don’t capture any data about users explicitly, you still need to be compliant. That is because WordPress and other tools you use do capture user data in the form of IP Addresses, Cookies, and other things. Staying compliant is recommended as the cost of non-compliance is gigantic. Even Google isn’t exempt from the extreme fines.
How to Achieve It
The good news is that WordPress already has a lot of compliance features built-in. If a user asks to see the data that you have captured or even erase it, you can do it by using the privacy tools in Tools > Privacy.
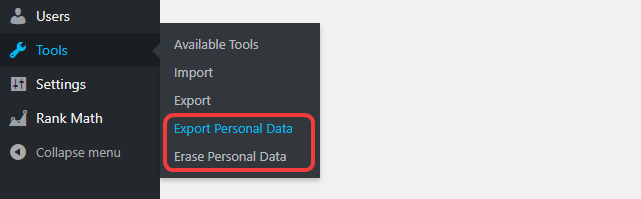
Most plugins that you use should already be updated to comply, and the data they capture can be exported from these tools.
Another part of GDPR compliance is to have an up to date Privacy Policy, which we covered in another step.
The last thing you need to do is add a cookie-notice to your website. A big part of GDPR is that user consent has to be explicitly given, you cannot assume it. In the case of cookies, you have to take explicit consent from the user to store cookies.
If this sounds complicated, don’t worry, there are plugins that can do that for you. The Cookie Notice for GDPR is one such plugin that you can use.
34 Add a comment Management Plugin
If you have a website about a topic that brings forth a lot of discussions, then the default WordPress comments will prove far from useful. To better manage your comments, you should install a dedicated comment management service.
Why is this Important
A healthy number of comments on your website is a sign that you’re on the right path. It means users read your content, engage with it, and want to share their opinion.
As a website manager, you can only moderate and respond to a fixed number of comments. As you attract more users, the task of managing comments becomes tougher. Your time is limited, and even if you wanted to, you wouldn’t be able to respond to everyone. The WordPress comment management system just isn’t built for it.
But, there are other solutions. By replacing regular WordPress comments with a dedicated comment management service, you can reduce the time it takes to manage comments while keeping your readers happy.
How to Achieve It
There are many comment management services out there, and one of the most popular ones is Disqus. It’s a freemium service that will help you manage your comments. To integrate them into your website you can use their official plugin.
Please note that Disqus is ad-supported. That means it will show ads on your website if you use the free plan. If you don’t prefer having ads, upgrade to an ad-free plan or look for alternatives.
35 Setup a Backup Plugin
Before you start posting content, it is absolutely critical that you set up a backup plan for your website.
Why is it Important
Think of backups as insurance. You have it, but hope to never use it. Backups are the same way, you create backups, but hope that you never need to use it.
You might be inclined to skip this process, but we highly recommend that you don’t. The pain of losing your website is far greater than taking the time out to set up a backup. If anything goes wrong, and things do go wrong, you can lose everything. A backup might save the day in that case.
How to Achieve It
We recommend that in addition to the backups by your host, you set up your own backups using a plugin. We recommend the WP My Backup plugin. It is a free plugin that can back up your website to Google Drive, Dropbox, and in other ways automatically once you set it up.
36 Setup a Plugin to Sell Online
This step is optional but highly recommended. You should install a plugin that helps you set up shop on your website.
Why is it Important
Even if you have no plans of selling physical products on your websites, you should set it up that way.
Why?
Because selling physical products is not the only selling you can do. You can sell digital goods too. Courses, books, checklists, graphics, sheets, and a lot of other things can be sold online. That is why you should set up your blogs for selling—even if you don’t plan to sell immediately.
How To Achieve It
There are many plugins that help you sell online, but only a few who do it well. Here are our recommendations.
- WooCommerce: For selling physical and digital products
- Easy Digital Downloads: For selling digital products
Both of the plugins listed above are powerful for selling online. It might be tough to set them up, especially if it is your first time, but it is easy to do so. Both the plugins have helpful documentation that you can refer to if you get stuck.
37 Install a Broken Link Checker
The next step in making your website ready for launch is to install a broken link checker.
Why is it Important
The more content you create, the more you would interlink your content. The more content you create, the more content you will re-arrange, optimize, and organize. The result of all this activity?
Broken links.
Links are called broken when they point to a page that is no longer there. For example, thousands of blogs would have linked to the iPhone 4 when it came out, but as the that iPhone became obsolete, the page was moved (or removed). The result, thousands of broken links.
The above example was for external broken links, but you can also develop internal broken links. It is ideal to fix these as soon as possible to maintain a positive experience for your readers.
How to Achieve It
It is obvious that manually checking each of your links is out of the question. The ideal solution is to use a plugin to check your links.
For broken links, we suggest not 1, but 2 plugins.
The first plugin is called Broken Link Checker. It’s an open source plugin that parses your entire website and reports all the links that are broken on your website. Apart from just reporting, it also lets you fix a lot of errors right through the plugin, saving you a bunch of time.
The second plugin that we recommend is Rank Math. While the Broken Link Checker checks links that are present on your website, it does not check incoming links from other websites. For example, if you had a page on your website which was linked to by other websites and you removed the page, the Broken Link Checker will not find that error but Rank Math’s 404 monitor will capture the error. 404 is the error code that is sent by a server when a page isn’t found, indicating a broken link.
The combination of the 404 monitor and the Broken Link Checker will ensure that your website is always clean of broken links.
38 Create and Submit a Google Sitemap
In the next step of setting up your website, you should create a sitemap and submit it to Google and other search engines.
Why is it Important
As your website grows, the content on your website will also grow. The more content a website has, the more difficult it becomes for search engines to discover all the content on the website, even if it connected with internal links. To work around this problem, a sitemap can be created.
A sitemap is similar to an index in a book, it lists everything the book contains and where. Similarly, a sitemap lists all the content that your website has in an easy to understand manner. Using the sitemap, search engines can find and index your content effectively.
How to Achieve It
The simplest way to create and keep sitemaps updated is to use a plugin. There are many plugins that can do it, but we recommend that you use Rank Math. It’s a fantastic SEO plugin which also has the capability to create and submit sitemaps. Once installed, you can see the sitemap settings under Rank Math > Sitemap Settings.
![]()
There you will find fine-grained options to setup sitemaps just the way you like. We even have resources on our website which explain how to configure the settings—useful if you’re a beginner.
![]()
Note: Following the above process will help you create a sitemap, not submit it. After creating a sitemap, you would also have to submit it to Google inside Google Search Console.
Fortunately, the process is simple. You have to grab the link to your sitemap (from Rank Math’s settings) and paste the link in the sitemap submission page in Google Search Console.
39 Verify Search Engine Visibility
When you’re setting up your blog, you wouldn’t want to search engines to index incomplete, unfinished articles from your website. WordPress does have an option which you can turn on to discourage search engines, but should use it with caution.
Why is this Important
The option to discourage search engines might seem useful, and it is too. But, if you forget to turn it off after using it, your website will not appear in the search results—no matter how well optimized your content is. Therefore, it is important to check whether the setting is on or off, and if that is what you intended.
How to Achieve it
Head over to Settings > Reading from the WordPress menu.
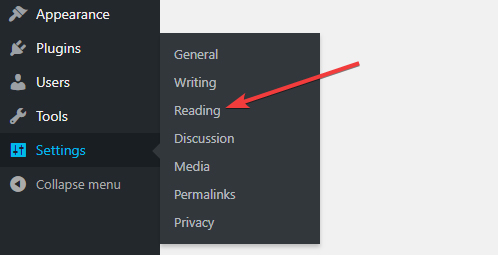
Scroll down, and you’d see the Search Engine Visibility setting.

If you’re new, it’s easy to get confused about the setting, so let us clarify.
- When the option is checked: That means that search engines will not index your website. When your website is not ready for launch, you can enable this.
- When the option is unchecked: Search engines will index your website. Once your website is ready for launch, disable the setting.
40 Setup Discussion Settings
Before you are flooded with readers on your website, you should set up your discussion settings inside WordPress.
Why is it Important
Unfortunately, spammers work hard. Work hard at making your life miserable that is. Anytime they see an opportunity to waste your time, they will. This includes spamming your website’s comments. If left unchecked, they will flood your website with spam, unrelated comments, and more things that you will need to clean up.
Setting up your discussions will eradicate that problem once and for all.
How To Achieve It
The discussion settings are available in Settings > Discussion in the WordPress menu.

Here is a non-exhaustive list of the settings that you should configure there.
- Default Article Settings: Disable pingbacks
- Other Comment Settings: Basic rules for comment management
- Email Settings: When should you be notified
- Comment Moderation: Automated rules for when a comment should be moderated before appearing
- Comment Blacklist: Automated rules for when a comment should be trashed
- Avatars: Setup default avatars for comments
41 Install an Image Compression Plugin
The next step in your blog preparation should be to install an image compression plugin.
Why is it Important
To please users, and the mighty search engine lords, your website has to be fast. The slower your website is, the faster it will lose visitors.
If your car is overloaded and runs slowly, you would shed some of the weight to make it go faster. From a size perspective, images are the “heaviest” elements on a page. Compressing images will help bring the overall weight down and increase your website’s performance significantly.
How to Achieve It
There are 2 ways you can achieve this: a manual way and an automated way.
The manual way would be to compress the images on your computer and then upload them to your website. This method is easy (if you know how), but does require some time.
The automated way is to use a plugin. There are several amazing plugins available which can compress your images. Some compress the images right on your server, while others transfer the images to their external server, compress it, and then bring it back to yours. In both cases, the job gets done.
An important advantage of using a plugin is that they can compress the images you’ve already uploaded to your website. Depending on the size of your website, this can save you a ton of time in manual work.
There are several plugins that do image compression well, and one of the best ones is Smush Image Compression. It’s free to use, has no limits on usage, and produces fantastic results.
42 Change the Default Login URL
The next step in preparing your WordPress website should be to change the default login URL for your admin area.
Why is this important
The default login URL for all WordPress websites is www.website.com/wp-admin. Although the admin area is protected with a username and a hopefully strong password, it is still accessible. Because it is accessible, hackers will try to break in by trying malicious things which might include trying default passwords, attempting recovery, and other things.
The simplest way to discourage them is to change the URL itself. If they don’t know the URL, they won’t be able to attempt any of the malicious things in the first place.
How to Achieve It
Changing the login URL usually requires one to mess with WordPress’s core files, which can be risky. But, there are some fantastic plugins out there that will help you change your WordPress admin URL with ease. One such plugin is WPS Hide Login. Simply install the plugin and follow the instructions in the plugin to change your login URL.
Fair Warning: When you change the login URL, remember to make a note of the new URL and save it in a safe place. If you accidentally lose or forget the new URL, you won’t be able to log in to your admin area. It is not the end of the world, and you won’t lose your website if you do forget the URL, but you have to jump through a lot of hoops to gain access. Avoid the troubles in the first place by securely storing the new URL someplace.
43 Install a Custom Theme
Before you’re ready to launch your blog and are ready to invite users over, we recommend that you install a custom WordPress theme.
Why is this Important
The answer to that is simple — visual identity.
Think about all the brands that you know of. They use a specific combination of colors, styles, and fonts to cement a visual identity in your brain. This makes their brand more recognizable in a crowd of thousand others.
If you use a custom theme on your blog, that is what you will achieve as well. You will create a visual identity of your blog inside the minds of your readers.
How to Achieve It
You don’t need to spend a lot of money on a custom theme. There are thousands of free themes available in the WordPress repository that you can use on your website. Head over to Appearance > Themes from the WordPress menu.
On the theme page, click the Add New button on the top and select from the thousands of available themes.
Pro Tip: We at MyThemeShop have also created a bunch of free themes that you can use which will give you many advantages over other free themes.
- All our themes can be customized with unlimited colors
- All our themes have our custom created option panel which helps optimize performance
- We offer support for a full year for our free themes for a surprisingly low price (optional)
So, before you finalize a theme for your website, don’t forget to check out MyThemeShop themes as well.
44 Install an Optimization Plugin
In the list of important plugins, you should never forget an optimization plugin. We advise that you install an optimization plugin as soon as possible.
Why is it important?
Just because you bought a car, doesn’t mean you won’t need to get it serviced. Similarly, your WordPress website also requires frequent tune-ups to run in top shape and perform the best.
Optimizations should be taken care of sooner than later. Similar to a car, if you don’t get regular service done, you won’t feel that anything is wrong until the day everything comes falling apart. To save yourself from the madness, you should install an optimization plugin and use it regularly.
How To Achieve It
In this step, all you have to do is install a reputed optimization plugin. There are plenty of them out there, and WP-Optimize and Autoptimize are a couple of good ones.
45 Setup a Coming Soon Page
Even if your WordPress is set up completely, that does not mean that you’re ready to have visitors. You’ll first have to stock the shelves with enough content.
If you feel the same way, you can set up a coming soon page on your website. Having a coming soon page is the equivalent of having a “We’re opening soon” sign outside a store, but with some advantages.
Why is it Important
Coming Soon pages are great to capture email addresses while your website is being built. It’s a way to utilize your website even if there is no content on it.
You might feel odd about this strategy, but you shouldn’t. The same strategy is used by some of the top bloggers in the industry. Think about it this way too. How many times have you seen commercials for a car, before it’s even available for purchase? Many times, right? Similarly, you can advertise your blog even before you’re ready to launch. A well designed coming soon page will help you make the most out of the launch time.
How To Achieve It
Although you can set up a Coming Soon page manually, it is quite technical, and we wouldn’t advise you to do so. However, there is an easy way too. Plugins.
There are many plugins out there which specialize in creating Coming Soon pages on your website. In fact, we have a plugin called Launcher that does exactly that—for free! Just install the plugin and follow the instructions from the plugin to create a Coming Soon page.
Advanced Settings
What follows below this point are the advanced settings. Each of the settings is powerful, useful, and can help manage and grow your blog. But, you have to proceed with caution since you’ll be making direct changes to your WordPress files in most of the steps. If you don’t feel confident in making a change, avoid it, and ask for an alternative in the comments below before you make a change.
46 Disable Post Revisions
WordPress has a built-in post revision system that backs up your posts every time you make any change. To ensure the best performance of your website, you should disable it, or at least limit the number of revisions that are stored.
Why is it Important
On the surface, the post revisions sound like a great idea; and they are too—upto an extent. When you’re creating a new post, revisions can help you make changes without worries and create content effortlessly. But, as your website grows and you update your content regularly, the number of revisions can become gigantic and slow down your website. If each of your posts has 10 revisions, your website server will have to manage 10 times the content than what is actually published. And, this problem will become even bigger as your website grows.
How to Achieve It
Post revisions are configured inside the wp-config.php file. Use an FTP client to access the file, then add the following piece of code to it.
define(‘WP_POST_REVISIONS’, false)
This will disable the revisions altogether. If you’d like to limit the number of revisions, for example, to 3, change the code to this.
define(‘WP_POST_REVISIONS’, 3)
47 Block Access to WordPress folders
It might sound surprising to you, but most of your WordPress files, including themes, plugins, etc., are stored as folders similar to folders on your computer. Savvy users can try to access these folders, and you should block them.
Why is it Important
Access to WordPress folders is a security risk. Although no-one can change data on the files even they can access it; it still poses a significant risk. To stay on the safe side, you should block access to these folders.
How to Achieve It
To block access to WordPress folders, add the following code to your .htcaccess file.
Options All -Indexes
48 Stop WordPress Core Files from being Indexed
Just as your WordPress files and folders can be accessed by users if you don’t stop them, they can also be accessed by Google. What’s worse is that they can also be indexed. You should block Google and other search engines from being able to crawl and index this content.
Why is it Important
Think about it, your theme’s important files being listed in the search results for everyone to see. It’s not pretty, right? Not only is it a security risk, but the fact that your files appear in the search results also appears unprofessional.
Even if Google and other search engines don’t index your files, they will still crawl them. That means you will waste a good chunk of your precious crawl budget on files that shouldn’t have been crawled in the first place—not recommended.
How to Achieve It
To stop search engines from indexing WordPress core files and folders, you’ll have to add the following chunk of code to your robots.txt file.
User-agent:*
Disallow: /wp-admin
Disallow: /wp-includes
Disallow: /wp-content/themes
Disallow: /wp-content/plugins
Allow: /wp-admin/admin-ajax.php
49 Remove Meta Information from WordPress Header
WordPress, by default, includes a bunch of information about your website inside the header. The header is the portion that is not visible on screen, but is present in the website code. To stay safe, you should disable this functionality.
Why is it Important
Meta information serves a real purpose. It helps developers and support people understand the environment of your website, which helps them diagnose issues. But, the same information can also be used by hackers for malicious purposes.
Hackers often look for “signatures”, which is a set of criteria for a website that they know they can hack into. The meta information gives them access to the data they need to validate your website against known vulnerabilities. That is why it critical to remove meta-data from your website’s headers.
How To Achieve It
To disable meta-data in WordPress, you’d have to add the following line of code inside your theme’s functions.php file:
remove_action(‘wp_head’, ‘wp_generator’);
50 Disable HTML in WordPress Comments
The last and final setting that you should do in WordPress is to disable the use of HTML inside your comments.
Why is this Important
Nobody likes it, but spam is a real problem. You open up comments on your website hoping to find real users’ comments, but a lot of times you’d find spam comments filling up the majority of them. Apart from being annoying, dealing with spam takes up a lot of precious time. Wouldn’t you rather spend time dealing with real users with real comments?
The easiest way to deal with spam comments is not to let them happen at all. Even after installing an anti-spam plugin, some comments will still pass through. The best way to discourage spammers is to disable the HTML in your comments. Since spammers will get no benefit out of commenting without HTML, they will leave your website alone.
How To Achieve It
To disable HTML inside your comments, you will have to add the following code into your theme’s functions.php file.
add_filter(‘pre_comment_content’, ‘wp_specialchars’);
Conclusion
Phew! That was a long article with 50 of the most essential settings that you must configure before you publish your first post.
It might feel long and tedious, but we recommend that you do each and every step before you hit publish. The taller you want a building to be, the better the foundation has to be, and these are the steps that will create a rock solid foundation for your website.
As you launch and build your website, there will be more steps. Some easy, some difficult. Some quick to implement, some not so much. If and when you’re overwhelmed with the steps, you should remember, each step that you take takes your website closer to success.
Do you have another step to add to this list? Or, do you have questions? Let us know in the comments.