Yoast SEO is the most popular WordPress SEO plugin out there, and that’s for a reason. It comes loaded with features that no other SEO plugins come even close to matching, while also making itself an ideal option for both beginners and advanced users alike.
Try Something with More Features
In it’s early versions, it was called WordPress SEO by Yoast, and it has always been a great WordPress SEO Plugin with a ton of features. That is the good thing *and the bad thing* about the Yoast WordPress plugin. Because of the tons of features, it’s extremely powerful, but the same features make it complicated for beginners.
But that’s what this Yoast SEO tutorial is about. In this article, we’re going to teach you all the options in the Yoast SEO Plugin, how they impact your website, and how you can configure them for the best SEO results. Let’s get started.
1 How to Install the Yoast Plugin?
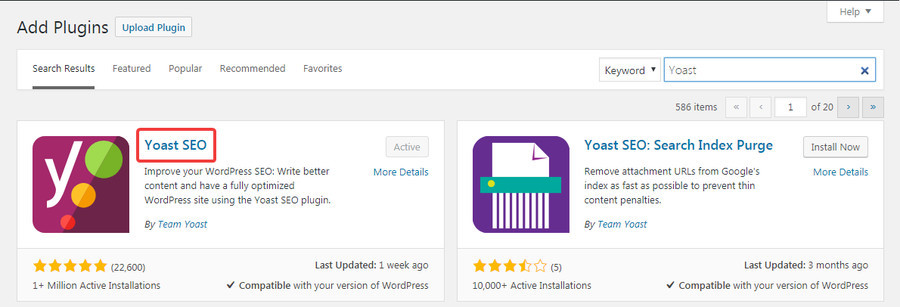
If you’re a complete beginner to WordPress and using plugins, you may need some help with installing the Yoast SEO plugin. You need to hover your mouse on the Plugins option that you can find on your WordPress dashboard on the left. Three options will pop up, and you need to click on “Add New.”
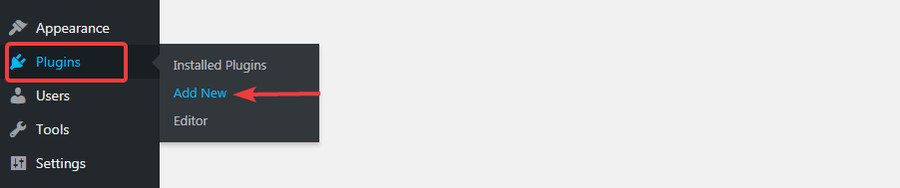
Then you need to search for “Yoast” in the search bar on the top-right of the screen. Click on Install, and once installed, click on “Activate” to put it in action.
2 Tools
As we said, there’s a reason Yoast absolutely dominates the SEO plugins market. It offers so many features that not only help you perfectly optimize your site for SEO, but also make it easier to manage your site.
The Tools it offers are one of the features that are aimed at taking a lot of challenge out of managing your site, or making it easier for you to deal with unexpected issues that may otherwise take a lot of time and effort to fix.
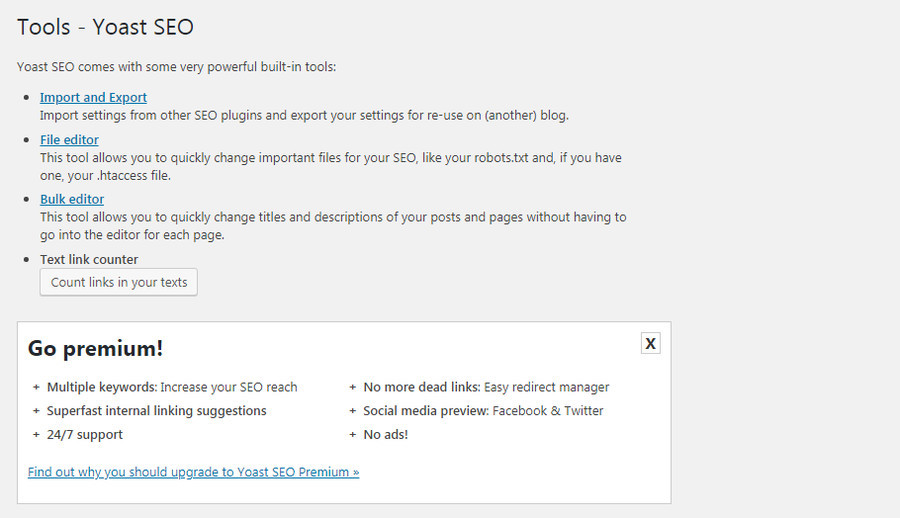
The reason we are getting to it first is that some of the changes it allows you to make may overwrite the changes you will be making in the later stages of setting it up. This is especially true if you’re going to import your SEO settings from another plugin.
2.1 Import and Export in Yoast SEO
The Import and Export is a feature that will make your life easier when switching to and from the Yoast SEO WordPress plugin. If you have used an SEO plugin in the past and don’t want to go through the pain of setting up another SEO plugin (Yoast) again, the Import and Export feature has you covered.
Yoast SEO’s Import Export Feature allows you to import the settings from another SEO plugin in two ways: using a settings.zip file, or directly from the other plugin you still have installed on your site.
Similarly, it also allows you to export its own settings so that in case something messes up down the line with respect to the Yoast plugin or your site itself, you will be up and running with the Yoast plugin within minutes by importing the settings again.
2.2 File Editor
There’s absolutely no reason to touch this feature unless you have a very strong reason to do so and know exactly what you’re doing. Even a minor error here may lead to disastrous consequences for your site.
2.3 Bulk Editor
This is a really cool feature that allows you to get the most out of your posts and pages (in terms of traffic and optimization) without making much of an effort.
It allows you to edit the titles and slugs/page URLs of all the posts and pages on your site. While we wouldn’t recommend messing with the URLs, the titles are definitely something you should focus on.
A couple important ways in which you can optimize your titles:
- Rewrite them in a way that makes them more catchy and likely to be clicked on, helping you drive up the click-through rates to your posts and getting more traffic
- If you hadn’t focused on optimizing your titles properly for their targeted keywords when you first made them, you can do it now to make them rank better for those keywords
2.4 Text link counter
We will be getting to it in a bit, but for now, let us just tell you that it’s not worth your time or attention at this point.
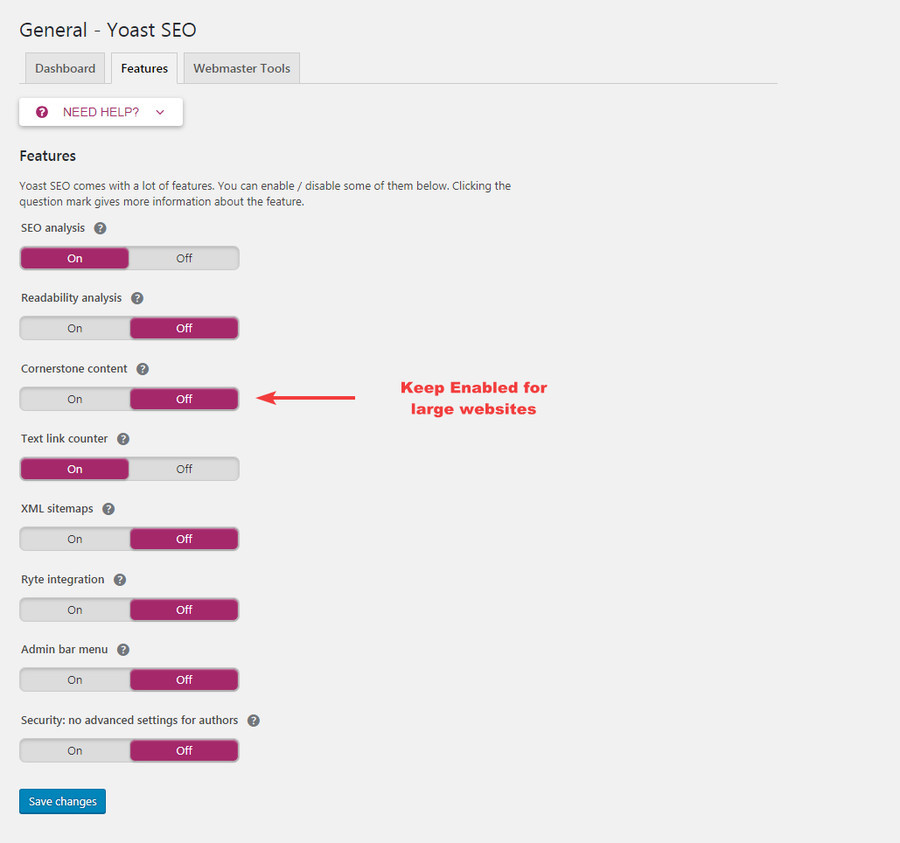
3 Choose Yoast SEO Features in WordPress
As they say, sometimes less is more. And it couldn’t be truer when it comes to the Yoast SEO plugin’s features.
While Yoast does come with tons of features, some of them are quite redundant and you would be better off keeping them disabled. If you can’t figure out what you need and what you do not, stick to our recommendations below:
- Turn off the Readability feature because it often makes recommendations that end up making parts of your content sound weird if you follow all its suggestions
- You should be linking to the other posts on your sites in a natural way, and not do so simply because Yoast says it’s a good practice, meaning that you can do away with the Text link counter as well (unless you have thousands of posts on your site and can’t be bothered to do the internal linking manually)
- If you’re using another XML plugin for managing and submitting your site’s sitemaps to search engines, you will want to disable the XML Sitemaps feature as well (we will recommend going with a plugin called Google XML Sitemaps for hands-off sitemap submissions)
- If you’re just starting out and creating your own fresh content (and not using any shady content practices), you don’t need the Ryte integration to keep checking whether your posts are getting indexed (they certainly will on their own)
- You likely don’t need any third-party tools at this point, so the Admin bar menu can stay disabled as well
- Unless you have other authors having access to your WordPress site, you don’t need to have the Security feature for authors turned on
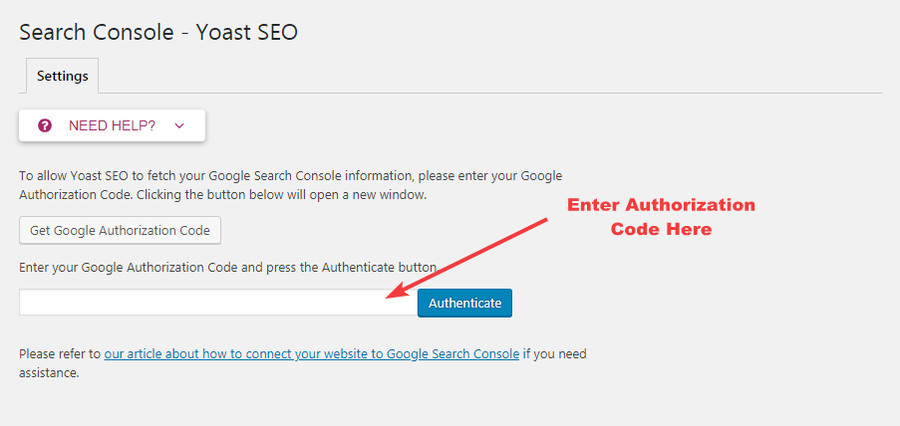
4 Search Console in Yoast SEO
It’s important to set up this feature with Yoast before you do anything else as it will help you identify crucial crawl errors on your site, which is the first thing you would want to do when optimizing your site for SEO.
What this feature does is that it connects Google’s Search Console to Yoast SEO. Using Search Console’s API, Yoast then brings all of Search Console’s data to your WordPress dashboard. Most importantly, you’ll be able to see crawl issues, 404s, or other errors that your website was throwing across.
You will be surprised how many you manage to find, especially if you have done things like changing the permalink structure, deleting pages and remaking them, set up redirections incorrectly, moving to a new domain and more.
The beauty of this feature is that it will help you fix all these errors just by making some changes using your site’s dashboard.
If you have verified your site when setting up the Webmaster Tools as we explained above, all you need to do here is click on the “Get Google Authorization Code” button, login using your account the site in question is associated with, get the authorization code and put it into the box and click on “Authenticate.”
Here’s how to start fixing crawl errors after authenticating your site.
4.1 Fixing Crawl Errors with Yoast SEO
If your site has been around for a long time now and you have made some major changes to it in the past, you may have crawl errors on your site. These errors not only hurt the SEO of your site but also lead to a bad user experience, which further affects your SEO efforts.
After the authentication process is complete, it may take anywhere from a few minutes to a few hours for all the crawl errors to pop up. They may include everything ranging from the “page not found” errors to more complicated DNS or server errors to something as specific as mobile-specific URL errors.
Once all the errors show up, you should begin the task of fixing them. Now, you would have two options here. You can either go with the Yoast SEO Premium to set up easy redirects to fix them or install a free plugin specifically for this task.
If you would like to go with the latter, our recommendation will be the SEO Redirection Plugin for small sites, and the Redirection plugin for very large sites that may have hundreds or even thousands of crawl errors to fix. While the former has a premium version and restricts some of its important features for free users, the latter is completely free with no premium version.
However, it’s important to note that these free options are often not very reliable, especially when it comes to something as important as fixing crucial crawl errors on your site. If you have a site that’s very important to you or bringing in a decent amount of revenue, it will probably be wise to simply go with the Yoast SEO Premium.
It costs $89 per year which isn’t a lot in the grand scheme of things (if you’re running a successful website), and you wouldn’t have to install another plugin that may slow down your site.
With that said, if you’re using the free SEO Redirection Plugin, you will see something like this:
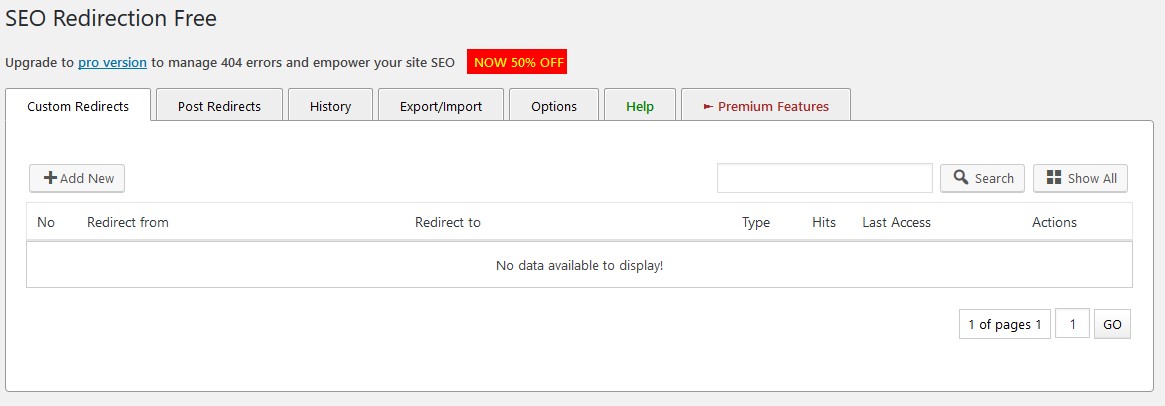
You will find all the errors listed here in the “Custom Redirects” tab. As we don’t have any, it says there’s no data to display.
The Yoast SEO Premium, however, will allow you to see different types of crawl errors, including for desktop, smartphone, feature phone and not found errors, 404 errors and more.
It will also make it really easy for you to fix them, offering everything you need one place.
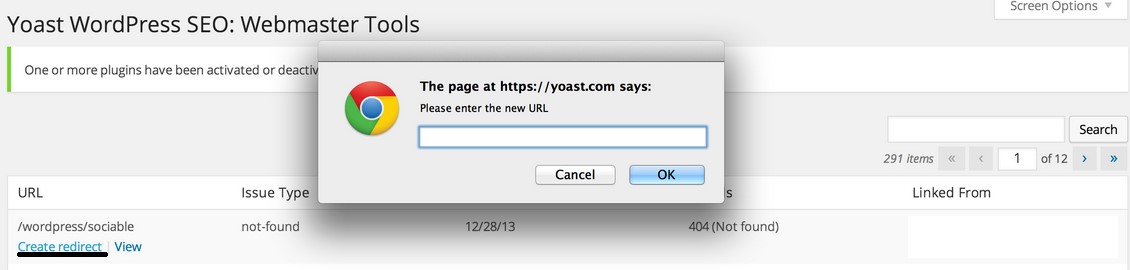
As you can see in the above image, you will be shown the list of errors on your site this way. You need to click on the option saying “Create redirect” under each error, and enter the new URL in the box that will pop up.
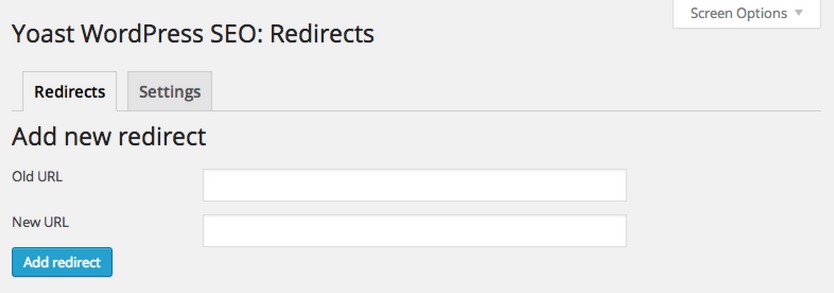
Moreover, you will also be able to set up URL redirects manually, as shown in the below image. This is helpful if you have some recent posts that have been moved, but don’t want to have a time gap where the users may find an error on the old page or, if taken longer, allow Google to crawl the old page and mark it as an error.
5 Setting Up Webmaster Tools
It’s recommended to use Yoast’s Webmaster Tools. You can do it by verifying your site through Google’s Search Console.
All you need to do is click on the Webmaster Tools tab in the Yoast settings area, and then click on the Google Search Console link under the Google verification code box.
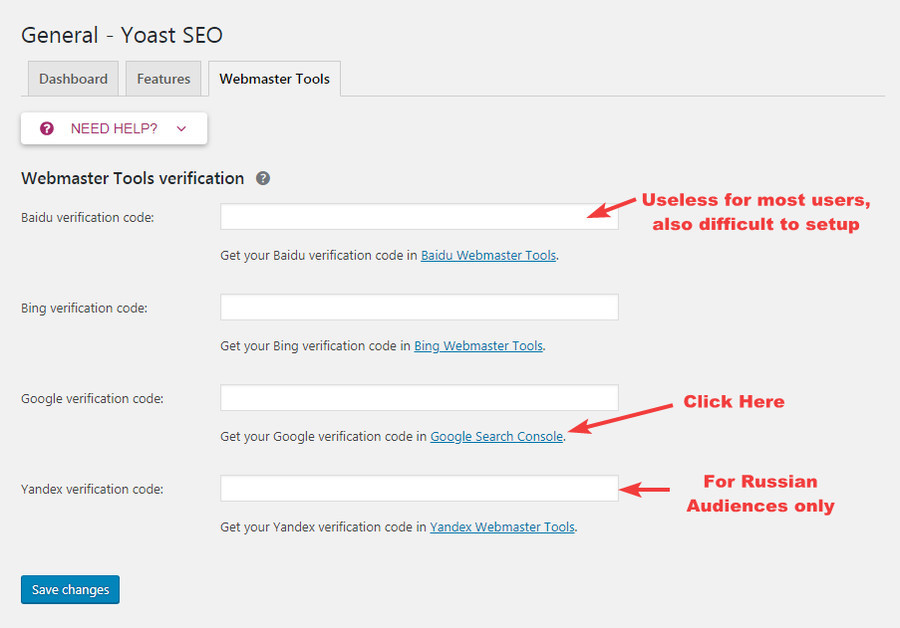
Once the page loads up, choose the “HTML tag” option, copy the code you’re shown, and paste it into the said box. You will now need to remove everything except the code itself (including the quotations), which is the text in the quotes at the end.

You need to do the same for Bing, and even Yandex if you think you may also be getting visitors to your site from Russia. However, as most users won’t have anything to do with Chinese audiences, they can leave Baidu’s verification code box blank. Finally, click on “Save changes” and you will be good to go.
6 Search Appearance
Next up is the Search Appearance tab, that you will find listed right under the General settings. Let us quickly walk you through all the features you can access under it and which ones you should be tweaking to your preferences and which ones you shouldn’t bother with at all.
6.1 General
The title separator is basically something that separates your homepage’s title with your site name (given you’re not using a custom title, which is more recommended). We personally like the “-“ and “|” the best, and would avoid the rest.
Now, you don’t need to make any other changes here if you have a dynamic homepage with your latest posts automatically appearing on the homepage. However, if you’re using a static homepage (the contents of the page don’t change, with your homepage working more like a page or post), you got two options here:
- Use a custom title targeting your most important keyword
- Leave it as is so that it can come up with a title for you, which can only be ideal if your site name contains your main keyword
You also need to put in custom meta description that includes your main keyword, and then click on “Save changes.”

6.2 Content Types
Most users wouldn’t want to make any changes here. However, we will explain some of the more common customizations it offers in detail for the few that do need to make some changes.
Title template: In today’s modern SEO era, you can’t rely on automatically generated titles based on a template. So, this option actually shouldn’t matter, as you need to write custom, SEO-optimized titles for each of your posts. However, if for some reason you don’t want to do that, the existing template will do a decent job for you.
Meta description template: Leave it blank, as here you will have no option but to write custom meta descriptions for all your posts.
Data in Snippet Preview: Showing the date wouldn’t hurt, but hiding it might, especially if you’re in a time-sensitive niche.
Leave the rest as is, unless your pages talk about time-sensitive topics as well, in which case it would make sense to “Show” the date for them as well.
6.3 Media
There’s only one option here, and it should be set to “Yes.” Not doing so will lead to the search engines separately indexing all the images in all your posts and pages, which means your site will be flooded with many empty pages (in the search engines’ eyes).
6.4 Taxonomies
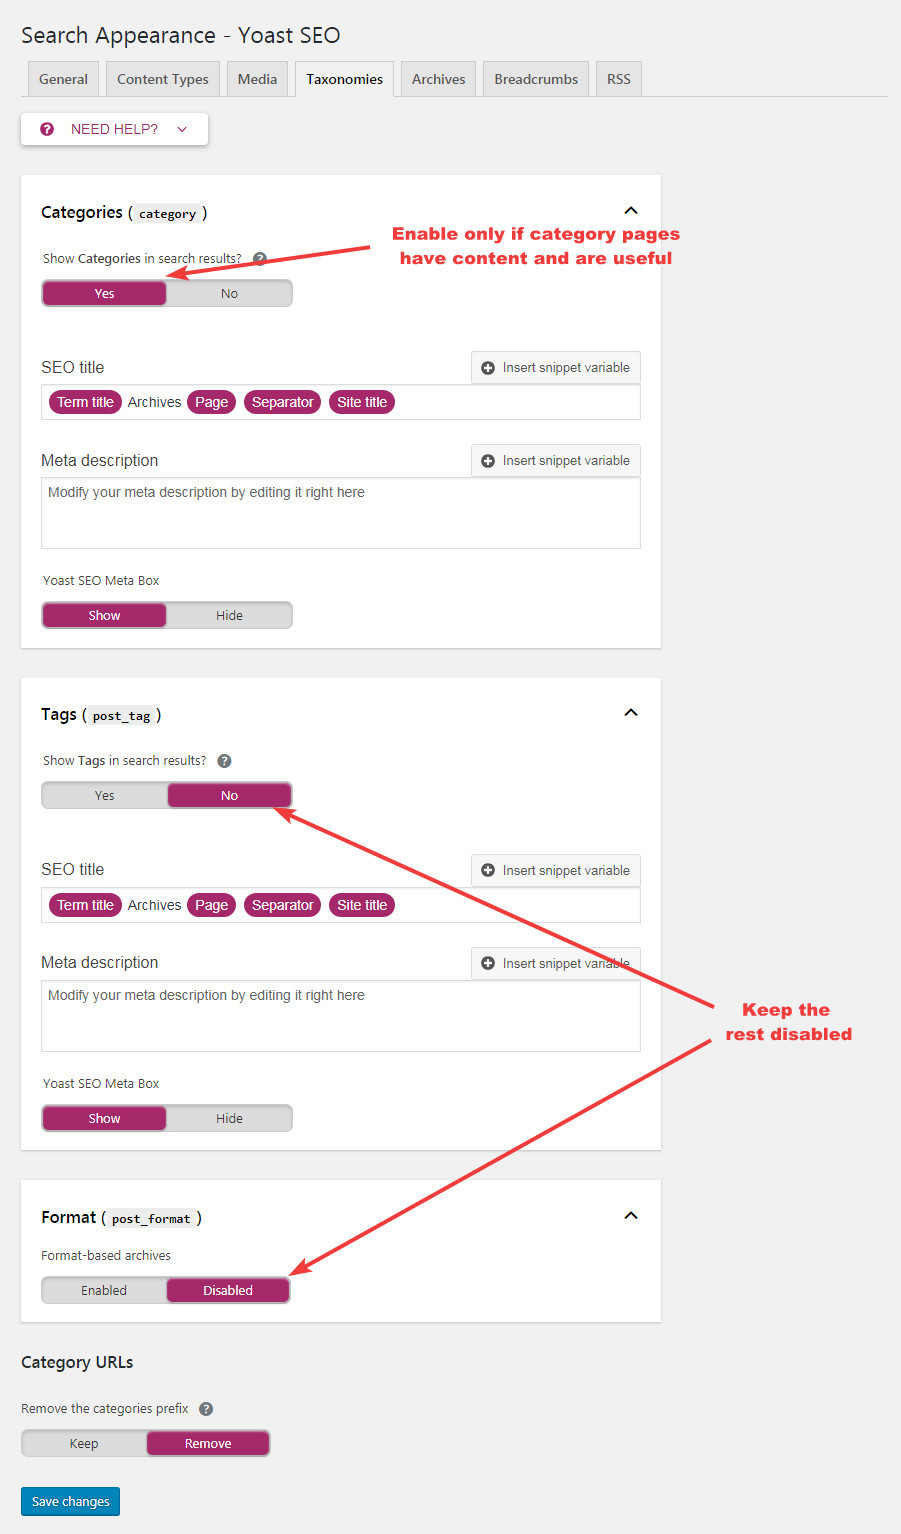
Categories: Most users will be better off with not letting categories get indexed in the search engines (so they should set it to “No”). However, if you’re sure you need them to get indexed, you can set it to “Yes,” but you will need to work on making them useful by adding relevant and quality content to them.
Yoast SEO Meta Box: If you have enabled the indexation of categories, this needs to be set to “Show” so that you can write custom meta descriptions for your categories. If you’re not letting categories get indexed, it wouldn’t matter and you can leave it turned off.
For the rest of the options, you should be setting them to No, Hide, Disable and Remove, respectively, for the four options. This is because they are not useful in optimizing your site for SEO or in any other way, but might cause more harm than good (if any at all).
6.5 Archives
Set both the Author archives and Date archives to “Disabled,” in order to prevent the issue of duplicate content. This is because they both typically index the same content that has already been indexed in the form of posts or pages.
You don’t need to bother with the rest two options, as they don’t matter once you disable the said features.
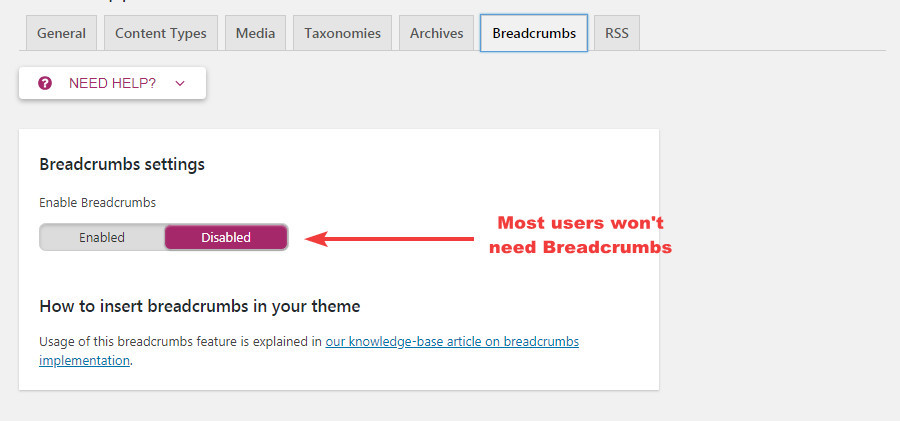
6.6 Breadcrumbs
If you’re a total beginner to building a WordPress site, save yourself the headache and simply keep the Breadcrumbs Disabled. They are not worth the hassle for 99% of the users anyway.
Another reason to avoid breadcrumbs is that they can make the area above your content appear cluttered and messy. In fact, although Yoast does have a guide on adding breadcrumbs to your site, it makes it clear that doing it on your own will be a temporary solution as the changes will be undone when you update your theme. So, you will eventually have to get in touch with your theme provider for a permanent solution.
However, if you have a really large site with thousands of posts or pages, OR you got some other reason for using breadcrumbs, you can add them by performing the following steps:
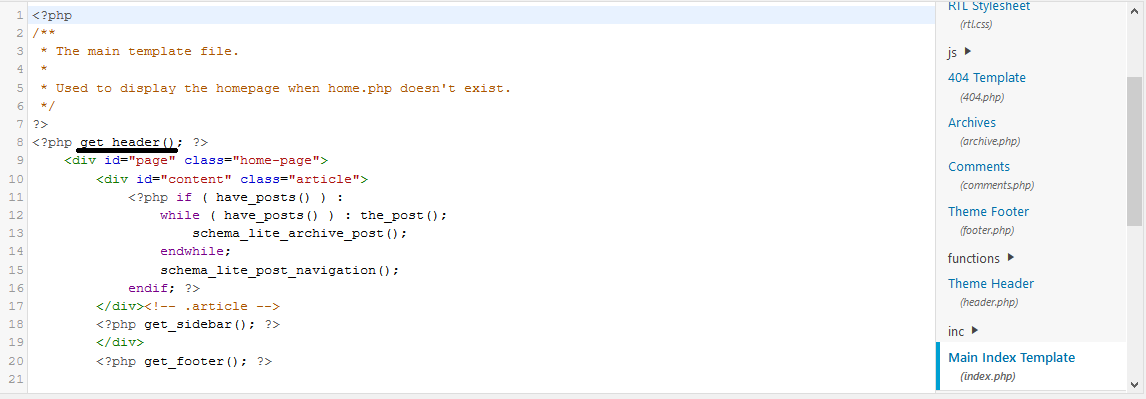
- Hover your mouse to the Appearance option on your WP dashboard, and then click on Editor
- Scroll down to find the to find index.php (as you can see in the below image, with the title Main Index Template) and click on it
- Then find the “get header ();” as highlighted in the below image, and paste the following code below it:
<?php
if ( function_exists('yoast_breadcrumb') ) {
yoast_breadcrumb(' <p id="breadcrumbs">","</p>');
}
?>
Finally, update the file and you’re done.
6.7 RSS
Some users build scrapers to blatantly steal content from other sites without giving them any credit. This may give their users the impression that they are the original owner of the content.
The RSS feature prevents this from happening. While it can’t keep the scraper from scraping your site, what it does is mentions that the content originally appeared on your blog, while also linking out to your blog. This way, you at least get the credit for your work along with a backlink, which might help you with your off-page SEO as well.
Yoast’s settings here are spot on, so you don’t need to edit anything.
7 Social
The Social feature is a really cool way to let the search engines know about the social profiles of your site. More importantly, it lets you upload images to your posts and pages in a way that creates perfectly-optimized thumbnails for each of the popular social media networks: Facebook, Twitter, Pinterest and Google+.
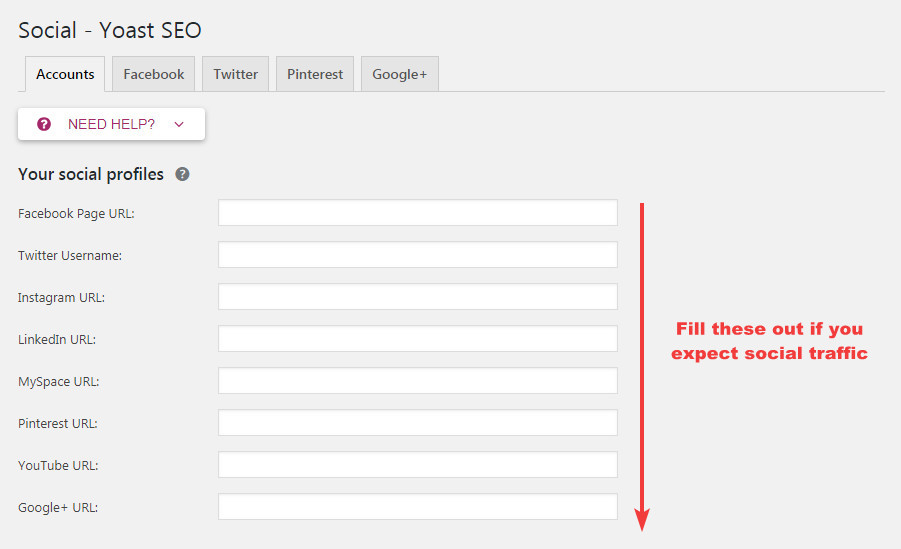
It makes your posts more likely to get better traction on social media than they otherwise would.
7.1 Facebook
You certainly don’t want to miss out on what the world’s largest social network has to offer to your site. Make sure the Open Graph meta data option is Enabled.
You will ideally want to fill out the Frontpage settings as well; it only takes a couple minutes but can make your site considerably more Facebook-friendly. Basically, what this will do is use the info you fill whenever your site’s homepage is shared on Facebook, which can otherwise look pretty weird and unappealing on Facebook.
Finally, the Default settings allow you to upload an image that will be used for all the posts and pages of your site that are shared on Facebook but don’t contain any images. Before you move to the next tab, don’t forget to click on “Save changes.”
7.2 Twitter
On the Twitter tab, there’s nothing to do but ensure the meta data option is enabled.
7.3 Pinterest
The Pinterest setup works in a similar way to Facebook, so it will only work if you have Enabled Facebook’s Open Graph meta data.
The next step will be to verify your site with Pinterest, which can be done by clicking on the hyperlink “confirm your site with Pinterest” that you can find in the Pinterest tab.
You will need to login to your Pinterest account, visit the account settings section, and get the meta tag that you will need to enter into Yoast’s Pinterest confirmation box.
7.4 Google+
Setting up Google+ is easier, as all you need to do is enter your Google+ business page’s URL in the box you can see on the Google+ tab, and also link to your website from the About section of your business’ Google+ profile.
8 Yoast SEO Premium
Honestly speaking, most users wouldn’t need any of the features that Yoast Premium offers. Sure, finding crawl errors and being able to fix them easily is an important feature, but it’s usually sites that are years old that will really need such a feature.
For small sites with minor issues, you can get away with the free redirection plugins. However, an advanced feature Yoast Premium offers and the free alternatives don’t is automatically setting up the correct redirect when you change the permalink of a post.
Being able to get a preview of how your shared page will look on social networks is another premium feature we are a fan of. What makes it actually worth it is that while there are a plethora of social share plugins, none of them offer what this premium feature does.
However, it will probably justify the Premium version’s cost only for sites that rely heavily on social media for traffic. So if you’re planning to build a viral-content site, it may make sense for you to get the Yoast Premium.
Of course, the 24/7 support may also make it worth it for some users, especially those that are building a very important site with little to no knowledge of all the technical and SEO stuff.
All that being said, if you’re someone who’s on the fence about whether or not to buy the premium version, you may want to know if the other features we didn’t discuss above are worth anything at all. So let us walk you through them as well.
8.1 Keyword Optimization (Allows Targeting Multiple Keywords)
While targeting multiple relevant keywords when writing content is believed to be a very good approach to your on-page SEO, the recommended practice is to include them “loosely” wherever they fit. The problem with the multiple keywords optimization feature of Yoast Premium is that it only counts exact match keyword, meaning that the keyword has to be exactly what you’re targeting, and not a partial match or another highly relevant version of it.
For example, if we are targeting “Yoast SEO plugin” as a secondary keyword in this post, Yoast wouldn’t approve of us mentioning it as “Yoast plugin.” However, if you follow this approach, you may end up heavily overoptimizing your content for some keywords, which is often referred to as “keyword stuffing,” something Google frowns upon.
Similarly, trying to stuff in your keywords every now and then will also interrupt with the flow of your content, and take a toll on its overall readability. The readers may not find your content as appealing, leading to higher bounce rate and other issues, all of which could negatively affect your SEO.

So while you can include secondary keywords, they can be a partial match or simply mentioned in a form that makes them look natural; they don’t need to appear in their original form every time you mention them.
Considering these limitations of using exact match keyword, we’ve worked hard to do something different in Rank Math. We’ve built a functionality into Rank Math which takes keyword variations of your original keyword into account as well. It’s not perfect yet, but it works much better than Yoast’s keyword detection.
8.2 Internal Link Suggestions
The recommended practice here is to manually go through the post you have written, and also all the other posts and pages you have on your site. Then find the ones that are relevant to parts of the content in your new post, and link to them in a natural way.
Now, this sounds pretty neat the way we have put it, but it can quickly get overwhelming if you have thousands of posts on your site, and plan to post further tens of posts every week. This is where Yoast Premium’s internal link suggestion comes in.
It can save a ton of your or your VA’s time, especially given that not linking internally is not even an option for such large sites – it’s an absolute must for them.
8.3 No Ads
Unlike some other SEO plugins, Yoast doesn’t seem to be showing ads in a way that gets annoying for the users. So spending $89/year may not turn out to be a very good idea just for getting rid of the ads.
8.4 SEO Analysis
Yoast Premium allows you to generate a CSV file that helps you closely track some of the most important SEO factors like your keywords, the readability scores, titles and URLs.
As we have made it clear above, Yoast SEO’s readability is pretty unreliable to say the least, and you should focus on pleasing your readers, not Yoast.
Being able to track the keywords can be a useful thing, but you can also maintain an Excel file for it right from the get-go so that you don’t lose track of them in the first place.
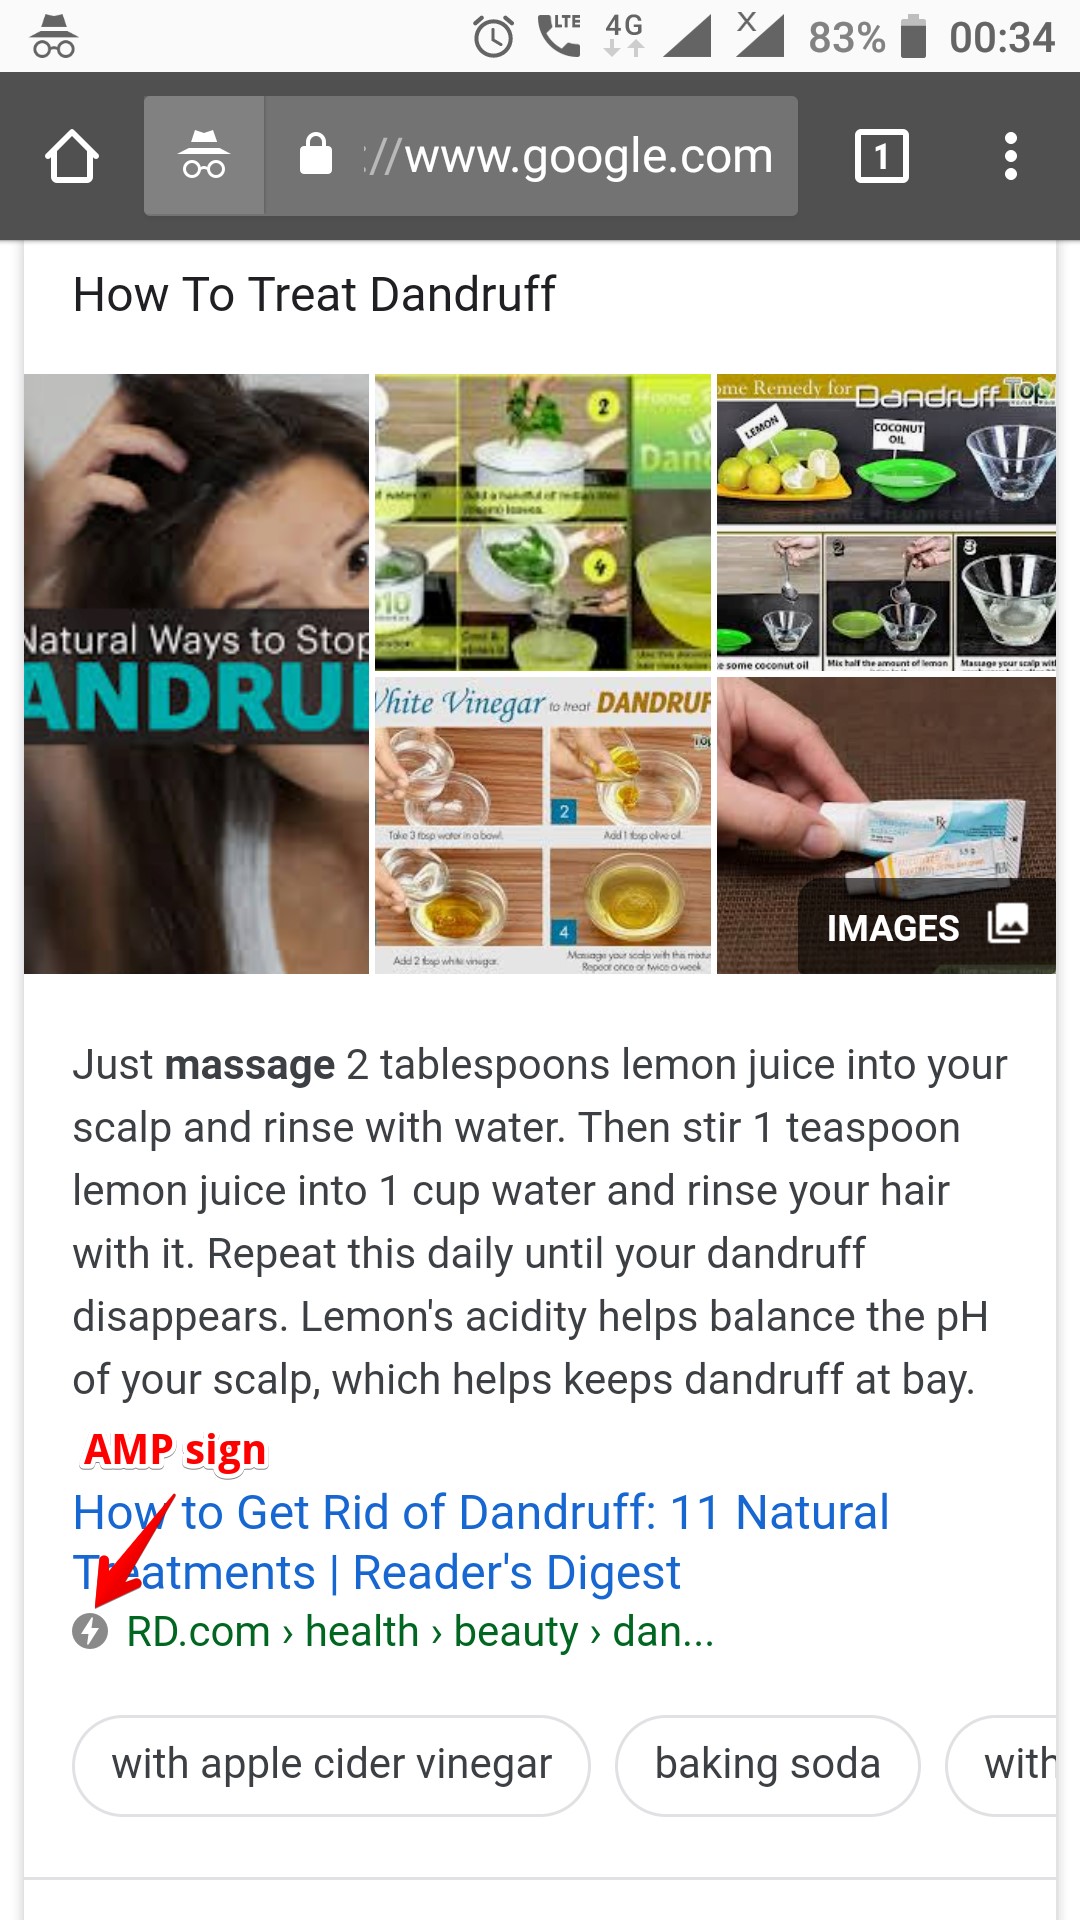
9 Accelerated Mobile Pages (AMP)
It goes without saying that optimizing your site for mobile devices is something you just wouldn’t want to overlook, given how much emphasis Google is placing on making your site mobile-friendly. But as most of you reading this article are no web designers, we will guide you how to do it incredibly easily by integrating a couple free plugins with the Yoast plugin.
Following the below process will also add an “AMP” sign before your site’s snippet (for mobile devices), making users more likely to click on it.
- Get the AMP Plugin – it will help you optimize your site for mobile devices
- Get the Glue for Yoast SEO and AMP – it will make the AMP Plugin and Yoast plugin work together
- Add /amp/ at the end of the URL of a page on your site to see how its AMP version looks like
- Head to the Design tab in AMP settings of Yoast, which will allow you to change the styling of your AMP to make it relevant to your brand
- If you want to add tracking code to your site specific to the AMP version, you can do so by going to the Analytics tab under the same (AMP settings) menu
- That’s pretty much it!
A common error many users come across is the featured image showing up at the top of the post, which often doesn’t look very nice. While there’s a workaround for this, it involves a bit of a compromise.
This is because you will either have to skip having a featured image in your posts, or have a default image to show up as the image for your posts.
To set up the latter option, you need to go to the Design option on the AMB tab under Yoast. You will see that one of the options is setting a default image; you will want to upload an image that goes well with all your posts in general, as it will show up for all your posts on mobile devices.
However, it will only show up for posts that don’t have a featured image. For the ones that do, the featured image will appear on the top, and the default image will be nowhere to be seen for such posts.
Additional settings to take care of:
- Going to the Webmaster Tools and verifying your mobile site with Google and Bing (and also Yandex if you plan to get traffic from it)
- Check the General tab under Search Appearance for any duplicate site names; if there are, fix them by enabling the Force Rewrite Titles
- Under the same tab, fill out all the details that you did for your site as explained above (SEO title, meta description and how will you like the site to be identified)
- Next up are the Content Types and Taxonomies tabs, which will allow you to decide what content shows and what doesn’t in the search results, as well as make other changes like adding “published dates” to your posts
- You can also set up the breadcrumbs the same way you did above for the desktop version of your site
- The process of setting up the Search Console for your site’s AMP version, and then finding and fixing crawl errors is going to be the same as well (as explained above)
- Set up the social profiles in the Social tab, while also uploading a logo for your Facebook profile and enabling Facebook insights
10 Keyword Research
Although this post is about the Yoast SEO plugin, it probably wouldn’t be complete without some useful information on keyword research. After all, quality keyword research is the starting point of any SEO project or strategy, and there are no exceptions to it.
Now, while keyword research is a very vast thing that we have covered in detail here, we will be teaching you a nice little trick that can help you build a goldmine of keywords. The basic idea is to find what are known as “longtail” keywords, which as the name suggests, are longer but relevant keywords that are much easier to rank for than shorter keywords.
To find keywords using this technique, you will need to download the Chrome extension called MozBar. As it’s a Chrome extension, you will have to use the Chrome browser to make it work.
Also, before we get to the more advanced steps, you should also check your Domain Authority (DA) here. Theoretically speaking, if the sites ranking for the keywords you want to target have a considerably lower DA than your site, you have a pretty good chance of ranking for those keywords. You will also have to take into account the Page Authority (PA) though, as a higher PA may mean more competition.
Finally, if you don’t want to do back and forth with and the Google search, you can also download a free keywords tool called Keywords Everywhere. It shows you the keyword volume right under the Google search bar.
With that said, fire up Google and get keyword-searching. However, instead of putting the entire keyword yourself, you should only type a part of it and the Google search will offer many suggestions to complete it, many of which will be the longtail keywords you will want to target.
Here’s the image explaining what we mean here:
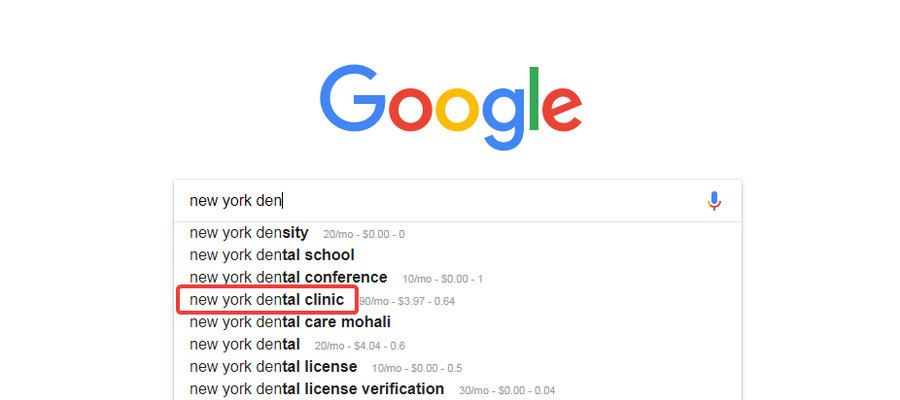
As you can see, if you simply type “New York Den” instead of “New York dentist,” you find a whole lot of keywords that you may want to target, like “New York dental clinic” in this case.
You can also apply this technique to find a word to fill in the middle of the keyword, instead of just at the end. All you need to do is put an extra space between two words, as you can see in the image:

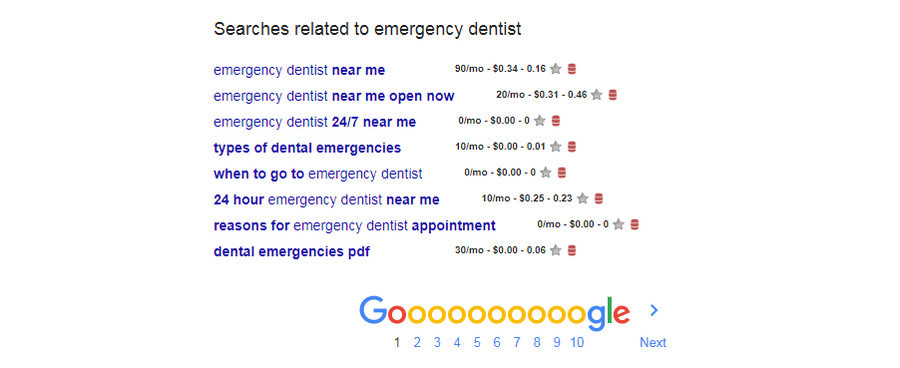
Of course, the related searches at the bottom of the search page isn’t something to be ignored either, as it can help you uncover some juicy longtail keywords as well.
Now, before we show you how to analyze keyword competition, let us tell you that it depends on different factors, with some of the more important ones being:
- The DA and PA of the ranking sites – the lower the better
- Whether they are actually targeting your keyword or something not very relevant to it
- Is their content extremely good or can you do better? If you can do much better than them, you’re game!
- If their content is good but not very relevant to your keyword, it means you still have a pretty good chance of ranking for it
Here’s how the search results look like for the keyword “Best dentist in New York.”
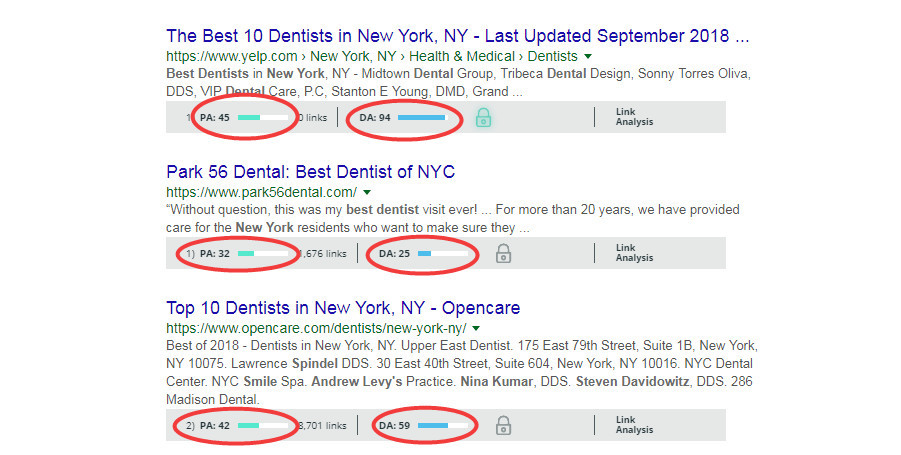
As you can see, the top sites ranking for “best dentist in New York” have a very strong DA and PA, and are also targeting exactly the same keyword. These are certainly the keywords you will want to avoid like the plague.
But here’s something that may turn out to be a better keyword (Holistic dentist New York):
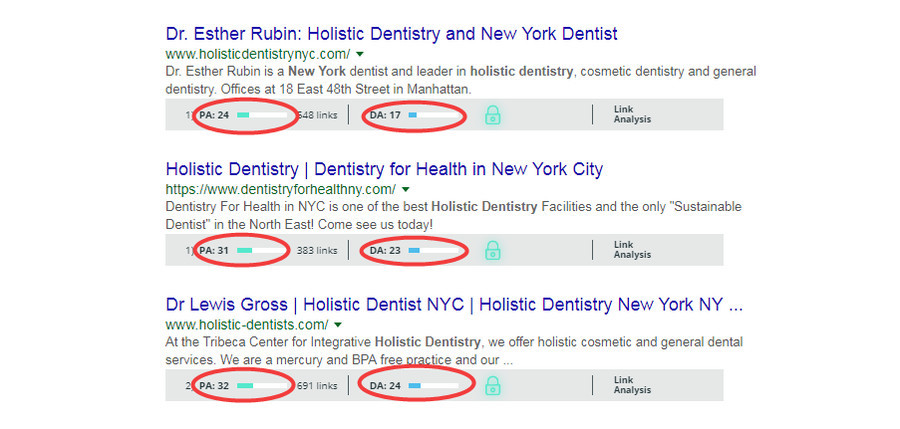
While it still has Yelp.com ranking with a very high DA and PA, the other sites seem beatable given your DA, PA and other factors. In other words, it’s a much easier keyword to rank for than “best dentist in New York.”
Want to Know More?
We are sure many of you are going to have questions with respect to your specific SEO strategy or using the Yoast plugin. If you do, post away, and we will be getting back to you as soon as we can.