In our last security guide, we covered WordPress security in depth. Today, we’re going to show you how to harden your server against attacks.
Hardening your WordPress installation is a vital first step, so if you haven’t read through the first article, go and read it now.
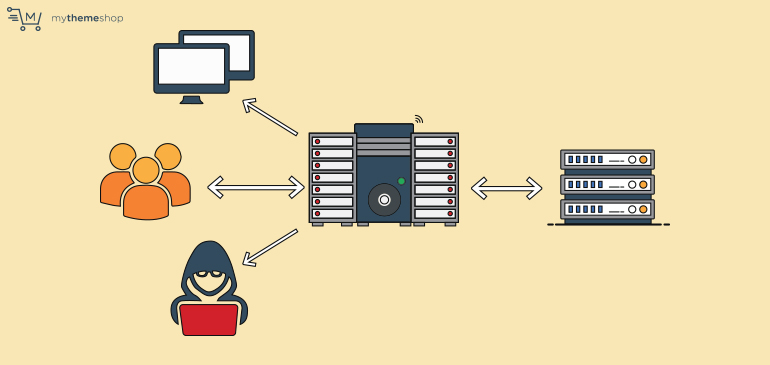
That said, there are plenty of ways for a hacker to damage your website without even touching WordPress. If your server is vulnerable, they can alter or delete any of the content on your site, steal your customer data, or use your machine for their own criminal games.
Standard Linux servers have pretty weak security out the box, so you have to take matters into your own hands. Alternatively, you can migrate to a specialist WordPress hosting company – they take care of the security for you so you can focus on your content.
If you find your head spinning as you read this guide, that may be the best choice for you.
That said, managing your own web security is totally do-able.
Table Of Contents
- 1. Hardening Your Server
- 2. Tools of the Trade
- 3. How Hacks Happen
- 4. Security – An overview
- 4.1. Know Your System
- 4.2. Principle of Least Privilege
- 4.3. Defense In Depth
- 4.4. Protection is Key but Detection is a Must
- 4.5. Know Your Enemy
- 4.6. Proactive Vs Reactive
- 5. It’s Not Just WordPress That Gets Hacked
- 6. Access Control
- 6.1. Discretionary Access Control
- 6.2. Permissions
- 6.3. Owner Permissions
- 6.4. Public Permissions
- 6.5. Group Permissions
- 6.6. Putting it Together
- 6.7. Directories Are Weird
- 6.8. Elevated Privileges
- 6.9. A New Group Appears!
- 6.10. Inhuman Users
- 6.11. DAC Summary
- 6.12. Capabilities
- 6.13. Mandatory Access Control
- 6.14. SELinux
- 6.15. AppArmor
- 6.16. GRSecurity
- 6.17. Application Level Access Control – Apache
- 6.18. Application Level Access Control – WordPress
- 7. Network Based Attacks
- 8. Firewalls
- 9. Intrusion Detection
- 10. Denial of Service Attacks
- 11. Slowloris
- 12. DNS Attacks
- 13. Hiding Your Server
- 14. How CDNs Protect Themselves
- 15. IP Leakage
- 16. Cryptographic Concepts
- 17. Cryptographic Hash Functions
- 18. Cryptographic Salts
- 19. Cryptographic Functions
- 20. Public and Private Keys
- 21. Magic Server Boxes
- 22. Virtual Machines and Containers
- 23. The Drawbacks of Virtual Machines
- 24. Introducing Containers
- 25. Docker
- 25.1. Deploying With Containers
- 25.2. Getting Started With Docker and Containers
- 25.3. What are Cgroups?
- 25.4. What are Namespaces?
- 25.5. The Docker Daemon
- 25.6. The Docker Client
- 25.7. Docker Hub
- 25.8. How to Build an Image – the Low-Level Way
- 25.9. A Better Workflow
- 25.10. Dockerfiles
- 25.11. Docker Volumes
- 25.12. Docker Compose
- 25.13. Docker Security Warning
- 25.14. WordPress is Complex
- 25.15. Simpler Maintenance
- 25.16. Microservices
- 25.17. Using Multiple Containers for your WordPress Site(s)
- Step 1: Bare Bones Installation
- Securing Your Host Machine
- Installing Tripwire
- RKHunter
- Set Up SSH Certificates on Both Machines
- Prevent Super User SSH Access
- Setting Up a Firewall
- Installing Fail2ban
- Step 2: Set Up Docker on the New Machine
- Step 3: Transfer Your Site Data
- Set Up a Workspace Folder
- Exporting Your Existing WordPress Site
- One Site or Many?
- Database Containers for Multiple Sites
- Step 4: Importing Your Site into New Wordpress and Database Containers
- Step 5: Launch Your Site Inside the Docker Containers
- Step 6: Accessing Your Site on the New Server
- Step 7: Check the Site Works
- Step 8: Tightening Container Security
- Optional Step – Server Image
- Step 9: Complete the Migration
- Step 10: Automated Backups
- Step 11: Maintaining Your Server
- Summary
1 Hardening Your Server

Any computer system is only as secure as its weakest element. I previously said that most hackers target the host – the machine running your site. This is true.
To be honest, if you had a totally secure WordPress site installed on a weak server, it would still be very easy for a skilled hacker to compromise it.
Not all hackers are skilled – most have a few tricks up their sleeves, and they give up if they can’t get a result. They usually make a huge list of potential targets, and then look for the weak sites they can take down.
With the steps above, you’ve taken yourself out of the “really easy” category – at least as far as your WordPress site is concerned.
While there are millions of unskilled hackers picking off weak targets, there are still thousands of skilled hackers looking for more challenging victims. To them, you’re still a sitting duck.
In this section, we’re going to share some advanced methods to ramp up your site’s security.
You will have to learn some security concepts as you go along – and there’s quite a lot of ground to cover. Our goal in writing this article was to make a complete guide that anyone can follow, regardless of their background. However, it’s possible you may find some of this stuff too technical.
If you feel that any of these ideas are too techy for you, that’s fine. There’s no shame in delegating complex tasks to professionals. You can hire someone to implement these steps, or you can host your site with a company that specializes in WordPress security (like Kinsta).
That said, it’s worth your time to gain an understanding of this stuff, even if you pay someone else to do it for you. That way you’ll know if they have done a good job or not!
We’re going to take a whirlwind tour of server security concepts, and then we’ll use these ideas to build a secure server.
Then we’re going to use some cutting-edge technology to isolate our WordPress site in a specially contained environment, where it can’t harm the system.
Next, we’ll cover methods you can use to harden WordPress against the most common attacks. You’ll also learn how to defend yourself against attacks that haven’t even been discovered yet!
We’ll cover intrusion detection tools you can use to recognize subtle attacks, so you can act fast and fix your server.
Then we’ll talk about keeping your site secure into the future.
2 Tools of the Trade
WordPress has a nice, simple visual interface. That’s great for day-to-day use – it shelters you from the horror of editing code by hand or configuring your host machine via the command line.
In this advanced section, we will be going beyond the simple actions you can perform through the WordPress admin panel. For some of our readers, this will mean using unfamiliar tools – especially the command line.
If you’ve never used a command line shell before, you may wonder why anyone would bother. Surely it’s a primitive way to control a computer?
For a long time, if you wanted to use a computer, you only had one choice – learn to use a command line shell! In the mid 80s and 90s, graphical interfaces started to appear, and they made it much easier for newbies to interact with their machines. And, in some cases, graphical interfaces speed up the workflow.
But that isn’t always the case. In a great many cases, a text based shell allows you to get the job done faster. True, you do have to invest a little time learning how to use a text only interface, but it’s not as much time as you would think. It’s time well spent, as you’ll gain a huge degree of control over your host machine.
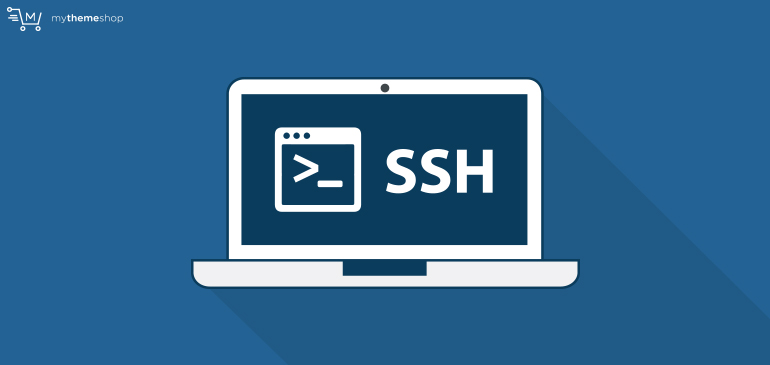
When you connect to a text shell on a remote machine, you should use SSH – which stands for “secure shell”. SSH is a protocol that uses encryption to secure your connection, and it’s an absolute must.
In the section on recovering from a hack, we used SSH to remove malware. I mentioned that Macs and Linux PCs have SSH installed by default – Windows doesn’t. You can install a free SSH client for Windows called PuTTY – it’s the most popular choice, and it does the job well.
While you can do a lot over SSH, editing files can be a little tricky. There are good shell based text editors such as Vim, Emacs and Nano. They present their own learning curve – in the case of Vim and Emacs, it’s quite a steep learning curve! Text editing is also one of those areas where graphical interfaces do a better job – especially for code.
If you don’t want to spend the time getting to grips with one of the shell based code editors, you could simply edit the files on your machine and upload them to the server with an FTP program. This can quickly become a chore when you make multiple changes in a short time – especially when you have to change the file permissions of your uploaded files each time.
Alternatively, you can use a service like Cloud 9. Cloud 9 is a complete cloud based IDE (integrated development environment) for Linux based software. An IDE is like a text editor – but it’s optimized for code. It has tools for debugging and testing, and its goal is to make programmers more productive.
Cloud 9 has an option to link the editor to your server box via SSH – it’s one of their premium services (ie. you can’t do this on a free account). The benefit of using software like C9 is that you can use a visual interface to browse directories and edit files, and you can use the shell to execute commands. It’s the best of both worlds.
As you secure your site, you will certainly have to edit some code – an IDE can help you spot and eliminate mistakes, and it can speed up the process for you. When you edit the file on the remote machine, the permissions will remain unchanged (if you don’t know what I’m talking about, it will become clear later on in the article).
If you don’t want to pay for Cloud 9, you can use a more traditional IDE like Eclipse. With Eclipse’s “Remote System Explorer” you can access the remote machine as if it were on your PC – behind the scenes, the IDE uses SSH and SFTP to modify the host machine.
IDEs are sophisticated apps with hundreds of features – and you only need a few of them for your task. Don’t feel you have to learn the entire system before you can get started!
Also, you can access multiple SSH sessions at the same time. So you can open two PuTTY windows, or use PuTTY and an IDE side-by-side.
Now you’re armed with the tools you need, let’s broaden your understanding of security. Then we’ll dive into the server specifics.
3 How Hacks Happen

In reality, most hacks are opportunistic. You get hacked because an attack script identified weaknesses in your site or server. New weaknesses are discovered every day, and these lead to exploits and hacked sites.
Opportunistic hackers use an array of tools to identify potential targets. It all starts with a list of exploits. Let’s say a weakness has been discovered in a popular slideshow plugin.
The hacker learns about this weakness and investigates the plugin. They learn that there’s a recognizable “footprint” for the plugin – every site that uses it has the text “Powered by MyCoolSlideShowPlugin”.
From this point, it’s easy to scrape Google to build a huge list of hackable sites. So that’s what the attacker does.
Then they write a simple script to perform the hack, they load up their list of targets and set it lose. The script goes out onto the web and attempts to hack every site on the list.
Some hacks will succeed, many will fail. The script will record the sites that are susceptible to the weakness. After the initial run, the attacker can go back to the list and filter it to find the most popular sites.
At this point, they have a number of options. They could insert links into the site to boost their SEO rankings. Hackers can make a killing selling links from exploited sites. Alternatively, a hacker could deface the site and demand money to restore it (ransom).
They could even place ads on the site and use the traffic to make money.
In most cases, an attacker will also install backdoors into the server. These are deliberate security holes that allow them to come back and exploit the site in the future – even if the insecure plugin has been replaced.
From the viewpoint of the victim, it can feel like persecution. Their site keeps getting hacked again and again.
The point is that most of these attacks are not personally motivated. It doesn’t matter if you’ve led a blameless life and have no enemies. If your site is exploitable, it’s only a matter of time until someone does exploit it.
So it’s in your best interest to ensure your site is not an easy target.
You may be asking yourself – how do weaknesses come about, and how do they get discovered?
To begin with, most programmers are focused on a single goal. They want to make software that works – whether it’s a theme, plugin, or full-blown application.
They have a set of requirements and features, and they’re highly focused on getting them implemented. They usually work with tight deadlines, so they don’t have much time for any other concerns.
Many developers are very weak in the area of security (not all, of course). They may think it’s not an issue because the plugin they’re working on doesn’t handle sensitive data.
Unfortunately, under WordPress, every plugin and theme has the ability to alter anything on the site. They can even be exploited to infect other apps and sites hosted on the same machine.
As soon as the plugin works, the developer releases it. If it’s useful or has cool features, hundreds or thousands of people will download it.
Once the plugin is released, it also comes to the attention of hackers. All hackers are fascinated by how things work – whether they’re ethical hackers or black hats.
They want to know how the code works, and how to make it do things it wasn’t designed to do. Maybe they plan to exploit it. Maybe they want to warn others about security risks. Maybe they’re just bored and want to entertain themselves.
Fundamentally, at the most basic level, all code works in the same way – it takes input, processes it, and spits out output. When it gets an expected input, it should produce a sane output. The trick is working out which inputs will make the code do something unexpected – which inputs create unexpected output.
Quite often, that unexpected output is harmful. It could damage vital data, or expose private information. In these cases, the hacker has discovered an exploit. If the input only causes the app to crash or act funny, it’s not an exploit as such – it’s more correct to call it a bug.
Some people consider all exploits to be bugs, and that makes sense. A program should be secure – if it can be tricked into doing something insecure, then that’s certainly an unwanted “feature”.
Finding exploits isn’t easy – you have to read the code and really understand what it’s doing. You have to trace the input data through the code, and recognize the places where it can do something dangerous. With experience, you learn to spot the weaknesses.
After a hacker has found an exploit, one of several things will happen:
- They exploit it, causing damage to as many targets as possible. This is the worst-case-scenario.
- They publish it – often in the hopes that the original developer will fix it.
- They contact the publisher discretely and tell them to fix it. Then they publish the exploit.
When the exploit is published before the fix has been made, it’s called a “zero-day exploit.” From this moment, until the exploit is fixed, the users are at risk.
Once the cat’s out the bag, other hackers will learn about it. The exploit is public knowledge – but the issue hasn’t been fixed yet. It may be a quick fix, but often it takes a while for the project’s team to put together a patch. They need to test their fix thoroughly – a small change to the code could cause other bugs or security weaknesses.
In the meantime, the plugin’s users are at risk. If the developer is aware of the exploit, they’ll work fast to fix it and publish the update. But people can be slow to apply these updates – some sites are running plugins that were patched years ago. Until the plugin is updated, their site is at risk.
Lacking real programming skill isn’t as much of a handicap as you may think. There are “exploit kits” that automate the process of cracking websites using known exploits. These tools are used by security experts to spot weaknesses in their companies’ defenses – they’re also used by black hats to cause chaos on the web.
An exploit kit, like Metasploit, has a huge database of exploits, together with scripts to use them. It also has tools to customize and deliver malware payloads to compromised servers. Armed with these tools and a small amount of knowledge, an inexperienced hacker can wreak havoc.
According to WP White Security, 29% of WordPress sites are hacked through an insecure theme. Some innocent looking code buried deep in the theme allowed an attacker to gain a foothold in the system.
Theme developers are often relatively inexperienced coders. Usually, they’re professional graphic artists who have taught themselves a little PHP on the side.
Plugins are another popular line of attack – they account for 22% of successful hacks.
Put together, themes and plugins are a major source of security trouble.
4 Security – An overview
We’ve examined how exploits are discovered and used to hack sites. Your goal is to protect your site from such an attack. To do that, you need a good understanding of security.
So, what are the key ingredients of cyber security?
- Know Your System
- The Principle of Least Privilege
- Defense in Depth
- Protection is the Key but Detection is a Must
- Know Your Enemy
Know Your System
Before you can secure your site, you need to understand how your system works. The deeper your understanding, the more easily you can spot and fix weaknesses.
To begin with, you should develop a good understanding of how your WordPress site works. Specifically, you need to know which Plugins are responsible for which features, what custom code has been added, and so on.
But the “system” includes the server environment, too. That’s why we’ll be covering server security at the end of this article.
Principle of Least Privilege
Each person who uses your system should only have the privileges they need to perform their tasks.
There’s no reason for a web designer to have root access to your server. A website visitor should only be able to access the public pages on your site. Writers should be able to log on and write content – they shouldn’t be able to install plugins or new themes.
Understand who is interacting with your site, and understand which privileges they require to perform their tasks. Give them that much access – no more, no less.
Defense In Depth
Don’t depend on a single security measure to keep your server safe. You need multiple rings of defense. The more layers you deploy, the harder it is to break through and hurt your site.
In other words, don’t install a single security plugin and think you are safe! Put as many barriers as possible in a potential hacker’s path. That way, only the most obsessively dedicated hacker will ever persist to break your site.
Protection is Key but Detection is a Must
You should do everything you can to make your site secure. But even then, don’t get complacent. You should have some way to detect an attack, so you can understand how it happened and prevent the same thing from happening in the future.
There are no guarantees in security – even the most ironclad sites get hacked from time to time. If your site ever gets hacked, you need to know as soon as possible.
Know Your Enemy
You should understand the methods people use to deface or hack websites. This allows you to strengthen your defenses.
Most of us are not malicious hackers – we don’t have the experience or the skillset. That’s our misfortune.
To know how to make systems more secure, you have to understand how they can be broken.
Security professionals study cybercrime in depth and they usually learn how to commit these crimes. They learn under controlled conditions, and they never hurt real targets.
At security conventions (like Black Hat US), they rub shoulders with real hackers. They’re both there to learn how systems get attacked – the only difference is their goals.
Learning to think like a hacker opens your eyes to the holes in your own security.
Proactive Vs Reactive
Most people have a reactive approach to security. When something gets broken, they work out how to fix it. When a security update is released, they download it.
This protects you against known exploits, which have been published or detected “in the wild”. It’s important to fix known problems, but it’s only part of the job.
But what about the exploits we don’t know about? I’m talking about so-called zero-day exploits and future attacks that haven’t even been invented yet.
An exploit must always be discovered before it can be fixed. That means there’s a period of vulnerability.
If the person who discovers the exploit is an ethical hacker, then they’ll probably show the developer how to fix the exploit before they publish it. If the discoverer is an unethical hacker, they’ll try to exploit it for as long as possible.
Proactive security means defending yourself against unknown threats. You assume your software will be exploited at some point, so you take action now to limit the damage.
With a good plan in place, it can be very easy to recover from an attack. If you don’t have a plan, it can be almost impossible.
For instance, your plan should definitely involve backing up your vital data. If someone deletes your database, you won’t be able to recover your content unless you can find a copy somewhere.
It’s easy to recover the data if you have a recent copy. If you don’t, you’ll have to piece it together from public copies (archive.org) and random files on hard drives. Not an easy task.
In the rest of this article, we’ll outline a proactive security plan. No plan is perfect, and we can’t guarantee your site won’t be hacked at some point in the future.
If you follow our advice, you should be able to minimize the possibility of such an attack, and you will be able to recover quickly.
5 It’s Not Just WordPress That Gets Hacked

When you visit a WP site, WordPress is the most visible component. It’s not the only software installed on your server. Server environments are complex systems, with thousands of moving parts. Security exploits exist at all levels of the technology stack, from the hardware up.
WP White Security revealed that 41% of WordPress sites are hacked through a weakness in the web host. Some software component running on the server machine had a security hole, and a hacker exploited it.
Often, this weakness has nothing to do with the web service.
This is massive, so I’ll give you a moment for it to sink in. The biggest single source of danger has nothing to do with WordPress.
For hackers, this is great news. A server exploit is much more tempting because it allows them to attack any kind of site – WordPress, Joomla, static HTML, anything.
The remaining 8% of sites are hacked because of a weak password. While it’s important to use a strong password, password cracking is not a primary focus for hackers. That’s because there are simpler and more effective ways to attack sites.
As a footnote, a tiny number of sites (less than 1%) are hacked through the WordPress core files. This just goes to show how thorough the WordPress team is at closing security holes.
Understanding Server Security
Server security is a big subject – we could easily fill several books covering all the details – in fact, many authors have! Nevertheless, the basic concepts are quite easy to grasp.
Most public web hosts run Linux, so we’re going to cover Linux server security. Many of these concepts apply to other platforms, but the implementation details will obviously be different.
To really get a good grasp of security, you need a good basic understanding of how the operating system works. Here’s an incredibly simple overview.
How Your Server Box Works
In essence, a Linux machine is a set of files on a disk or SSD.
Of course, that’s a little like saying a tree is basically a seed.
An operating system is in motion – it responds to input and produces output, and it allows other processes to do the same. A seed requires water, sunlight and time to turn into a tree. An operating system requires a processor, memory, and other devices.
When a seed turns into a tree, we call it growth. When a Linux machine comes to life, we call it bootstrapping (or booting).
In its “living” state, a Linux OS is a file system together with a bunch of processes in memory. True, there are other components, such as input devices and output devices.
Linux has a special way of dealing with these devices – it treats them as files. This makes it much easier for programmers to deal with input and output, as they can treat everything as a file.
When they want to change a hardware setting, they write to the “file” that represents the hardware. If they need input from a device, they “read” the file.
Now an operating system is useless if you can’t use it to get things done. There are millions of ways you can use a computer, but in general what we want to do is take some input, process it, and produce an output.
Users achieve this by sending data to a process that is already running. This is a very important point – it has a big bearing on security. Before you can interact with the computer, there must be a running process listening for your input.
It’s like a courier trying to deliver a parcel. She knocks on the door, but if there’s nobody inside, she has to take the parcel back to the depot.
Maybe you’re trying to request a web page from a machine over the net. If there’s a web server running on that machine, you’ll get a response – hopefully, you’ll get the web page you are looking for. But what happens if there is no web server?
Nothing happens. Eventually, your web browser gives up and tells you the connection has timed out.
In very broad terms, users interact with running processes through the operating system – specifically through the kernel. These processes take the data and do something with it. Then they produce some output – again, they go through the kernel to make this happen.
What is the Kernel?
The kernel is a program.
It’s the most important process in the system because it’s responsible for making the whole system run properly. It handles the computer’s devices, the file system, and the network. It also manages all the other processes running on the machine, providing them with resources, starting them and stopping them.
The kernel is actually the heart of an operating system. On its own, it’s not an entire OS – you also have other programs that provide services and create an environment where applications can run.
It’s entirely possible to write a program that runs without an operating system. Such a process would be very complex – it would have to manage the input and output devices itself, running at a very low level. In a system like this, you could only have a single process running at a time.
The earliest computer programs worked like this, and many still do. These programs usually live in “single purpose” systems inside electrical devices – such as a wireless remote control, or a microwave oven.
A single purpose program is very useful in devices we use for a single task. But computers are supposed to be general purpose. Nobody would buy a computer that can only play solitaire.
If you want to run multiple processes at the same time, you need some way of managing them. This is basically what a kernel is. It does more than that – it handles all of the complex details of the computer hardware, too. And it runs the computer’s networking capabilities (through the hardware).
Early mobile phones were single purpose machines. You used them to make and receive phone calls. Then someone decided it would be a good idea to also store numbers on the phone.
At this point, there were two tasks – still managed by a single program. However, maintaining a large program that does many different tasks is a hard task. At some point, phone developers decided it would make sense to build a simple operating system for their devices.
Having an operating system made it easier to add new functions. Jump forwards a few decades, and you have smartphones – which are fully functioning computers with complex operating systems.
As an interesting note, iPhones and Android are both built on Unix-like kernels. IOS is built on XNU, and Android is built on the Linux kernel.
Processes Creating Processes
In a Unix-like machine, processes can create other processes to take care of some part of their job. This is very similar to the way people work in the real world.
If you open a restaurant, you hire people to do the different tasks – cooking food, greeting and serving guests, cleaning, etc. Of course, you don’t “create” people to do these jobs (if it was possible, employers probably would!)
As a user, you interact with a user interface – a graphical one or a text one. This interface is a process (often more than one).
When you launch an application, you actually tell the UI interface to create and run the app’s process. The interface can’t do this on its own – it has to ask the kernel to do it.
Linux distros ship with a large number of programs that are really great at doing simple common jobs. Application developers can achieve complex tasks by delegating smaller tasks to these simple programs. When their application does this, it asks the kernel to create the process and send it data.
This is one of the reasons why Linux and other Unix-based systems are so popular. The toolset is amazing and well understood.
When Computers Go Wild
So far, I’ve painted a very nice Utopian image of how things work inside a Linux machine. An image where dozens of processes work together smoothly to fulfill your every wish. Unfortunately, real life is different.
Computers often go wrong. Instead of doing what you want, they do nothing. Or worse, they do something utterly horrible.
There are three reasons why this happens:
- The computer is broken
- There’s a bug in the software
- Some evil, malicious person has deliberately misused the system to mess with you
All three of these situations happen very often. In security, we’re interested in the third case. The second case is also important – hackers often exploit bugs to make bad things happen.
While this article is about security, you also have to plan for the other two possibilities – we’ll leave that discussion for another day.
Hackers
It would be a wonderful world if everyone respected other people and their property. Nobody would commit any crimes, everyone would be safe all the time.
Unfortunately, that’s not the world we live in. In the real world, there are people who steal and cause harm just because they can. Connecting your computer to a public network makes it a target for these people.
Computer criminals are usually called hackers. There are plenty of people who object to that – the word “hacker” originally meant a computer enthusiast. People still use the word that way.
Thanks to the media, we’re stuck with the “hacker = criminal” mentality. Even the criminals call themselves hackers. So please don’t take offense when I use “hacker” to imply criminal intent.
What are hackers trying to achieve? They want to either:
1. Break your system – prevent your software from doing what it should
2. Make your system do something it shouldn’t
Simply being an evil hacker doesn’t give you magical powers over computers. You would still have to interact with computers in the same way legitimate users do – by sending data to existing processes through the operating system.
This brings us to a very important point – your machine’s attack surface.
The Attack Surface
Hackers can only interact with the processes that run on your system. When you only have a couple of processes running, they only have a couple of targets to work with. If you have many processes running, you give them a bigger target to aim at. We can think of this “target size” as a surface area – the larger the surface, the easier it is to cause harm.
Each new process running on your system increases the hacker’s chances of breaking into your machine.
Now, you may have hundreds or thousands of programs on your machine – it’s unlikely they’re all running at the same time. But these dormant programs are also a part of your attack surface.
If a hacker gains control of a running process, they can use it to launch other processes – they can use these processes to achieve their goals. If the program they need is already installed on your machine, it makes their job much easier.
Let’s imagine an example – let’s say the hacker wants to delete your hard drive. Let’s imagine your system has a program that deletes hard drives (Linux does ship with programs that can do this).
Now the hard drive deleting program is very unlikely to be active when the hacker gains access to your system – unless you were deleting a hard drive at the time! So the hacker has to gain control over an active program first.
Let’s say you’re also running SSH (a program that allows you to log on to a text interface over a network). And, for the sake of simplicity, let’s imagine you allow any anonymous user to log onto your system through SSH.
Now the job becomes very simple: log on to ssh, type the command to run the hard disk deleter.
Clearly, this is a very insecure system!
If the hardware deleter was not already installed, the hacker would have a harder challenge. They would have to:
- Log on to SSH
- Install a hard drive deleter
- Run it
It’s not very hard to do that, but it’s more work.
This example illustrates a point – the more software you have installed on your machine, the easier it is to hack – even if you aren’t using the programs!
Clearly, programs that are designed to destroy your system are dangerous. But even innocent software can be used in an attack.
A screwdriver is an innocent tool, designed to – well, drive screws. But it makes a pretty nasty weapon in the wrong hands.
So the simplest security step is to remove software you don’t need. If the program serves no useful purpose in your system, it shouldn’t be there. Even if it seems innocent, there could be some inventive way to use it harmfully.
Modern operating systems are designed to be used in many different situations, for different purposes. Users hate installing software – they want their machine to work out of the box. So OS developers anticipate their users’ needs and ship a huge selection of popular programs with every release.
If your web host is running a popular Linux distribution, it probably has hundreds of programs you don’t need. This creates a big attack surface!
There are 3 ways to reduce the attack surface:
1. Run fewer processes
2. Uninstall programs you don’t need
3. Build a system from scratch that only has the processes you need
Building an entire Linux distribution is quite a tall order. But you can start with a very minimal system (such as Alpine Linux). Then you add the software packages you do need and ignore the ones you don’t.
That’s quite a challenging chore because you often have to compile programs from their source code. What’s more, you may have to track down obscure dependencies – and that’s a little too awkward for our article today.
Trust
At heart, security is all about trust. Who do you trust? Hopefully, you trust yourself. You know you aren’t going to destroy your own server in a fit of melancholy.
What about your employees? Sure, you trust them, but how much? Not as much as yourself. A disgruntled or anti-social employee could damage your system out of spite.
What about the public? You know some of them, and you know they want your site to succeed. They rely on your services or whatever you provide to them.
But you don’t trust them entirely. You wouldn’t give them the keys to your business empire – maybe they would steal your resources so they didn’t have to pay for them.
Then there are anonymous users. This is the rest of the world’s population – strangers that appear on your site, reading your content. Are they good or bad? There’s no way to be sure.
It’s easy to get paranoid, but it’ not very productive. Instead, you need some kind of policy that controls what people can do with your computer. The people you trust the most can do the most. People you don’t trust should be able to do very little.
What you need is some kind of automatic system that enforces these trust policies. These systems exist – some of them are built into your operating system already.
Users
A user is someone who uses something. In computing, a user is someone who uses a computer.
Computers are basically machines that do what they’re told. Someone tells a computer to do something, and it does. But should a computer always do what it’s told?
It depends on who is telling it, and what they’re telling it to do.
If you own the computer, it should follow your orders. Of course, it’s possible you could accidentally tell the computer to do something crazy – like delete everything on your main hard disk.
So it’s useful to put some limitations on your own access – even if it’s just a question that pops up and says “are you really sure you want to do that?”
Other people should have limited access, based on how much you trust them to act in your best interest.
Computers need some way to know who is giving them orders. They do this through the concept of user accounts and authentication.
When you gain access to a computer, it will identify you as a user based on some kind of identification process. This is called “authentication”. There are different ways to perform authentication – the simplest is asking for a username and password. Complex systems use bio-scanning software to scan your retina, read your fingerprint, or check your birthmarks (or whatever).
Other systems check for cryptographic keys installed on your computer.
A really good authentication system uses multiple tests. Someone could steal or guess your password. They could grab your laptop with its cryptographic keys. Or they could cut off your finger (which would also be a problem).
It’s unlikely they would do all three.
Processes
The idea of user accounts is a useful abstraction. In reality, users can only interact with the system through processes. You don’t step into the machine like a character from the Tron films.
In other words, the Kernel doesn’t deal with users. It deals with devices and processes.
When a program is executed, the kernel creates a process space in memory and loads the program into it. It tags this process with data that identifies which program is running inside. And it also tracks which user created the process.
Processes can only interact with the system’s resources through the kernel. These resources are pretty much everything outside the processes’ memory space (such as files or the network).
When a process asks the kernel to do something, it has to make a decision. Should it comply, or should it refuse the request? It depends on what the request is, and who is asking.
To identify the “who” part of the question, the kernel checks the user account associated with the process. If it’s a superuser (system administrator), it should probably do what it’s told. If it’s an untrusted account, it might refuse.
The kernel makes this decision based on one (or more) access control settings.
6 Access Control
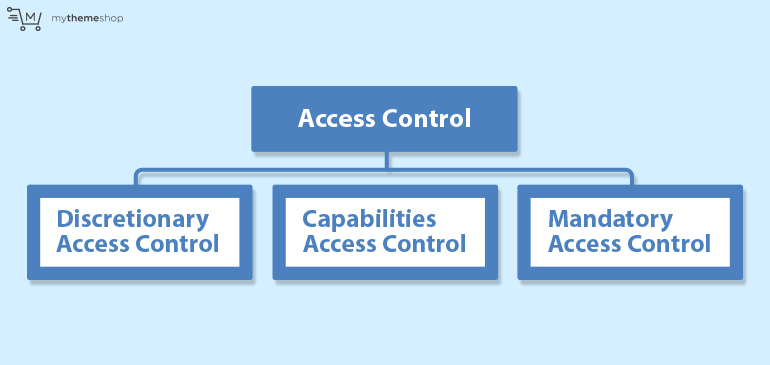
We previously mentioned automated systems for controlling who can do what. These systems are called “access control”. They control which users can access the resources on your system. At a low-level, resources are files and processes.
There are 3 types of access control that work at a very low-level in Linux. These are:
- Discretionary Access Control (DAC)
- Capabilities Access Control (CAP)
- Mandatory Access Control (MAC)
They’re not mutually exclusive – you can use them together.
Now, the names don’t really explain what they are, so let’s examine each one
Discretionary Access Control
Discretionary access control is built right into the basic Linux kernel – it’s a part of the Unix standard. It’s a way to describe which users can access a file or process on a computer. It’s very tightly coupled with the idea of user accounts. And it introduces the concept of ownership.
Every file is owned by some user. When you log on to a Linux machine and create a file, you’re the owner. File owners can also transfer a file to a different user.
The file’s owner has discretion over who can use it, and how. They control this permission by tagging the file with data that the kernel can read.
Everyone who accesses a computer is a user. They have their own permissions (enforced through DAC). Linux also has the concept of a user group.
Let’s imagine a system with 4 users, Alice, Bill, Charlie, and Delilah.
Alice is the system administrator – she’s the superuser.
Bill and Charlie are software developers. We should group them together because they have a similar job, and they need to cooperate to get it done.
Delilah is a customer.
Alice should have complete control over the system.
Bill and Charley should be allowed to create, edit and delete the source code for their software. And they should be allowed to compile the source code to build applications.
Delilah should only be allowed to download the applications she has bought.
DAC gives us a simple way to enforce these policies.
As Alice is the superuser, she has no restrictions. She basically bypasses the entire DAC system and can do whatever she wants. She can edit source code, delete it, compile it, download the app – basically anything goes for Alice.
She can also create new users, and remove old ones from the system (maybe the company fires Bill and hires Edward).
To Linux, there are only 2 types of user accounts – superuser (or root) and regular user. So, Bill, Charlie, and Delilah are all regular users.
However, you don’t want Delilah to get her hands on the source code, or go crazy with the compiler. So you need to limit her access.
You can do this with file ownership. Delilah is given a directory on the system that she owns. The software she bought is loaded into this directory, and she’s the owner of that file, too.
Every other file belongs to someone else – Bill, Charlie, and Alice.
Permissions
So, how does the kernel know if it is allowed to show files to Delilah? Through permissions.
Under Linux, there are 3 things you are permitted to do to a file. You can read it. You can write to it (this includes deleting it). And you can execute it – turn it into a running process.
Owner Permissions
Delilah should be able to read the app files in her directory – otherwise, she can’t download them! Should she also be able to write to them – to change the files on the server? Nope! She might break them, and then blame the company for it. She can do that on her own machine!
Should she be allowed to execute the file – run it on the company’s server? Again, no. Let her pay for her own computer resources!
Alice’s access should be read-only. If we lay that out in a table, we get the following:
| Read | Write | Execute |
|---|---|---|
| Yes | No | No |
Computers love numbers – everything in a computer is encoded as a number, including file permissions. So the permission is encoded as a binary number that looks like this:
| Read | Write | Execute |
|---|---|---|
| 1 | 0 | 0 |
The binary permission number is 100. That’s not “one hundred” – if you convert that into a decimal number (which humans like) you get 4. Here’s why:
| 4 | 2 | 1 |
|---|---|---|
| 1 | 0 | 0 |
The “1” in “100” means 1 * 4. The first zero means 0 * 2. The last digit – zero – means 0 * 1. 4 + 0 + 0 = 4.
When Delilah attempts to download her application, she uses an FTP program on her computer, that chats with the FTP service running on the server. She tells it to download the file. The FTP service asks the kernel to read the file.
The kernel has to decide if Delilah should be allowed to read the file. So it checks who owns it – Delilah does! Does she have permission to read the file – it’s “owner” permission is set to 4. Yes, she does! So the kernel agrees to the request and sends the file to her.
What if Delilah attempted to upload a file with the same name to her directory? FTP allows people to upload files, so her client program on her computer has no problem with the request. It sends it to the FTP daemon running on the server.
The FTP daemon sends the request to the kernel – Delilah wants to write to the file. The kernel has to make a decision – does Delilah have a write permission on the file?
Well, she is the owner, and the owner has a permission of 4 (100 in binary). Wait a minute, the write bit is set to zero. Delilah does not have write permission! Request denied!!
The kernel tells the FTP daemon to get lost. Fortunately, the FTP daemon has a tough skin and takes rejection well. So it sends a message to Delilah to tell her her request was rejected.
What about the other files on the system – the source code files, for instance?
Public Permissions
Bill has created a file called “my_app.go”. This file lives inside the /source directory, which he owns. He doesn’t want unauthorized users to access the file, so he set the “public” permission to “000” – can’t read, can’t write, can’t execute.
If Delilah attempted to download this file, the kernel would say “No. The read bit is zero.” If she attempted to write to it or execute it, she’d get the same response.
Setting the right public permission is very important – some resources should be available to the public. For instance, if Delilah wanted to read the contents of her folder, she’d have to run the ls program (which lists the contents of a directory). This program is a file on the computer system, usually located at /bin/ls.
To access and run this program, Delilah would have to have the “execute” permission on the /bin/ls file. And so would other users. The permission should be public, as Delilah is not the superuser.
Should she be allowed to write to the file (change the program)? Hell no! She could put a virus inside it. So the public permission code should be:
| Read | Write | Execute |
|---|---|---|
| 1 | 0 | 1 |
That’s 101 in binary, or 5 in decimal.
Group Permissions
So, we’ve seen how DAC applies to Delilah and her downloads.
What about Bill and Charlie?
Bill was the first programmer who worked for the company, and he created the /source directory and the early code. As time passed, the job became too big for one programmer, so they hired Charlie. Charlie has created several of his own files in the /source/ directory, and he also edits Bill’s files from time to time.
As the senior programmer, Bill likes to check up on Charlie’s code, and he often has to correct mistakes.
Bill and Charlie should be able to read, write and execute their own files – the owner permissions on these files should be:
| Read | Write | Execute |
|---|---|---|
| 1 | 1 | 1 |
That’s 111 in binary or 7 in decimal.
However, we’ve already said the public permissions should be set to 000 (or plain old 0 in decimal). So how can they access each other’s files?
A file can only have one owner, after all.
The answer is to create a user group called “developers” and add Bill and Charlie to it. Then tag all the source code files as belonging to this user group.
In addition to owner and public permissions, files have group permissions and group owners.
For these files, every member of the “developers” group should have the same access as the owner – which was 7.
Putting it Together
When we list a file’s permissions, we combine these 3 numbers in this sequence: owner-permission group-permission public-permission.
For Delilah’s application file, the permissions would be:
400
For the source code files, the permissions would be:
770
Directories Are Weird
Remember how I said the “execute” permission means the permission to run code as a process? Well, directories are different. When you “execute” a directory, you’re actually accessing the directories contents.
Files live in directories, and to access them, you have to have “execute” permissions on the containing directory.
Let’s say Delilah’s folder was set to 400
This means she has permission to read (but not write or execute) the folder.
So she can’t rename it or delete it. But she can’t access the files inside it, either!
Here’s the correct owner permission:
| Read | Write | Execute |
|---|---|---|
| 1 | 0 | 1 |
That’s 101, or 5 in decimal. So the correct permissions value would be:
500
Elevated Privileges
Charlie’s having a bad day. First of all, he set the permissions wrong on one of his new source code files – instead of setting it to 770, he used 700.
Next, he fell down an old well. Don’t worry, the rocks broke his fall. The rescue chopper is on the way and he should be able to return to work in a month.
Meanwhile, Bill has to review the new source code and compile it. The only problem is that Bill doesn’t have access to the file – the group permission is 0. In fact, Bill only knows the file exists because he has execute permissions on the directory, so he can list the contents.
Bill could log on under Charlie’s account, but this is a bit dodgy. Also, Charlie’s the only one who knows his password, and he’s in no state to talk to Bill.
So Bill does the only thing he can – he asks Alice to change the permissions for him.
Alice is far from happy – she already has more work on her hands than she can manage, what with this massive system with 4 users and all! But it’s the only way out, so she puts down her Sudoku book and logs on.
There is another option that would save Alice’s precious time. She could authorize Bill to use the sudo command.
Sudo stands for “substitute user do” – it used to stand for “superuser do”, but it’s more useful now. It allows you to temporarily become another user to execute a command. The new process that you launch runs as that other user.
If Alice configures sudo to accept Bill, he could temporarily elevate his access to the superuser level, and run commands as if he were Alice. This allows him to change the permissions on Charlie’s file, as the superuser has no restrictions!
Of course, with great power comes great responsibility – the sudo command can be dangerous. We’ll come back to this concept later. But for now, let’s assume Bill is a trustworthy guy.
In day to day work, developers use sudo for all manner of purposes. Installing new software packages is a major reason. Software packages are usually installed in directories that belong to the superuser. These are where the system software lives, along with programs that are intended for all users on the system.
To install software to these directories, you need super user access. The sudo command gives you the power to install packages from a less-privileged account.
Upgrading Bill’s account to full-time superuser access would be a bad idea. He could make important changes without consulting Alice first. Or he could accidentally cause some kind of damage. By forcing him to type “sudo” before running any important command, he has to take a moment to think about what he’s doing – at least in theory.
A New Group Appears!
One day, the impossible happens. The company manages to get a new customer – Engelbert!
This poses a bit of a problem. Do they create a new download directory for him? Well, the application files are rather big, and they only have a small hard drive. So why not create a new download directory and make it accessible to all their customers (both of them).
If you remember, the permissions on the application file were set to 400, and Delilah was the owner. If Alice simply moved the file to the new directory with the old permissions intact, Engelbert would be unable to download it.
There’s a simple solution:
- Create a new “customers” group. Add Delilah and Engelbert
- Change the owner to Bill – he’s the guy who compiles the file, so he should be able to replace it when he fixes bugs or releases new features.
- Set the permissions to 740
These permissions are:
Owner - read, write, execute
Group - read only
Public - no access
But there’s a problem. When Bill creates files, they belong to him and his group (developers). To allow the customers to download these files, Alice will have to change the group owner to “customers”.
When she does this, Bill will be able to read-write-execute the file, and the customers will be able to download it (read it).
Even though Bill is not part of the customer group, he can still access the file because he is the owner. The user-owner does not have to be a member of the group-owner group!
Inhuman Users
So far, every user we’ve considered represents a real live person. But there are times when you may want to create a non-human user.
Why on Earth would you want to do that?
No, it’s not so you can market to animals and aliens. Remember, every process that runs on a system does so as a user.
The core processes that start when Linux boots usually start as the root user, since they perform admin tasks.
Sometimes you want to start a long running process on a machine, but you want to restrict its access to the system – usually, because it will interact with people you don’t trust.
A web server is an example of such a process. It has to keep running for as long as the machine is on. And you don’t trust the people who interact with it.
Which user should you use to run the web server?
It doesn’t make sense to pick an existing human user’s account because these guys have well-defined jobs. So the solution is to create a new user with a single role – to run that process!
Then you launch the program using this user account – for instance, you could use the sudo command to become the inhuman user for a moment.
This has become a common practice, and most long running background applications are installed and run with their own user accounts.
The package manager usually sets this up for you, so you don’t have to remember it at run time. You type the command in the console, and the program switches user before it starts working.
It uses a mechanism called SUID (set user id) to run as a different user – so you don’t have to remember to type “sudo” when you run the command.
Apache (the popular web server) usually runs as “httpd” or “web-data” in Debian and Ubuntu distributions. Other distros use different naming conventions.
DAC Summary
OK, this example had nothing to do with WordPress! However, it does illustrate how Discretionary Access Control works. Let’s close this section with a simple WordPress example.
Sometimes lazy webmasters upload all their WordPress files with the permissions property set to 777. Can you see why this is a bad idea?
It means every user has full access to the files. They are free to read them, write to them, and execute them.
This makes it painfully easy to corrupt the files, inject malicious code, add executable files into the WordPress directories, and so on.
In a later section, we’ll show you the permissions you should apply to your WordPress files and directories.
Capabilities
We’ve seen how you can use the sudo command to temporarily become the super user. The superuser has the ability to do anything on the system because they bypass DAC entirely.
Of course, giving a regular full access to the system is dangerous. They could cause massive damage, either by accident or on purpose.
On the other hand, there are times when a regular user needs admin powers – adding new software is an example.
Now, in a high-security organization, the solution is to never give out sudo access, and force the administrator to perform all these tasks. Even then, there are services and daemons that require some superuser abilities to work.
Here’s an example – the web server. Web servers have to listen to network traffic over port 80 – a well-known port. In Linux, only superuser processes can bind to well-known ports.
Of course, it’s extremely dangerous to allow a web server to run as the root user – an attacker could use it to gain control of the system.
So we have a catch-22. Do you run Apache as a root user so it can listen to port 80, or do you run it as a regular user and take a higher port number, like 2345.
When people visit your site, the browser requests content on port 80. If you were serving content on port 2345 instead, you’d have to use ugly URLS like this: http://www.mysite.com:2345/my_content.html.
The problem goes back to Linux’s origins, in Unix. Unix is pretty old – it emerged in the 70s, and was based on ideas from earlier operating systems. Computer systems were far simpler back then, so it made sense to see the world in terms of black and white – superusers and regular users.
Many of the Unix design principles have aged very well, but this isn’t one of them. To make web servers and other similar programs secure, we need some shades of gray. Otherwise, we can’t apply the principle of least privilege.
This is where capabilities come in. Capabilities are a newer concept that breaks down what it means to be a superuser. A superuser has many capabilities – things they can do which ordinary users can’t.
Of course, I keep talking about users. What I mean is “processes”. A user only interacts with the system through processes – those processes the user starts are tagged with their name and permissions.
Capabilities allow you to grant some of the powers of a superuser to a process, regardless of who the user is. We only give the process the abilities it needs.
Capabilities are granted to programs with the setcap command – this command is applied to the program’s file directly, and the capabilities are loaded with the program when it executes.
If the program has already started before you use setcap, you will have to restart it to see the changes.
It’s worth noting that this is usually done for you during the installation process. But you have the power of changing these settings manually.
Capabilities are a standard part of the Linux kernel – there’s no need to install any additional software.
Mandatory Access Control
DAC doesn’t apply to the superuser. This is a deliberate design choice in Linux, but it opens the door to a wide array of attacks. A hacker can hijack a process with superuser capabilities (such as the command “password”) and then modify its code while it’s running. This is hard to do, of course, but there are ways to achieve it.
By changing the code, they change the behavior. They can make it do things it shouldn’t.
There are two common tactics:
Privilege Abuse:
The hacker uses the processes privilege level to do bad things a regular user couldn’t. If the process is running as the owner of a set of files, or a group owner, they can do things with those files that a less privileged user can’t – like change them or delete them.
In any case, this type of abuse is only possible because of the existing privilege level of the process.
Privilege Escalation:
The hacker uses some method to increase the process’s privilege or to launch a new process that has a higher level. In any case, the goal is to abuse the new, higher privilege level.
One common tactic is to force it to open another program that is configured to run as root. Suddenly the hacker is logged on as a superuser – able to do literally anything on the system.
DAC’s “all or nothing” approach to privilege is at the root of the problem. Mandatory access control (MAC) is one solution to this issue. It complements DAC and Linux capabilities to limit the damage a superuser can do.
There are several different flavors of MAC, including Rule-Based Access Control and Role-Based Access Control – which confusingly have the same acronym (RBAC)!
SELinux
SELinux is the most comprehensive example of MAC – it stands for security-enhanced Linux. It was developed by the NSA, who have very specific security requirements. They also know a thing or two about bypassing security!
Under SELinux, every resource on the computer is given two labels. A resource is a file or program (programs exist as files when they are not running in memory). One label describes the classification of the file (such as sensitive, top secret, unclassified, etc). Another label describes who is supposed to use the file (such as a task force, manager, work group, individual, etc).
Each user has a set of labels, too. These describe their role and what level of secrets they are allowed to access.
Labels exist in hierarchical levels. Teams are members of larger groups. Managers are members of these groups, but they have senior access. Groups are parts of departments – and so on.
In addition, the system administrator sets up a detailed list of rules. These rules explain the organization’s security policy in terms of these labels.
SELinux is a kernel security module that mediates how processes can act on the system. When a process sends a system call to the Kernel, it first checks it’s built-in DAC rules. If the request is OK according to DAC, the kernel asks the SELinux module whether it’s OK.
SELinux looks at the labels that apply to the process, the action it’s trying to accomplish, and labels for the resource. Then it looks up the appropriate rules. If it can’t find a rule that specifically allows the action, it sends a negative response to the kernel. SELinux’s default response is to deny any request.
If the response is negative, the kernel sends an error message to the process.
SELinux is extremely comprehensive, but this power comes at a price. It’s difficult to learn, complex to set up, and time-consuming to maintain. What’s more, it has to be updated to reflect changes within the organization – and to reflect the organization’s changing practices and security policies. If someone reorganizes the work teams, it can take days for the sysadmin to catch up!
Of course, this gives sysadmins something to do when they run out of Soduku puzzles!
AppArmor
AppArmor is an example of a MAC tool, although it’s nowhere near as comprehensive as SELinux. It applies rules to programs to limit what they can do.
You can configure AppArmor to limit processes to certain areas of the file system, for instance. You can tell the kernel which files the process is allowed to read, write, delete or execute. You can specify which ports it can open. And you can control its ability to launch other processes.
AppArmor can set or revoke specific Linux capabilities for a process. You can even limit how much memory a program can use.
When a process requests an action from the kernel, it first checks to see if DAC allows it. If the DAC request passes, then it checks the AppArmor rules.
Unlike SELinux, you don’t have to create labels for every resource on your disk. Instead, you use pathnames to specify the files a process can and can’t access.
This is simple and easy, but there’s a risk you could overlook some sensitive file or directory. SELinux would catch this kind of omission with its system of labels and denying all requests.
AppArmor is controlled through simple language. You create a configuration file (or “profile”) for each risky process. Many files have been created and shared by the community, so you don’t have to write one from scratch.
However, you may want to increase the restrictions – the community files are deliberately loose to allow a wide range of use cases. In your own projects, you have specific needs, and these are unlikely to change. So you can afford to tighten the restrictions. (We’ll show you an example of this in a later section.)
AppArmor comes with tools to help you get your settings right. You can check your configurations with the “complain” mode.
In this mode, AppArmor will not block a process from doing something it thinks is not OK. Instead, it will log the violation (or complain about it).
You can test a configuration by deliberately carrying out routine operations and checking if any complaints were generated. If they were, you need to loosen the restrictions and try again.
Eventually, you will find a configuration that allows the software to do the stuff it needs to do, and stop it from doing anything bad.
In the case of WordPress, you should try out all the different actions you would usually perform on your site:
- Make a blog post
- Edit a blog post
- Make a page
- Add and remove widgets
- Change themes
- Download a theme
- Download a plugin
- Activate and deactivate plugins
- Update WordPress
- Moderate comments
etc.
Of course, you may have a very customised WordPress installation, with lots of proprietary code. You may require special permissions that other sites can do without. In any case, you need to check and see if your policy is too restrictive.
AppArmor has a learning tool that uses the “complain” mechanism to generate a set of policies. It starts by assuming the most restrictive policy possible. You use the app, as mentioned above. While the app runs, AppArmor generates complaints about every system call, logging the request and privilege the process required.
When you have run the app through its paces, you tell AppArmor you’re done. It will then automatically generate a security profile, granting the process privileges for every action mentioned in the logs.
You can manually tweak this profile, tuning it for greater security and readability.
AppArmor is relatively easy to set up, but it does require you to configure each application and program one by one. This puts the onus for security in the hands of the user or sysadmin. Often, when new apps are added, users forget to configure AppArmor.
Or they do a horrible job and lock themselves out, so their only option is to disable the profile.
That said, several distributions have adopted AppArmor. They create profiles for every application in the repository, so users install a new AppArmor profile automatically.
Generic profiles shipped by repo teams are designed to cover a wide range of different use cases, so they tend to be fairly loose. Your specific use cases are usually more specific. In this case, it pays to fine-tune the settings, making them more restrictive.
GRSecurity
GRSecurity is a suite of security enhancements. Many of them are designed to make it harder for hackers to take control of running processes. These modules protect against malformed data, shellcode, memory overflow attacks, and exploits that deliberately execute code out of intended sequence.
The access control part of GRSecurity is similar to AppArmor, in that you create profiles for programs, describing what they can or can’t do. GRSecurity also has a learning mode. Unlike AppArmor, you don’t have to train GRSecurity with each app one at a time. Instead, you run your system as normal. After a period of time, GRSecurity will have gathered enough information to understand the required permissions for the entire system. It will create a security profile for you.
Just like AppArmor, it makes sense to examine these profiles and tweak them by hand.
GRSecurity is a commercial product, but there is an unofficial port, which is integrated into the Alpine Linux package. By “unofficial port”, I mean an independently developed project that does the same thing – not an illegal rip-off.
As GRSecurity and the port both draw on the same open source projects, they’re virtually identical in capabilities, stability, and reliability.
GRSecurity is also easier to use than AppArmor – and both are much simpler than SELinux.
Building a secure web server on top of Alpine Linux is a little complex – since the distribution is less popular, there are fewer precompiled packages. You have to compile the software from source, and it can get quite complex.
For this reason, we won’t attempt it in this article. In the future, this could become a viable option.
For now, we’ll use Ubuntu and AppArmor.
Application Level Access Control – Apache
Aha, you thought I’d finished talking about access control! Well, I almost have.
Everything I’ve covered so far has dealt with access control at the operating system level. This constitutes your last line of defense, and it’s incredibly important to enforce the rules at this level.
Apache is a user-facing service – it’s how your users interact with your website. It’s important to control this interaction too.
WordPress is made up of multiple files sitting in publicly visible folders. These folders contain code that WordPress requires to function. They include your site’s configuration, plugins and themes, and core WordPress files.
The web server must be able to access them because it has to load the code into the PHP runtime – otherwise, your site will break. So blocking Apache from accessing them is not an option.
But unauthorized public should never be able to read these directories or the source code contents of the files in them.
When users navigate through your site in an innocent fashion, they click on links and see your content. But a hacker could attempt to view your WordPress folders directly. Knowing your site’s address, it’s quite easy to type in an address and browse through the contents of your folders.
This is default Apache behavior, to generate a directory index when there’s no index.html or index.php file.
If your Apache configuration is bad, these files can be viewed as plain text. All of your code will be visible for anyone to see – this potentially includes your database credentials, cryptographic keys, and salts. Keeping this data secret is vital – otherwise hacking your site becomes trivially easy.
You can configure Apache to refuse any requests for these essential directories using .htaccess files. These are folder-level configuration files that Apache reads before it replies to a request. You can modify most of Apache’s settings in .htaccess files, and these settings only apply to requests for content in that folder. It’s a cool feature that enables all kinds of interesting behavior.
The primary use for .htaccess files is to control access (the clue’s in the name!).
In a later section, I’ll show you exactly how to do that.
Application Level Access Control – WordPress
WordPress has its own access control features built into the core files, and you can extend them with plugins.
Before you can write a page or post, you have to log on to your admin panel. In the standard setup, this requires a username and password. Using a secure password is essential – avoid words or phrases that can be guessed easily.
You can also add a second layer of authentication – some plugins will send a special code to your phone as a text message, for instance. This means that simply having the password is not enough. An attacker would also have to steal or clone your phone.
That’s great, but there are some exploits that bypass the login process entirely. If an attacker knows your WordPress cryptographic salts, they can use fake cookies to trick WordPress into thinking they have logged on already. Without your password, they have to use brute force, trying multiple possible combinations at a rate of 30 attempts per second.
As these attempts do not generate error messages, it’s hard to track them. Of course, you’ll notice the increased network traffic. And you can configure your firewall to block any single machine that makes so many simultaneous connections. But a good hacker knows how to cover their tracks (using a botnet, for instance).
Applying the concept of defense in depth, you can limit the damage a hacker can cause if they do manage to log on. You can prevent them from installing plugins or themes (with corrupted code) by changing some settings inside your wp-config file. You can also use AppArmor to block the Apache process from changing the code on your storage.
The downside is that you’ll have to install plugins or change themes manually – but that’s a small price to pay. I’ll show you how you can make the process painless in a later section.
7 Network Based Attacks
So far, we’ve covered how attackers harm computer systems through running processes. So how do attackers interact with these processes?
Data enters the system through hardware devices. Keyboards and mice are input devices – and so is the network card.
If the hacker has physical access to the computer, they have many options at their disposal. They can type commands through the keyboard, or insert a disk or USB stick into the machine and launch an attack that way.
When it comes to network-based attacks, attackers have to reach through one of the machine’s network ports. Ports are a routing mechanism that computers use to ensure messages reach the right process on a computer.
A typical computer system has dozens of processes running at any one time, and many of them will communicate over the network. Often, these processes expect a reply. Other processes wait patiently until someone connects and requests data.
IP addresses allow the network infrastructure to deliver messages to the correct computer. But how do these messages make their way to the right process? They do this through a port number.
Inside the computer, the incoming data packets are sent to processes that are “listening” to these ports. If no process is registered, the data packet is deleted.
Imagine the computer is a massive apartment building, with thousands of units inside. Some of them are occupied, and others are empty. They all share the same street address (IP address). But each unit has its own number.
When a process starts up, it can request a port number from the kernel. If another process is already listening on that port, the kernel will signal an error.
If the port’s free, the kernel assigns it. Some ports are privileged, and the process will not be granted access unless it’s running as a superuser, or with elevated privileges.
Client processes send requests to server processes. They can ask for data or send it – the server is supposed to do something with the data that it receives.
Clients can use any random port, but servers have to listen on a specific port. Otherwise, nobody would know how to route a message to them!
The kernel doesn’t know or care if a process is a client or a server. It just handles the routing. It delivers the data and lets the processes deal with it in their own way.
When a packet arrives on a computer, it has a port address. If there’s a process listening on that port, the kernel sends a signal to the process and delivers the data.
If we go back to the apartment building example, it’s like the porter calling the apartment and telling them to pick up a parcel.
If there’s no process listening, the kernel simply deletes the data.
For an attacker to exploit a system, they have to communicate to a process that’s listening on a port. Otherwise, they’d simply be sending messages that are ignored.
This is why you should only run processes that you need for your site to run. Anything else is a security risk. It forms a part of your attack surface.
There are literally thousands of network-aware programs that could be running on a computer, and there’s no way to know in advance which ones are there. What’s more, many of them will be listening on an unexpected port address – ports can be assigned randomly.
So hackers often employ a tool called a port scanner. This service systematically sends messages to a range of ports on potential target machines. They can be set to check popular ports or to scan every port.
When the target machine replies, the scanner knows that port is occupied. After a short time, the hacker has a complete picture of the machine’s network attack surface. This allows them to plan and execute their attack.
Often, ports are occupied by processes that provide no real valuable service to the machine’s legitimate users. This tends to happen when you install a large distribution designed for multiple uses.
Large distros include software that is useless to you in terms of running a website. So the best strategy is to start with a very lightweight distro and add the components you need.
Some of these processes can be exploited. So it’s vital to identify them and shut them down.
You can get a list of processes connected to your machine’s ports with this command:
netstat -tulpn
If you see any unnecessary processes, you can shut them down manually. Better yet, if the process is completely unnecessary, you can remove it from your system.
8 Firewalls

It’s easy to overlook a stray software package and end up with an exposed port. It’s also easy to misconfigure a networked app, leaving it open to attack.
Sometimes you want to run a process on a port, but limit the access to it. For instance, you might want to ensure that only certain computers can connect to it, or limit what type of information is sent to it. You should also think about what kind of information leaves your host machine, too.
This type of control is not built into the low-level networking protocols – their job is to send messages between machines and ensure they get delivered to the right processes. They don’t deal with whether the information should be delivered.
To control the flow of data in and out of your computer, you need another type of software component. You need a firewall.
Firewalls are quite similar to access control within the computer. They operate on a network level, and you can use them to enforce security policies.
A firewall can prevent processes from broadcasting information from a port. It can stop outside users from sending data to a port. And it can enforce more complex rules.
For instance, you could specify how many simultaneous connections an external user could have on a certain port. Or you could say that the machine should only accept connections from a list of known IP addresses.
Simply installing and running a firewall does not make your host machine secure – it’s just one layer in the security cake. But it’s a vital and a powerful one.
9 Intrusion Detection

Firewalls limit a hacker’s options, but they don’t prevent attacks. They force a hacker to exploit legitimate lines of communication into the server.
There are many creative exploits that work over legitimate connections. So we need additional layers of security. First of all, we need to configure our software to resist common attacks. But that can only protect us from attacks we know about.
Access control software, such as AppArmor, can drastically limit the damage caused by unauthorized access. But you still need to know an attack is in progress.
This is where Network Intrusion Detection Software (NIDS) is essential. It scans the incoming network traffic, looking for unusual patterns or signs of a known attack. If it sees anything suspicious, it logs an alert.
It’s up to you to review these logs and act on them. When you see an alert, there are several possibilities:
- It’s a false alarm
- It’s a real attack, but it’s ineffective
- It’s a real attack, and a hacker has gained access to your system.
If it’s a false alarm, you should tune your NIDS software to ignore it. If it’s an ineffective attack, you should review your security and block the attacker through the firewall.
If it’s an effective attack, you have to repair the damage and prevent it from happening again.
But how do you know the extent of the damage? This is a job for Host-based Intrusion Detection Software (HIDS). HIDS scans your disk for unauthorized changes, looking for files that have been added or altered. These “payloads” can be detected and removed, returning your server to a normal state.
Of course, it’s much harder to achieve that without regular backups. That’s why it’s essential to have an automated backup system.
Finally, you need to understand how the attack succeeded, so you can prevent it from recurring. You may have to change some settings on your Firewall, tighten your access rules, adjust your Apache configuration, and change settings in your wp-config file. None of this would be possible without detailed logs describing the attack.
10 Denial of Service Attacks

I’m sure you’ve heard of denial of service attacks (DOSes) and their deadly variations – distributed denial of service attacks and amplified denial of service attacks.
Let’s briefly cover what they are, and then I’ll show you what you can do to protect your site.
A denial of service attack is any kind of attack that prevents a computer from providing an expected service. Switching off the power could be considered a primitive type of DOS. Smashing your server with a brick would be another.
A hacker could perform a DOS with a single line of code in a shell session – by triggering an unending cascade of new processes that eat up the entire system memory.
These are all DOS attacks. The end result is the same – when someone tries to visit your site, nothing happens.
When most people speak about DOS attacks, they’re thinking of HTTP based DOS attacks. In an HTTP DOS attack, a hacker sends many fake requests for HTTP content to your server. Web servers can only serve so many people at a time, and eventually, they run out of resources and can’t handle legitimate requests.
Due to its design, Apache is quite weak against this type of attack. A few hundred simultaneous connections are enough to overwhelm it.
Nginx uses a different model to deal with multiple simultaneous connections – it can survive thousands of connections at once, as long as your host machine is powerful enough.
Every web server has a breaking point and dedicated DOS attackers are willing to increase the load until your server buckles.
Good firewalls offer some level of protection against naive DOS attacks – they know it’s unnatural for a single user to request the same content hundreds or thousands of times per second. At some point, they’ll start ignoring requests from that machine.
Unfortunately, they aren’t so good against distributed DOS attacks (or DDOSes). A DDOS uses multiple machines to send HTTP requests – often thousands of them spread out across the entire world.
How does the hacker achieve this? By using malware to control other people’s computers, and forcing them to join a botnet.
In any case, the firewall sees thousands of legitimate requests and passes them on the web server. The server would think the traffic was legitimate too, and it would quickly drown.
You can offset the weight of a DDOS attack with brute strength – use multiple servers to increase your resources beyond your attacker’s ability to consume them. This can work.
But there’s an even worse type of DOS attack – the amplified attack. These attacks typically use a different protocol – HTTP works over TCP. The most effective amplified attacks use UDP. Both of these protocols are supported in Linux, and they both consume your network resources.
TCP attacks (including HTTP attacks) require a connection from a machine that your hacker controls and your server. Both machines have a little chat before the hacker can send the attack request (this is called the handshake).
The handshake is important because TCP is designed to ensure data arrives in the right place. So Linux will ensure the connection is good and the client machine is listening before it starts sending requests.
Because this little chat has to happen first, the attacker has to use the real IP address of a machine he or she controls. And this places a limit on the number of connections they can make.
UDP is a different type of protocol – it’s used to send data when it doesn’t matter if some of the information fails to arrive. It’s used for voice over IP, webcams, and other less important connections.
With UDP, a hacker can use a fake IP address in their request packets. In fact, they use YOUR SERVER’s IP address.
Here’s how it works. The hacker will contact thousands of online services and request data using your IP address. These services think the request comes from your machine.
They will start sending a lot of data as a reply. The only problem is the return address belongs to your server! Because UDP does not include a handshake, these services are not able to check the source of the request. They implicitly trust it.
The key to making this type of attack work is to choose services that send a big answer to a short question. This way a hacker can use their bandwidth efficiently, while completely destroying yours.
Your server will be flooded with gigabytes of unwanted data per hour, completely consuming your network resources and preventing your real users from seeing your site.
Let’s put this in real-world terms. Imagine someone wanted to destroy your peace of mind. They know your street address, so they decide to hold a fake party at your house. They create a poster that makes people want to come to this party – they tell them there will be lots of free booze and celebrity guests.
They then put thousands of these posters up all over the entire city. They go into nightclubs and hand them out. They find the places where all the drunks hang out and tell them that you will pay them to drink your alcohol.
You know nothing about this until the night of the party. Suddenly thousands of drunk and angry people turn up at your door and attempt to force their way into your house. You’re in for a bad night!
And while you’re trying to deal with the crowd without getting lynched or stabbed, they continue to send people out promoting the party.
How can you defend yourself against this type of attack in the real world? Probably the only defense would be to ensure psychopaths don’t know your address.
You can do the same thing online. But before I reveal how, I need to tell you about a couple of other DOS variations.
11 Slowloris

So far, every HTTP attack has depended on overwhelming your server with masses of traffic very fast. They have all relied on the attacker having access to huge bandwidth. Despite their effectiveness, they’re a very primitive type of attack. Slowloris is a little more sophisticated.
The HTTP protocol is designed to be reliable. It should work with fast connections and slow ones. As long as the server receives a well-formed HTTP request, it should honor it.
Slowloris works by deliberately connecting very slowly. It sends a well-formed HTTP request one character at a time, with long pauses in between.
In fact, it’s finely tuned to wait until the server is just about to time-out the connection. This can keep a single Apache connection busy for minutes.
Apache can handle around 200 simultaneous connections, making it easy to overwhelm with a residential Internet connection. Nginx can handle thousands of connections at the same time, but this isn’t much harder to beat.
Firewalls can help to protect against slowloris – you can limit the maximum number of connections per requester. But if an attacker launched a distributed slowloris attack, you would be back in the same boat.
12 DNS Attacks
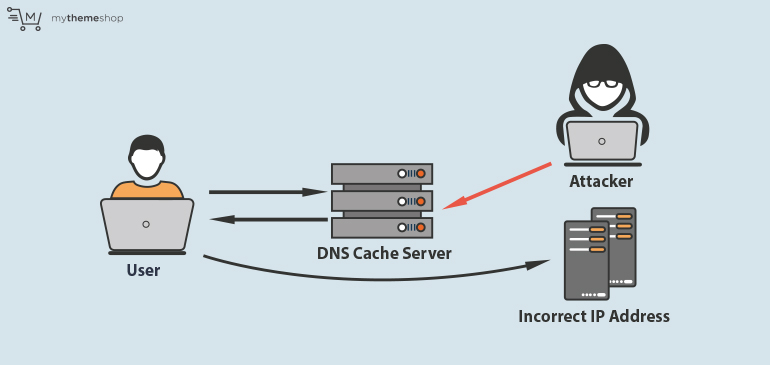
DNS attacks are especially scary because they’re almost undetectable. That’s because the attacker doesn’t target your machine. Instead, they attack your host’s name servers.
The nameservers are responsible for translating your domain name into an IP address so users can reach your website. Without an IP address, nobody can reach your site.
When a hosting company’s DNS nameservers are taken offline, all their customers’ sites disappear from the web. You can become a victim by accident, simply by using the same service provider as the attacker’s real target.
Major DNS attacks have taken down some of the biggest sites in the world – including Ebay and Paypal. Large hosting companies like Hostgator and Blue Host have been attacked. It’s a serious risk!
Fortunately, I’m about to tell you how you can protect yourself against all of these attack types.
13 Hiding Your Server

How can you possibly hide your server’s address? After all, without your address, user’s can’t access your site, right?
Well, that’s almost true. Right now, due to the way the web currently works, it’s impossible to download a web page without the IP address of a server. In the future, technologies like IFPS and MaidSafe could change that. But today, the web is centralized and without an IP address, there’s no website.
But nobody says it has to be YOUR server’s IP address. Of course, that sounds very dodgy, so I should immediately clarify what I’m talking about here.
Have you ever heard of a CDN? It stands for Content Delivery Network.
CDNs are special global networks that are designed to get your content into the hands of your users faster. CDNs fetch the content from your server and then distribute it to dozens or hundreds of data centers around the world.
When someone from Brazil requests your content, the CDN serves it from a data center close to them (maybe in the same city).
The same thing happens in Australia. And Europe. And Asia.
Your content is offloaded onto a worldwide network, and they take over the role of providing it to your readers. The end result is super fast content delivery.
To make this possible, you have to transfer your domain name to their name servers. This is what makes the magic possible.
When someone tries to visit your site, their browser sends a DNS request – to convert your domain name into an IP address. This request is sent to a DNS resolver that belongs to their Internet service provider.
The ISP DNS resolver looks up your domain name in the global registry and sees who provides the DNS service (the content delivery network). So they send a request to the CDN name servers to find out what your server’s IP address is.
The content delivery network receives the request, and then they do something very clever. They look up the geographical address of the requesting DNS resolver. Then they reply with the IP address of one of their servers (a CDN server, not yours). The server they choose is the one located close to the requester.
The next time a person in that area requests your IP address using DNS, they get the cached reply – again, they get an IP address of the server that’s located close to them.
These servers are called edge servers. Their IP address is not the same as your server’s.
So there are 2 benefits to using a CDN. The first is that your content gets to your readers fast. The second benefit is server anonymity – nobody knows your real IP address – including the psychos.
This makes it pretty impossible to attack your server – nobody can attack a server without an IP address.
But what happens if the attacker targets the edge server instead? If it goes offline, your readers won’t be able to read your site.
14 How CDNs Protect Themselves
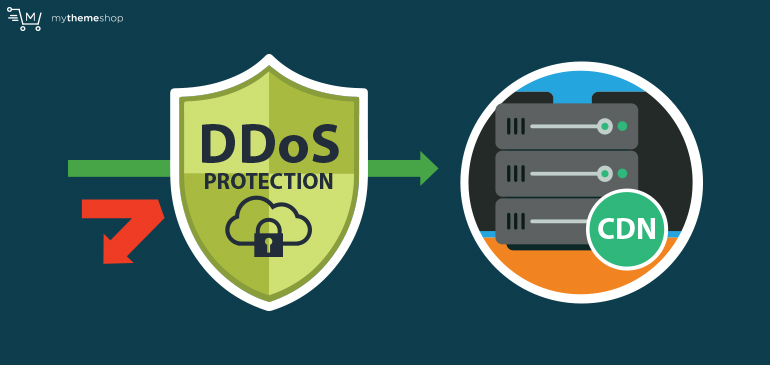
Well, it turns out that CDN companies have amazing DDOS protection. They have huge resources to throw at the problem, which is essential because they serve millions of websites. They’re probably under constant attack!
Distributed DOS attacks can be very scary if your site is sitting on a small isolated server. Thousands of computers attacking from the four corners of the globe can easily overwhelm your machine.
CDN edge servers never feel the full impact of a DDOS. Because machines are given the IP address of the edge server that’s closest to them, each of the global attack machines is given a local server. Instead of receiving thousands of TCP connections, each server only receives a few dozen.
When CDNs discover a DDOS attack, they have their own ways to deal with it. They often display a very lightweight “are you human?” message with a captcha.
This tactic reduces the bandwidth costs and screens out the automated attacks. If the attack machine ignores the captcha address, the CDN edge server simply ignores future requests from that IP address.
So, how much does it cost for this degree of protection? Top end CDNs can be expensive, but amazingly enough, you can get started for free!
Cloudflare offers basic CDN coverage with a free plan – they have premium plans that provide enhanced speed, and it’s worth using them. But even the free plan will protect you from DDOS attacks and UDP floods.
15 IP Leakage

While a CDN will hide your server’s address, it’s still possible to blow your cover with a poorly configured DNS record. It’s like trying to hide behind a wall, but sticking your head up so everyone can see it.
If any of your DNS records point to your actual server, then it’s easy to find it and attack it. This includes A records (aliases) and MX records (mail exchange).
You should also use a separate mail server machine to send your emails. Otherwise, your email headers will expose your real email address.
There are many email hosting platforms to choose from.
For newsletter emails, you can use a hosted service like Mailchimp or even host your own autoresponder with a program like Sendy (which delivers emails through Amazon’s servers).
If you are switching to a CDN, and your site has been online for some time, your server’s IP address is already known. There are sites that track the servers connected to domain names, and it’s easy for a hacker to look up your real IP address.
So the final step is to change your server’s IP address. Some hosting companies make this a simple admin panel task. Other companies can do it for you if you contact their support team.
If your hosting company refuses to give you a new IP address, it may be time to find a new service provider.
16 Cryptographic Concepts

Cryptography is an essential weapon in the security arsenal. In simple terms, cryptography is about using codes to hide the content of messages. The idea of cryptography is a lot older than computing. People have relied on codes for thousands of years.
When you relay a message to someone else, there’s always a risk that an unauthorized person could read it. If the information is sensitive, it’s important to keep it private. The only way to guarantee it remains private is to use a code that other people cannot understand.
This was true on ancient battlefields, and it’s critical on the internet. Messages change hands many times before they arrive at their final destination, hopping from machine to machine. Spying on these messages is not hard at all.
There are millions of ways to form a code, and there are millions of ways to crack one. For instance, you could say everything backward – most normal people wouldn’t understand what you were saying. But it wouldn’t be too hard for your enemies to crack the code – and then they’d have your secrets.
Modern cryptography is based on very complex mathematics. I’m not going to bore you with the details here, but I will show you how it’s used.
There are 3 main uses for cryptography on the Internet:
1. To keep messages private
2. To prove identity (authentication)
3. To verify the contents of a file – for instance, if you download a program, you can check it hasn’t been altered
When you connect to your server using a text interface, you use a program called ssh – or secure shell. SSH uses cryptography to hide the commands you type and the response from your host machine.
When you log on to your WordPress site, your computer sends your username and password to the server. You need to keep that information private – so your browser and server use https and encryption.
If you run e-commerce on your site, your users will expect you to protect their data with encryption.
WordPress uses encryption to store passwords in the database. It doesn’t store the actual password – instead, it stores an encrypted version. If someone steals your database tables, they won’t have the actual passwords.
So encryption is essential for WordPress sites.
17 Cryptographic Hash Functions
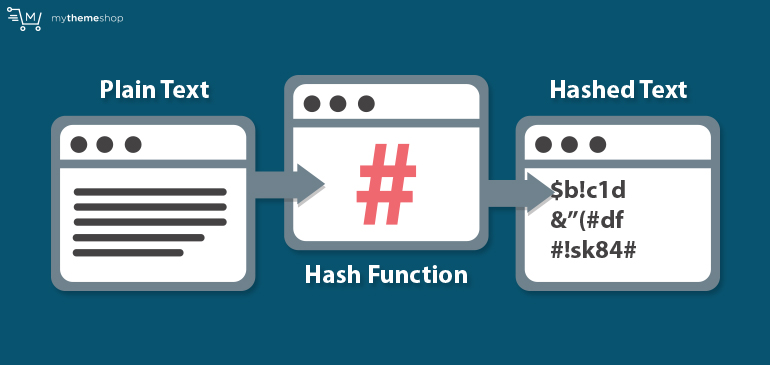
Cryptography relies on code called “cryptographic hash functions”. Let’s break down the definition:
A function is some piece of code that converts one value to another. Given the same input, it will always produce the same output. So if I gave a sentence to a function, it would convert that sentence into something else – maybe a number, like 7. If I repeat the exercise with the same function and the same sentence, it should give me the same output, 7.
OK, so what’s a hash function? A hash function converts a bunch of text (a string) into a relatively short number (or a mix of numbers and letters). This output is called the hash.
For instance, a hash function might convert a sentence into a hash like this:
| Sentence | Hash |
|---|---|
| I went to the shops to buy some milk, but the shops were closed so I had to go back | 4be25d06682fd0389a0abd458086e70bb5a475fe |
The hash isn’t much shorter than the sentence!
The function I used to produce the hash is a common one called SHA1. SHA1 always produces hashes of the same length, even if the input is small or long. I could feed in an entire book and the hash would be the same length as the sentence’s hash.
There are different types of hashing functions, and you can make your own. For instance, what if we simply used the first letter of each word? We’d get:
| Sentence | Hash |
|---|---|
| I went to the shops to buy some milk, but the shops were closed so I had to go back | IwttstbsmbtswcsIhtgb |
This is a valid function – that sentence would only ever produce that output, no matter how many times we run it. It could be useful in some cases, but it’s not a very good hash function. Other sentences could produce the same output, like:
| Sentence | Hash |
|---|---|
| I want to take sugar then buy some medicine, bill the scholar who cooked so I have terrible green bees | IwttstbsmbtswcsIhtgb |
That’s called a hash collision – different sentences produce the same hash.
Hash functions are used for all kinds of purposes, not just cryptography. For instance, you can use hash functions to index a large collection of data in an efficient way.
Generally, we want to reduce the number of identical inputs that produce the same hashes. This is especially useful in cryptography.
Imagine if I used a sentence as a password, and I used that hash function to store it. Anybody with the hash could make up a random sentence to get into my app!
So, what’s a cryptographic hash function? It’s a regular hash function that meets some simple requirements:
- It should be free of collisions
- It should be extremely hard to reverse – to get the original input from the hash.
- The input can be any length
- The output is fixed length
- It should be relatively easy to compute (but not too easy)
- Similar inputs (with a few small differences) should produce very different hashes – otherwise, it would be easy to break in several steps
When a hash function meets all these requirements, it meets the minimum requirements for cryptography. In real practice, there are additional requirements that involve complex math.
But there’s a big risk with functions that only accept one input. Here’s why:
Let’s say you use the SHA1 algorithm to store some password hashes into a database. Every time someone types in a password, your app hashes it and then looks in the database. If the hash in the database matches the password hash, then the user has typed in the correct password.
Now let’s say the user has picked a common password – “1234password” for example.
One day, a hacker manages to steal your database. She has a big list of password hashes. Of course, she can’t type these into the login screen – if she did, the function would hash it, and it wouldn’t match the entry in the database. Instead, she has to type in the original password.
She could try every combination of letters and numbers until she found a matching hack. This is a common practice – it’s called a brute force attack.
But there’s a simpler method. She has a massive database of the most common passwords and their hashes – this is called a rainbow table. All she has to do is search her database, and she’ll find the password. It would take about a thousandth of a second.
If none of the users chose a common password, then her only option is a brute force approach – testing every possible password until she finds a match. This would probably take a few weeks (her computer would run through all the combinations for her).
A few weeks is a lot longer than a thousandth of a second – but it’s still a short period of time. If you used a simple hash function, a hacker could gain privileged access to your app in a short period of time.
18 Cryptographic Salts
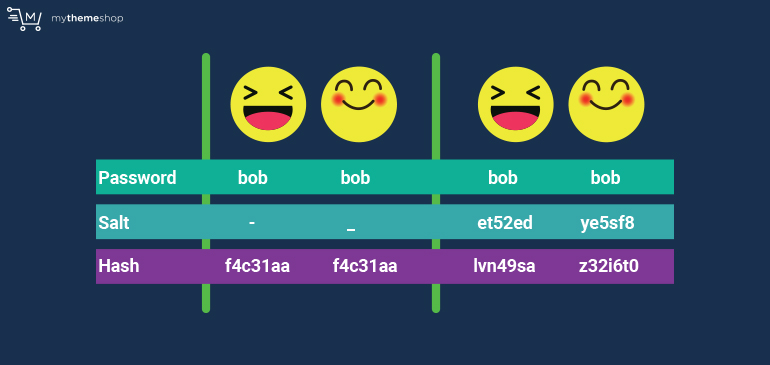
The solution is to use a unique secret text string, which is called a salt.
The salt is added to the value which is input – such as a function. If you change the salt, the output will be different. As long as the salt stays the same, the password will always hash to the same value.
Why’s it called a salt? I guess it makes the function tastier.
Each site should use its own salt string. Your site should have a different salt from ours. If everyone used the same salt, it might as well be empty.
Because you don’t have to memorize a salt, you can use a long string of characters. In fact, you certainly should use a long string. The salt strings are stored in your site’s wp-config.php file.
Salts dramatically increase the time it would take to get a password out of a hash code – instead of taking a few weeks, it would take millions of years. It’s unlikely your site will even exist then, so your password system is more than adequate.
WordPress uses salts for authentication cookies – when you log on, it will store the cookie on your computer. Otherwise, you would have to log on again each time you loaded a new page.
19 Cryptographic Functions
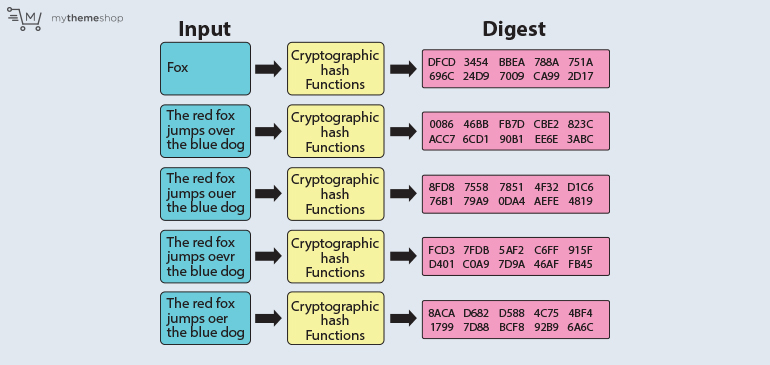
Sometimes, you want to encode a message so it can be decoded on the other end – or by yourself at a later time. Simple cryptographic hash functions are no good for that purpose – once the message has been hashed, there’s no way to get it back. They’re strictly one way.
Cryptographic functions can convert a message into code, and then convert them back again. You need a key – another string, like a password. The function uses the key to ecnrypt the message. Then, if you kept the key, you can restore it.
The key should be a long string of random text, or else people could crack the encryption quite quickly.
If you give someone else the key, they can restore your messages too.
But there’s a problem with sharing keys – what if the other guy used the key to read messages that you want to keep private?
Let’s put it another way. In the early days of radio, armies used keys to encrypt their messages (they used code books instead of mathematical functions, but the idea was the same). The enemy could hear the transmission, but they couldn’t understand it – unless they stole a code book.
Code books were often stolen.
20 Public and Private Keys
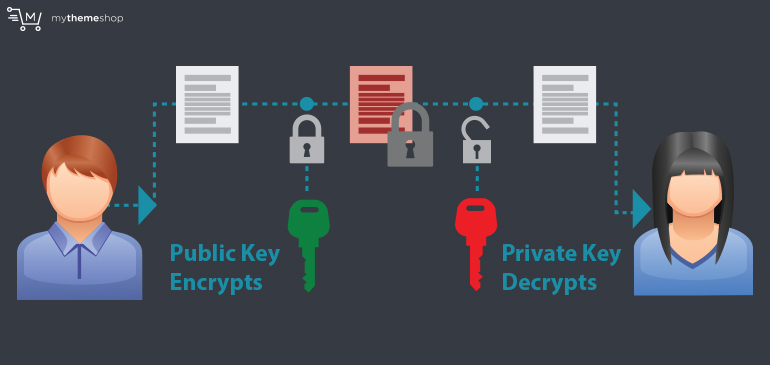
Imagine there was a cryptographic function that used two keys. One key could only be used to encrypt messages. And the other key was for decrypting them.
Anyone with the encryption key could convert a message into a coded form. But someone else with the same key would not be able to decrypt it.
The only person who can decode the message is the person with the “decryption” key.
You could give out the encryption key (the one that encodes messages) to anyone, or everyone. When someone sends you a message, they would use this key to encode it.
It doesn’t matter if someone else intercepts the message because they can’t decode it – even if they have the same key as the person who sent it to you.
You keep the other key (the decryption key) to yourself. If anyone stole it, they could decode your private messages!
These 2-key cryptographic functions do exist. They are the basis of TLS (https) and SSH.
Here’s how it works with SSH:
This is a simplification of the process – it’s actually a little more complicated and secure.
You use a software program to create a unique pair of keys – a public one and a private one. You store these in a special place where your ssh software can find it.
Then you connect to the server. It asks for your public key (the one that encodes messages) and it sends you its public key. Private keys are not shared.
At this point, you can encode messages for the server – and it can encode messages for you. But the server doesn’t know that you’re who you claim to be – remember, your public key is public – anyone can access it!
So the server uses your public key to encode a secret message for you. You’re supposed to read this message, and then send it back again. (Actually your software does this for you).
Because you have your private key, your ssh program can read the message.
Now your SSH program uses the server’s public key to reply. It encodes the message again and sends it back.
The server has its private key, so it can decode the message. Ah, it matches! At this point, the server knows you are real.
But how do you know the server’s real? It could be a faker. The solution is to send an encoded message to the server and see if it replies properly.
The server replies properly, so you know you can both trust each other.
So the server encodes a welcome message and sends it to you.
When it arrives on your computer, your ssh software uses the private key to decode the message and displays it on your screen.
If someone managed to “listen in” on this conversation, they would only see a bunch of encoded nonsense. They would not be able to steal your data or send fake commands to your server (pretending to be you).
What about using ssh without a pair of keys – when you log on by typing a password. Well, that’s when it gets complicated. What happens is you share data with the server, and then you both use a special algorithm to create a secret key which can be used to code and decode messages (a one-key system).
The algorithm is very complex, but it’s set up so your computer and the server are the only machines that can do so.
There’s a lot more that could be said about cryptography – but you don’t need to know all the details to make it work for you.
21 Magic Server Boxes
To make your site secure, it’s vital that you reduce the exposure to risk. We’ve discussed the concept of “attack surface” – how much of your server environment is exposed to potential attacks. Basically, the more software you have running on your server, the larger the attack surface.
In other words, the most secure systems tend to be the simplest. The absolute secure machine would be one that was switched off.
A modern operating system is a giant, complex computer system. They often have dozens of programs running simultaneously.
Distributions like Debian and Ubuntu are designed as general purpose systems. You can use them for virtually any type of task, from serving websites to word processing, games, and video editing.
While this is great for usability, the downside is the increased security risk. Default Linux distributions tend to ship with tons of services and packages you don’t need in a server environment.
What do you really need to serve a website? Obviously, you need a web server application, like Apache or Nginx. For WordPress sites, you also need PHP and a database.
Installing these packages on your server increases your attack surface. PHP enables the public to run code on your server through HTTP requests. We rely on this behavior to fetch our content (which lives inside a database).
But what if someone managed to install malicious PHP code on your server? They would be free to cause virtually unlimited damage with a few HTTP requests.
Throughout history, mankind has had a simple solution for dangerous things (like lions, scorpions or fire) – put them in a box! If the box is strong enough, you don’t have to worry much about the risk. Any potential damage is limited to the content of the box.
If you need to get anything out of the box, you can poke a small hole in it, just big enough for what you want.
For instance, a furnace is a box full of fire. We want to get the heat out of the box, but we don’t want the fire to spread. So we make a small hole and run a water pipe through it. The pipe gives us plenty of hot water, while the fire stays in the box.
How can we apply this idea to web servers?
Well, we have a bunch of dangerous processes (such as PHP, the web server, the command shell, and several others). We need them to generate web pages and send them to our readers. But they can be just as dangerous as fire – in the wrong hands, these processes can burn our server to a crisp!
So we need a magic box with a hole in it (technically called a port) – actually, we need 2 holes if we plan to use TLS encryption (https). We put all the dangerous stuff in the box. Then we connect the holes to the network via the host machine’s TCP ports, 80 and 443 (the HTTP and https ports).
If something goes terribly wrong, the processes could destroy everything in the box – but they wouldn’t be able to hurt the system as a whole. If we did a good job of backing up all the “in-box” stuff, we can recover quickly and without much expense.
Of course, magic server boxes don’t exist, do they? Actually, they do.
22 Virtual Machines and Containers

Of course, if you called your hosting company and started talking about magical boxes, they’d think you were crazy. We don’t want that to happen! The technical names for these magic boxes are virtual machines and containers.
Let’s start with a quick introduction to VMs, and containers – then I’ll show you how you can use them to make your WordPress installation more secure.
What’s a virtual machine? The name makes it seem somewhat imaginary, like a computer that doesn’t really exist. In a sense, that’s true.
A VM is an emulated computer system running inside a real computer (the host). It contains its own operating system and resources, such as storage, and memory. The VM could run a completely different operating system from the host system – you could run OSX in a VM hosted on your Windows machine, for instance.
An emulator is a type of virtual machine. There are emulators that allow you to play Super Nintendo games on the PC – these emulators create a virtual SNES on your PC, with its own memory and resources.
Of course, this is a bit of a gray area legally, so don’t take this as a recommendation to install and run an emulator on your PC!
Just like a real computer, VMS can run software programs. When you run a process in a virtual machine, it’s completely isolated from the “real computer” – in other words, processes running on a Linux VM are completely “unaware” of your Windows environment. Their environment is entirely contained, and they are unable to access the Windows file system.
In the case of the SNES emulator, the game software “sees” a Super Nintendo and its regular resources – such as the on-cartridge memory (for game saves).
This isolation offers a degree of protection. Let’s imagine your VM gets infected with a particularly nasty virus – the VM’s file system could be completely destroyed, or the data could be hopelessly corrupted. But the damage is limited to the VM itself. The host environment would remain safe.
Security is one massive advantage of VMs, but it’s not the only one. VMs are useful for many different reasons.
For instance, if you’re developing an Android App, you can run an Android VM on your PC to test it. The VM simulates the devices you find on android devices (such as GPS and other sensors.)
Any code that runs on the VM should run on a standard Android device.
In all of these cases, we’ve looked at how VMs allow you to run software intended for a different operating system than the one installed on your machine. But it’s actually possible to run a Windows VM on a Windows machine, or a Linux VM on a Linux box.
There are a couple of reasons why you might want to do that. The first one is the security issue I mentioned above.
Providing web content to the world makes your server a target to hackers. With a VM, the degree of potential damage is contained. Sure, it’s annoying if the site on your host machine gets corrupted. But it’s much worse if a hacker gains access to your machine’s hard disk!
Security is a compelling motivation for VMs, but there’s another more compelling one – resource utilization.
We all wish our websites were as busy as Facebook or YouTube, but the truth is most sites are much less active. You may only see a few visitors per hour. And it only takes a few seconds to send content to each visitor (unless you are streaming video or large files).
Most web servers spend the majority of their time inactive. They sit idle until someone requests a file via HTTP. While they’re inactive, they’re still consuming electricity and taking up space.
Keeping a computer connected to the internet and powered up costs money. If you’ve ever paid for a dedicated server, you understand how expensive it can be.
Now, you can serve multiple websites from a single computer. That’s one effective way to make better use of your resources – there’s no reason why you couldn’t serve a dozen or more sites without slowing down the performance.
This is how web hosting companies used to serve sites for many customers – they would create new user accounts on a single machine. But opening up a Linux environment to multiple customers creates a security risk.
What if a malicious customer hacked the system? They could easily cause problems for the other customers. The malicious user could steal their data, or corrupt it, or deface their sites. Or they could simply switch off the Apache service, taking every site offline in one stroke.
The same thing could happen if an external hacker gained access to the hosting environment. These risks are too big for any hosting company to accept.
Fortunately, VMs offer a solid solution.
You’re not just limited to a single VM running on your PC at one time. You can run multiple VMs on a single physical computer, creating the “illusion” of multiple computers with their own file systems and memory. If the real machine has multiple network cards, you can give each VM it’s own IP address.
This is how shared hosting and virtual private servers (VPSes) work today. Each customer has access to their own self-contained environment, within a virtual machine.
They have the power to customize their Linux environment to their heart’s content – they can even break it if they want. As the other customers’ sites exist on a different VM, their site is safe.
VMs are not just for hosting companies. If you’re hosting multiple sites on a dedicated server or a VPS, VMs can help to make your server more secure. Each site can live inside its own VM. That way, if one server is hacked, the rest of your sites are safe.
23 The Drawbacks of Virtual Machines
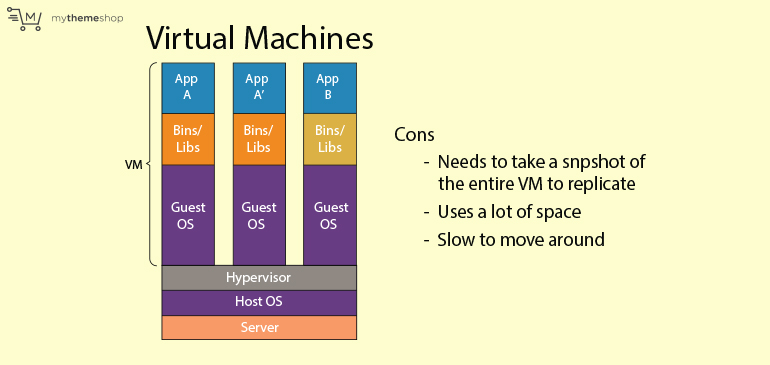
While VMs may sound like a magical solution to all problems, they do have a significant drawback. Each time you add a new VM to a machine, you’re installing and running another operating system. Even without running any user software, each operating system places a demand on the “real” computer’s CPU.
An operating system requires a certain amount of processor time and memory space just to function.
In addition, you need to run a program called a “Hypervisor”. The hypervisor is the component that makes VMs possible. It provides a simulated environment for the VM’s operating system, including a fake BIOS, disk space, input and output devices, and memory.
In a “real” non-virtual computer, the operating system communicates with the BIOS to control the hardware. But you don’t want a VM to communicate with your computer’s real BIOS – otherwise, it would have complete access to your actual hardware. So the hypervisor simulates the BIOS environment for the VM.
As you can imagine, a hypervisor is a complex piece of software in its own right, and this complexity comes at a cost. Hypervisors consume system resources too.
The overall performance of software running on a VM is usually much slower than software running on a “real” computer. Here’s an example to show why:
Let’s say you had a very simple web application that outputs “hello world”. Your app’s URL is http://www.example.com/hello.php (the app is written in PHP).
Here’s a very simplified breakdown of what happens when someone requests your app over the Internet (this is without VMs):
- The user’s browser sends a request via HTTP to port 80 on your machine
- The operating system receives this request, and forwards it to the web server (Apache)
- Apache notices the .php extension, and forwards the request to the PHP runtime
- PHP has to load the “hello.php” script into memory, so it sends a system request to the operating system
- The operating system receives the request, and forwards it to the disk driver (part of the BIOS)
- The bios accesses the data on the disk, and sends it to the OS
- The OS sends the contents of the script to the PHP runtime
- The PHP runtime compiles and executes the code. It generates the output “hello world”
- PHP sends the output to the web server
- The web server wraps the output in HTTP headers and sends it to the operating system, so it can forward it to the user over the network
- The operating system sends “hello world” to the user over the network.
That’s 11 steps (and I simplified it). It looks like a lot – but compare it to what happens on a VM:
- The user’s browser sends a request via HTTP to port 80 on your machine
- The “real” computer’s operating system receives this request, and forwards it to the hypervisor
- The hypervisor identifies which VM should receive this request
- The hypervisor simulates a signal from a network card for the VM
- The VM’s operating system receives this request, and forwards it to the Apache process
- Apache notices the .php extension, and forwards the request to the PHP runtime
- PHP has to load the “hello.php” script into memory, so it sends a system request to the operating system
- The VM’s operating system receives the request, and forwards it to what it thinks is the disk driver – it’s actually the Hypervisor
- The hypervisor translates the VM’s request for a resource on the “simulated” hard disk into an actual address on the “real” hard disk
- The hypervisor sends a request to the “real” operating system
- The real operating system receives the request and forwards it to the real BIOS
- The real BIOS loads the data from the disk, and sends it to the real operating system
- The real operating system forwards this data to the hypervisor
- The hypervisor forwards this data to the VM’s operating system, imitating a BIOS response
- The VM’s OS sends the contents of the script to the PHP runtime
- The PHP runtime compiles and executes the code. It generates the output “hello world”
- PHP sends the output to the web server (inside the VM)
- The web server wraps the output in HTTP headers and sends it to the VM’s operating system, so it can forward it to the user over the network
- The operating system sends “hello world” to what it believes is the network driver (it’s actually the hypervisor in disguise)
- The hypervisor receives “hello world” and sends it to the “real” operating system, to send it to the user
- The real OS receives “hello world” and sends it to the real network driver, which sends it to the user
21 steps for “hello world” – that’s crazy!! Now imagine what happens in a real WordPress installation, with dozens of moving components – databases, multiple PHP files, computation, theme templates, and so on. Any time any piece of the stack attempts to perform input or output, the hypervisor steps in, adding extra steps.
This is the main reason why applications run slower in VMs. And you also have to consider that there may be dozens of VMs running on the same machine, taking time slices away from each other and slowing down performance even further.
Even with all these considerations, the benefits of VMs outweigh their drawbacks. But performance is vital on the web.
Is there a better way to provide the security and utilization benefits of virtualization without using VMs? Yes, there is.
24 Introducing Containers
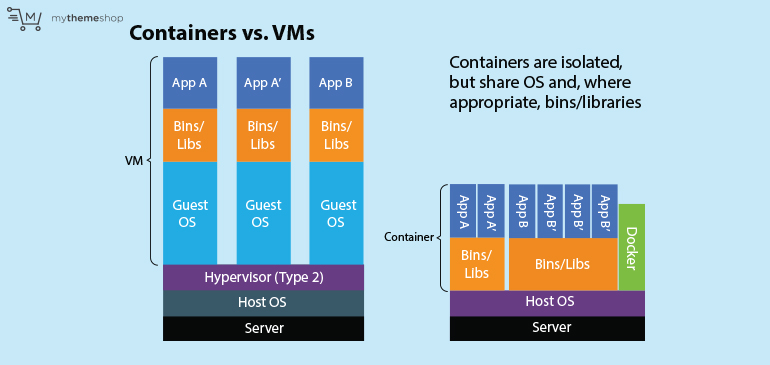
Containers (like Docker) are very similar to VMs. Each container is a fully contained operating environment, complete with all the services and resources you need to run applications. But they cut the hypervisor out of the loop. Instead of installing and running multiple operating systems, each container uses the host operating system directly.
They still have their separate file systems and services. And they have limited access to the underlying system resources. So each container operates as a self-contained environment. You can install software and run processes in a container that are not present in the host operating system.
If one container is hacked, the damage is limited to that specific environment. Other containers hosted on the same machine are protected.
Because we’ve cut the hypervisor out of the loop, applications run much faster – almost as fast as processes in the host environment. Keeping each container separate does involve some computation by the container software. But it’s much lighter than the work required by a hypervisor!
Applications in a container send system calls directly to the host kernel, cutting out many of the steps a VM has to go through. This leads to fast input and output.
What’s more, containers are lighter than VMs. A virtual machine image contains a complete operating system. The container, on the other hand, only has to contain the software used by the application itself.
Because containers are lighter than VMs, they’re much more portable. You can boot a container in seconds, allowing you to deploy it rapidly on another machine – this ability is very important in the cloud computing world.
25 Docker
When you mention containers, most people will think of Docker. It’s not the only container solution out there, but it is the one that took off.
Docker is more than a container manager – it’s a complete set of tools for container-based development and deployment. These tools empower you to scale your site up and down to meet different challenges.
Sometimes, traffic volumes can spike, and a single server may struggle to deal with all the added work. With Swarm Mode, you can scale your Docker-ized site onto multiple physical servers with a single command. When traffic volumes return to normal, you can scale back.
Docker Cloud is a web-based service that automates the task for you. It integrates smoothly with the most popular cloud hosting platforms (such as Amazon Web Services, or Digital Ocean).
Docker is quite easy to learn, it reduces the pain and effort of cloud computing, and it can make your site more secure!
Let’s take a closer look at some of the additional benefits containers bring, and how they can make your life easier.
Deploying With Containers
Deploying applications has traditionally been very painful.
Code that works perfectly on the developer’s PC may fail or crash on a live server. This is due to small differences between the developer’s computer and the environment on the live server.
Maybe the developer has a different version of a software package installed. Maybe an application on the server is incompatible with the dev’s code.
In any case, tracking down and fixing these problems can be very painful indeed.
This often happens in the WordPress world, especially if your site uses a lot of custom code.
With containers, you can guarantee that the developer’s environment is exactly the same as the live server. Before the developer writes a single line of code, they can download the container to their computer.
If the code works on their PC, it will work on the live server.
This is a huge benefit of using containers, and it’s a major reason for their popularity.
As long as your host machine can run Docker, you can count on dependable deployment. If you make changes to your WordPress container and it works on the developer’s machine, it will work on your server. If it works on your current server, it will work on another one.
This makes it easy to migrate between hosts if you ever have to change service provider.
Getting Started With Docker and Containers
Docker is designed for simplicity, and I could give you a list of copy-paste instructions and leave you to it. But you’ll get much more out of it if you understand how it works.
So far, I’ve described containers as a type of magic box. This is a little vague, so let’s get into some specifics.
Docker uses some functionality that’s built into the Linux kernel – these include namespaces and cgroups. It also relies on “copy on write” filesystems.
Without this functionality, there would be no Docker. Let’s explain these concepts one by one.
What are Cgroups?
Cgroups stands for control groups. It’s a way to organize a group of processes, and control their access to resources – like memory, CPU time, device access, and network connections.
Cgroups basically limit the resources a group of processes can use. This allows Docker to contain its processes, so they don’t eat up the host machine’s resources.
What are Namespaces?
Namespaces affect the way processes view the system they are running in, and it limits their ability to interact with the wider system.
This is the mechanism Docker uses to create the illusion that the processes are running on another machine.
Here are the types of namespace in Linux:
- PID – the list of running processes – this is the process space
- net – the network resources available to a process
- mnt – the filesystem available to the processes in the container
- uts – this contains information about the machine the process is running on, including the hostname
- ipc – ipc is a mechanism that allows processes to communicate with each other and share memory
- user – a container has its own list of users and user groups (including its own superuser). The superuser in a container is not the host superuser
When Docker launches a process, it creates a new namespace for each of these categories and places the running process in that namespace. It also creates a new root filesystem just for that container and adds this to the mnt namespace of the process.
If a process creates any child processes, they are automatically included in these 6 namespaces that docker created.
To the running process, the world outside the container is invisible.
Now, let’s talk about the filesystem that Docker creates. Docker builds a “copy on write” file system. To the process(es) running in the container, it looks like a normal filesystem. However, it’s not.
It’s actually made up of multiple read-only images layered on top of each other, together with a read-write layer on top.
Imagine it like a stack of tracing paper. Each piece of paper has pictures on it. If you look down from above, it looks like all the images are on one sheet. The top sheet starts empty.
Now you can draw your own pictures on this top sheet, even drawing over the pictures on the other sheets. It looks like you destroyed these images, but they’re still there.
You can also “delete” images by drawing over them with white paint. Again, the images are still there on the other sheets of paper. But, to your view, it looks like they are gone.
Let’s see how this applies to a Linux container. Inside the container, it looks like there’s a complete filesystem, together with all the files you would expect to see on a running Linux box. There are system files and directories. Programs are stored in the expected places (such as /bin/ and /usr/bin/, etc).
If you were a process accessing this filesystem, you would find everything you need to do your job! You could find your configuration files in /etc/your-name/. You’d see data in other folders, and process information in /proc/. You could write and read data (as long as you had the right permissions!)
You’d never know you were living in a simulated file system! Actually, Docker’s a little like The Matrix for Linux processes…
So, why use such a strange file structure? The idea is to keep Docker containers as light as possible. It’s quite common to run 5-10 docker containers on a single machine. If each container got a complete file system, this would rapidly use up your hard disk.
Instead, each container shares images. If you had ten copies of the same container running, they would all share the same “layers” – the only thing that would be different would be the top “read-write” layer, like the top sheet of tracing paper from our example above.
Now, some containers could be different in small ways – maybe one of them has Apache and PHP, and another has MySQL. However, if you were careful to build these containers from the common image, they would share many of the lower layers. They would have a couple of unique layers, but otherwise, they would be the same.
When containers share filesystem layers, they’re actually reading data from the same files on your hard disk.
A complete stack of these layers is called an “image”. You can make a new image from an old one by adding extra layers on top (adding, changing or deleting files).
The Docker Daemon
So I’ve explained how Docker creates containers. And I briefly mentioned images – I’ll get back to that soon. Now let’s look at how Docker works.
The core of Docker is the Docker Engine – which lives inside a daemon – or long-running process. The Docker daemon is responsible for:
- creating containers
- running them
- pausing or stopping them
- managing the running containers and providing information about them
- providing a network between containers – either on the same machine, or across machines
- attaching processes on them (so you can look inside a running container)
- deleting containers you no longer need
When you install Docker on your machine, it will automatically start the Docker daemon. It will also start when you reboot your machine.
The daemon also has a built-in RESTful API interface – like a web service. You can access this interface from within your machine, or remotely.
Now, you could communicate with the Docker daemon through the API, with a command line tool such as curl. It would be pretty messy, but it could be done. You would have to type the HTTP requests and understand the responses.
Fortunately, there’s a more user-friendly way to control the daemon.
The Docker Client
The docker client is a single command – “docker”. You add extra words after “docker” – like “docker run” or “docker pull”. The client then sends a command to the docker daemon, which performs the action.
Because the daemon exposes a restful API, it’s also possible to create your own applications that communicate with it – that’s way beyond the scope of this article.
Docker Hub
Docker would be a great tool if these were the only features. But there’s another great resource – the Docker Hub. The hub is an online directory of community-made images you can download and use in your own projects. These include Linux distributions, utilities, and complete applications.
Docker has established a relationship with the teams behind popular open source projects (including WordPress) – these partners have built official images that you can download and use as-is. Or you can use them as starting points for your own projects.
What’s more, you can get the Docker Hub code and create your own private directories – for images you don’t want to share (such as your own WordPress website). Or you can pay Docker to host private image repositories for you.
How to Build an Image – the Low-Level Way
Let’s build a quick and dirty Ubuntu LAMP server – just to demonstrate how it’s done. LAMP stands for Linux, Apache, MySQL, PHP/Perl/Python. We’ll use PHP in this example.
First, we need a base image to start from:
sudo docker pull ubuntu
You should see a bunch of lines indicating the progress of the download. If you look closely, you’ll see there are several lines running. Each line is a separate image (remember, docker’s filesystem is a stack of layers – each layer is an image).
When Docker has finished downloading the complete image, you can move on to the next step – running the container:
docker run -it ubuntu /bin/bash
Let’s explain the options:
-i means “interactive mode” – this mode sends the output to your screen.
-t this creates a pseudo-terminal or “tty”. It allows you to type commands into the session – inside the container.
/bin/bash – this is the path to the BASH shell (or command line, if you prefer).
After running that command, you’re inside the container, communicating with the BASH shell. Any commands you type at this point will be executed inside the container.
Right now, we have a bare-bones Ubuntu installation. There’s no apache, MySQL or PHP. You can test that by typing one of their commands, eg
php -v
And you get an error. So we’ll have to install these components, using APT – just as you would on a regular Ubuntu machine.
Before we install anything, we need to update the package database:
apt update
OK, let’s install Apache! Type:
apt-get install apache2
It will take a few moments to finish.
apt-get install mysql-server
The install process will ask you to supply a password for the root user. In this example, you can skip it. In the real world, you should always set a password for the root user!
Next, we’ll install PHP
apt-get install php libapache2-mod-php
This command installs PHP 7 and the PHP module for Apache.
Now let’s test if PHP is working:
php -r 'echo "nnYep, PHP Works.nnn";'
You should get the output “Yep, PHP Works.”
Now let’s test MySQL
/etc/init.d/mysql start
This command starts the MYSQL server.
mysql
You should be logged into the MySQL client.
SHOW DATABASES;
If everything is working, you’ll see a list of databases – MySQL uses them to store its own settings.
You can log out by typing:
exit;
Finally, type “exit” to leave the container’s shell and return to the host environment.
OK, so we have installed the complete LAMP stack. What’s happened inside the container?
Remember, only the top layer of the file system is writable – and this layer is deleted whenever you remove the container.
In order to save our work, we’d need to save the temporary file layer – in fact, that’s how you create a new image!
Leave the container with exit
The container is still alive, although the BASH process has stopped. You can see the list of containers by typing:
sudo docker ps -a
This will give you a bunch of information about your container, including an id hash and a made-up name. If you don’t provide a name to Docker run, it will create one for you.
Now, we want to save our work – here’s how you do that:
sudo docker commit [name of container] my_lamp.
Docker will save the temporary filesystem as a new layer, and return a number. This number is your new image’s id hash – that’s how Docker tracks these images internally. Because it’s hard to remember a hash, we’ve named our new image “my_lamp”.
Next, let’s take a look at the images installed on your machine:
sudo docker images
You should see your new image.
Great, let’s kill the old container:
sudo docker rm [container name]
sudo docker ps -a
Your container is gone, but you have an image!
But does it really work? Can you really use it to serve web pages? Let’s find out:
We need to start the apache web server in foreground mode (outputting text to the terminal). If we try to run it as a demon, the shell will exit immediately, and the container will stop. Here’s the command we need:
sudo docker run -p 80:80 -d --name lamp_running my_lamp apachectl -DFOREGROUND
This command tells docker to run (create and start) a container from the my_lamp image. Here are the options in detail:
-p 80:80 - Connect the container's port 80 to the host machine's port 80.  At this point, people on the internet can connect to the container on the HTTP port

-d - Run in detached mode - as a daemon

--name lamp_running - Name the new container "lamp_running"

my_lamp - this is the name of the image

apachectl -DFOREGROUND - this command is passed to the shell inside the container - it starts the apache server in foreground mode.
Note – this command will fail if you’re already running a web server on the machine you use to follow these steps. That’s because only one process can bind to port 80 at any given time. You can choose a different port number.
Now you should be able to open your browser and type in your machine’s address (localhost if you’re using your PC, otherwise use your machine’s IP address).
Well, if all goes well, you should see Apache’s “It works!” page.
Now, we don’t want a server that only shows the “It works!” page. How do we get out content inside that server? The most naive way is to log in to a container and create the content inside it. And that works fine.
Let’s delete our current container, and start a new one (that we can log into).
sudo docker rm -f lamp_running

sudo docker run -it -rm -p 80:80 my_lamp bash
The -rm option tells Docker to delete the container when the process ends – BASH will end when we log out. It’s a useful way to prevent your system from getting cluttered with old containers.
The first step is to get the apache daemon running – we can run it in the background this time. We’ll need the command line for sending commands.
apachectl start
Next, we have to get our content into the web root (the directory that Apache looks into to find content).
echo "<h1> New Content </h1>" > /var/www/html/index.html
/var/www/html/ is the web root on Ubuntu – you can change it, and other Linux distributions use different locations for the default web root.
Now we can test our changes by opening a new browser window and typing our host machine’s IP address in the address bar. You should see the new content.
So, we can get our content into the container – in a fairly ugly way. But it works. We know it works for plain old HTML – let’s test PHP.
First, delete the index.html file:
rm /var/www/html/index.html
Now create a new index.php file, containing the phpinfo() function:
echo "<?php phpinfo() ?>" > /var/www/html/index.php
Refresh your web browser, and you should see the PHP info screen.
Now we know PHP is working through Apache. Everything works fine. So we can save our container.
Exit the container:
exit
Now let’s commit it to create a new image:
sudo docker commit lamp_running php_info_works

sudo docker rm lamp_running
A Better Workflow
So far, our workflow looks like this:
- Run a container from an existing image, and log into a shell session inside the container
- Run some commands to make changes
- Exit the container
- Commit the changes to a new image
- Delete the container (we don’t need it anymore)
- Create a new container from the image and run it
This is a fairly ugly way to build new images. Here are some of the problems:
- It’s slow and inefficient.
- We have to do it manually
- If we have to keep doing this over and over, we can easily make a mistake and miss a step
- It’s hard for someone else to recreate the container. We’d have to give them detailed step-by-step instructions
There is a solution – Docker’s build command, and Dockerfiles.
Dockerfiles
A Dockerfile (with a capital “D”) is a list of instructions for Docker. They tell Docker how to build an image.
Docker reads through the file and executes each line one by one. Each new line creates a new image, which docker saves.
Behind the scenes, Docker’s going through the same steps we just did – but it’s working much faster, and it’s following the procedure flawlessly. If the build works once, it will work again and again – and different environments, too.
Here’s a sample docker file which accomplishes the same steps we took:
FROM ubuntu:16.04
RUN apt update
RUN apt-get -y install apache2
RUN apt-get -y install php libapache2-mod-php

RUN DEBIAN_FRONTEND=noninteractive apt-get install -y mysql-server

RUN rm /var/www/html/index.html
RUN echo "<?php phpinfo() ?>" > /var/www/html/index.php

CMD /etc/init.d/mysql start start && apachectl -DFOREGROUND
The first line gives the base image – the image that docker pulls from the hub. We’re using version 16.04.
It’s a good idea to use a fixed starting point, because Ubuntu could change in the future. Without a fixed version number, Docker will pull the latest version. At some point, the Ubuntu developers may decide to use different directories for the web root, or for MySQL’s startup script. This would break our image.
The last line starts the MySQL server and runs the apache daemon in foreground mode. It’s a convenience so we don’t have to type these commands every time we run the container.
Let’s build this file and create a new container:
sudo docker build -t new_phpinfo_works .
The build command follows this syntax:
docker build [options] PATH
In this case, the options were:
-t new_phpinfo_works

(tag - or name - the image as new_phpinfo_works)
And the path was:
. (the current working directory - where the build command can find the Dockerfile).
If you watch the output, you’ll see that Docker builds a number of images before it reaches the final one. Docker stores these images in a cache, so it can build the image quickly the next time you run docker build.
Run the command again to see the cache in action:
sudo docker build -t new_phpinfo_works .
It’s much faster, right? This is very useful when you make a lot of small changes to your project, for instance when you’re developing and testing code.
Finally, we can run our new image in a new container:
sudo docker run -d -p 80:80 --name new_phpinfo new_phpinfo_works
Check it out in the browser. Yay! It works!
Let’s stop and delete it with:
sudo docker rm -f new_phpinfo
But we’ve done something very ugly here – we’re creating our web files inside the Dockerfile, using the echo command. For short pages, that’s not a big problem.
But most web pages in the real world are hundreds of lines – if we dump that into the Dockerfile, it will become unreadable!
Including Files in a Docker Image
We can put our content in files on our host machine and use docker build to insert them into the image. Let’s create some new files on our file system:
mkdir web
echo "<h1> A new index page</h1> <a href='second_page.html'>Next Page</a>" > web/index.html
echo "<h1> The second page</h1>" > web/second_page.html
We’ve made a folder with two html pages.
Now let’s add them to a new image through the Dockerfile. Edit the Dockerfile to look like this:
FROM ubuntu:16.04
RUN apt update
RUN apt-get -y install apache2
RUN apt-get -y install php libapache2-mod-php

RUN DEBIAN_FRONTEND=noninteractive apt-get -y install mysql-server

ADD web/ /var/www/html/

CMD /etc/init.d/mysql start && apachectl -DFOREGROUND
Now we’ll build the image, and run it.
sudo docker build -t two_page_site .
Notice how Docker uses the cache to speed up the build, even though we have made changes?
Now we’ll test it with
sudo docker run -d -p 80:80 --name two_pages two_page_site
Let’s test it in the browser. If all goes well, it should work perfectly.
We can delete the container with
sudo docker rm two_page_site
Using Dockerfiles gives you automation – it also documents the build process. If you passed this file over to a developer or administrator, they would be able to understand how your container was built, and they’d understand what to expect from it.
Docker Volumes
Up to this point, we’ve had to build a new container each time we want to change the files inside the container’s filesystem. This isn’t a big deal if we’re building the final version of our tested code.
But if we are developing and testing code, it’s a pain to build each time we make a small change.
Docker allows you to add directories from your host file system as directories in a container. It calls these directories “volumes”.
Volumes are meant to save persistent data – data you want to keep. Remember, the data stored in a Docker container lives inside a special temporary file system. When you delete the container, that information is lost.
That’s bad news if the container held your MYSQL database and all your content!
While the official use for volumes is to hold your volatile data, it’s also a useful tool for changing code inside a running container.
Of course, when you finish developing your code, you should wrap it up inside a complete container image. The goal is to put all the code that runs your site inside a container and store the volatile data in a volume.
You can add a volume at runtime like this:
sudo docker run -d -v $PWD/web/:/var/www/html/ -p 80:80 --name two_pages_2 two_page_site
The -v option needs a little explanation. It tells the docker daemon to mount files from the local web directory to the /var/www/html/ directory. The $PWD fragment is a system variable. It contains the working directory – the same info you would get if you executed “pwd” (print working directory).
In other words, $PWD is our current working directory.
I inserted $PWD because the Docker daemon requires the full path to the host directory – it doesn’t work with local paths.
OK, let’s test it in the browser. Load the local machine in your browser, and you’ll see your pages.
Now let’s change the index.html file:
echo "<h1>The page has changed</h1>" > web/index.html
Reload your page in the browser. You should see the new version.
Using volumes like this helps to speed up development, but you should always include your code in the final version of your container image. The code should ideally live inside the container, not in an external volume.
Docker Compose
So, we’ve seen that there’s a nice automated way to build containers, with the docker build command. This gave us automation and better reliability over the image building process.
Running new containers is still a little ugly, with long commands packed with options and extra details.
There’s a simpler way to launch docker containers. It gives you more control, and it’s more readable. I’m talking about the docker-compose command and docker-compose.yml files.
What’s a yml file? It’s a file in YAML format (Yet Another Markup Language). YAML is a structured data language (not markup at all). It’s like XML or JSON, but it’s much more readable than either.
In the docker-compose.yml file, you describe your operational environment. You tell docker which containers to create, which images to use, and how to configure them. You can also tell Docker how these containers should communicate.
In our example, we’ve placed everything inside the same container – Apache, MySQL and PHP. In real practice, it’s better to separate your application into several containers, one for each process – we’ll discuss this shortly.
Separating processes into containers makes it easier to manage your app, and it’s better for security.
Let’s go over a simple docker-compose.yml file we could use to launch our existing server container:
version: '3'
services:
    lamp_server:
        image: two_page_site

        ports: "80:80"

        volumes:
            - ./web/:/var/www/html/

        deploy:
            replicas: 1
The version line refers to which version of the docker-compose.yml format we are using. Version 3 is the latest version at the time of writing.
The next line mentions services. What are services?
In our case, our website is a service – it’s a process that does work for users. An application can have multiple services, but our site is a single service. We’ll look at multi-service applications a little later.
A service could contain multiple containers. For instance, if our site gets really busy, we could decide to launch multiple web server containers to handle the load. They’d all be doing the same job, so together they would provide the same service.
If you do launch multiple containers through the docker-compose.yml file, Docker will automatically handle the load balancing for you. It will send each request to a different container in a round-robin fashion.
The next line is the name of our service – I’ve decided to call it “lamp_server”, although the image name is two_page_site. This doesn’t mean the container will be called lamp_server – Docker may decide to call it yourprojectname_lamp_server_1 or something similar.
We can use “lamp_server” with the docker-compose command to refer to the collection of containers.
The ports line bind’s the service to port 80.
The volumes line maps the local web directory to the /var/www/html/ directory inside the containers. Note that it’s OK to use local paths here, even though “docker run” rejects them.
Next, there’s a deploy option. This is where we can specify deployment details for our service. There are lots of possible options, but I have only used the “replicas” keyword. This allows me to say how many containers should run to provide the service – in this case, 1.
If we ever wanted to scale the service, we could do it with a single command:
docker-compose scale lamp_server=2
With this file in place, we can start our service with one command:
sudo docker-compose up
Notice that we’re using a new command – “docker-compose”, instead of “docker”. Docker Compose is a separate program, although it communicates with the Docker daemon in a similar way to the regular docker command.
The command will launch the service, starting a single container.
OK, we’ve covered enough of Docker for you to set up a Docker-based WordPress site. There’s more to learn, of course.
You should make some time to learn more about Docker, since there are some amazing features for scaling your site across the cloud – which is a good way to deal with traffic surges.
It’s an extremely useful tool!
Docker Security Warning
Although Docker can help to make your site more secure, there’s are a few major issues you need to understand.
- The Docker daemon runs as a superuser
- It’s possible to load the entire filesystem into a container
- It’s possible to pass a reference to the docker daemon into a container
Let’s take these up one at a time:
The Root of All Evil
The Docker daemon runs as the superuser! This means that an attack against the docker daemon would potentially give an attacker complete power over the system – as the superuser has unlimited powers under Discretionary Access Control.
If you were paying attention during the earlier sections, you’ll know that it’s possible to limit the abilities of a specific process with Linux capabilities and Mandatory Access Control.
The solution to this issue is to use a MAC solution like SELinux, GRSecurity or AppArmor.
Let Me Delete Your Hard Disk for You
We spoke about docker volumes above. In short, you can insert directories from your real filesystem into a container. It’s a useful feature.
Unfortunately, it’s also possible to mount the entire host filesystem into a container. If you do that, the container can (in theory) access any of your data, or delete it all.
This is potentially a big risk. The solution – once again – mandatory access control. Prevent the docker daemon from accessing files that are unrelated to its job and the containers you intend to run.
Pass the Daemon
It’s possible to pass a reference to the Docker daemon into a running container – there’s a socket file for the daemon. This allows processes in the container to communicate with the daemon, gaining control over it.
Some useful docker projects use this to provide container monitoring services, or to route internet traffic to the right container. We’ll use a couple of these to handle HTTPS traffic and to host multiple WordPress sites on a single machine.
However, the Docker daemon has tremendous power. It can be used to:
- Download any container in the public Docker Hub directory – potentially it could be used to download an image with malicious code
- Run the malicious code with full access to any directory in your filesystem
- Use this access to steal data (simply copy the data, commit the image, and upload it to the public directory)
- Delete or corrupt critical data
Note that containers cannot access the Docker daemon unless you pass it to them inside a volume – either through the “docker run” command or inside a docker-compose.yml file.
For this reason, you should be very careful to always understand the commands you type. Never let anyone trick you into running a strange docker command.
Also, only download and use Docker images from a trustworthy source. Official images for popular images are security audited by the Docker team. Community images are not – so make sure you read the Dockerfile and understand what the image does.
The same goes for docker-compose.yml files.
In addition, you should use mandatory access control (such as AppArmor) to limit what each container does – Docker includes an option to name an Apparmor security profile for each container you run.
You can also specify Linux capabilities in the docker-compose.yml file, or with the Docker run command.
It’s also possible to use an access control plugin for the Docker daemon. An example is the Twistlock Authz Broker. I won’t cover it in this article because we don’t have the time or space to cover every possible angle. But you can learn more by clicking on the link.
WordPress is Complex
WordPress may look simple, but it’s actually quite a complex beast. It relies on several components to make it work – obviously, there are the core WordPress files. These interact with the web server through the PHP runtime. WordPress also relies on the file system and a database server.
The situation is even more complex when you have custom code. Your code may require additional PHP modules to run. These modules may require software packages, services, or shared libraries to function.
For instance, you may use ImageMagick to manipulate or generate graphics. To use ImageMagick from PHP, you have to install several packages – ghostscript and imagemagick, and the PHP extension.
Every piece of software you install on your web server increases your security risk. And they introduce maintenance overhead – you have to spend the time to update each component on every server image.
This is bad enough if you’re only running a single web server. If you’re duplicating your server (for load balancing) you have to ensure each one is updated.
Simpler Maintenance
Using containers makes it easier to keep these images in sync, but there’s another conceptual tool that can simplify the task.
“The separation of concerns” is a useful principle in software development and maintenance. It makes maintenance easier, and it tends to contain risk.
The basic idea is that you break a complex system (or application) down into simple pieces that work together. Each piece is responsible for one simple task (or concern). When some part of the system has to change (to add a feature, fix a bug, or improve security) you can zero in on a small piece and make a change there. The rest of the system remains the same.
There are lots of ways to apply this idea to an application like WordPress. Object Oriented Programming is one tool – but this applies to the code inside your PHP files. “Microservices” are a higher-level tool you can use to decompose your web server into smaller pieces that are easier to manage.
Microservices
What is a microservice? Well, let’s start by defining a service.
A service is some software component that listens for requests (over a protocol) and does something when it receives those requests. For instance, a simple web server listens for HTTP requests and sends files to users when it receives a request.
The client (the person or thing that makes the request) may be a person. It could be another program running on a different computer. It could even be a process running on the same computer.
Complex applications are often composed from multiple services. A simple WordPress site relies on a web server, a PHP runtime, and a database (usually MYSQL).
From the viewpoint of the WordPress app, each of these is a “microservice”.
Usually, all of these services run on the same machine. But they don’t have to. You could put your database on a different server, for instance. Or you could put it in a different container.
Using Docker, you could install WordPress, Apache, and PHP in one container, and run MySQL from another. These containers could run on the same physical machine, or on different ones, depending on your setup.
The database service container can be configured to only accept connections that originate from the web container. This immediately removes the threat of external attacks against your database server (an incorrectly configured MySQL server on your web server could be accessed over the Internet).
With this configuration, you can remove a ton of unnecessary services from your containers. In fact, official Docker images are now built on top of Alpine Linux, a very minimal, highly secure distribution.
Because all the complex software that runs your site is safely stored in the “magic box”, you don’t need them cluttering up your host system. This gives you the perfect opportunity to remove high-risk software from your host machine, including:
- Language Runtimes and interpreters, such as PHP, Ruby, Python, etc.
- Web servers
- Databases
- Mail Servers
You don’t need a web server program or database on your host machine (these live inside containers).
Behind the scenes, docker creates a safe internal network for your containers to talk to each other. Other processes on your system are not included in this network, so they can’t communicate with each other. And the rest of the Internet is locked out of the internal network.
If your WordPress site communicates with other web applications on your machine, you can set them up in their own containers and allow them to communicate with your web server through Docker’s built-in private networks.
Docker makes it simple to set up these microservices without having to change your app’s code. It routes the messages between the containers in a secure way.
If a new version of MySQL is released, you can update the database container without touching the web container. Likewise, if PHP or Apache are updated, you can update the web container and leave the database container alone.
Some people take this architecture a step further – they separate the filesystem into its own container. WordPress uses the filesystem for its core files, templates, plugins and uploaded content.
If you separate the filesystem from the web server container, then you don’t have to update the web server so often. In fact, the only time you’ll have to update it is to install Apache or PHP updates!
In this article, we’ll use a local host directory as a volume, to store our WordPress files.
Using Multiple Containers for your WordPress Site(s)
As you can see, Docker containers are ideal for running small software components. Because Docker makes it easy to connect these containers together, there’s no reason to lump all your software inside a single container.
In fact, it’s a bad practice – it increases the security risk for any single container, and it makes it harder to manage them.
That’s why we’re going to use multiple containers for our new host machine. Each container has a reason to exist – a simple responsibility. Because Docker’s so lightweight, it’s viable to run a single container for each task.
Some of the tasks should be long running. For instance, your web-server containers should run constantly. The same goes for the database containers.
Other tasks are short-lived. Backing up your data may take a minute or two, but then it’s done. If you run a short-lived command inside a Docker container, the container will stop running as soon as the command has completed. You can configure these containers to delete themselves:
docker run --rm --volumes-from wordpress_container_name backup_data_image
The Ideal Docker Host
So, we’ve looked at how you can deploy your WordPress site through Docker. All the “risky” software is safely locked away inside containers, where they can’t do much harm.
However, if you’re running your containers on a typical web host machine, you already have copies of these programs installed and running. This is far from ideal – we’re trying to remove these security risks by putting them in containers!
Ideally, your host machine should be a very minimal system – virtually skeletal in its simplicity.
Building a simple system from scratch is much easier than trying to uninstall a bunch of software packages. There’s always the risk that you’ll break something along the way!
If your site is already live on an existing server, the best approach is to set up a new host machine and then migrate over to it. Here are the steps you need to take:
- Set up a new, secure machine with a bare-bones Linux installation
- Install Docker on the new machine
- Export your existing wordpress site (the WordPress files, user content, and database)
- Import this data into the new wordpress and database containers
- Run the docker containers
- Change your computer’s HOST settings, so you access the new server when you type your site’s URL (everyone else goes to the old server)
- Check it’s working and make manual adjustments
- Tighten your container security to the max, check the site still works
- Migrate your DNS records to the new host machine
- Set up automated backups
- Establish a new process to maintain your secure site
Let’s go through these steps one by one.
Step 1: Bare Bones Installation
As I mentioned before, most web hosting companies provision new servers with a ton of software. They want to make it easy to get up and running, so they install Apache, MySQL, PHP, Python, Ruby, and many other programs you’ll probably never use.
Our strategy is to contain these programs in containers, so we don’t need them running on the host machine. We can remove them, but it’s better to start with a blank slate.
Some web hosts do a good job of giving you a barebones installation. These are usually hosting companies that market themselves to a more technical audience – such as A2 hosting, along with cloud hosting companies like Amazon Web Services, Google Cloud Platform, and Scaleway.
With a minimal Ubuntu installation, you have a fairly bare-bones server. You also have the benefit of a huge repository of software you can install if you want.
Installing from a repo is much easier (and faster) than compiling everything manually.
The minimal server editions of Ubuntu start out with only 2 network aware processes running – SSH and the Network Time daemon.
Securing Your Host Machine
Ubuntu already has AppArmor. That goes a long way – but it’s not a complete solution. Let’s look at what you need to add:
- Configure secure SSH access on your new machine
- A firewall to prevent hackers from reaching into your server through open ports
- Fail2ban – it scans log files and bans hackers who attempt ssh brute force attacks
- Tripwire – an intrusion detection tool that identifies unauthorized changes to the filesystem
Before we do any of this, let’s upgrade the existing software:
sudo apt update
sudo apt dist-upgrade
Installing Tripwire
Many common attacks involve uploading malicious code to your server machine – whether it’s in a new file or an existing one. This code is stored as files on the hard drive.
Tripwire is a program that scans your file system for unauthorized changes. It starts by building a database of your existing file system. At a future point, it will scan and detect any changes that have occurred.
It doesn’t prevent damage from occurring, but it detects it after the event. Hopefully, it won’t happen – if it does, Tripwire will tell us.
If access control is like a lock protecting a building, intrusion detection is the security alarm that rings after someone breaks in.
Installing Tripwire is easy:
sudo apt install tripwire
You’ll have to fill in some options in the console. Select “internet site” when prompted, and provide secure passphrases for each step. Remember these phrases, as they are not stored on the machine!
Tripwire is very good at detecting changes to the file system – we can tell it which files we expect to remain static, and which ones should change. Some files should be present, but their contents can change over time. Some files should grow.
The configuration file is fully commented, so you can fine-tune Tripwire to your own requirements.
Right now, we’re configuring our machine, adding software and altering the file system. If we ran Tripwire right now, it would generate a lot of false alerts. We’ll configure it later, after setting everything up.
RKHunter
RKHunter is a rootkit hunter – it defends against some of the meanest malware out there.
For now, we’re just going to install it. Later, we’ll set it up and run it.
Type:
sudo apt-get install rkhunter
Set Up SSH Certificates on Both Machines
Ideally, you should already be using 2-key encryption to access your existing server. If not, you’ll have to set it up on the old and new machine – and on your PC too.
There are a few ways to do this, depending on your platform. If you have a Linux PC, you already have the tools you need. If you’re using Windows, you probably use PuTTY for SSH. PuTTY has a key generator program.
I’ll link to the different methods for each platform below:
Once you have a pair of keys on your PC, you’ll have to install the public key on your servers. You keep the private key to yourself – never share it!
The simplest way to get your certificate file onto the server is through SCP (secure copy) – as long as your PC supports it. There is a Windows SCP client, called WinSCP. Alternatively, you can create a new file on the server with nano (or vi if you feel adventurous) and copy-paste the key text.
If your PC runs Linux, you can use the shh-copy-id program. It uses SCP behind the scenes, but it knows exactly where to send your file.
The file goes into ~/.ssh/authorized_keys, where ~/ is your user’s home directory. authorized_keys is a file, not a directory. For root users, the home directory is /root/, otherwise it’s /home/user-name/.
Make sure the .ssh/ directory exists before you send your key. You can create it by running:
mkdir ~/.ssh
By the way, if you already have a key in the directory, it will get overwritten. You can add your new key to the file with a text editor – each key goes on its own line. Keys are so long they look like a huge paragraph, but they only take up a single line (it wraps.)
If you need to add nano to your Ubuntu box, you can do it with this command:
sudo apt install nano
Prevent Super User SSH Access
In the world of Linux, the superuser has the power and ability to modify the system in any way they want – they can even delete the entire system if they feel like it! Clearly, you don’t want to put this kind of power into a hacker’s hands.
Logging on to your host with a superuser account is a bad practice. It’s easy to accidentally break something. It’s actually unnecessary, as you can use the sudo or su commands to temporarily switch to the superuser when needed.
What’s more, SSH is not uncrackable – even if you use a unique cryptographic key. Some “man in the middle” attacks that can get around the encrypted SSH protocol – although using private and public keys do help.
As logging on as the superuser is so risky, it makes sense to permanently disable superuser login under ssh.
Here’s what you need to do:
- Create a new user account, complete with a home directory and a .ssh directory
- Copy the root public key to the new user’s .ssh directory
- Give the new user sudo powers
- Restart the ssh service
- Prevent the root user from logging on over ssh
Here’s a list of commands that achieve the first 4 goals (Replace the [type new username here] sections with your preferred username):
adduser  [type new user name here]
mkdir /home/[type new user name here]/.ssh
chmod 0700 /home/[type new user name here]/.ssh/
cp -Rfv /root/.ssh /home/[type new user name here]/
chown -Rfv [type new user name here].[type new user name here] /home/[type new user name here]/.ssh
chown -R [type new user name here]:[type new user name here] /home/[type new user name here]/
echo "[type new user name here] ALL=(ALL) NOPASSWD: ALL" | (EDITOR="tee -a" visudo)
/etc/init.d/sshd restart
usermod -s /bin/bash [type new user name here]
Test your settings by logging in to the host machine with the new user account. Do it in a new terminal – keep the old one open!
If you can log onto the machine, check that you can switch users to root:
sudo su -
whoami
exit
If you see “root” when you type whoami, you’re ready to remove root’s ssh privileges. Type exit to leave the pseudo shell and switch back to your new account. Open the sshd_config file in the nano editor:
sudo nano /etc/ssh/sshd_config
Find a line that reads:
PermitRootLogin without-password
Change it to:
PermitRootLogin no
Save the file (ctrl-x then y) and restart the ssh service:
sudo /etc/init.d/sshd restart
OK, we’ve created a new admin user and given it sudo powers. We’ve removed the ability for the root user to log in over SSH.
Setting Up a Firewall
We’re going to set up a simple firewall that blocks most of the network traffic entering and leaving the box. We’ll leave a couple of holes open for SSH connections, software package updates, and HTTP traffic.
During this process, it’s important to avoid locking yourself out!!
The basic firewall functionality is built into the Linux kernel. Iptables is an application that allows you to configure these built-in firewall capabilities – but it’s quite challenging.
So we’re going to use UFW (which stands for Uncomplicated Fire Wall). UFW is a pretty user-friendly tool, with readable commands. It’s a nicer interface for iptables.
Let’s install it:
sudo apt install iptables ufw
When UFW is first installed, it’s disabled. It’s a good idea to always check that it’s disabled before you start giving it orders – otherwise you could lock yourself out!
Check the status with:
sudo ufw status
It should say “inactive”
Now let’s set the rules:
sudo ufw default deny incoming
sudo ufw default allow outgoing
sudo ufw limit SSH
sudo ufw allow out ntp
sudo ufw allow out dns
sudo ufw allow http
sudo ufw allow https
The first two commands block everything. Then we selectively add services. We limit ssh connectivity to prevent brute force ssh attacks. If a client attempts more than 6 connections in 30 seconds, the firewall will ignore them for a while.
NTP is the network time protocol. We allow it so we can keep our server time updated.
DNS is the domain name service – it translates domain names into IP addresses. The package manager needs this service, as does Docker and other packages, including WordPress.
The next step is to enable UFW:
sudo ufw enable
This is the moment of truth! If you messed up your settings, you could lock yourself out of the box! Fortunately, we haven’t told UFW to run when the machine reboots. So it’s possible to reboot the machine and get back in.
It’s normal for your SSH software to end the session when you run this command, but if you can’t log in again, you’ll have to reboot your machine and check the UFW settings.
Finally, we configure UFW to start automatically when the server boots:
sudo update-rc.d ufw defaults
Installing Fail2ban
We’ve already limited SSH connectivity with UFW – if a client attempts to connect more than 6 times in 30 seconds, UFW will ignore them. With that in mind, a careful hacker could simply slow down their attack to avoid the penalty.
Fail2ban blocks SSH users who fail the login process multiple times. You can also set it up to detect and block hack attempts over HTTP – this will catch hackers who attempt to probe your site for weaknesses.
These attackers attempt to load multiple URLs, generating 404 errors as they go. They usually use a massive list of possible weaknesses, so it’s easy to spot them in the web server logs.
Fail2ban updates the iptables configuration, blocking the attacker’s IP addresses.
Install fail2ban with
sudo apt install fail2ban
Restart the service:
sudo service fail2ban restart
Make sure it runs on boot with:
sudo update-rc.d fail2ban defaults
Step 2: Set Up Docker on the New Machine
First, we’ll install it. The first step is to add some packages Docker needs:
sudo apt-get install
    linux-image-extra-$(uname -r)
    linux-image-extra-virtual
Next we need to add some packages that enable the installation:
sudo apt-get install
apt-transport-https
ca-certificates
curl
software-properties-common
Let’s add the official Docker repository:
curl -fsSL https://download.docker.com/linux/ubuntu/gpg | sudo apt-key add -
sudo apt-key fingerprint 0EBFCD88
Confirm the displayed fingerprint is actually 9DC8 5822 9FC7 DD38 854A E2D8 8D81 803C 0EBF CD88.
Now we’ll add the stable repo:
sudo add-apt-repository
"deb [arch=amd64] https://download.docker.com/linux/ubuntu
$(lsb_release -cs)
stable"

sudo apt-get update
Finally, we’re ready to install docker! Type the following:
sudo apt-get install docker-ce
You can test it’s installed properly with:
docker run hello-world
Now Docker is installed, you can set it to run at boot time with:
sudo update-rc.d docker defaults
You’ll also need docker compose, Docker’s orchestration tool. The version in the Ubuntu repositories is out of date. You can install the latest version like so:
curl -L https://github.com/docker/compose/releases/download/1.13.0/docker-compose-`uname -s`-`uname -m` > /usr/local/bin/docker-compose
chmod +x /usr/local/bin/docker-compose
OK, you’re ready to move on to the next step!
Step 3: Transfer Your Site Data
In this step, we’re going to transfer the code and data from your old site to your new host machine.
We’re going to use the “scp” command to transfer the files from your machine to the new one.
Set Up a Workspace Folder
Before we transfer the files, we must create a place for them to live. Create a workspace folder on your new server.
sudo mkdir /workspace
sudo chown [new user name] /workspace
This is a place where you can set up your new containerized WordPress installation. You will be importing your old code and data into this directory, so you should create subdirectories for them:
mkdir /workspace/wordpress
mkdir /workspace/db
Exporting Your Existing WordPress Site
A WordPress site is ultimately just data on a hard disk. True, that data comes in a number of forms. There are text files, such as the PHP files that make up the core WordPress code. Then there are binary files, like images and media. Finally, there’s database content. All of this data lives on the server’s file system.
While there are various plugins and export formats for wordpress, you can also just use SCP to copy the files and send them to the new server. It’s easy to achieve with a few commands over SSH. Log on to your original server through SSH, and type:
scp -Cr /path/to/wordpress/ user@new_server:/workspace/wordpress/
As long as you use the same public key on both machines, this will work.
That takes care of the core wordpress files and the user uploads. Now we need to transfer the database. The exact location of the MySQL (or MariaDB) database files is distribution specific – although most distros use /var/lib/mysql/
You can discover the exact location with this command (on your original server):
mysql -e 'SHOW VARIABLES WHERE Variable_Name LIKE "datadir"'
Now you can back it up in the same way as before:
scp -Cr /path/to/database/ user@new_server:/workspace/db/
At this point, you have the code and data that make up your site.
One Site or Many?
The next step is to build the containers! But before we dive into that, there’s one question you need to answer. Will you be hosting more than one site on this machine?
Here’s the problem – you can only attach a single container to each port on your machine. When people visit one of your sites, their browser will request the content from a standard port (port 80 for HTTP and 443 for HTTPS).
Each site should live inside its own container. This keeps them safe and prevents cross-contamination if any site does get hacked. But multiple containers can’t connect to the same port…
How do we solve this quandary?
With a reverse proxy. A reverse proxy is a process that sits on the standard http ports and routes the incoming requests to the correct container.
Each container is assigned a random port by Docker when you run it, so you need some way to tell the reverse proxy which port to use for each site.
Fortunately, there’s a simple solution. Jason Wilder’s “nginx-proxy” container is designed to automatically route requests to docker containers.
It cooperates with the Docker daemon to read the metadata for each container running on the machine. It searches for a VIRTUAL_HOST environment variable, which should correspond with your site’s address.
You can set the virtual host environment variable in your docker-compose.yml file:
wordpress-yourdomain:
…
environment:
– VIRTUAL_HOST=www.yourdomain.com
When nginx-proxy peeks at your container, it will see this declaration and route all HTTP requests for www.yourdomain.com to this specific container.
Database Containers for Multiple Sites
With multiple WordPress sites on your machine, you have 2 choices. You could create a new database container for each, or you could reuse the same container between them. Sharing the DB container is a little riskier, as a hacker could, theoretically, ruin all your sites with one attack. You can minimize that risk by:
- Use a custom root user and password for your database – don’t use the default username of ‘root’.
- Ensuring the db container is not accessible over the internet (hide it away inside a docker network)
- Creating new databases and users for each WordPress site. Ensure each user only has permissions for their specific database.
With this setup, a hacker would only be able to reach the database container through a WordPress container, and they would only be able to damage the database for that site.
What are the benefits of using a single database container?
- It’s easier to configure and scale.
- It’s easier to backup and recover your data.
- It’s a little lighter on resources.
Ultimately, the choice is yours. It depends on your paranoia level and patience!
Step 4: Importing Your Site into New Wordpress and Database Containers
There’s an official WordPress Docker image (called “wordpress”). Since we’re moving an existing site with existing code, we’re going to use the PHP image instead.
We already have all the code we need to run a WordPress site in our WordPress fles – which we copied from the original server. Start with:
docker pull php:5.6-apache
The container includes a web server and PHP 5.6 – the same version the official WordPress image uses.
Before we can use it, we have to add some extra software to the image – WordPress requires a few extensions. We’ll do that with a Dockerfile:
FROM php:5.6-apache

# install the PHP extensions we need
RUN set -ex;

        apt-get update;
        apt-get install -y
         libjpeg-dev
         libpng12-dev
        ;
        rm -rf /var/lib/apt/lists/*;

        docker-php-ext-configure gd --with-png-dir=/usr --with-jpeg-dir=/usr;
docker-php-ext-install gd mysqli opcache

# set recommended PHP.ini settings
# see https://secure.php.net/manual/en/opcache.installation.php
RUN {
         echo 'opcache.memory_consumption=128';
         echo 'opcache.interned_strings_buffer=8';
         echo 'opcache.max_accelerated_files=4000';
         echo 'opcache.revalidate_freq=2';
         echo 'opcache.fast_shutdown=1';
         echo 'opcache.enable_cli=1';
        } > /usr/local/etc/php/conf.d/opcache-recommended.ini

RUN a2enmod rewrite expires

VOLUME /var/www/html
I “borrowed” this from the official WordPress image Dockerfile. Don’t worry, it’s open source!
Now we need to build this file to make a new image:
sudo docker build -t wordpress_php .
We’ll use this container to run our site by adding a volume with your WordPress files.
If your site contains a lot of custom code, you may need to add more software packages to the container. It’s a very stripped-down environment – it’s missing many of the common Linux utilities, such as “less” and the “vi” editor. These are useless for the majority of websites, of course.
The WordPress image expects you to use a separate database container – such as MySQL or MariaDB. MariaDB is virtually identical to MySQL, but it’s completely free. MySQL now belongs to Oracle, so it’s possible it may not be freely available in the future.
You should use the same database in your container that you used for your original blog.
Let’s pull the image with:
docker pull mysql
Now you have the basic components of WordPress installed. Let’s get them to work together. When you’re working with more than one container, it makes sense to orchestrate them through Docker Compose. Here’s an example docker-compose.yml file:
version: "3.0"
services:

 proxy:
        image: jwilder/nginx-proxy
        ports:
            - "80:80"
            - "443:443"

        volumes:
            - ./certs:/etc/nginx/certs
            - vhost:/etc/nginx/vhost.d
            - html:/usr/share/nginx/html
            - /var/run/docker.sock:/tmp/docker.sock:ro

        networks:
            - webnet

    lets_encrypt:
        image: jrcs/letsencrypt-nginx-proxy-companion
        volumes:
            - ./certs:/etc/nginx/certs:rw.
            - ./var/run/docker.sock:/var/run/docker.sock:ro
            - vhost:/etc/nginx/vhost.d
            - html:/usr/share/nginx/html

        networks:
            - webnet

     your_site_name:
        image: wordpress_php
        ports:
            - "80"
            - "443"

        depends_on:
            - db

        environment:

           VIRTUAL_HOST: www.yourdomain.com

           VIRTUAL_HOST: yourdomain.com
           LETSENCRYPT_HOST: yourdomain.com,www.yourdomain.com
           LETSENCRYPT_EMAIL: your@youremail.com


        volumes:
            - ./wordpress/:/var/www/html/

        networks:
            - webnet
    db:
        image: mysql

        environment:
           MYSQL_ROOT_PASSWORD: uncrackable23pass
           MYSQL_DATABASE: wordpress
           MYSQL_USER: wordpress
           MYSQL_PASSWORD: wpPassWord45

        volumes:
           - ./db:/var/lib/mysql

        networks:
           - webnet
volumes:
    vhost:
    html:

networks:
    webnet:
Let’s start with the two services listed at the top. These are the nginx-proxy (which I named as proxy) and the letsencrypt-nginx-proxy-companion (lets_encrypt). These are essential to provide TLS (HTTPS) for your site.
When someone attempts to visit your site over HTTPS, they’ll connect to the proxy service. This will check for a valid signed certificate, inside the ./certs folder of your host machine. If the certificate does not exist, it will reach out to the lets_encrypt container.
This starts a fairly complex procedure to get a new HTTPS certificate. Let’s Encrypt will automatically give you a certificate, but you have to prove that you own the site. The lets_encrypt container takes care of this for each of the sites you run on the server.
This container communicates with the let’s encrypt server, and asks for a certificate. Let’s encrypt will send an HTTP request to your domain to check you own it. The container will answer with a valid page, proving you own the certificate. It will then receive a cert from Let’s Encrypt, and store it in the directory on your host machine.
Next time someone attempts to load your site over HTTPs, the certificate is already there.
The environment variables under the “your_site_name” service provide information that the proxy container and let’s_encrypt container use to identify your domain name.
This means you could potentially run multiple sites on this physical machine. Docker ensures the HTTP requests are routed properly.
If you wanted, you could also add a caching container, like Varnish. Varnish caches your content so it can serve pages quickly – much faster than WordPress can. But it’s not really a security enhancement, so we’ll leave this for another day.
I’ve included some random passwords here. You would use the actual usernames and passwords for your database. You’ll notice that I’ve opened port 80 and part 443, to deal with HTTP and HTTPS.
We’ve included the wordpress files from your original site. And we’ve also included the database files from the ./db directory.
The VIRTUAL_HOST line is there so you can use a reverse proxy, as we discussed above. This is only necessary if you have multiple sites on one server.
Webnet is the name of a private network – Docker can set up as many of these as you need, and only the containers on the network can communicate with each other. This keeps your database secure from other containers and from the outside world.
Before we can execute the stack, we need to make one small edit to your wp-config.php file.
Right now, it probably expects to find the database on localhost, or on some other database server. We need to tell it to look inside another container. Fortunately, this is not complex – Docker handles routing between containers and provides load balancing for free.
Here’s the new code:
/** MySQL hostname */
define('DB_HOST', 'db:3306');
Save the change, and you’re ready to go. All we have to do is start the containers.
Step 5: Launch Your Site Inside the Docker Containers
If you’ve followed all the steps correctly, you can launch your site with this command:
docker-compose up -d
You may have to start the database first. It takes longer to get ready, and the WordPress container will quit if it can’t connect to the database. So if your site doesn’t work, you can run this command to start the database:
docker-compose up -d db
Give it a minute or two, then type:
docker-compose up -d your_site_name
After a few seconds, your site should be online. You can test it by typing your new machine’s IP address into the web browser’s address bar. Any absolute URLs on your site will be broken at the moment – so it may look a little ugly. We’ll fix this in the next step.
Step 6: Accessing Your Site on the New Server
Accessing your site using an IP address can cause all kinds of strange behavior – Apache expects to see a host field in the request header. And absolute links will no longer work.
Your new server is not connected to your domain name yet, and we should only change the DNS settings when we’re sure the new site is working properly.
For now, you can edit your computer’s host file so it believes your domain name points to the new server. The host file is a plain text file with hostnames and ip addresses.
When you navigate to a website, your computer checks in the hosts file for the IP address. If it doesn’t find it, then it sends a request to a DNS server.
If you add your site’s name and the IP address of your new server machine to the host file, you will be able to visit in your browser – you’ll bypass the DNS system. Links and images will work. The rest of the world will still see your old server.
Each operating system handles the host file in a slightly different way. You can find instructions for your OS here.
Follow the instructions, and load your site in your browser.
Step 7: Check the Site Works
Now is the real moment of truth. We’ve torn your website out of its natural environment and placed it in a constrained Dockerized space. Hopefully, it will still run perfectly. But there’s a possibility that your containers are lacking some components they need to support your site (this is especially true if you’re using custom or exotic themes and plugins).
Even if your site appears to work properly, you should test all the features you regularly use. Log in and out of the admin panel. Interact with the plugins and other admin settings. Make a post, create a page. If everything works properly, breathe a sigh of relief and move on to the next step. (Remember to delete any weird posts you made!)
If there are any problems, you’ll have to figure out what is missing. It helps to activate PHP errors in the wp-config file (just comment out the code you inserted at the start of the file).
There are 2 ways to track your error logs. You can read the docker logs:
docker logs container-name
Or you can reach into the container and read them with tail:
docker exec -it container-name bash

tail /var/log/apache2/error.log
Reload the web page, and watch the errors that appear. You will probably discover that you are missing PHP modules or software packages from the system.
Don’t just log into the container and install the software – it will disappear when you shut down the containers or reboot the machine.
Instead, you need to add the components you need to the Dockerfile and build the image again.
For instance, if your site needs the ImageMagick software and PHP extensions, you would modify your Dockerfile like this:
...
RUN apt-get install imagemagick
RUN docker-php-ext-install imagemagick
If you can’t work out what’s missing, you’ll need to contact the developers who coded your plugin or theme.
Step 8: Tightening Container Security
Docker is great, but it’s not without its own share of security issues. The Docker team have done an amazing job of fixing exploits as they crop up, but we still need to protect ourselves against unknown exploits.
And, as we mentioned above, we need to be careful about downloading and running strange container images.
Here are some important points to remember:
1. Protect Your System Resources
Docker has the ability to limit how much processor time and memory each container gets. This protects you against exhaustion DOS attacks – where a hacker creates processes that eat up your system’s resources, causing it to grind to a halt.
You can set limits for your containers in the docker-compose.yml file:
deploy:
    resources:
        limits:
            cpus: '0.001'
            memory: 50M
2. Protect Against Break-Outs
While Docker’s processes are contained inside a specific Linux namespace, it’s possible to break out of that namespace – though it’s hard, it can be done.
In theory, this would give the process root access to the host operating system! In practice, Docker uses Linux capabilities to restrict the power of containerized processes.
First, it drops all capabilities (effectively reducing the process to regular user capabilities). Then it selectively adds capabilities, giving the process the minimum root powers to do its job.
A containerized process still has some of the abilities of root, making it more powerful than a regular user. But it’s not as bad as full-on root privileges.
With AppArmor, you can tighten the security further, preventing the process from accessing any parts of the system that do not relate to serving your website.
3. Poisoned Docker Images
Docker makes it really easy to share images with other users. Docker Hub works like GitHub – you can upload and download images for free. The downside is that there’s no security auditing. So it’s easy to download a trojan horse inside a container.
Official images (such as WordPress and Apache) are audited by the Docker team. These are safe. Community images (which have names like user/myapp) are not audited.
This places the responsibility for security in your hands. You need to ensure you don’t download poisoned images.
Docker Hub usually provides links to the Dockerfile that built the image. But it’s possible to bait-and-switch – a malicious user could build a poisoned image and then link to an innocent Dockerfile.
If in doubt, you can build images from Dockerfiles instead of pulling them from the Hub. Make sure you check the contents of the FROM image, too. A malicious user could hide malware inside a custom source image.
4. Kernel Exploits
Docker shares the same kernel as the host system. This means a kernel exploit executed inside a container will affect the entire system. The only way to protect against kernel exploits is to regularly update the host system. Use:
sudo apt update && sudo dist-upgrade.
5. Isolation Does Not Mean “No Security Needed”
Containers run in isolation from the rest of the system. That does not mean you can neglect security – your website lives inside these containers! Even if a hacker cannot access the full system from a container, they can still damage the container’s contents. That gives them the ability to harm your site.
That’s why we hardened the WordPress installation, and we’re going to take that degree of protection further in the next step.
Securing Your Containers With AppArmor
Under Ubuntu, AppArmor already protects you – to a degree. The Docker daemon has an AppArmor profile, and each container runs under a default AppArmor profile. The default profile prevents an app from breaking out of the container, and restricts it from doing things that would harm the system as a whole.
However, the default profile offers no specific protection against WordPress specific attacks. We can fix this by creating a custom profile for your WordPress container.
First, we need to create the profile. Create a file named wparmor, with the following contents:
#include <tunables/global>


profile wparmor flags=(attach_disconnected,mediate_deleted) {

  #include <abstractions/base>

  # GENERAL CONTAINER RULES
  network,
  capability,
  file,

  deny @{PROC}/* w,   # deny write for all files directly in /proc (not in a subdir)
  # deny write to files not in /proc/<number>/** or /proc/sys/**
  deny @{PROC}/{[^1-9],[^1-9][^0-9],[^1-9s][^0-9y][^0-9s],[^1-9][^0-9][^0-9][^0-9]*}/** w,
  deny @{PROC}/sys/[^k]** w,  # deny /proc/sys except /proc/sys/k* (effectively /proc/sys/kernel)
  deny @{PROC}/sys/kernel/{?,??,[^s][^h][^m]**} w,  # deny everything except shm* in /proc/sys/kernel/
  deny @{PROC}/sysrq-trigger rwklx,
  deny @{PROC}/mem rwklx,
  deny @{PROC}/kmem rwklx,
  deny @{PROC}/kcore rwklx,

  deny mount,
  deny umount,

  deny /sys/[^f]*/** wklx,
  deny /sys/f[^s]*/** wklx,
  deny /sys/fs/[^c]*/** wklx,
  deny /sys/fs/c[^g]*/** wklx,
  deny /sys/fs/cg[^r]*/** wklx,
  deny /sys/firmware/efi/efivars/** rwklx,
  deny /sys/kernel/security/** rwklx,

  # WORDPRESS SPECIFIC
  deny /var/www/html/* wlx,
  deny /var/www/html/wp-admin/** wlx,
  deny /var/www/html/wp-includes/** wlx,
  deny /var/www/html/wp-content/* wlx,

  deny /var/www/html/wp-content/plugins/** wlx,
  deny /var/www/html/wp-content/themes/** wlx,
  owner /var/www.html/wp-content/uploads/** rw,

  # GENERAL CONTAINER RULES
  # suppress ptrace denials when using 'docker ps' or using 'ps' inside a container
  ptrace (trace,read) peer=docker-default,


  # docker daemon confinement requires explict allow rule for signal
  signal (receive) set=(kill,term) peer=/usr/bin/docker,

}
Most of this policy covers things a docker container shouldn’t be able to do, such as access the /sys file tree. The lines following “# WORDPRESS SPECIFIC” are specifically targetted to WordPress.
They prevent processes in the container from writing, linking or executing files in certain directories. These directories are:
/var/www/html/ - the web root
/var/www/html/wp-admin/ - the admin console
/var/www/html/wp-includes/ - core WordPress files
/var/www/html/wp-content/plugins/ - where WordPress installs plugins
/var/www/html/wp-content/themes/ - where WordPress stores themes
There is limited access (for owners only) to one of the WordPress directories:
/var/www.html/wp-content/uploads/ - this is where wordpress stores uploaded media files (such as images)
The net effect is that it’s impossible to install malware, themes or plugins through the web interface. We’ve already covered this to some degree with the .htaccess rules and directory permissions. Now we’re enforcing it through the Linux kernel.
All you have to do to apply this new policy to your WordPress container is add a couple of lines to the docker-compose file, under the entry for your wordpress container:
security_opt:
    - apparmor=wparmor
This tells Docker to use the wparmor profile as the AppArmor profile for this container.
Before AppArmor can apply wparmor, it has to parse it. Type the following command:
sudo apparmor_parser wparmor
Now restart your Docker container stack with:
docker-compose up -d
How Do I Install Plugins Now??
We’ve prevented hackers from installing plugins through the admin panel … but the same restrictions also block you.
You can install plugins by loading them into the /workspace/wordpress/wp-content/plugins directory. These plugin files will “magically” appear inside the container. You can do the same thing with themes, too.
Upgrading plugins and themes manually can sometimes cause problems – it’s possible you could install a version that’s not compatible with your current WordPress installation (although you should always run the latest version of WP).
It’s a good idea to create a test environment on your own machine. You can download the contents of the workspace on your server to a convenient location on your hard disk, and then run it on your PC using Docker. Use your “hosts” file to trick your browser into fetching the content from your local docker containers, instead of the server.
There are versions of Docker for Mac and PC, so you’ll be able to run your site from your home machine. If the code works on your PC, it will also work on the server.
Install the plugins and test them – make sure your site doesn’t break. When you’re done, upload the project folder to the server, and restart the containers with Docker Compose.
Since it’s impossible to alter your WordPress installation through the web interface, it’s also impossible for a hacker to install poisoned themes and plugins. They’re powerless even if they manage to get your admin password!
Configure Tripwire
Now we have our site set up and working, we can turn our attention to the security software we installed on the host machine. We’re going to configure our intrusion detection software, starting with Tripwire.
First, we need to create a database of the machine’s file structure:
sudo tripwire --init
You will be prompted for the local passphrase you created when you installed tripwire.
After building the database, we need to customize the configuration to remove false positives. This is a two-step process:
- First, we run the check, saving the output into a text file
- Next, we need to edit the configuration, commenting out the lines that refer to these files
The first step is easy. Just type:
sudo sh -c 'tripwire --check | grep Filename > /etc/tripwire/test_results'
The grep command filters out the lines that mention “Filename” – these are all we’re concerned with for the moment. The results are stored in /etc/tripwire/test_results.
Give it a couple of minutes to execute.
Next, we have to edit the policy file. Open the file with a text editor:
sudo nano /etc/tripwire/twpol.txt
Use the search feature to find each file and comment it out using a hash symbol (#). The symbol goes at the beginning of the line, like this:
#/etc/rc.boot -> $(SEC_BIN) ;
It really helps if you open another ssh console and put them side-by-side. You can read the contents of the test results in the second console by typing:
less /etc/tripwire/test_results
Tripwire tends to complain about the entries in the /proc filespace, which are auto-generated by the Linux kernel. These files contain information about running processes, and they tend to change rapidly while Linux runs your system.
We don’t want to ignore the directory entirely, as it provides useful signs that an attack is in progress. So we’re going to have to update the policy to focus on the files we are interested in.
Inside the policy file, you’ll find a section on Devices and Kernel information. It looks like this:
(
  rulename = "Devices & Kernel information",
  severity = $(SIG_HI),
)
{
        /dev            -> $(Device) ;
        /proc           -> $(Device) ;
}
Replace the contents of the curly brackets with:
{
        /dev                    -> $(Device) ;
        #/proc                  -> $(Device) ;
        /dev/pts                -> $(Device) ;
        /proc/devices           -> $(Device) ;
        /proc/net               -> $(Device) ;
        /proc/tty               -> $(Device) ;
        /proc/sys               -> $(Device) ;
        /proc/cpuinfo           -> $(Device) ;
        /proc/modules           -> $(Device) ;
        /proc/mounts            -> $(Device) ;
        /proc/dma               -> $(Device) ;
        /proc/filesystems       -> $(Device) ;
        /proc/interrupts        -> $(Device) ;
        /proc/ioports           -> $(Device) ;
        /proc/scsi              -> $(Device) ;
        /proc/kcore             -> $(Device) ;
        /proc/self              -> $(Device) ;
        /proc/kmsg              -> $(Device) ;
        /proc/stat              -> $(Device) ;
        /proc/loadavg           -> $(Device) ;
        /proc/uptime            -> $(Device) ;
        /proc/locks             -> $(Device) ;
        /proc/meminfo           -> $(Device) ;
        /proc/misc              -> $(Device) ;
}
The next section we need to change deals with system boot changes. It’s normal for daemon processes to make some changes in this area, so we’ll have to make some edits to prevent false positives. Find the section that reads “System boot changes”, and comment out the following lines:
/var/lock              -> $(SEC_CONFIG) ;
/var/run               -> $(SEC_CONFIG) ; # daemon PIDs
Change these lines to:
#/var/lock              -> $(SEC_CONFIG) ;
#/var/run               -> $(SEC_CONFIG) ; # daemon PIDs
Make sure you address all the false positives which appeared on your list – they could be different from mine!
Now we need to activate the new profile:
sudo twadmin -m P /etc/tripwire/twpol.txt
You will have to type your site passphrase. Next, we rebuild the tripwire database:
sudo tripwire --init
This will require your local passphrase. After the database has been rebuilt, the false positives should be gone. Check again with:
sudo tripwire --check | grep Filename
If you do see any file complaints, edit the policy file again and repeat the above steps (from sudo twadmin …).
Finally, check the full text of the tripwire check to see if there are any other alerts:
sudo tripwire --check
You will see a nicely formatted report that summarizes tripwire’s findings.
Let’s clean up the temporary file we created:
sudo rm /etc/tripwire/test_results
Now we should install an e-mail notification utility – to warn us if anything changes on the system. This will enable us to respond quickly if our system is compromised (depending on how often you check your emails).
Since we just installed a software package, tripwire should notice the changes when we run it. It will fire off a report. Let’s send the report to your email address:
sudo tripwire --check | mail -s "Tripwire report for `uname -n`" your_email_here@your_email_host.com
When you add software, you can tell tripwire it’s OK using it’s interactive check feature. Start by typing:
sudo tripwire --check --interactive
After performing the check, tripwire opens a file in your standard text editor. The file lists all the changes that were made (in depth) and asks you if you are OK to add these changes to the database. It will provide a checkbox with an “X” like this [x]. There’s one checkbox for every change.
If the change is fine, leave the X in place. If it’s not OK, delete the X, and tripwire will continue to consider the file as hostile.
After you have reviewed the file, save it. You don’t have to make any changes this time because we know that we were the source of the change.
Tripwire will prompt you for your local passphrase again. This prevents a hacker from circumventing tripwire’s protection – they don’t know the passphrase, so they can’t trick tripwire.
You should go through this routine every time you add new software packages to your machine – otherwise, you could forget the installation and get false positive warnings.
You should set tripwire to run on a schedule – once a day. We’ll use cron for this. Open up your cron table with the following command:
sudo crontab -e
Then add a row like this
30 5 * * * /usr/sbin/tripwire --check | mail -s "Tripwire report for `uname -n`" your_email_here@your_email_host.com
This will run at half past five (AM) every day. It will email the results to you.
Just save the file, and the cron table will be updated.
Remember to check your emails regularly – if you see any complaints, it means your file system has been altered without your permission.
RKHunter
Our last tool is a rootkit scanner. Rootkits are malicious code that hackers install onto your machine. When they manage to get one on your server, it gives them elevated access to your system, allowing them to pull off dangerous exploits.
Attackers often hide rootkits in obscure places, or inside innocent looking places (like your web root or public FTP folders).
Tripwire is configured to search in key areas. It’s good at detecting newly installed software, malicious sockets, and other signs of a compromised system. RKHunter looks in less obvious places, and it checks the contents of files to see if they contain known malicious code.
RKHunter is supported by a community of security experts who keep it updated with known malware signatures – just like antivirus software for PCs.
The first step is to update the malware database. Run:
sudo rkhunter --update
Right now we have a clean system. We need to tell RKHunter that everything is fine – it will store a record of the current filesystem. Run:
sudo rkhunter --propupd
Now we’ll run the first check. This will probably generate a few false positives, and we’ll have to deal with those. Let’s see what happens when we run:
sudo rkhunter -c --enable all --disable none --rwo
This command will print warnings only. Here are the warnings I saw:
Warning: The command '/usr/bin/lwp-request' has been replaced by a script: /usr/bin/lwp-request: a /usr/bin/perl -w script, ASCII text executable

Warning: The following processes are using deleted files:
     Process: /usr/sbin/mysqld    PID: 10249    File: /tmp/ibicaybw
     Process: /usr/sbin/apache2    PID: 10641    File: /tmp/.ZendSem.1Hf3kc
     Process: /usr/sbin/apache2    PID: 10703    File: /tmp/.ZendSem.1Hf3kc
     Process: /usr/sbin/apache2    PID: 10704    File: /tmp/.ZendSem.1Hf3kc
     Process: /usr/sbin/apache2    PID: 10705    File: /tmp/.ZendSem.1Hf3kc
     Process: /usr/sbin/apache2    PID: 10706    File: /tmp/.ZendSem.1Hf3kc
     Process: /usr/sbin/apache2    PID: 10707    File: /tmp/.ZendSem.1Hf3kc
     Process: /usr/sbin/apache2    PID: 10708    File: /tmp/.ZendSem.1Hf3kc
Warning: Process '/sbin/dhclient' (PID 3539) is listening on the network.

[12:07:55] Warning: Group 'docker' has been added to the group file.
Copy and paste the text into a text editor on your PC so you can refer to them in the next step.
Configuring RKHunter
We need to make a few changes to the configuration:
- Add an email address for warnings
- Add known script files
- Whitelist device files
To do this, we need to edit the configuration. Run:
sudo nano /etc/rkhunter.conf
Then change the following lines:
| Original line | New line |
|---|---|
| MAIL-ON-WARNING=root | MAIL-ON-WARNING=”your_email@address.com” |
| ALLOW_SSH_ROOT_USER=yes | ALLOW_SSH_ROOT_USER=no |
(put your actual email address in the quotes)
Add the following whitelist lines. For each script warning you received, add a line that follows this pattern:
eg. for my script warning, I wrote:
SCRIPTWHITELIST=”/usr/bin/lwp-request”
Configure the way RKHunter inspects device files:
ALLOWDEVFILE="/dev/.udev/rules.d/root.rules"
ALLOWHIDDENDIR="/dev/.udev"
ALLOWHIDDENFILE="/dev/.blkid.tab"
ALLOWHIDDENFILE="/dev/.blkid.tab.old"
ALLOWHIDDENFILE="/dev/.initramfs"
Allow certain processes to access deleted files:
ALLOWPROCDELFILE=/usr/sbin/mysqld
ALLOWPROCDELFILE=/usr/sbin/apache2
Allow certain processes to listen on the network:
ALLOWPROCLISTEN=/sbin/dhclient
Now let’s check our configuration:
sudo rkhunter -C
Note the “C” is capital. This will check the configuration file and make sure it works. If it executes without messages, your configuration is fine.
Now let’s scan again to see if we get any warnings:
sudo rkhunter -c --enable all --disable none --rwo
You should get a single warning – RKHunter will recognize that its configuration has changed. We can clear this false positive by getting RKHunter to rebuild its internal database:
sudo rkhunter --propupd
The final step is to update Tripwire – remember, you have to do this whenever you add or configure software. Run:
sudo tripwire --check --interactive
Save the file and type in your local passphrase when prompted.
Finally, we’re going to add a cron task to run the test automatically. Run:
sudo crontab -e
Add a line for the task:
23 04 * * * /usr/bin/rkhunter --cronjob --update --quiet
And save the file.
Optional Step – Server Image
At this point, your server is fully configured. I’m sure you’ll agree it took a lot of work to reach this point!
If your hosting company offers the option, this would be a good point to make an image of your server. Most cloud hosting companies offer tools to do this.
Generally, there are two steps:
- Stop the server (don’t delete it!!)
- Capture an image
Make sure you read your hosting company’s documentation before you stop the server. Some machines have “ephemeral storage” – which means the data will be destroyed when you shut down your machine!
With an image, it’s easy to launch new servers or recover the old one if things go horribly wrong.
Step 9: Complete the Migration
OK, your server is fully configured and working. You’ve set up your security software, configured it, and tested it. You have daily reports sent to your email address.
Your new server is ready to go! The next step is to register your domain name with a CDN service – we’ll use CloudFlare in this article
Using CloudFlare gives us two big wins. First, we hide our machine’s IP address from nosy hackers. Next, our site visitors will get faster service, making them happier. We can achieve both of these goals with the free plan!
The process is very simple – you just fill in the forms on CloudFlare’s site. They walk you through the process step-by-step. First, enter your domain name. Cloudflare will scan your existing DNS records and copy them over.
As soon as CloudFlare has finished scanning your DNS files, you’ll see a list of the records it found. These are the details for your old server.
Look through it, and change the IP address for any “old server” record to the IP address of your new server. In most cases, you will have a single A record to change. If you have email records, you can keep the old server or use a third party email provider – the choice is yours.
Most hosting companies use their own machines to handle your email, so if you’re planning to cancel your old hosting account, you should get a new mail service provider. You will have to configure the new records inside CloudFlare. The email service provider will tell you how to do this when you sign up.
After checking the records, click on the “continue” button. Choose the free plan (unless you have a very busy site – in which case, choose a plan that suits your traffic needs).
Next, you’ll see a list of name servers. You need to go to your domain registrar and add these domain servers to your domain name’s records. Don’t forget to remove the entries for your hosting provider.
When you’ve done that, you’ve completed the domain name migration.
Step 10: Automated Backups
If your site does get hacked, backups make it possible to get up and running in moments. Without a good backup, it could take days of hard work – or else you could lose your content forever.
Many hosting companies give you the option of backing up your data for you. You can automate the process on a set schedule. This is the simplest option, but there are other choices.
There are many different backup options available. You can back your site up to DropBox. You could backup to Amazon Storage. You can pay a premium backup service. Or you could run a cheap cloud server and back your data up to it.
We recommend using UpdraftPlus WordPress Backup Plugin to automatically backup your content and database to multiple backup options.
Step 11: Maintaining Your Server
Always ensure you are running the latest version of any software installed on your box. You can update software packages on the host machine with:
sudo apt update && sudo apt dist-upgrade
Updating your core WordPress files is a little more tricky. You could download the latest version and unzip it into the WordPress folder – make sure you backup your wp-config.php file first, as it will be overwritten during the process.
You have options when it comes to backups thanks to a large variety of hosting providers. The benefits of AWS vs. Azure or other hosting providers vary based on your needs. So, ensure you do your due diligence.
Alternatively, you could temporarily remove the Docker Compose security options settings, log on to your admin panel, and update from there. Just remember to re-apply the security settings after you have finished.
Summary
Let’s take a step back and look at what we’ve accomplished:
- We’ve hidden our server from the world while making it easy to read our content
- We’ve built a firewall to block malicious traffic
- We’ve trapped our web server inside a container where it can’t do any harm
- We’ve strengthened Linux’s access control model to prevent processes from going rogue
- We’ve added an intrusion detection system to identify corrupted files and processes
- We’ve added a rootkit scanner
- We’ve strengthened our WordPress installation with 2-factor authentication
- We’ve disabled the ability for any malicious user to install poisoned themes or plugins
At this point, our server is a hidden fortress!
Improving Your Security Further
Your server is pretty secure right now. You have monitoring software running that regularly checks the system and creates warnings if there’s trouble. Don’t ignore the messages! Make a routine of checking the logs (or emails if you configured email reporting).
It’s vital to act quickly if you see any warnings. If they’re false warnings, edit the configuration. Don’t get into a habit of ignoring the reports.
Learn to read the various log files. They tell you about important events, such as whenever someone logs onto your server or uses the sudo command. Virtually everything that happens on a Linux machine is logged.
This becomes essential when you are researching a recent or ongoing attack. You can read more here: Linux Log Files
Security is an ever-changing field – it’s actually an arms race. Hackers continue to discover ingenious exploits, and security experts continue to fix them.
Today’s unbreakable secure server is tomorrow’s cake-walk. So it’s not enough to do this “security thing” once and walk away.
You have to make a habit of checking for new exploits and learn how to protect yourself against them.
Regularly check for security patches and issues in the core WordPress app: WordPress Security Notices
Also, check regularly on the forums or mailing lists for the plugins and themes you use on your site. You can never predict which plugins contain a fatal flaw – the infamous Panama Papers Hack was performed through a harmless-seeming image carousel plugin.
Keep your server updated – you can update every package with:
sudo apt update && sudo apt dist-upgradeYou should also update your container images whenever a new version of Apache or PHP is released. You can update all your docker base images with the following lines:
for docker in $(docker images|awk '{print $1,$2}'|sed 's/ /:/g'|grep -v REPOSITORY); do docker pull $docker; done
for dockerImage in $(docker images|awk '$2 == "<none>" {print $3}'); do docker rmi $dockerImage; done
The first line gets a list of images that were pulled from a remote repository, and then pulls each one. The second line deletes the outdated images from your disk.
After pulling new base images, you will have to rebuild your local images (in my case, it’s the wordpress_php image).
Go to the workspace directory, and run:
docker build -t wordpress_php .
You don’t have to do this if docker didn’t pull any new images.
Remember to restart your running containers:
docker-compose down
docker-compose up -d
The containers will restart with the latest images.
Speaking of Docker, it would make sense to move your security software into Docker containers. Each of the apps we installed came with a large number of requirements, including PERL modules, Ruby, and other runtime environments. These increase your server’s attack surface.
Unfortunately, there are no reliable official images for these components, so we’d need to roll our own Dockerfiles. It’s a time-consuming task, but it would increase the security of your system.
We haven’t installed every possible server security measure. Currently, there is no network level intrusion detection service – you can fix that by installing Snort or PSAD.
Snort reads the network packets that make it through the firewall. It can analyze them and spot malicious content before it even reaches the software on your machine. It’s highly configurable, so you can teach it to block the latest attacks.
Unfortunately, you’ll have to compile it from source. There is a version of Snort in the Ubuntu repositories, but it’s terribly outdated – the security rules are almost ten years old.
After you set it up, you need to configure it to your system and install the latest rules packages. Snort is a bit of an arcane art, and the documentation is written from the viewpoint of professional network security experts.
Snort For Dummies is an approachable guide, and it covers how you can use Snort on a server. It’s a bit of a long read, at just under 400 pages, but it will turn you into a proficient Snort user.
PSAD is a more limited tool – it’s designed to recognize port scans, which are an early stage of a server attack. You can learn how to set it up here.
AppArmor is effective, but SELinux is much harder to break. It takes a long time to learn and set up, and it’s more work to maintain. But it makes most exploits much harder.
The key point is that security is not a one-time race. It’s more of a constant war of attrition. The only way to guarantee your safety is to constantly update your security tactics and never get complacent.
Learn about new WordPress exploits as they are discovered – WPVulnDB.com and wordpress.org are good places to check regularly.
WordPress security scanners, like MalCare, are a great option. They are regularly updated with the latest exploits and can detect them on your installation. The MalCare plugin scans your WordPress site from the inside, which is faster and uses fewer resources.
Whenever you receive a warning, act fast to fix it.
Final Words
Well, that about wraps it up for now. Of course, we haven’t covered every single aspect of web server security – it’s a massive field, and it’s constantly changing. That said, we’d love to hear your feedback. Have we missed anything out? Have you had any difficulty following the instructions?
If you have any questions or feedback, please leave a comment below.