It’s no secret that website speed matters.
Nobody likes a slow-loading website – especially Google.
So unless a poor user experience and reducing your chances of ranking in Google is something you want, it’s really about time you optimize your WordPress website.
There are without a doubt more than enough tutorials which cover ways to optimize and speed up WordPress, but it can be confusing to try and find everything you need in one place. So – in this post – we’re going to share absolutely everything we know, and there is to know about WordPress speed optimization so you can start speeding up your website today.
According to W3Techs, WordPress currently has 34.5% of the CMS market share, making it the world’s most popular content management system by far. Popularity is great, I mean we all love WordPress, but the result of this is for the average user is that they go crazy with plugins. Many of us have fallen victim to this, after all, there are 55,048 plugins on the WordPress plugin repository, so it’s easy to see why people do.
With that said, you’ll find this guide to help you speed up WordPress useful whether you’re new to WordPress or have been developing & designing WordPress websites for decades.
But don’t worry because we’ve decided to change all that with this complete guide to WordPress speed optimization.
This guide will take beginners, intermediate users, and advanced users through the entire process of optimizing their website to load as fast as possible.
Right before we get started, in case you’re still wondering why websites should or have to load fast, take a look at this post we put together about why page speed is important.
But, without further ado – let’s dive right in! 🏊♂️
Feel free to use the table of contents section to the section most suited to you – whether you’re a beginner, intermediate user or advanced WordPress user, we’ve got you covered with some brilliant speed optimization tips and techniques…
Speed Up WordPress – Table Of Contents
Prerequisites to Follow This Guide
Before we jump right into this guide and start optimizing your websites, it’s worth clearing a few things up.
This guide is intended for anyone to follow but to take full advantage of the guide, it would help to already be somewhat comfortable with using WordPress.
If you are new to WordPress, you might find our WordPress video tutorials and WordPress error fixes video series useful. Those will almost definitely get you up to speed so you’ll have no problem following this entire guide.
Another pre-requisite that will help you effectively follow this guide is to create a child theme. A child theme makes it easier (and less risky) to make changes to your website. The use of a child theme also ensures that any changes you make to your theme files aren’t overwritten when you update your theme.
If you’re not quite sure how to create a child theme, there’s absolutely no need to worry – we also have tutorials that show you how to do exactly that. Feel free to check them out before reading on:
If you’re using a MyThemeShop theme (which we obviously highly recommend) the process is simple and fast thanks to our 1-click child theme creation option.
For a range of the optimizations you will come across later in this guide, you’ll notice that we chose to share code snippets with you that you will have to place in certain files. We could have alternatively recommended plugins that make it easier, but that would defeat the purpose of this guide. However, in certain cases, we have recommended plugins for certain optimizations as it would simply be far too complicated to replicate.
If you feel uncomfortable with code or the general idea of editing your WordPress files, you don’t need to worry – we have provided crystal-clear instructions and given you the codes you can copy-paste into your website.
Now that we got that out of the way, it’s time to speed up your WordPress websites! 🚀
Tips for Beginners
- 0. Test Your Website’s Speed – Creating a Control
- 1. Choose a Fast Web Host
- 2. Choose The Right WordPress Theme
- 3. Update Your WordPress, Themes, and Plugins
- 4. Use PHP 7 and Above
- 5. Use SSL/HTTPS and HTTP/2
- 6. Choose The Right WordPress Plugins
- 7. Using Caching to Speed Up WordPress
- 8. Image Optimization
- 9. Setup Cloudflare and it’s CDN
- 10. Lazy Loading YouTube Videos and Images
- 11. Specify Image Dimensions
- 12. Serve Scaled Images
- 13. Gravatar Optimization
- 14. Lazy-Load Disqus
- 15. Limit Post Revisions
- 16. Use AMP (Accelerated Mobile Pages)
- 17. Limit Spiders and Crawlers
- 18. Use Javascript Free Social Sharing Buttons
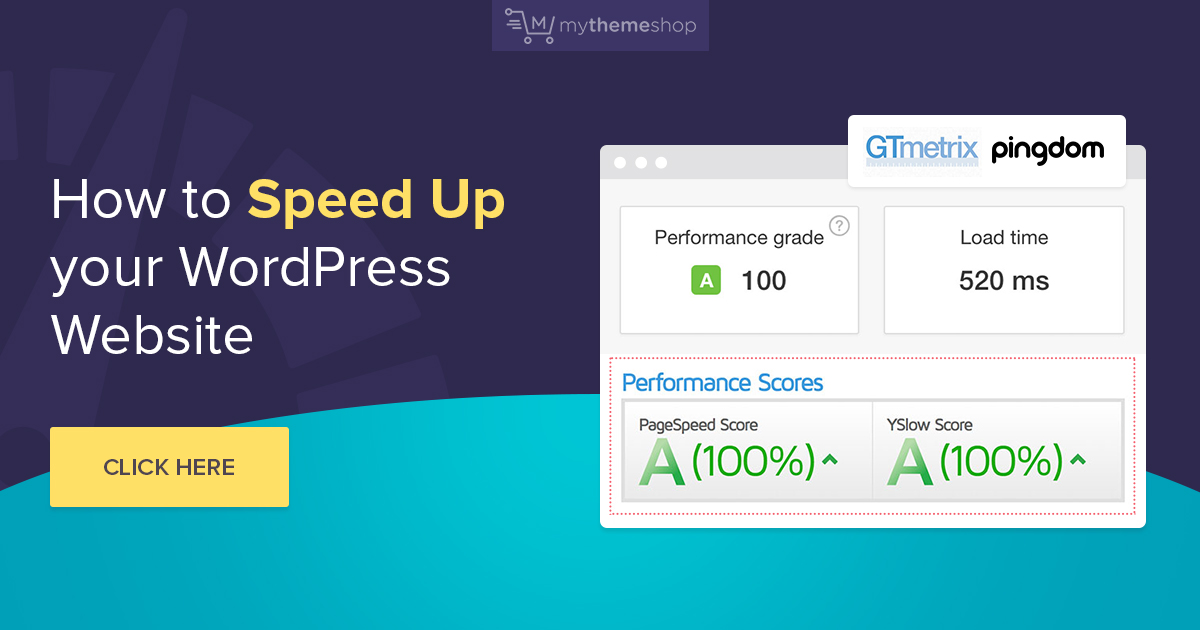
0 Test Your Website’s Speed – Create a Control
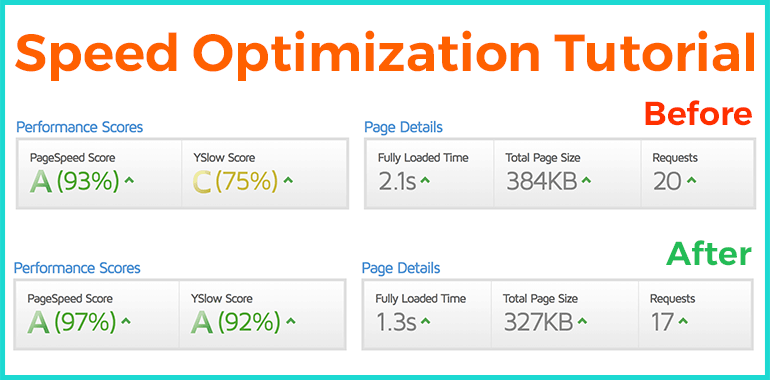
In order to be able to assess the effectiveness of our very own recommendations and this WordPress speed optimization guide, we’ve created a completely new website and carried out all of the optimizations ourselves.
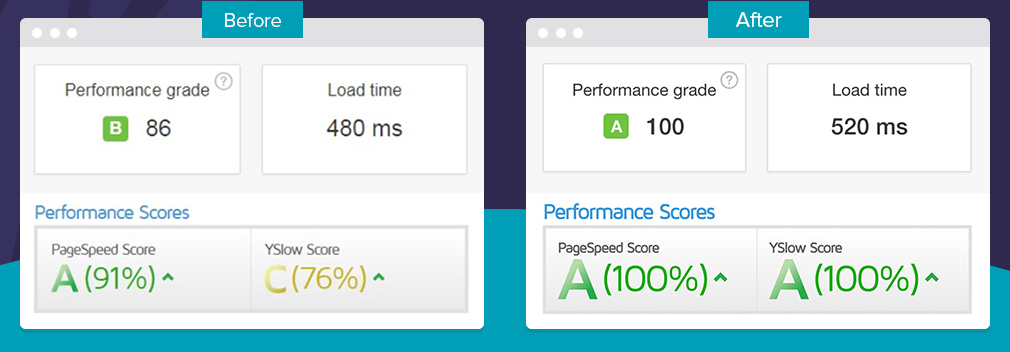
We recommend that you do the same as this will allow you to compare the performance of your website before applying any of these changes so you are able to properly evaluate the result of the changes that you’ve made.
Here are the results of performance tests performed with Pingdom, GTMetrix as well as Google Pagespeed Insights. For reference, the website we tested was using the Schema theme from MyThemeShop.
Google Pagespeed
Pingdom Tools
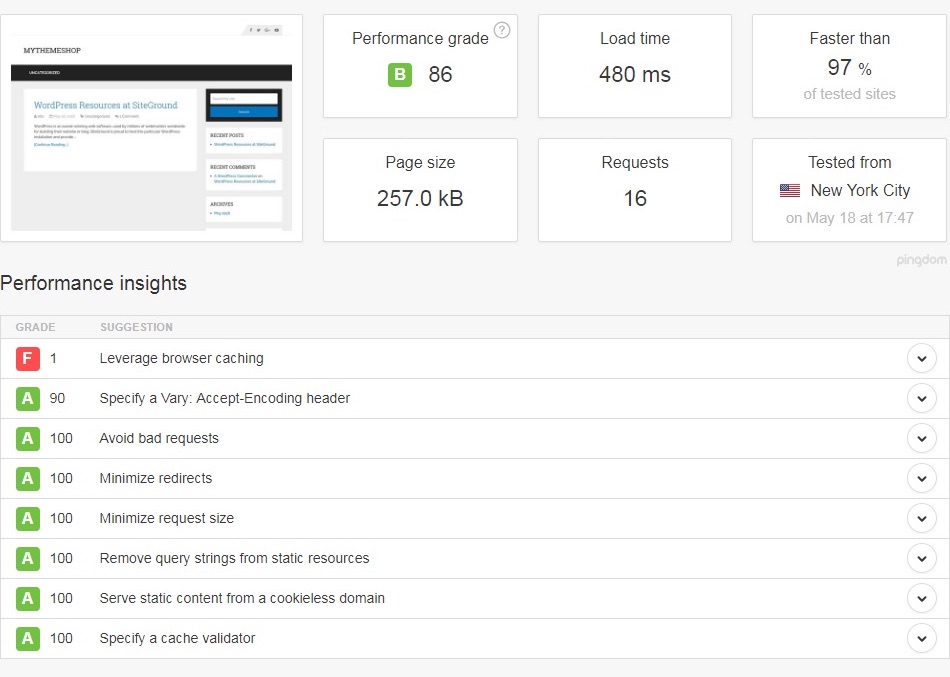
GTMetrix
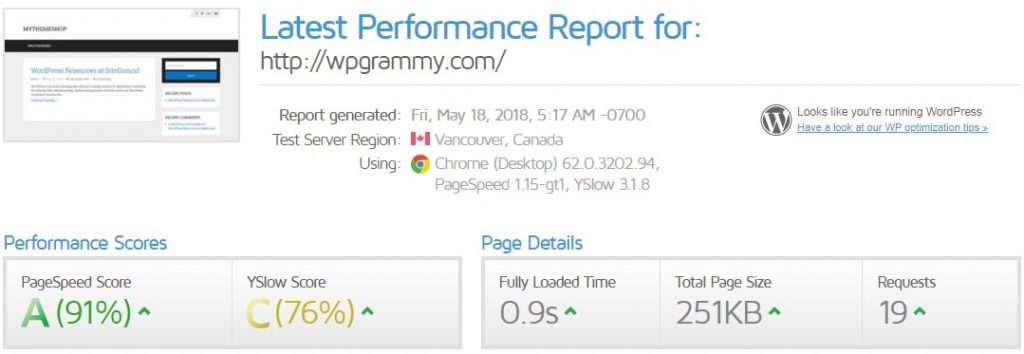
You might be thinking that the performance of the website before tweaking and optimizing it is already pretty good. That’s true and is the case because we’re using our recommended WordPress host (which we’ll get onto later) as well as the high-performance Schema theme.
But a website can never be too fast, so let’s try and push our own limits and get this site to perform even better.
1 Choose a Fast Web Host

Choosing a fast web host is one of the most significant and important decisions when it comes to improving your website’s speed. Using a slow host doesn’t necessarily mean that you can’t optimize your website but it can be compared to having a large building on a shaky foundation. You just never know when and if it will fall.
Free and unlimited hosts all sound great on paper, but in the real world, nothing is free and unlimited. As a result, it’s wise not to choose a host that makes outrageous promises that are nothing but unreasonable.
There are a number of characteristics that define an excellent WordPress host, including:
- Fast Server Response Time (or time to first byte, TTFB)
- A Technology/Hosting Stack that is optimized for WordPress
- Great Customer Support
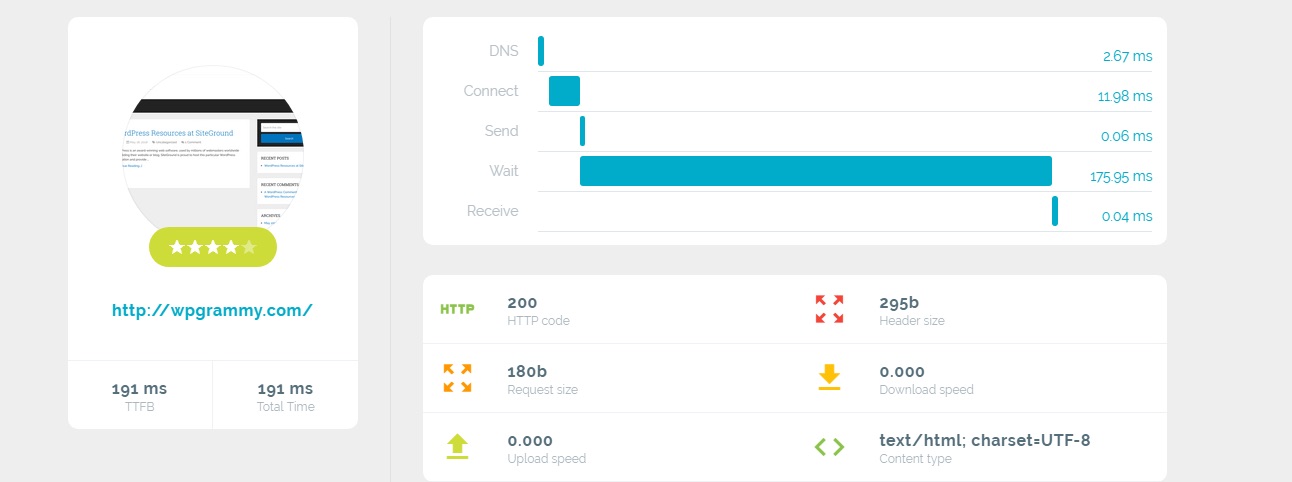
The most common way to measure the quality of a host is to check the TTFB. TTFB or time to first byte is the time it takes for the server to respond, which represents how quick the server is.
One way to assess the quality of a particular host and compare it to another host you’re considering is to check the TTFB. This is essentially the time that it takes for the server to respond and, therefore represents how fast the servers are.
To test the TTFB visit, ByteCheck and enter your URL there. This free TTFB testing tool will break down the response time of your website. Here’s what our result looked like:
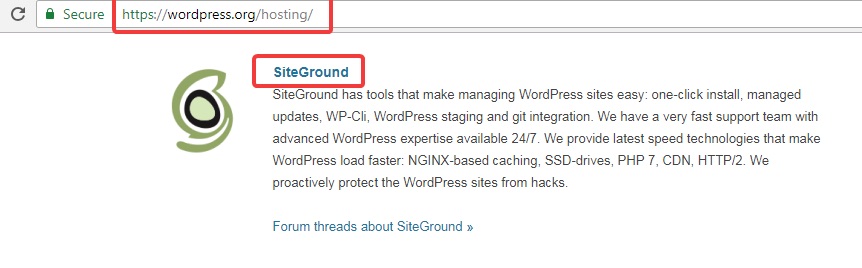
To save you the hassle of researching web hosts which is something we’ve wasted a fair amount of time on and since you’re already reading this guide, we’ll cut this section short. We recommend choosing SiteGround’s WordPress hosting. We’ve already done a comprehensive review of SiteGround in the past which we highly recommend checking out if you’d like to learn more about them before making the decision to host your website with them.
We wholeheartedly recommend it for websites of all sizes. And, in addition to this, they are also the WordPress host of choice for a number of independent bloggers and website owners in this industry. Perhaps most importantly for some of you, on top of providing excellent service, their plans are also affordable for bloggers of all sizes and they are officially recommended by WordPress on their page dedicated to helping you choose where to host your website here.
2 Choose The Right WordPress Theme

Would you buy a car that looks beautiful, has tons of features, but only goes up to 5 miles an hour? I don’t think so.
Sadly, most WordPress themes are built the same way. They look good, are full of more features than you can imagine, but they pay no attention to performance.
This may not seem important to you in the beginning and you’re likely reading this section thinking that you’ll just optimize your images more or make use of caching to compensate. This might be harsh but it’s important to remember that there is a massive difference between a theme that can be made to perform well and one that is built to perform extremely well under load.
Most themes aren’t designed to serve posts and pages to hundreds or even thousands of visitors.
Obviously, we’re biased, but we recommend choosing a theme from MyThemeShop. We build themes that sport lightning-fast performance and are able to perform extremely well under load but also have all the features you need to create the website you want. If you’d like to take any of them for a spin, you can try out Schema and SociallyViral – but if you develop multiple websites and would like access to all of our themes and plugins, we also have a financially-friendly membership that gives you access to all MyThemeShop themes and plugins for a single, low monthly fee.
Our themes notably come with dedicated performance features that will help you eliminate the use of many additional, third-party plugins from developers which will help you optimize your website even further.
No matter what theme you choose, always prioritize performance over functionality.
3 Update Your WordPress, Themes, and Plugins
Properly updating and maintaining themes and plugins is a huge part of not only keeping your WordPress website fast but also vital if you want your site to be secure.
The only exception to this would be for major releases.
For example, when WordPress 5.0 was released, updating as soon as possible may not have been the best decision – for several reasons:
- Many plugins might be incompatible with the new version
- Alpha releases (X.0 versions) are usually buggy and not fit for production (live websites)
- Performance issues are addressed only after a couple of releases after the alpha release
For these reasons, you shouldn’t update to major updates as soon as possible. These reasons do not apply to WordPress alone. Major releases for themes and plugins should also carefully considered before updating, as the same problems can appear for them as well. In all other cases, keep your WordPress setup, themes, and plugins updated to the latest version.
This doesn’t only apply to WordPress, it actually applies to all software as well as themes and plugins. However, in all other cases, always ensure your WordPress installation (including themes and plugins as well) are running on the latest version available to the public.
4 Only Use PHP 7 and Above For The Best Performance
PHP is the fundamental open-source, server-side scripting language used to power WordPress. The majority of core WordPress software is written in PHP as well as your plugins and themes.
You should ensure your WordPress host offers at least PHP 7 or higher.
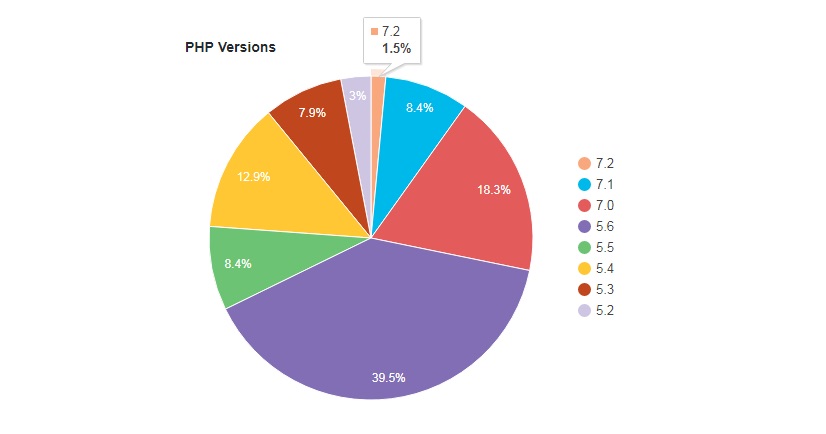
It’s actually quite sad to see that only 6.8% of all WordPress installations use PHP 7.3, while a whopping 28.6% still use PHP 5.6 which was released back in August of 2014.
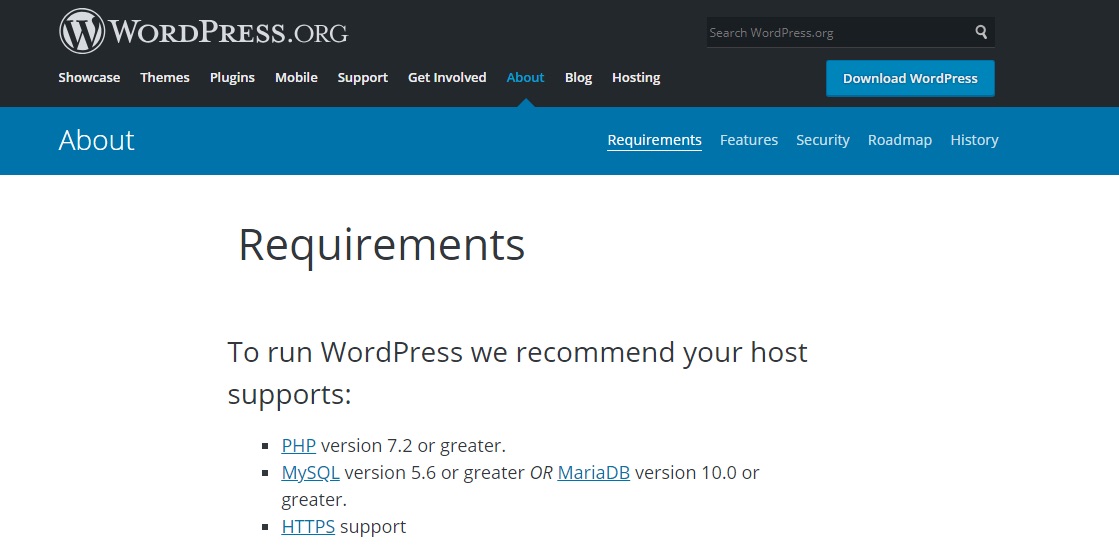
Even WordPress themselves now recommends that you use PHP 7.2 or above.
Could you imagine using a phone which was released in 2014? I certainly couldn’t, the slow & sluggish response times would drive you insane.
That’s how your website’s visitors will feel if you use PHP 5.6.
The solution to this is to choose a host which supports PHP 7.2 and is proactive in keeping their technology stack, including WordPress, up to date.
Again, we recommend SiteGround as they use the latest PHP version and regularly update their servers to support the newer versions.
We at MyThemeShop use PHP 7.2.3, which is the latest PHP version as of this writing, to develop our themes and plugins. That means your website speed will not be bottlenecked and will have peak performance with any MyThemeShop theme or plugin.
5 Use SSL/HTTPS & HTTP/2
While using an SSL certificate does not directly impact WordPress speed, it is still highly recommended that you do so.

Firstly and perhaps also most importantly, Google has confirmed that proper use of HTTPS/SSL is a ranking signal, which means that not configuring an SSL certificate for your site also means you will fall behind in search results.
This reason will also be amplified when Google starts highlighting non-secure websites in a few months. If your website is not secure, your users will be presented with a giant red sign in the address bar that will say “non-secure.” Avoiding this message will be crucial if you want to maintain trust in the eyes of users. For more details, refer to this article.
The second reason is consumer trust. Since websites with SSL are presented with a green padlock sign in the address bar, they appear more secure and increase confidence. Trust is crucial for any conversions on your website, so no matter if you run a blog or an eCommerce website, you should switch to SSL.
The third reason is security.
With the recent GDPR regulations, data privacy and security is of paramount importance. Sites that do not comply can be fined up to $24 Million or 4% of their annual revenue, whichever is higher. We don’t know about you, but we certainly don’t want to pay hefty fines. Having an SSL certificate installed on your website will encrypt the data transferred to and from your website, which will make your website more secure.
With the move of the entire web (including your competitors to HTTPS, this is no longer just a nice feature to have; it’s a necessity. With practically everyone and perhaps most importantly, your competitors, moving to HTTPS, this is no longer something nice-to-have it’s absolutely essential if you want your website to perform and outperform your competition.
The performances improvements caused by updating to HTTP/2 are due to a number of reasons including the better support for multiplexing, parallelism and more. In addition to this, another big win for your website if you decide to switch to HTTP/2 is that you no longer need to worry about concatenation (the combination of files) or domain sharding as these optimizations have now been made obsolete.
6 Rethinking Your Plugin Use
You might have heard that installing too many WordPress plugins will slow down your website. While there obviously is some truth to this, the number of plugins you install actually isn’t as important as the quality of the plugins.
As is the case with WordPress themes (which we covered earlier in this article) what really matters is how the plugin was developed – was it built with performance in mind?
The fact that this is such a big problem doesn’t really surprise us given that the official WordPress plugin repository has over 55,000 plugins to choose from.
Finding the right ones can be hard, so next time you’re about to install yet another plugin on your website – look no further than this shortlist of the best, essential WordPress plugins that we’ve put together just for you.
Using a MyThemeShop theme puts you at a significant advantage. Our themes cover most of the features like lazy-loading images out-of-the-box.
That means instead of looking at a plugin that does the job of many; you don’t have to look at a plugin at all.
7 Using Caching to Speed Up WordPress
Caching is one of the most important and also one of the easiest ways to speed up WordPress
It’s an extremely powerful technique that can make your WordPress loading time a fraction of what it once was. When it comes to improving page loading times at scale, caching is definitely one of the techniques that yields the most significant results.
Caching in WordPress is achieved with plugins, and one the best plugins for setting up caching in WordPress is W3 Total Cache. It’s a comprehensive plugin with a lot of configurations and options. If you find W3 Total Cache extremely daunting and complicated to set up, even with the help of the extremely detailed and easy-to-follow tutorial that we’ve put together, you might want to check out WP Rocket. From the makers of Imagify – yet another WordPress image optimization that we can also easily recommend, the plugin does basically everything for you and also has a great integration with Cloudflare to ensure that when you update posts and pages, it also updates the Cloudflare cache.
Simply put, it’s a beginner-friendly & done-for-you WordPress caching plugin.
However, it is important to note that WordPress caching plugins only speed up the requests that are cached but slow down those that aren’t. Given that the regular cache hit rate is somewhere between 10-25%, a cache plugin will technically slow down your website for ~75% of your visitors. This doesn’t mean that we don’t recommend using a caching plugin, we obviously do – but using a server-based caching solution is the ideal solution.
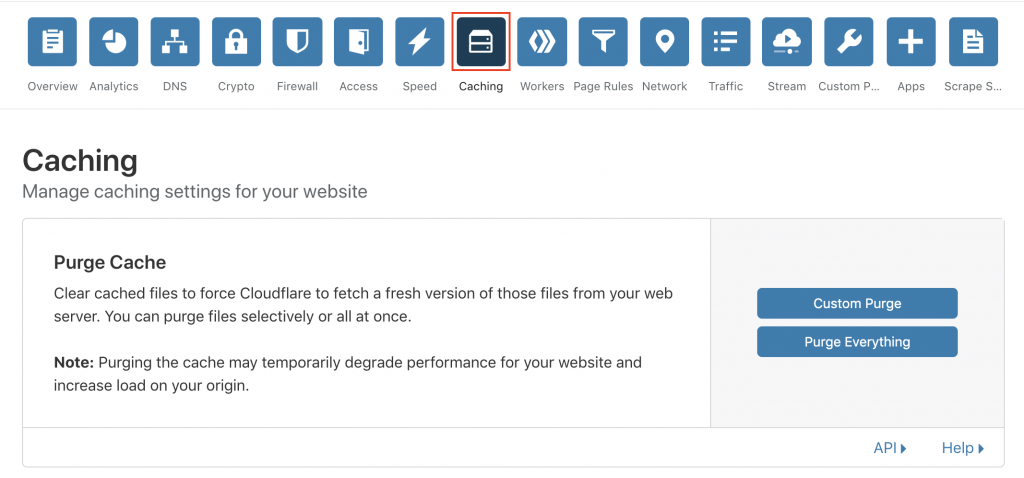
Caching of static resources such as images and scripts can be handled by Cloudflare. This is something we’ll get into later in this guide.
In our recent experiment with W3 Total Cache properly configuring it yielded the following results.
W3 Total Cache isn’t that easy to install, so we highly recommend you check out our comprehensive guide to configuring W3 Total Cache.
In that post, we walk you through (step-by-step) how to install, configure each and every single one of the settings available in the W3 Total Cache plugin. We also provide you with a downloadable file that contains all of the settings, so you don’t even have to go through the guide. Here is a direct link to that section.
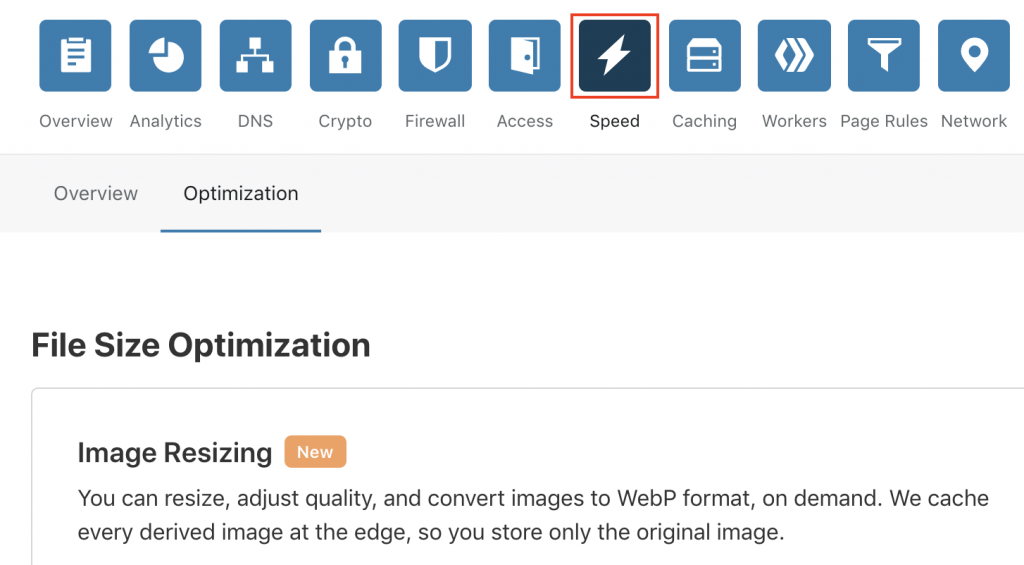
8 Image Optimization

The chances are that your website relies heavily on images.
An easy way to speed up your website, save bandwidth and storage all at the same time is to start optimizing your images with one of the plugins we’ll be taking a look at in this post…
- 💰 Serving images of lower file sizes can reduce your website’s bandwidth usage.
- 🚀 Faster page loading times mean fewer visitors bounce.
- 🕵️♂️ Don’t give search engines a good reason to hate your website and make it rank lower.
Images are the files which typically add the most ‘weight’ to your webpages so properly optimizing images can shave off up to a few seconds depending on the site – and every second counts.
There are a number of ways in which images can be optimized, in this section, we’ll be taking a look at all of them:
Choosing the Right Image Format
Choosing the right image format is critical. The most commonly used image formats are JPG, PNG, and GIF. GIF is used mostly for animated images, leaving still images to just JPG and PNG.
Without getting into the technicalities of why this is the case, the JPG (or JPEG) format is most suitable for the display of photographs and images with lots of colors while the SVG format should be used for logos. PNGs should only be used on occasion if it is not possible to use an SVG and transparency must be preserved so a JPG can’t be used either.
Here is a side-by-side comparison of the same image in both JPG and PNG format.
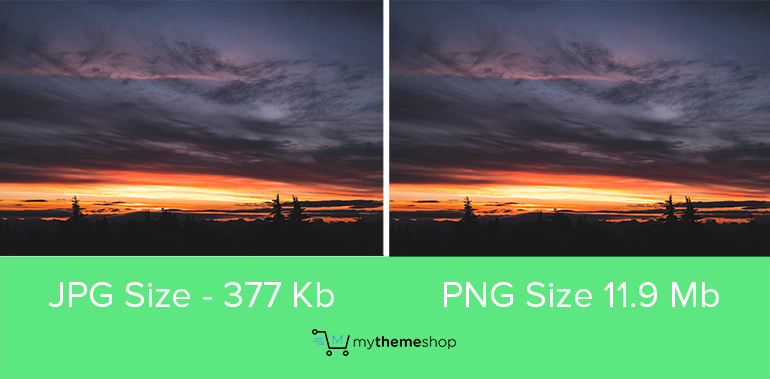
As you see, the difference in size is enormous while the difference in quality is hardly noticeable.
That’s exactly why it is important to pick the correct image format.
If you have a tough time deciding which image format to choose, then there is an easy solution.
Choose a bulk image processing utility like XnConvert which can resize, crop, change formats, and many more operations on hundreds of images in minutes.
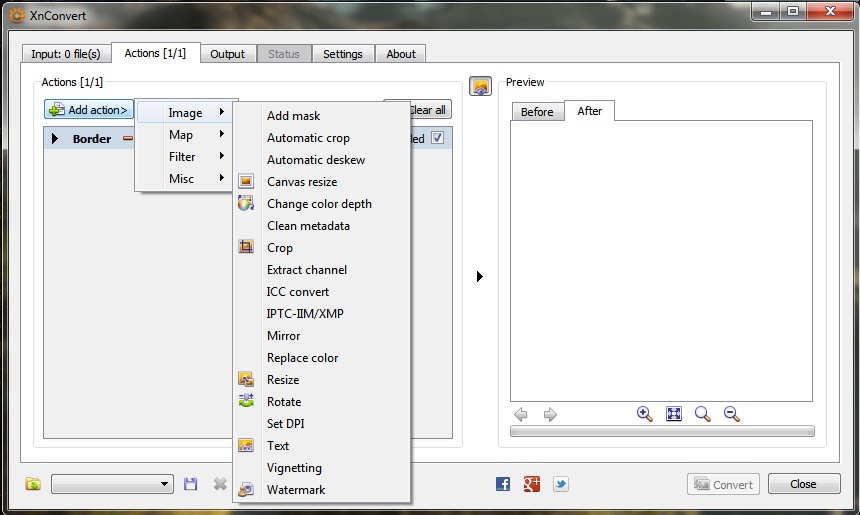
To help choose, just drag and drop all your images to XnConvert and convert them to JPG and PNG. You can then choose the images with the lowest sizes for your website.
XnConvert can also convert images to WebP format, which is a new image format being developed at Google. The WebP format is versatile and offers even more savings over JPG and PNG.
Use Image Compression
JPG and PNG images both support compression. In some software, compression is also denoted with quality.
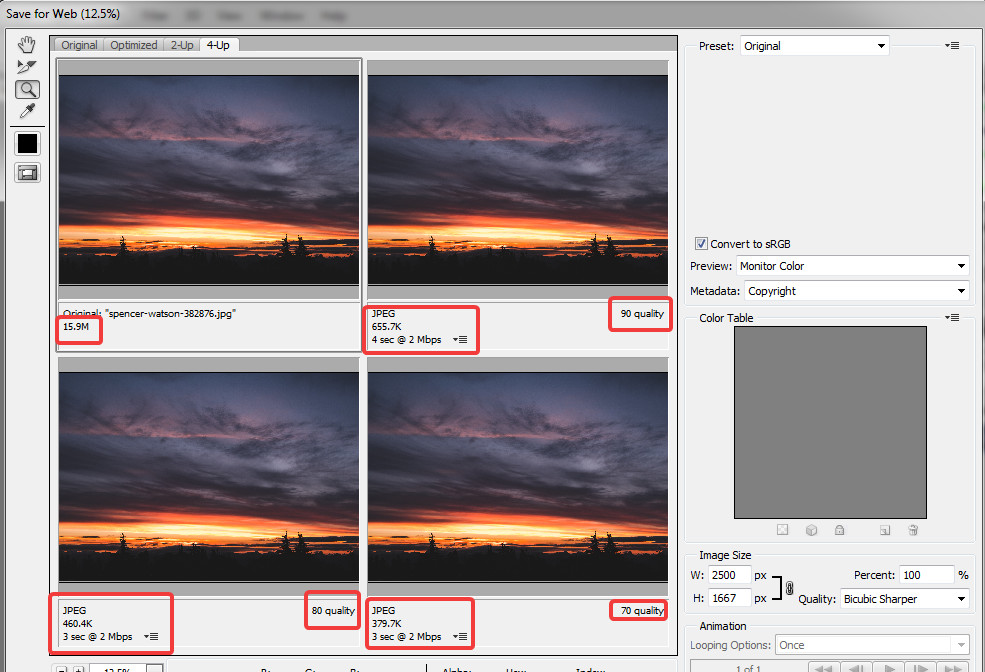
When you create images, they are usually at 100% quality. If you lower the image quality (compression), the size of the image goes down. Usually, you can compress JPG images to 85-90% without any visible changes. Here is an example.
If you have no idea how to compress images, you can use XnConvert again. XnConvert has a quality setting using which you can set the quality images in all the formats that support it.
If you don’t want to compress the images before uploading manually, then you can choose a WordPress plugin to do that for you. There are plenty of plugins out there that can compress images for you, but we use and recommend the ShortPixel Image Optimizer.
It’s important to note that while image optimization is important, doing it incorrectly can also negatively affect your site’s performance. These are the only image optimization methods we recommend:
- Server-based image optimization
- Optimize images locally before upload
- wp media regenerate (WP-CLI)
- ShortPixel Image Optimizer
- Imagify (from the makers of WP Rocket)
The ShortPixel plugin is an extremely useful plugin with a range of options to compress images. With the free version, you can compress up to 100 images per month, and if you need to compress more images, you can buy a 5,000 image license for just $4.99.
As an alternative, you can also use the LiteSpeed Cache Plugin to compress your images. LiteSpeed is a caching plugin, but it also supports image compress using a free Google Pagespeed addon.
There is no limit to the images you can compress with LiteSpeed, and all the images are compressed on their server. This is important because it means that your server’s response time will not suffer even if you have a large number of images on your website.
The only limitation with LiteSpeed is that it does not compress all your images in one go, but rather compresses them in batches. This puts you at a disadvantage if you have a lot of images on your website because it may take some time to compress all of them.
9 Setup Cloudflare and it’s Content Delivery Network (CDN)

Cloudflare is a free CDN and reverse-proxy caching service. If you didn’t understand that sentence, no worries. All you need to know that it’s a mostly free service that will help in making your website faster.
Cloudflare improves your websites speed by fetching your website data and storing it on their servers. Cloudflare has to be set up in a way that any visitor coming to your site comes through Cloudflare. Since Cloudflare can see which pages the visitor has requested, they can provide a lot of content to the visitor from their server, thereby saving your server the hassle.
Setting up Cloudflare is not too complicated, and we’ve shown how to install and configure Cloudflare in our W3 Total Cache Article. Here are the basic steps.
Install Cloudflare
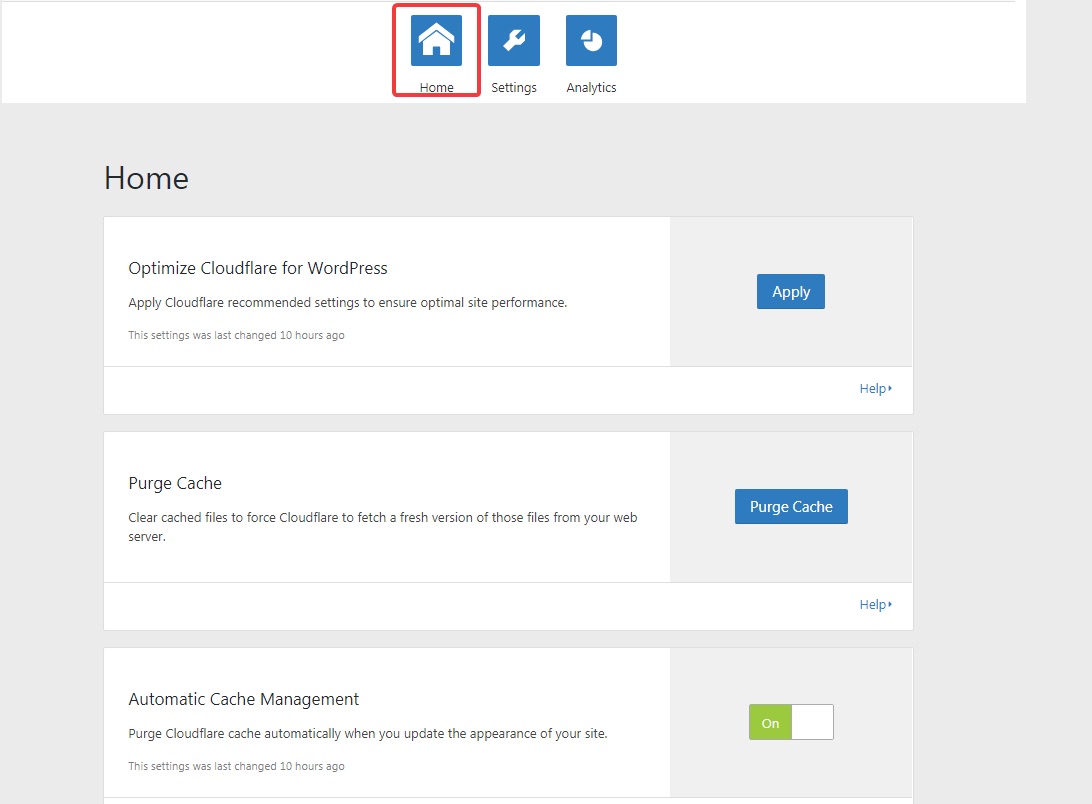
The first step is to download and install the Cloudflare official plugin on your website. After installation, head to Settings > Cloudflare.
Home Page
In the home page settings, here are our recommended settings.
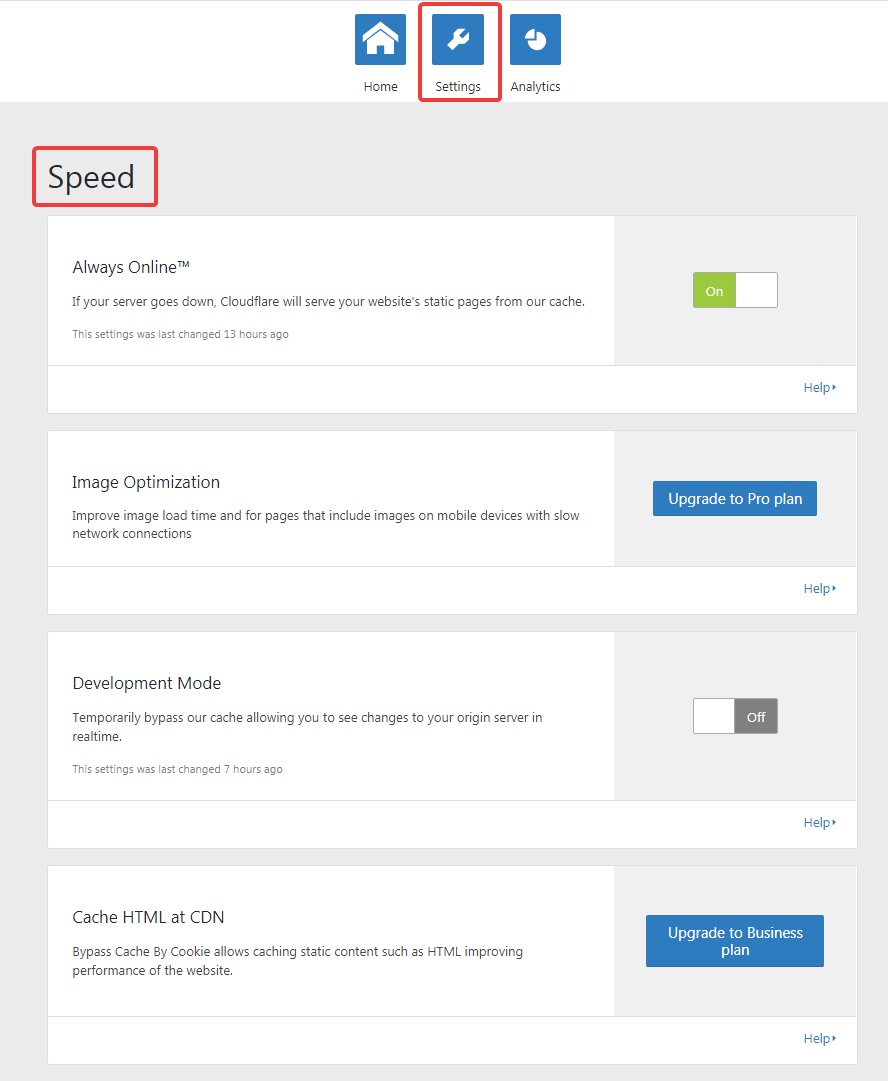
Settings Page
In the settings page, there are two tabs. Here are our settings for the ‘Speed’ tab.
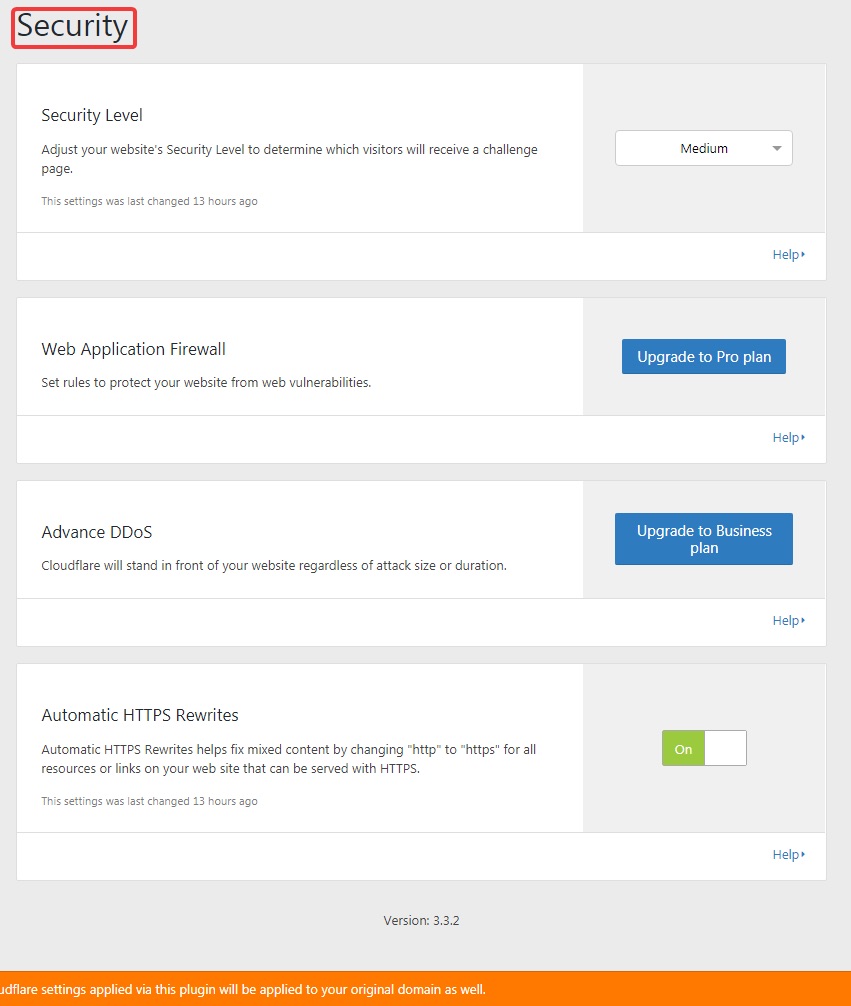
And here are our recommended settings for the ‘Security’ section.
Settings in Cloudflare
Apart from the settings in the plugin, there are a few settings that you can set up in your Cloudflare account. Log into your Cloudflare account and use the settings from the screenshots for the ‘Speed’ and ‘Caching’ tabs. The rest of the settings can be left at default.
Here are the settings for the Speed Tab.
And here are the settings for the ‘Cache’ Tab.
10 Lazy Loading YouTube Videos and Images
Lazy-Loading images is another extremely important and easy optimization to make which can help significantly improve your website’s loading times.
When lazy loading isn’t implemented, all media files (such as images and video thumbnails) are loaded on the initial page load even if they are not visible as the user hasn’t scrolled down. This obviously slows down your website if you have a number of images on your website’s posts or pages.
Lazy Loading is a technique which saves load time by loading images and other heavy assets only when a visitor scrolls to the point on a webpage where they appear.
It can boost website speed considerably when done right.
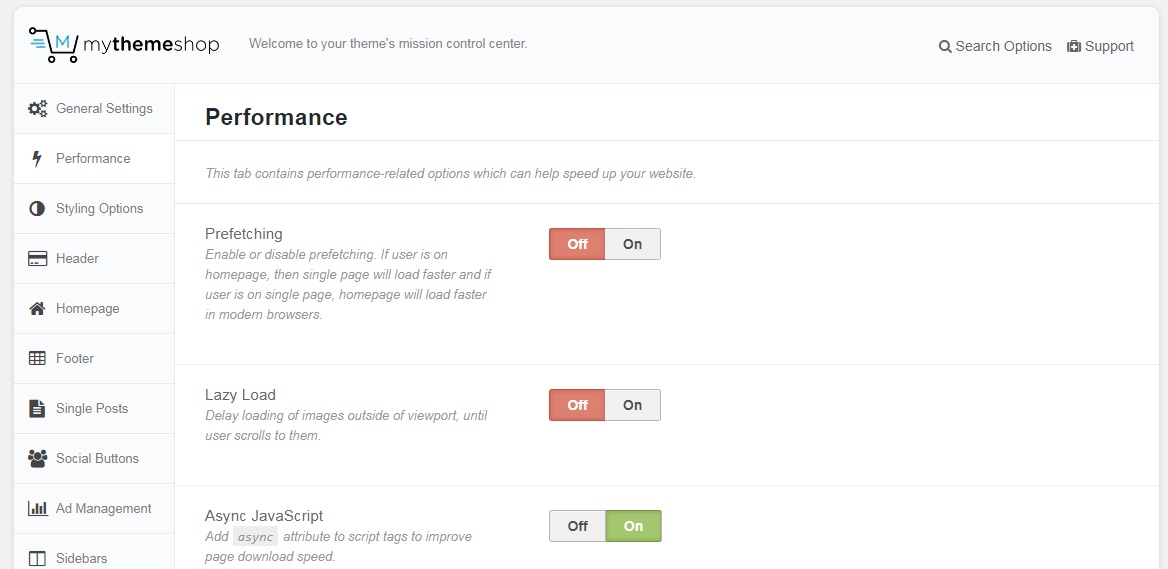
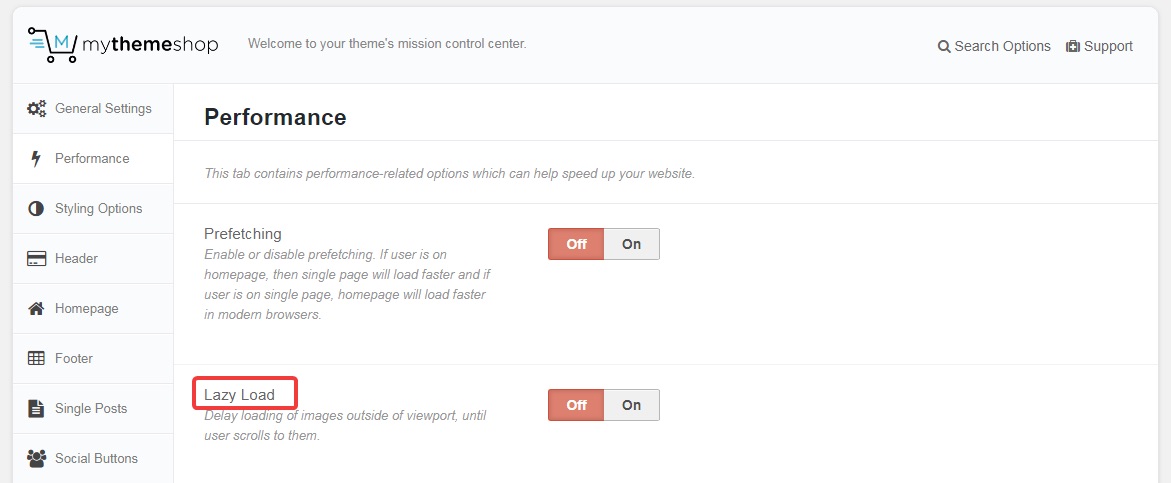
Most MyThemeShop themes have lazy-loading features built right into the theme so all you have to do is enable the feature from the settings area as shown below:
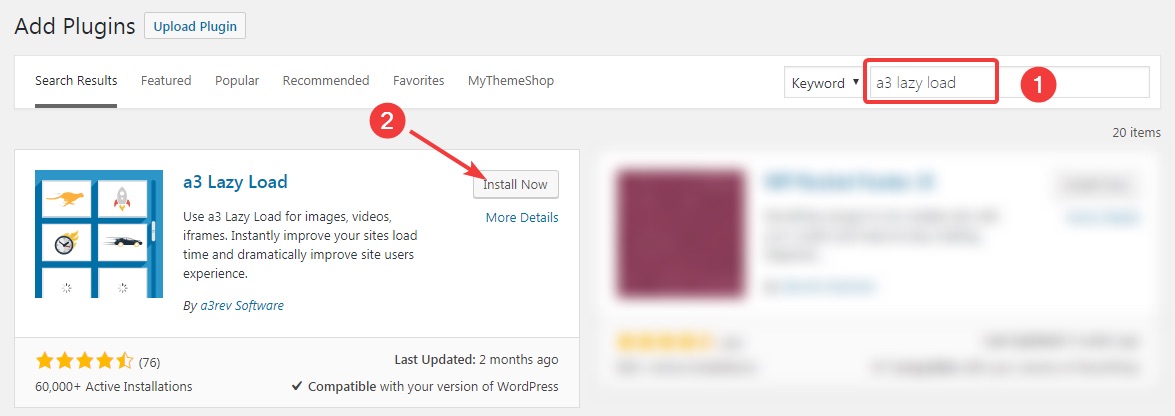
For other themes, there are several plugins out there that will do the job. Two popular plugins are BJ Lazy Load and A3 Lazy Load.
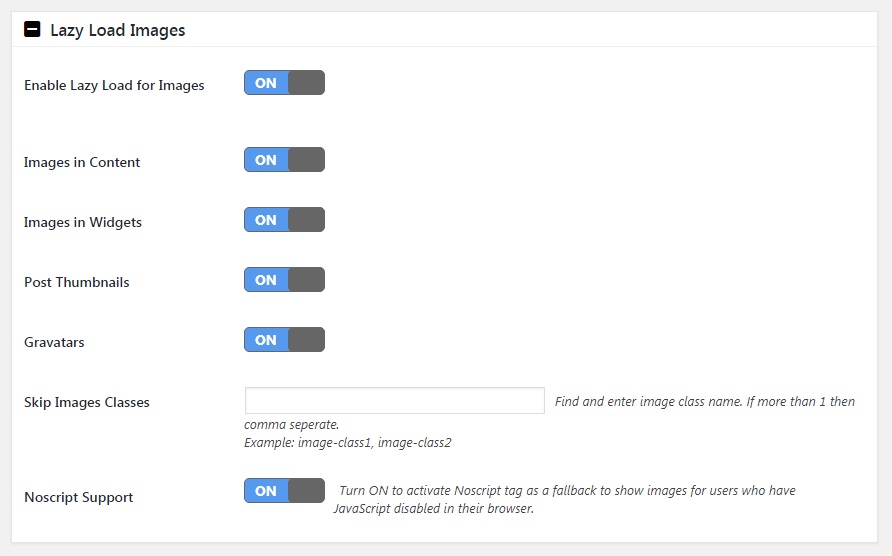
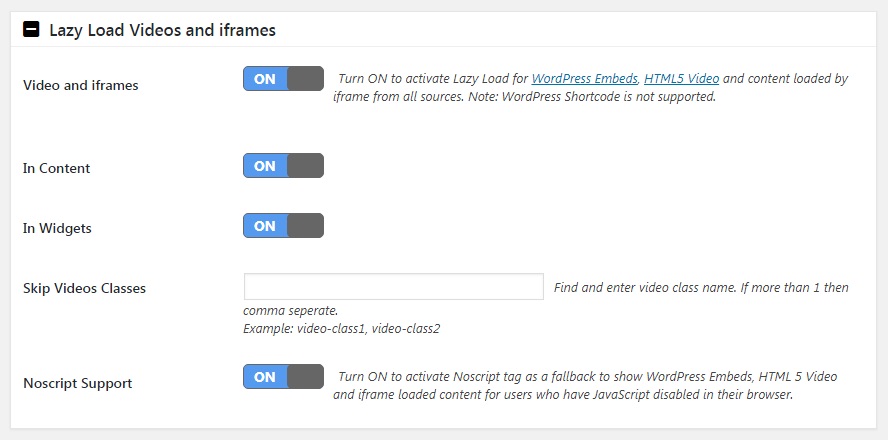
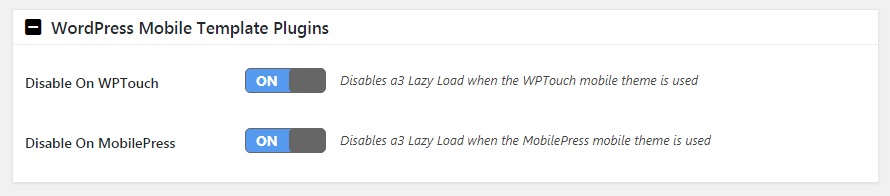
Here is how you configure the A3 Lazy Load Plugin.
1. Install the Plugin
Search for ‘A3 Lazy Load’ in the plugins menu, and install it.
2. Configure the Plugin
Head to the settings of the plugin.

There are plenty of settings, all of which are self-explanatory.
Here are the ideal settings that you should configure A3 Lazy Load with.
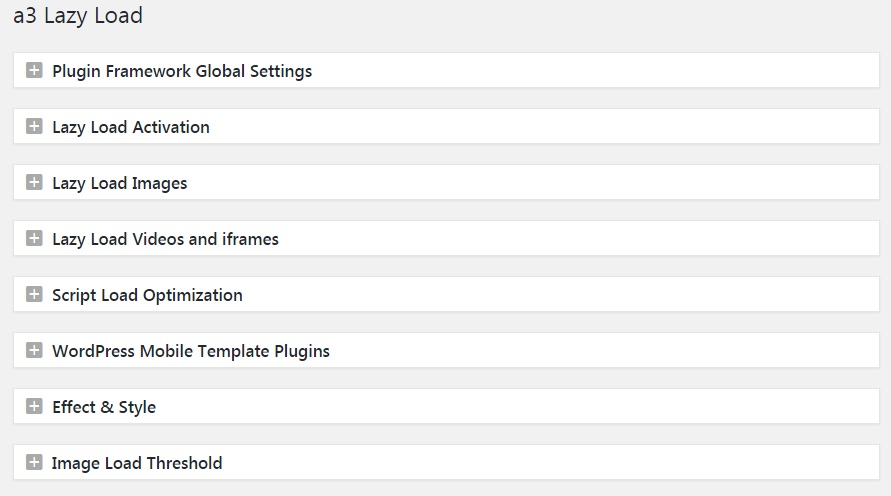
Lazy Load Activation

Lazy Load Images
Lazy Load Videos and iFrames
Script Load Optimization

WordPress Mobile Template Plugins
Effect and Style
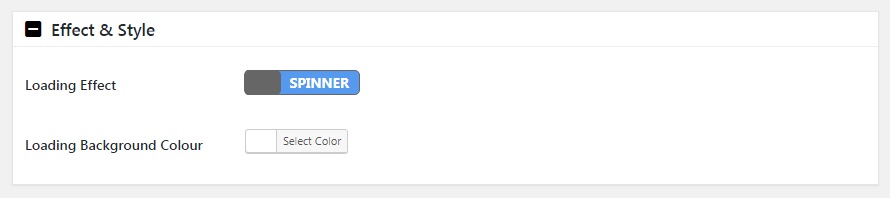
Image Load Threshold

To conclude this section, it’s important to note that lazy-loading is a complex technique and it can mess up your website if not configured correctly. When enabling it on our websites and adding the functionality to our themes we have tested the configuration thoroughly, but there may always be exceptions for your own sites.
11 Specify Image Dimensions

This optimization is not speed-related, but user experience related. For the optimal user experience, you must specify the dimensions of the image in the HTML of your page.
To understand why this is important, let us explain how a webpage loads.
When a page loads, all the text is loaded at once, and the page layout is set. Then the images are downloaded one by one. As an image is loaded, the browser then finds the image dimensions and adjusts the layout of the page. For every subsequent image load, the browser has to re-create the page on image dimensions.
Not only does this waste resources, but your visitor is unable to read the text as the page keeps shifting.
By specifying the image dimensions, the browser sets space aside for the images beforehand, and the page does not need to be changed multiple times.
To specify image dimensions manually, you have to find the size of the image first, which can be done in the WordPress media library.

Open the image to find the image size on the right of the screen.

Once you have the image size, you have to go into the HTML version of the page and append the size to the img tag.
If you have a lot of images on a lot of pages, it can be a hassle to achieve this manually. To automate the process, you can use a plugin like specify image dimensions which will scan your website and add the dimensions for all the images automatically.
12 Serve Scaled Images
This optimization is only limited to certain websites. Many themes are not optimized to handle images, and they load the full-size images and then scale it with HTML and CSS.
For example, if you upload a photograph with a 2000px width, then the theme would load the entire image every time and then scale it down to fit the various areas of your website. This wastes bandwidth and precious resources. Ideally, you should change to a theme that does this automatically, but if you can’t, then you can use the Force Regenerate Thumbnails plugin to recreate your thumbnails. Make sure to set the correct sizes for your thumbnails before using the plugin.
The best way to ensure that you are uploading the correct sizes for your images is to use a cheat-sheet. Go to your WordPress Settings > Media and make a note of the image sizes that your theme uses.

Add to this the other image sizes (slider, sidebar, etc.) and create a cheat sheet. The next time you create an image, resize the image by referencing this cheat sheet.
If you use a MyThemeShop theme, then you don’t need to do any of this. Our themes resize large images automatically when you upload them. This means your images will always be the appropriate size in your posts and not waste bandwidth.
13 Gravatar Optimization
Gravatar (global avatar) is the service that lets you and your website commenters have pictures on their profile. There are many advantages of using Gravatar, but the biggest disadvantage is the loading time.
When you use Gravatar, every comment’s profile pictures is fetched from the Gravatar service, which takes time. To top it off, Gravatar also introduces multiple redirects which slow down your site even further.
To get rid of the bloat introduced by Gravatar, there are a few options that you can use:
- Disable Gravatar on your websites
- Delete spam and excessive comments from posts
- Configure WordPress to show only a few comments at a time
- Use a caching plugin for Gravatar like FV Gravatar Cache
14 Lazy-Load Disqus
Disqus is a popular alternative to the default WordPress comment system. It has grown to be so popular because of its advanced moderation functionality and highly effective spam prevention.
Unfortunately, these advantages do come with a cost: load time.
Every time Disqus loads on your website, it results in more than 10 additional requests which drastically affects load times.
Thankfully, there is a solution. A plugin by the name of Disqus Conditional Load has been created by a developer which helps in lazy loading the Disqus comments on your website.
But don’t worry because there is a solution. A plugin called Disqus Conditional Load created by a developed called Joel James helps lazy-loading the Disqus comments section on your website.
We explained lazy loading in a previous section, but here is a reminder. Lazy loading is a technique in which our website assets (images, scripts, videos) are not loaded with the page, but loaded when the user scrolls near them.
We explained how lazy-loading for images works earlier in this post, and similar to how lazy-loading for images works, the Disqus Conditional Load plugin ensures that the comments section of your website only loads when a visitor scrolls to the end of the page, therefore ensuring that the page initially loads faster by reducing the number of requests.
15 Limit Post Revisions
By default, WordPress will save revisions of a post as often as you make even the smallest change. On a frequently edited/updated post, this might lead to tens of copies of the post being created. Eventually, this will fill your database with a lot of unwanted data which will cause server slowdowns.
To avoid this problem, it’s a wise idea to limit the number of revisions of a post. The exact number will depend on your preferences, but we think 3-5 should be sufficient.
define ('WP_POST_REVISIONS', 3);
Paste the above code inside the wp-config.php file.
Place it before the code require_once(ABSPATH . ‘wp-settings.php’); appears.
This will change the maximum number of revisions to 3. You can also change the number in the code above to adjust the number of revisions.
To disable post revisions completely, you can use the following code:
define ('WP_POST_REVISIONS', false);
Paste the above code inside the wp-config.php file to disable revisions altogether.
To remove excess revisions of old posts, we recommend that you use a database cleanup plugin. There are several useful plugins out there, and here are a few recommendations.
After you’ve used any of the plugins above to remove revisions of your old posts, you can delete the plugin from your website.
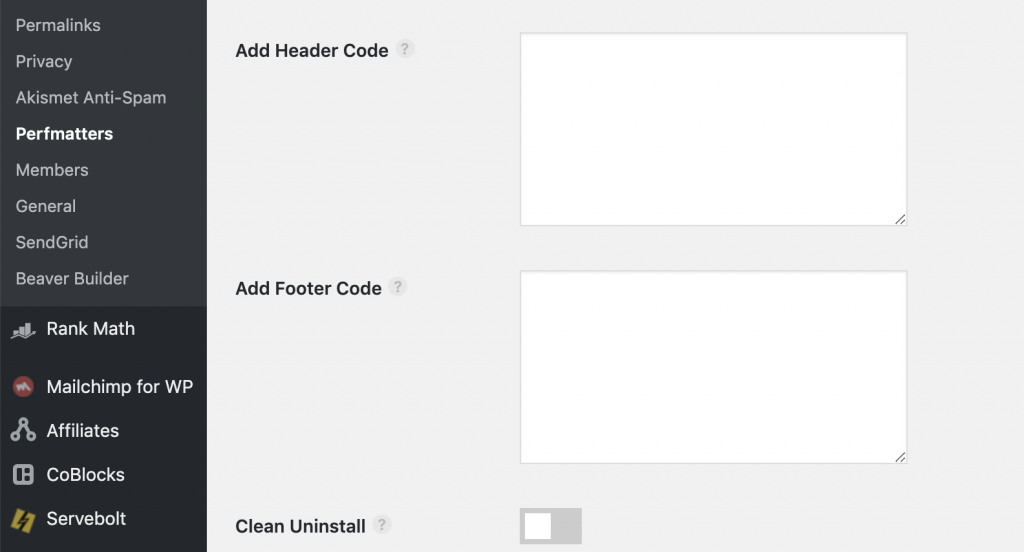
Another plugin which we highly recommend using is Perfmatters. The Perfmatters WordPress plugin is a lightweight WordPress performance plugin that makes it easy to properly set & optimize a number of important settings. The plugin truly is great and we highly recommend giving it a try anyway but here are some features we really like:
- You can easily disable comment URLs which significantly reduces the number of spam submissions.
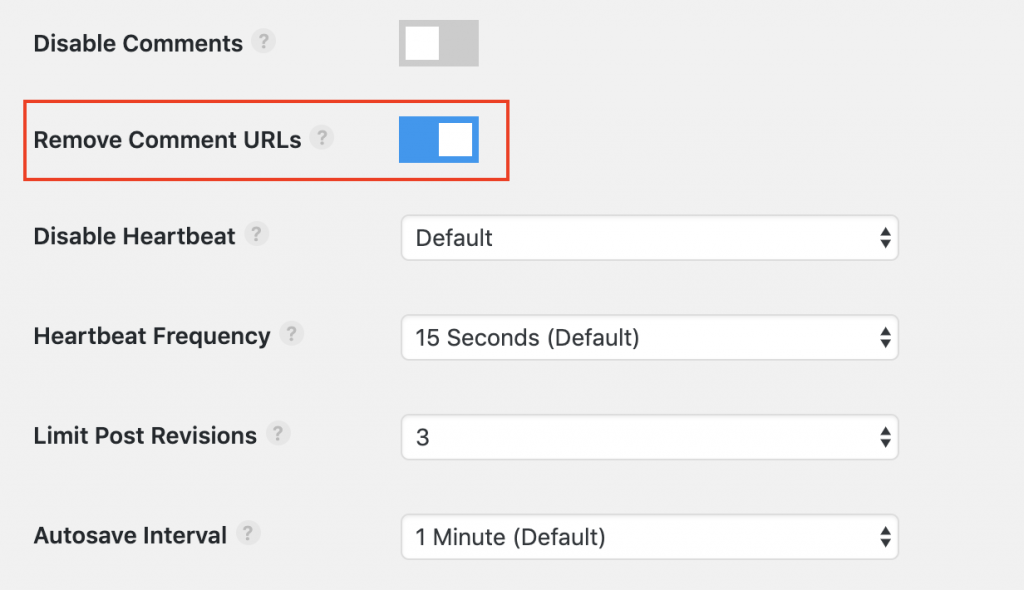
- You can limit post revisions & adjust the autosave interval.
- You can easily insert code into your header & footer which makes installing the Google Tag Manager code extremely easy.
If you care about WordPress performance enough to spend just $19.95 a year (which we think is excellent value for what the plugin provides), check out Perfmatters here.
16 Use AMP (Accelerated Mobile Pages)
Having a mobile-friendly website is a must. AMP helps you with that. AMP or Accelerated Mobile Pages is an open-source web standard designed to speed up delivery of content and advertisements on mobile devices.
The project was announced by Google in October 2015 with partnerships with many publications around the world. Since 2016, millions of pages have been served using the AMP standard, and major publications have reported that AMP pages load up to 75% faster and consume ten times less bandwidth.
With such amazing improvements in speed and bandwidth, it’s obvious that you should also opt-in for AMP. We will show you two ways to set up AMP for your website.
Setting up AMP with Cloudflare
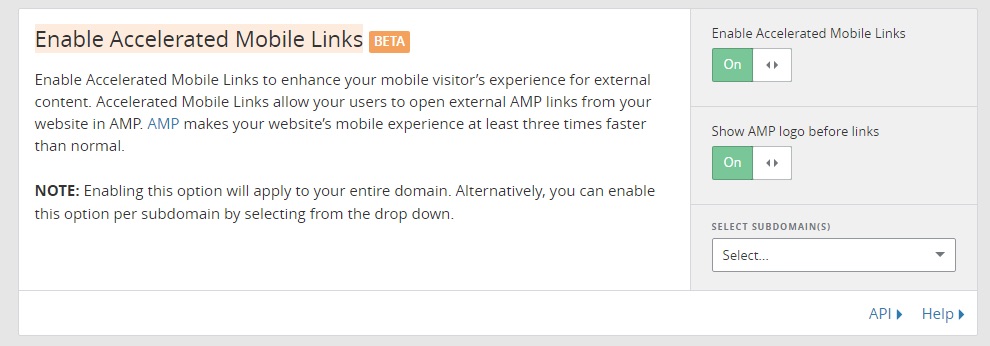
If you have set Cloudflare up, then you can enable the use of AMP on your website in a single click. Log into your Cloudflare account, go the Speed Settings, and scroll to the section which says ‘Enable Accelerated Mobile Links.’
The feature is still in beta, so some hiccups should be expected. To start using AMP, enable both the settings.
Setting up AMP with Plugins
You can also set AMP up on your website using plugins. WordPress has made an official AMP plugin which you can use, but there are some other plugins out there as well. Here is one example of another AMP Plugin.
Once you install the plugin, you can then visit Appearance > AMP on your website to open the AMP version for editing. Since AMP uses a barebone page, you will not have many options to configure the page, so configure all the available options and hit save. An AMP version of the page will be saved and be accessed at the AMP URL.
If the regular URL for the page was
http://example.com/post1/
Then the AMP URL will be
http://example.com/post1/amp/
The plugin will also add a meta tag to the page similar to:
<link rel="amphtml" rel="noopener" href="http://example.com/post1/amp/" />
This tells Google where the AMP version of the page is located.
Testing your AMPs
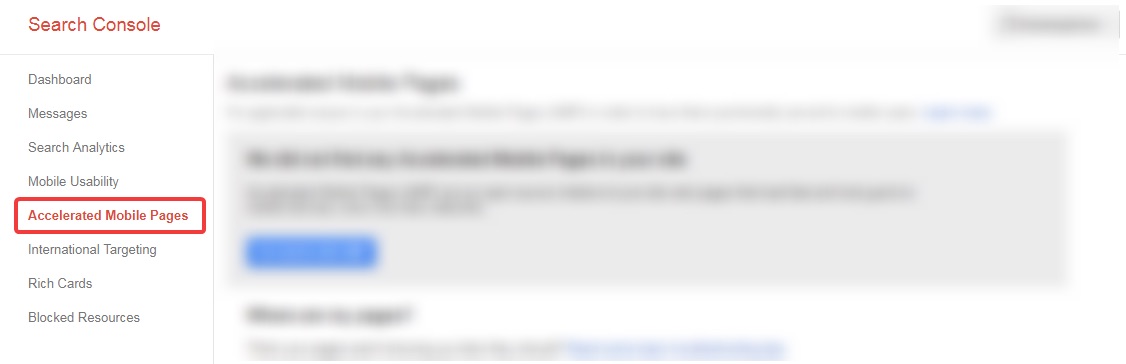
After AMP has been implemented, then you should test your pages to know if they are operating as expected. The easiest way to do it is by checking out your Google Search Console Account.
Log into Search Console, open up a property, and you will see the ‘Accelerated Mobile Pages’ on the left.
17 Limit Spiders and Crawlers
Spiders and web crawlers are resource hungry, sometimes even more than your users.
Apart from search engine spiders, there are many other types of bots like scrapers, email scrapers, spambots, that crawl your website with malicious intentions. Not only do they not provide any value to your website, but your server also has to expend resources to serve them.
It is wise to manage bots activities on your website so that the crawling process (or even legit bots) does not affect your users.
GoogleBot is one of the most resource-hungry bots, and for a good reason. You can control GoogleBot’s crawl rate from right inside your Google Search Console Account.
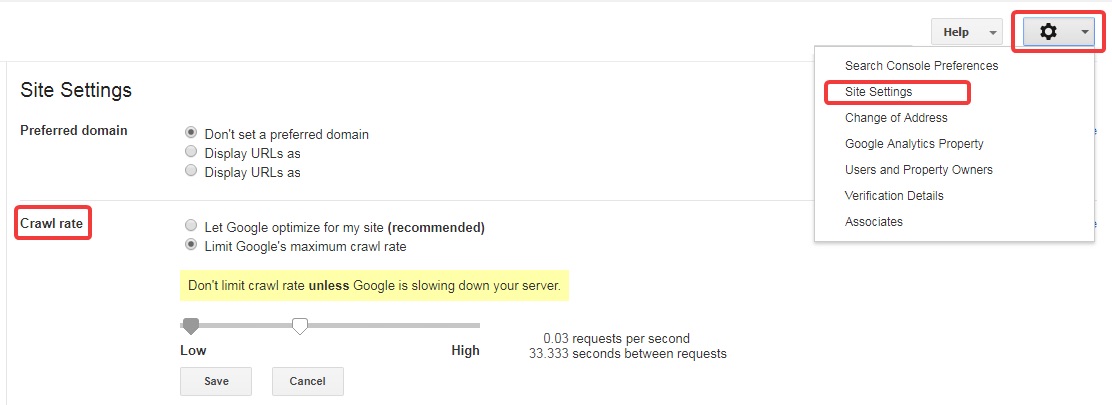
However, you should do that only if GoogleBot is slowing down your website. Slowing down crawl rate otherwise will limit Google’s ability to index your website, which will affect your search engine rankings and traffic.
You can do the same for Bing Bot inside Bing Webmaster Tools.
If your site is slowing down because of malicious bot activity, then there are a few steps you can follow to prevent those bots.
First, you can refer to the Bad Bot .htcacess file from HackRepair.com. It’s a .htaccess file which will block most of the known bad bots from your site.
Second, you can refer to the Bad Bot Report from BotReports.com. They have listed out a comprehensive list of bad bots which crawl websites with less than ideal intentions. You can use this data to block these bots from your website.
Third, you can use the rate-limiting features of the popular security plugin WordFence. It has plenty of features to throttle visitors and bots, and you can also block IP addresses manually.
18 Use Javascript Free Social Sharing Buttons
Social sharing buttons serve many purposes on your website, and there are many reasons to use them. But you should know that most social sharing buttons are Javascript heavy. That means a few things.
- They track users across the web
- They take a long time to load on your website
- They consume more bandwidth when downloading
- They block the rendering of the page if not optimized
To prevent all these issues, you should use Javascript-free social sharing buttons. Using these buttons will remove the inefficiencies mentioned above and help improve your load times.
If you use a MyThemeShop theme, then we got you covered. Our themes already include Javascript-free social sharing buttons that you can use in a few clicks.
For all other themes, you can remove the existing buttons/plugins, and use a service like Sharingbuttons.io
Tips to Speed Up WordPress for Intermediate Users
- 19. Disable Emojis
- 20. Disable Embeds in WordPress
- 21. Remove Query Strings
- 22. Disable XML-RPC
- 23. Remove RSD Links
- 24. Remove jQuery Migrate
- 25. Hide WordPress version
- 26. Remove wlwmanifest Link
- 27. Remove RSD Link Tag
- 28. Remove the Shortlink Tag
- 29. Disable RSS Feeds
- 30. Disable Self Pingbacks
- 31. Remove REST API Links
- 32. Disable Dashicons
- 33. Disable Google Maps
- 34. Disable Contact Form 7 JS/CSS
- 35. Disable Heartbeat
- 36. Disable WooCommerce Style Sheets
- 37. Disable Cart Fragmentation
- 38. Disable WooCommerce Widgets
- 39. Remove WooCommerce Meta Boxes
- 40. Avoid Google Fonts and Server Fonts Locally
- 41. Use WOFF2 Fonts Instead of WOFF
- 42. Optimize Font Awesome Icons
- 43. Concatenate CSS and Javascript
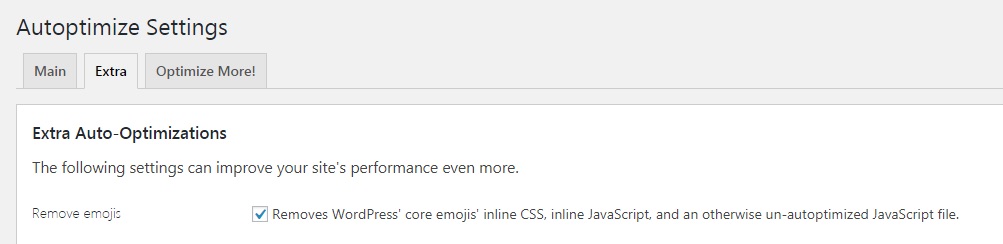
19 Disable Emojis
Emojis are fun to have on your website, but not when it costs you precious load time. Unless there is a strong reason to keep emojis enabled, you should disable the use of emojis on your website.
/**
* Disable the emoji's
**/
function disable_emojis() {
remove_action( 'wp_head', 'print_emoji_detection_script', 7 );
remove_action( 'admin_print_scripts', 'print_emoji_detection_script' );
remove_action( 'wp_print_styles', 'print_emoji_styles' );
remove_action( 'admin_print_styles', 'print_emoji_styles' );
remove_filter( 'the_content_feed', 'wp_staticize_emoji' );
remove_filter( 'comment_text_rss', 'wp_staticize_emoji' );
remove_filter( 'wp_mail', 'wp_staticize_emoji_for_email' );
add_filter( 'tiny_mce_plugins', 'disable_emojis_tinymce' );
}
add_action( 'init', 'disable_emojis' );
/**
* Filter function used to remove the tinymce emoji plugin.
* @param    array  $plugins
* @return   array  Difference between the two arrays
*/
function disable_emojis_tinymce( $plugins ) {
  if ( is_array( $plugins ) ) {
    return array_diff( $plugins, array( 'wpemoji' ) );
  } else {
    return array();
  }
}
Put the above code inside your functions.php file to disable emojis.
If you are intimidated by the possibility of editing your files, then you can use a plugin that does the same thing. A fantastic free plugin that disables emojis and does a lot of other optimizations is Autoptimize.
20 Disable Embeds in WordPress
Similar to how you embed a YouTube video, a tweet, or a Facebook post in your posts, your post can also be embedded on other websites.
This feature was introduced in WordPress 4.4 and has been present since then.
Embedding can be a useful feature. However, most websites have never used this feature, and it’s likely they will not use it in the future.
If this is the first time you are reading about embeds, then you also probably don’t need the feature. It’s not worth having the additional load on the server if you don’t even use the feature.
function disable_embeds_code_init() {
  // Remove the REST API endpoint.
  remove_action( 'rest_api_init', 'wp_oembed_register_route' );

  // Turn off oEmbed auto discovery.
  add_filter( 'embed_oembed_discover', '__return_false' );

  // Don't filter oEmbed results.
  remove_filter( 'oembed_dataparse', 'wp_filter_oembed_result', 10 );

  // Remove oEmbed discovery links.
  remove_action( 'wp_head', 'wp_oembed_add_discovery_links' );

  // Remove oEmbed-specific JavaScript from the front-end and back-end.
  remove_action( 'wp_head', 'wp_oembed_add_host_js' );

  add_filter( 'tiny_mce_plugins', 'disable_embeds_tiny_mce_plugin' );

  // Remove all embeds rewrite rules.
  add_filter( 'rewrite_rules_array', 'disable_embeds_rewrites' );

  // Remove filter of the oEmbed result before any HTTP requests are made.
  remove_filter( 'pre_oembed_result', 'wp_filter_pre_oembed_result', 10 );
}

add_action( 'init', 'disable_embeds_code_init', 9999 );

function disable_embeds_tiny_mce_plugin($plugins) {
  return array_diff( $plugins, array('wpembed') );
}

function disable_embeds_rewrites ($rules) {

foreach($rules as $rule => $rewrite) {

  if(false !== strpos($rewrite, 'embed=true')) {
    unset($rules[$rule]);
  }

}

return $rules;
}
Copy and paste the above code into your functions.php file to disable embeds on your website.
Alternatively, you can also use the following code:
function my_deregister_scripts () {
  wp_dequeue_script( 'wp-embed' );
}
add_action( 'wp_footer', 'my_deregister_scripts' );
If you don’t feel comfortable in editing your website code, then you can use plugins to do this for you. Two of the plugins that can do this are Disable Embeds and WP Disable.
21 Remove Query Strings
Many CSS and JS files in WordPress are appended with a query which looks like this scripts.js?ver=2.7.9.
The “?ver=2.7.9” is the query string that denotes a specific file version that should be loaded.
The trouble with query strings is that most servers do not cache files with query strings. That means that with every request, all the files with query strings have to be downloaded from the server. This wastes a lot of bandwidth and system resources which in turn increases load times.
You can improve the load times of your website by disabling query strings altogether. Removing query string enables the caching of the files which in turn reduces load time.
function _remove_script_version ( $src ){
  $parts = explode( '?', $src );
  return $parts[0];
}
add_filter( 'script_loader_src', '_remove_script_version', 15, 1 );
add_filter( 'style_loader_src', '_remove_script_version', 15, 1 );
Add the above code in your theme’s functions.php file to remove query strings.
If you get scared by the code, you can use plugins to disable query strings. Both W3 Total Cache and Autoptimize support disabling query strings.
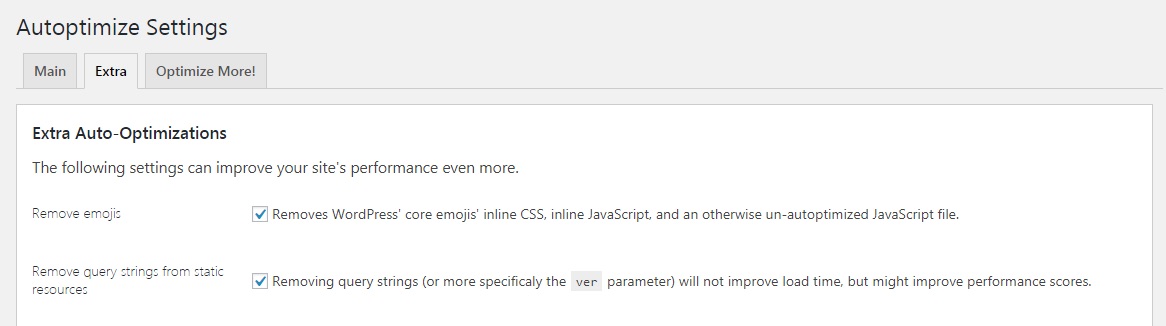
If you use a MyThemeShop theme, then you don’t have to worry about using plugins or editing code at all as all MyThemeShop themes have a built-in feature to remove query strings.

22 Disable XML-RPC
XML-RPC is a protocol that is used to standardize communication between various apps. It is used when you use the official WordPress mobile app, a WordPress client or any other app that connects to WordPress.
If you don’t use any of those features, you can safely disable them to improve your load time.
add_filter( 'xmlrpc_enabled', '__return_false' );
Add the above code to your theme’s functions.php file to disable XML-RPC.
To verify that the service is disabled, you can use the WordPress XML-RPC Validation tool. Put in your website’s address there and press the ‘Check’ button.
Disabling Pingbacks
Pingbacks are a type of WordPress comment created when you link to any other WordPress blog. If this feature is enabled, you will also get Pingback notifications whenever any other blog links to yours.
Pingbacks were used in the initial days of WordPress, and now they are rarely used. You can safely disable the Pingbacks feature to improve your load times.
To disable Pingbacks in WordPress, go to Settings > Discussion inside your WordPress admin, and uncheck the following settings.
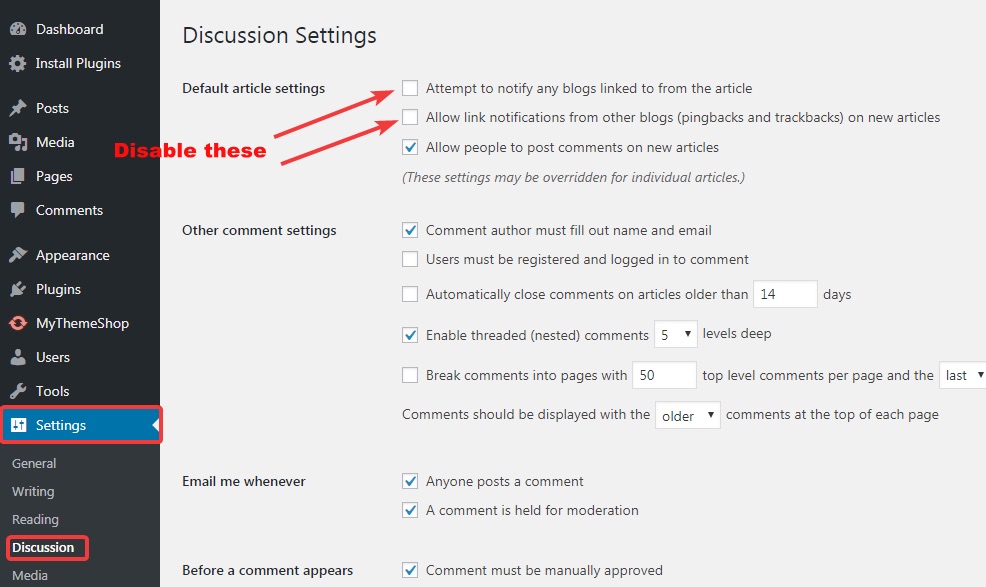
This will disable Pingbacks only on new posts, but the Pingbacks on older posts will remain enabled. To disable Pingbacks on older posts, follow these steps:
- Go to Posts > All Posts
- Bulk select all posts
- In the Bulk Actions drop-down, choose Edit and then Apply
- In the Pings dropdown, choose ‘Do not allow’
- Click Update
Block Access to xmlrpc.php
The method we used above disables XML-RPC, but the xmlrpc.php file is still accessible. It’s better to disable access to the file to prevent a worst-case hacking scenario.
<Files xmlrpc.php>
  <IfModule mod_authz_core.c>
    Require all denied
  </IfModule>
  <IfModule !mod_authz_core.c>
    Order allow,deny
    Deny from all
  </IfModule>
</Files>
Add the above code to your .htaccess file to disable access to xmlrpc.php.
23 Remove RSD Links
RSD is a discovery service that helps discover Pingbacks and XML-RPC on WordPress blogs. If you disabled XML-RPC and Pingbacks, then you can safely disable RSD as well.
remove_action( 'wp_head', 'rsd_link' ) ;
Paste the above code inside your theme’s functions.php file to disable RSD links.
24 Remove jQuery Migrate
jQuery Migrate are Javascript files (jquery-migrate.js and jquery-migrate.min.js) that are present on every page of your website. They are included to provide support for themes that use older versions of jQuery.
If you have 10,000 visitors to your website, then the jQuery Migrate files will have to be served 10,000 times by your server. Not only does that waste bandwidth, but it also increases your load time. If you use a modern theme, you can safely disable jQuery Migrate.
To disable jQuery Migrate, you can install the Remove jQuery Migrate Plugin. The plugin is pretty small and installing it will not bring any load on your server.
26 Hide WordPress version
By default, WordPress includes a meta name tag on every page on your website which shows the current WordPress version.

Removing that extra line of code will reduce the page load by a few bytes. You might be thinking if saving a few bytes is worth it? But remember, a few bytes start to add up when you serve thousands of visitors a day.
And not only that, it’s a bad security practice to display your WordPress version. If a security flaw is found in a specific WordPress version, this meta name tag will help hackers identify the website that they can break into, including yours.
// remove version from head
remove_action('wp_head', 'wp_generator');

// remove version from rss
add_filter('the_generator', '__return_empty_string');

// remove version from scripts and styles
function shapeSpace_remove_version_scripts_styles ($src) {
  if (strpos($src, 'ver=')) {
    $src = remove_query_arg('ver', $src);
  }
  return $src;
}
add_filter('style_loader_src', 'shapeSpace_remove_version_scripts_styles', 9999);
add_filter('script_loader_src', 'shapeSpace_remove_version_scripts_styles', 9999);
Enter the above code into your theme’s functions.php to hide the WordPress version on your website.
26 Remove wlwmanifest Link
The wlwmanifest tag is another meta tag that shows up on every WordPress website.

The tag is used by Windows Live Writer, which is an almost obsolete app used to publish directly to WordPress. You can remove this code to marginally improve your load time.
remove_action('wp_head', 'wlwmanifest_link');
Add the above code to your theme’s functions.php file to remove the wlwmanifest tag.
27 Remove RSD Link Tag
In optimization number 24, we disabled the RSD service, but its meta tag still shows up on every page on your website.
Since the RSD service is disabled, you can safely remove this tag from your website’s header.
<?php remove_action('wp_head', 'rsd_link'); ?>
Add the above code to your theme’s functions.php to remove the RSD link tag.
28 Remove the Shortlink Tag
The shortlink tag is also present on every page on your website, which contains the link to the post with the pageID.
If you use short and precise URLs anyway, then this tag is unnecessary and should be removed.
add_filter('after_setup_theme', 'remove_redundant_shortlink');
function remove_redundant_shortlink() {
  // remove HTML meta tag
  // <link rel='shortlink' rel="noopener" href='http://example.com/?p=25' />
  remove_action('wp_head', 'wp_shortlink_wp_head', 10);

  // remove HTTP header
  // Link: <https://example.com/?p=25>; rel=shortlink
  remove_action( 'template_redirect', 'wp_shortlink_header', 11);
}
Add the above code to your theme’s functions.php to remove the shortlink tag.
29 Disable RSS Feeds
RSS or Rich Site Summary is a way in which your blog’s content is shared in a machine-readable format. It is primarily used by aggregators apps to collect and display content from many websites (like Feedly).
If you don’t have any users who use your RSS feed to consume your content, then you can disable the RSS functionality altogether.
function itsme_disable_feed() {
  wp_die( __( 'No feed available, please visit the <a rel="noopener" href="'. esc_url( home_url( '/' ) ) .'">homepage</a>!' ) );
}

add_action('do_feed', 'itsme_disable_feed', 1);
add_action('do_feed_rdf', 'itsme_disable_feed', 1);
add_action('do_feed_rss', 'itsme_disable_feed', 1);
add_action('do_feed_rss2', 'itsme_disable_feed', 1);
add_action('do_feed_atom', 'itsme_disable_feed', 1);
add_action('do_feed_rss2_comments', 'itsme_disable_feed', 1);
add_action('do_feed_atom_comments', 'itsme_disable_feed', 1);
Add the above code to your theme’s functions.php.
WordPress also embeds links to your RSS feed in the page’s header. If you disabled the RSS feed, then you should also disable that by using the following code.
remove_action( 'wp_head', 'feed_links_extra', 3 );
remove_action( 'wp_head', 'feed_links', 2 );
Place the above code in your theme’s functions.php to disable RSS links from appearing in the head section.
30 Disable Self Pingbacks
Self Pingbacks are created when you link to one of your posts on your website. They provide no value and should be disabled.
function no_self_ping( &$links ) {

$home = get_option( 'home' );

foreach ( $links as $l => $link )

  if ( 0 === strpos( $link, $home ) )

    unset($links[$l]);
}

add_action( 'pre_ping', 'no_self_ping' );
Add the above code to your theme’s functions.php to disable Self Pingbacks.
31 Remove REST API Links
The WordPress REST API lets WordPress communicated with other apps and allows developers to create creative solutions. However, most websites do not use this feature, and it can be disabled.
Every page on your website will contain a link in the header which should be disabled.
<link rel='https://api.w.org/' rel="noopener" href='https://domain.com/wp-json/' />
Use the following code to fix that.
add_action('after_setup_theme', function(){
    remove_action( 'wp_head', 'rest_output_link_wp_head', 10 );
});
Add the above code to your theme’s functions.php file to remove the REST API links.
32 Disable Dashicons
Many WordPress themes are now bundled with icons based fonts. One of the most common of those is the Dashicons Icon Library.
The dashicons.min.css is the file that contains the icon styles, and it is around 30kb in size. When you multiply it by the number of visitors, you can understand how much bandwidth and server load does this single file cause.
If you don’t use Dashicons, then you should remove it. However, you can’t delete the file from your WordPress installation. If your theme is coded in a way that it needs Dashicons, then it can break your website’s layout.
To avoid that issue, use the following code.
// remove dashicons
function wpdocs_dequeue_dashicon() {

if (current_user_can( 'update_core' )) {
  return;
}

wp_deregister_style('dashicons');
}
add_action( 'wp_enqueue_scripts', 'wpdocs_dequeue_dashicon' );
Paste the above code in your theme’s functions.php file to disable Dashicons.
33 Disable Google Maps
Many themes and plugins bundle the Google Maps API with them, which can wreck your performance optimization efforts. While Google Maps API is loaded in async, it does increase the total load time of the page by a large margin.
/*
*  Remove Google Maps API Call
*/

function disable_google_map_api($load_google_map_api) {

  $load_google_map_api = false;

  return $load_google_map_api;

}

$plugins = get_option('active_plugins');
$required_plugin = 'auto-location-pro/auto-location.php';

if ( in_array( $required_plugin , $plugins ) ) {
  add_filter('avf_load_google_map_api', 'disable_google_map_api', 10, 1);
}
To disable Google Maps on your website, add the above code to your theme’s functions.php file.
Or, you can use the following code.
add_filter( 'avf_load_google_map_api', '__return_false' );
Obviously, this will disable Google Maps on your entire website, and if you have pages with embedded maps, they will break as well.
34 Disable Contact Form 7 JS/CSS
Contact Form 7 is one of the most popular contact form plugins available for WordPress. If you use Contact Form 7, then you should know that their CSS and JS files are loaded with each page of your website, whether that includes a form or not. It’s an unnecessary waste of resources that you should avoid.
To disable the loading of the files on each page load, use this code.
add_filter( 'wpcf7_load_js', '__return_false' );
add_filter( 'wpcf7_load_css', '__return_false' );
Add the above code to your theme’s functions.php file.
35 Disable Heartbeat
WordPress uses a Heartbeat API to establish and maintain a connection between a browser and a server. You’ve experienced this when WordPress automatically saves your posts in the background.
On the surface, the Heartbeat API is a useful feature. But, from a performance standpoint, it’s not a good tradeoff as WordPress makes an AJAX call every 15 seconds to the server, which then causes some code to execute on the server. As you understand, it’s not a wise use of CPU resources.
You can disable the Heartbeat API to reduce your CPU usage and free resources.
add_action( 'init', 'stop_heartbeat', 1 );

function stop_heartbeat() {

wp_deregister_script('heartbeat');

}
Paste the above code inside your theme’s functions.php file to disable Heartbeat API.
A word of warning before you disable the API. The Heartbeat API is also used for some essential functions like locking the post when an admin is editing it, and disabling the API will disable that as well.
If you have multiple authors on your website or experience issues after disabling Heartbeat, then remove the code that you added and use the Heartbeat Control Plugin to manage the API instead of disabling it altogether.
The next few optimizations are meant for WooCommerce store owners, so please use them only if you use WooCommerce on your website.
36 Disable WooCommerce Style Sheets
When you install WooCommerce, it adds a few stylesheets to your website which are loaded with your page. If you use a custom theme (which is likely), then you can stop these style sheets from loading.
add_filter( 'woocommerce_enqueue_styles', '__return_empty_array' );
Add the above code to your theme’s functions.php file.
If you want to enqueue your own stylesheet, use this code.
/**  Enqueue your own stylesheet */
function wp_enqueue_woocommerce_style(){
  wp_register_style( 'mytheme-woocommerce', get_template_directory_uri().'/css/woocommerce.css' );

  if ( class_exists( 'woocommerce' ) ) {
    wp_enqueue_style( 'mytheme-woocommerce' );
  }
}
add_action( 'wp_enqueue_scripts', 'wp_enqueue_woocommerce_style' );
Use the above code inside the functions.php file to enqueue your own stylesheet.
37 Disable Cart Fragmentation
WooCommerce has a built-in feature to update a customer’s shopping cart without the refreshing the page. Whenever a customer adds a product to the cart, the cart contents are automatically updated using this feature.
This feature does provide a better user experience, but all that benefit is negated because of the excessive loading time. To enable this functionality, WooCommerce has to continually check if any product was added to the cart. This check is resource intensive, and on large websites, it can take many seconds to finish.
It’s not worth having this feature enabled when it adds so much load time to your website. To disable the feature, use this code
add_action( 'wp_print_scripts', 'nuke_cart_fragments', 100 );
function nuke_cart_fragments() {
  wp_dequeue_script( 'wc-cart-fragments' );
  return true;
}

add_action( 'wp_enqueue_scripts', 'dequeue_woocommerce_cart_fragments', 11);

function dequeue_woocommerce_cart_fragments() {
  if (is_front_page()) wp_dequeue_script('wc-cart-fragments');
}
Add the above code to your theme’s functions.php file to disable cart fragmentation.
38 Disable WooCommerce Widgets
WooCommerce comes pre-loaded with many widgets by default. Most themes have their own functionality to replace these widgets, and keeping them enabled increases the load time while providing no value. You should disable the default widgets to improve your load times.
add_action( 'widgets_init', 'remove_woo_widgets' );

function remove_woo_widgets() {
  unregister_widget( 'WC_Widget_Recent_Products' );
  unregister_widget( 'WC_Widget_Featured_Products' );
  unregister_widget( 'WC_Widget_Product_Categories' );
  unregister_widget( 'WC_Widget_Product_Tag_Cloud' );
  unregister_widget( 'WC_Widget_Cart' );
  unregister_widget( 'WC_Widget_Layered_Nav' );
  unregister_widget( 'WC_Widget_Layered_Nav_Filters' );
  unregister_widget( 'WC_Widget_Price_Filter' );
  unregister_widget( 'WC_Widget_Product_Search' );
  unregister_widget( 'WC_Widget_Top_Rated_Products' );
  unregister_widget( 'WC_Widget_Recent_Reviews' );
  unregister_widget( 'WC_Widget_Recently_Viewed' );
  unregister_widget( 'WC_Widget_Best_Sellers' );
  unregister_widget( 'WC_Widget_Onsale' );
  unregister_widget( 'WC_Widget_Random_Products' );
}
Use this code inside your theme’s functions.php file to disable the default WooCommerce Widgets.
39 Remove WooCommerce Meta Boxes
When you install WooCommerce, it adds a lot of meta boxes to the backend of your website. These meta boxes serve little purpose, and you can disable them to improve your backend loading time.
add_action('edit_form_after_title', 'my_custom_post_edit_form', 100);

/**
* remove all meta boxes, and display the form
*/
function my_custom_post_edit_form($post) {

  global $wp_meta_boxes;

  // remove all meta boxes
  $wp_meta_boxes = array('my_custom_post_type' => array(
    'advanced' => array(),
    'side' => array(),
    'normal' => array(),
  ));

  // show my admin form
  require dirname(__FILE__) . '/views/my-custom-post-edit-form.php';
}
Add the above code to your theme’s functions.php to disable the meta boxes.
40 Avoid Google Fonts and Server Fonts Locally
Google Fonts is an amazing product that gives you access to hundreds of fonts at your fingertips. The only problem is that it increases the load time of your website.
Let us clarify. Google Fonts itself is very fast. But when your website fetches a font from Google, your server has to perform DNS lookups, download the font, then render it.
If you compare that process to simply loading a font from your website, it’s obvious that this method is faster.
That is why it is recommended that take all the fonts that your website uses, and serve them locally.
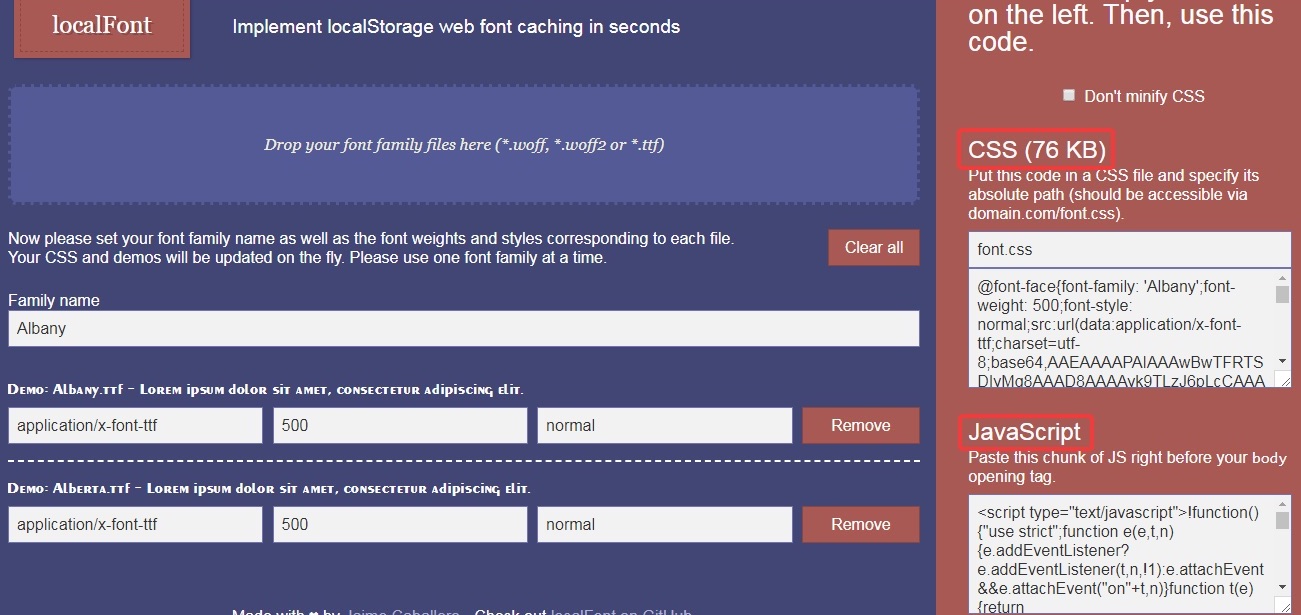
To make the process even more efficient, you can implement localStorage caching for your fonts.
To do that, you can use the LocalFont service. Simply drag and drop your fonts onto the page to begin.
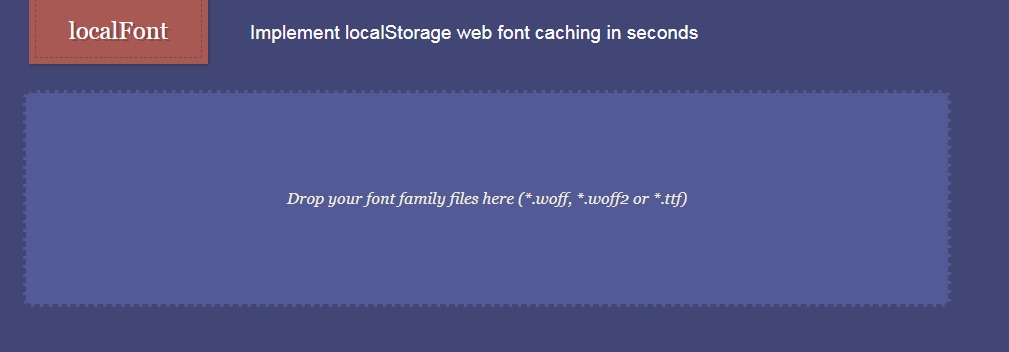
The website will process your fonts and create the necessary CSS and Javascript for you. Copy and use the code on your website to use LocalStorage in your fonts.
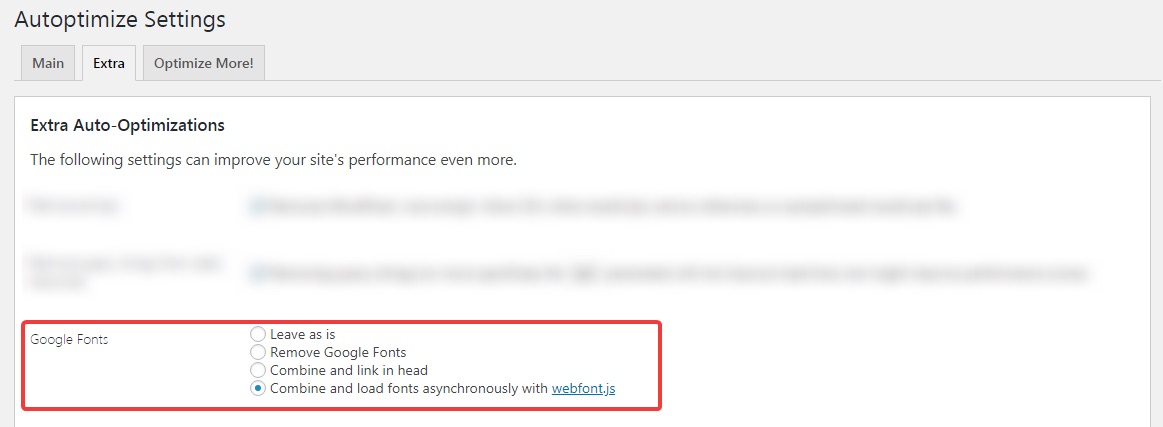
Alternatively, you can use the Extra Settings in the Autoptimize plugin to achieve this.
41 Use WOFF2 Fonts Instead of WOFF
The WOFF (Web Open Font Format) is a web format specially designed for the web. It’s an OTF or TTF font format combined with metadata and compression.
WOFF2 is the next generation of WOFF fonts. The new standard offers 30% more compression over the WOFF format on average. This will reduce the size of your fonts even further.
We recommend that you switch to WOFF2 fonts on your website to save bandwidth and speed up your website. It doesn’t matter if your server serves fonts locally or uses Google Fonts, you can convert those fonts to WOFF format easily. Let us demonstrate how to do it with a Google Font example.
- Find the font you prefer on Google Fonts. We chose Nanum Gothic
- Download the font from Google Fonts, which will give you the TTF versions of the font.
- Open Transfonter.org and upload the fonts there. Make sure to select the WOFF format, and convert the fonts.
- Transfonter will generate a zip file with the WOFF2 versions of the fonts and a CSS file.
- Upload the fonts to your child theme’s ‘fonts’ directory. If it does not exist, create it.
- Add the CSS code to your child theme’s stylesheet
- Use the font on your website
While WOFF2 is a modern and high-performance font format, not all browsers support it completely. To overcome that problem, we recommend that you also upload the WOFF format with the WOFF2 format on your website. The “@font-face” we used will automatically instruct the browser to use the latest format supported.
42 Optimize Font Awesome Icons

Font Awesome is another widely used icon library. When you use Font Awesome, a CSS file is created on your server that has to be repeatedly loaded.
To speed up the loading of Font Awesome, you can use KeyCDN’s free CDN dedicated to Font Awesome.
Here is how to set it up.
- Edit your theme’s header.php file.
https://opensource.keycdn.com/fontawesome/4.6.1/font-awesome.min.css
- Paste the above code in between the
<head>tags. - Use Font Awesome Icons on your website with the <i> tag. Here is an example.
<i class="fa fa-database fa-la"></i>
43 Concatenate CSS and Javascript
When your website loads in the browser, the Javascript files and CSS are downloaded separately. You can optimize this process by combining both the files into a single file. The process might increase the file size that needs to be downloaded, but the tradeoff is worth it as it saves the server from making another HTTP request.
Another way to optimize this process is to download both the files in parallel, which reduces the overall time the process takes to complete.
Which method will work best on your website is dependent on a lot of factors, and it’s not possible to tell which will work best without testing them out. We recommend that you try each of the methods out on your website and choose the one that produces better results.
To automate the process of combining your CSS and Javascript files, we recommend that you use the following plugins.
Tips to Speed Up WordPress for Advanced Users
- 44. Fix Render Blocking Scripts and CSS
- 45. Reduce Redirects and Force SSL
- 46. Disable Hotlinking
- 47. Add Expires Header To Static Resources
- 48. Preload, Prefetch, and Preconnect
- 49. Disable Scripts on a Per-page and Per-post Basis
- 50. Switch to Nginx or Litespeed
- 51. Enabling Compression
- 52. Improve WordPress Search
- 53. Use MariaDB Instead of PostgreSQL
- 54. Convert all MyISAM to InnoDB Tables in your Database
- 55. Add a MySQL Index to WordPress wp_options Table
- 56. Tuning Your MySQL Database
- 57. Configure Redis
- 58. Use InstaClick
- 59. Find Your Slowest Pages and Fix Them
- 60. Find Bottlenecks by Deep-diving Into WordPress
- Testing the Results of the Optimizations
- Conclusion
Warning: Advanced Optimizations Ahead
Please note that the speed optimizations that follow are recommended for advanced users only. Treat them like a sharp sword. In trained hands, a sharp sword can accomplish many things, but in the hands of the untrained, it can damage the wielder. Proceed with caution and only if you are comfortable working with servers and WordPress under the hood.
It’s also recommended that you take a backup of your website before making any change. Also, make sure that if anything goes wrong, you have the right server setup with proper permissions, and the skills to restore your website.
44 Fix Render Blocking Scripts and CSS
JavaScript and CSS files that are present at the beginning of the HTML of the page are render-blocking. That is because all Javascript files have to be downloaded and executed first, only then the rest of the page even begins to load.
Depending on their size, render blocking scripts can add anywhere from a few milliseconds to many seconds to your website’s loading time.
To reduce loading time, it’s critical to optimize these scripts. There are a few methods that can be used.
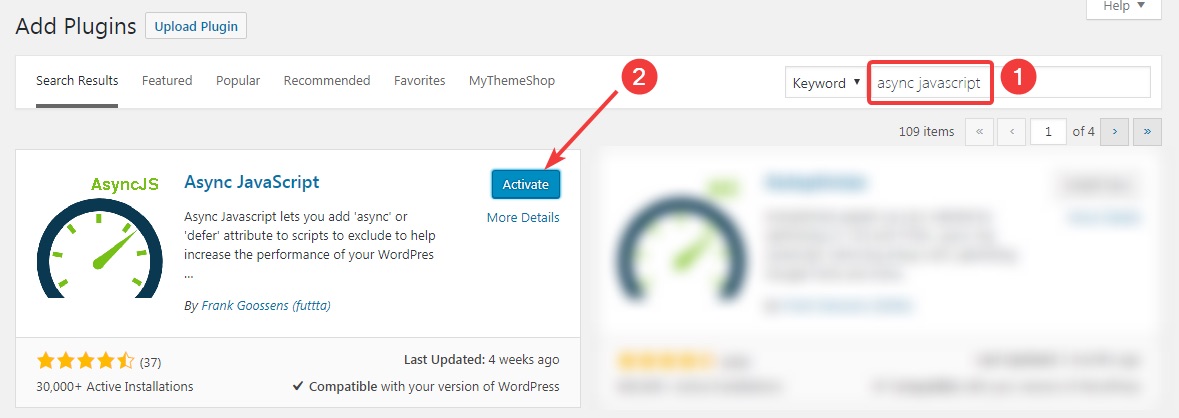
44.1 Use the Async Javascript Plugin
The Async Javascript Plugin is a fantastic choice to optimize render-blocking Javascript files.
Here is a short tutorial on how to configure the plugin.
Install and activate the plugin from the plugins menu.
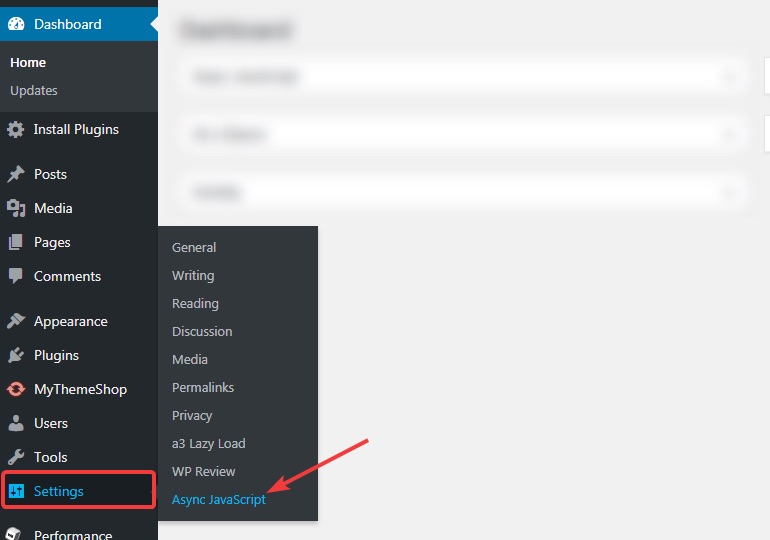
Open the plugin’s settings by navigating to Settings > Async JavasSript.
Enable Async Javascript
Obviously, you have to enable this feature to use the plugin.

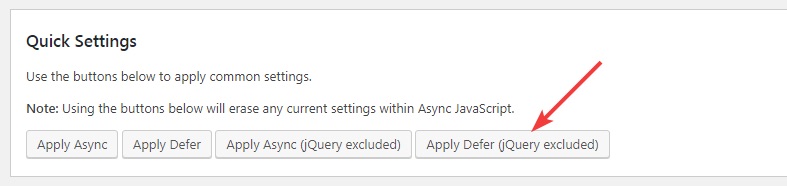
Quick Settings
This setting allows you to defer all your scripts in one go. If you want to test out the plugin quickly, then this is your best option. We recommend that you use ‘Apply Defer (jQuery Excluded)’ setting to test out first. This is because a lot of other scripts depend on jQuery, and if jQuery is not loaded, then other scripts will start failing as well.
The ideal setting would be to keep jQuery at Async while the other scripts at defer, which we will learn to do in the advanced settings.
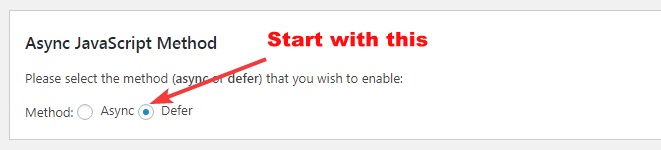
Async Javascript Method
Here you will set if the Javascript on the page will be deferred or Async’ed. The setting will be dependent on your environment, and we recommend that you use Defer first. If your page is Javascript heavy, then Defer will cause issues. Then you can shift this setting to Async.
jQuery
We recommend that you use Async for jQuery because a lot of other scripts are dependent on jQuery. However, some websites may still experience issues with Async jQuery. If you get issues, we recommend that you exclude jQuery from optimization.

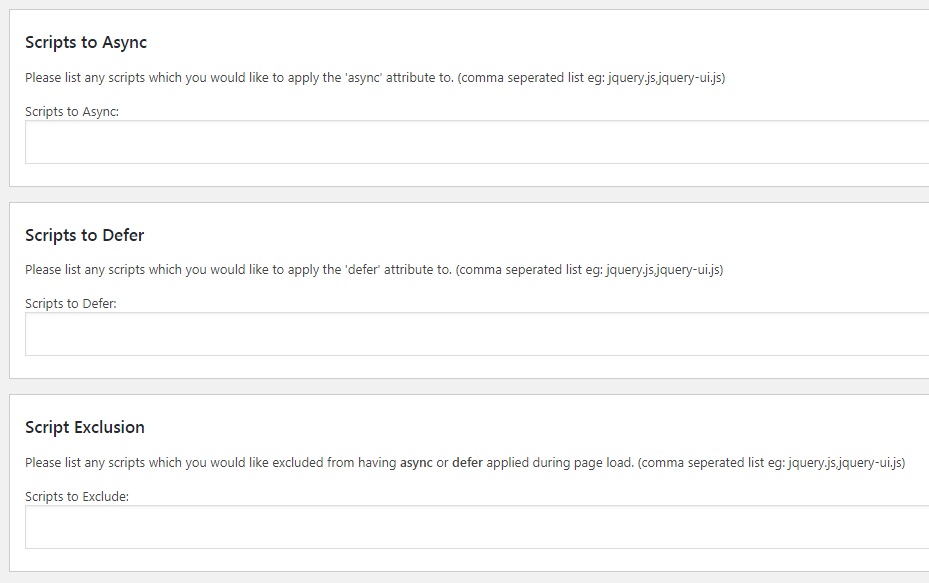
Scripts to Async, Scripts to Defer, and Script Exclusion
These three settings give you manual control over which scripts you want to async, defer, or exclude. If the easy settings did not work for you as expected, then you can manually enter the script’s name in the respective sections to optimize their loading.
Finding Scripts to Optimize
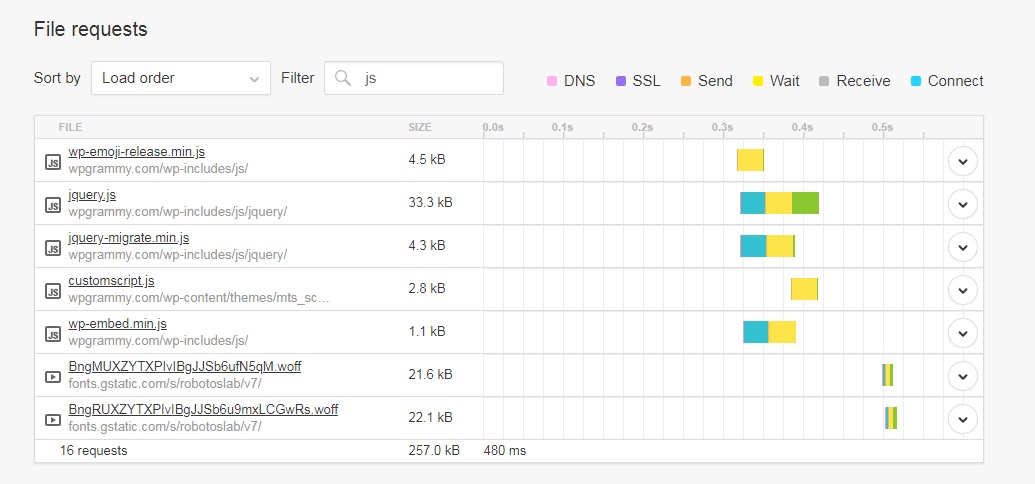
Sometimes optimizing all your scripts would cause issues and you would want to find out the most essential scripts to optimize. You can find out all the scripts that your website loads and also the order and time they take to load in Pingdom Tools.
Perform a speed test in Pingdom Tools for the page you want to optimize or the entire page. After the test is complete, scroll to the section that says ‘File Requests.’
Type ‘js’ in the filter segment to see all the JS files that are being loaded on the page. You can refer to the legend, or hover over the script’s bars to get more details about each script.
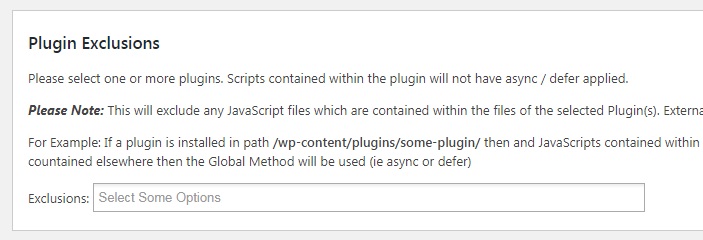
Plugin Exclusions
Plugin Exclusions is where you can exclude scripts from certain plugins from being affected by your optimization.
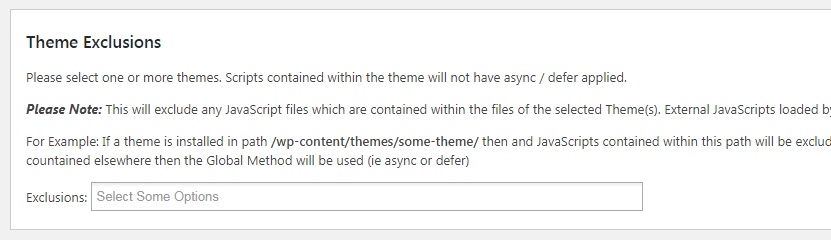
Theme Exclusions
This setting allows you to exclude an entire’s themes scripts from being affected by this plugin. This will apply only to the scripts placed inside the theme folders. Any external scripts or even local scripts outside of the theme’s folder will not be affected by the plugin.
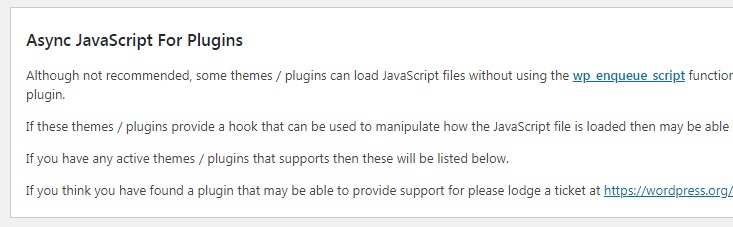
Async Javascript for Plugins
The recommended method to load any script in WordPress is by using the wp_enqueue_script function. However, some themes or plugins will bypass this and load scripts because of certain reasons. If you have any such theme or plugin installed on your website, it will be shown in this section along with the scripts it loads. You can then optimize those scripts with this plugin as well.
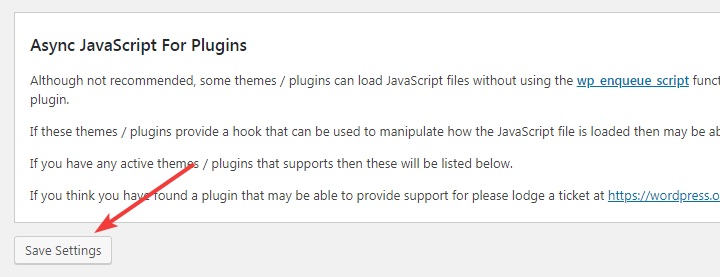
After you’ve configured the settings, press the ‘Save Settings’ button to save your changes.
44.2 Optimize using W3 Total Cache
You can use W3 Total Cache’s built-in support to optimize and eliminate render-blocking scripts as well.
The method is slightly lengthy, but it offers more control over the entire process. Here is a helpful guide to configuring it in W3 Total Cache
45 Reduce Redirects and Force SSL
You should know that you can operate your website as a www version or a non-www version. For example, our website runs on the non-www version; therefore, the URL is https://mythemeshop.com.
On the other hand, Apple’s website uses a www version; therefore, the URL is https://www.apple.com.
From an SEO or performance standpoint, there is no difference whether you choose the www version or the non-www version.
From a technical perspective, there are quite a few differences, and discussing them would not be within the scope of this article. If you are interested, you can read through this article.
The important point is to pick one and stick with it. If you decide on one setup and then change it later, it is going to be bad for your SEO.
To choose one version of the site, use one of the following code snippets. Copy and paste them into your .htaccess file.
To Use the www Version
RewriteEngine on
RewriteCond %{HTTP_HOST} ^example.com [NC]
RewriteRule ^(.*)$ HTTP://www.example.com/$1 [L,R=301,NC]
Use the above code inside your .htaccess file to use the www version of your website.
To Use the non-www Version
RewriteEngine on
RewriteCond %{HTTP_HOST} ^www.example.com [NC]
RewriteRule ^(.*)$ http://example.com/$1 [L,R=301]
Use the above code inside your .htaccess file to use the non-www version of your website.
In both the codes snippets, replace example.com with your domain name.
Once you’ve decided to choose one of the two setups, you should let Google know which version you prefer by setting it up in Google Search Console. This will help Google show the correct URLs for your website in the search results.
Force SSL
Once you’ve installed an SSL certificate, you’d think that your all your visitors will visit the site using the https version. That is not always true. Because of old links, bookmarks, and shares, many people will still visit the un-secure version of your website.
It is in your best interests, and your visitor’s best interests, that they visit the https (secure) version of your website. To make that happen, you have to force a redirect from the non-secure (http) to the secure (https) version of your website.
RewriteCond %{REQUEST_URI} !^/[0-9]+..+.cpaneldcv$
RewriteCond %{REQUEST_URI} !^/.well-known/pki-validation/[A-F0-9]{32}.txt(?: Comodo DCV)?$
RewriteEngine On
RewriteCond %{SERVER_PORT} 80
RewriteRule ^(.*)$ https://www.example.com/$1 [R=301,L]
Insert the above code into your .htcacess file to force a redirect to your secure website.
Replace example.com with your domain in the code snippet before pasting.
Updating old URLs
After making the switch from HTTP to HTTPS and forcing a redirect, the last important thing to is to replace your http content with https content. Let us explain.
Over the course of your website’s life, you would have placed links to other posts, uploaded images, and a lot more content. All those links and images that you created still live on the http version of your website.
Obviously, when a visitor tries to access those, they won’t be able to as you will force them over SSL and the resources don’t exist over SSL.
To solve this problem, all you have to do is to change links to all the HTTP assets to HTTPS. There are two ways to achieve this.
Updating using Code
To achieve this with code, you will need access to PhpMyAdmin. Log into our PhpMyAdmin and run the following SQL query on your database.
UPDATE wp_posts SET `post_content` = REPLACE (`post_content`, 'src="images/http://www.your-site.com', 'src="images/https://www.your-site.com');
Run the above SQL query on your database using phpMyAdmin.
Be sure to replace your-site.com with your domain name in both instances.
Then run the following query to update the GUID (this will fix your images).
UPDATE wp_posts SET `guid` = REPLACE (`guid`, 'http://www.your-site.com', 'https://www.your-site.com') WHERE post_type = 'attachment';
Run the above SQL query on your database using phpMyAdmin to update image URLs.
Again, be sure to replace your-site.com with your domain name in both instances.
Updating using a Plugin
You can also update your URLs using a dedicated plugin. Any plugin that you use is only needed to update the URLs and can be deleted once the task is accomplished. Here are a couple of recommended plugins.
46 Disable Hotlinking
Hotlinking is the process of adding an asset to your website without uploading it to your server. When hotlinking, you point to the resource from your website instead of hosting the resource. The result is that the asset is displayed on your website, but your server didn’t have to host it.
If that sounds like a good deal to you, then you haven’t been on the other side of the table.
The bottom line is, someone has to host the content that a visitor views. It might be you or someone else. Your job is to make sure that no one else benefits from the content that you are hosting and paying for. For an entertaining example, read this story.
To protect yourself from unnecessary server load and hosting bills, you should disable hotlinking from your website.
RewriteEngine on
RewriteCond %{HTTP_REFERER} !^$
RewriteCond %{HTTP_REFERER} !^http://(www.)example.com/.*$ [NC]
RewriteRule .(gif|jpg|jpeg|bmp|zip|rar|mp3|flv|swf|xml|php|png|css|pdf)$ – [F]
Paste the above code into your .htaccess file to disable hotlinking of images
Replace example.com in the snippet above with your domain name. What this snippet will do is that it will deny any request for common embedded files (images, pdf, music, and more) if they don’t originate from your server.
If instead of just denying access, you want to have a little fun or teach the hotlinker a lesson, use the following code snippet.
RewriteEngine on
RewriteCond %{HTTP_REFERER} !^$
RewriteCond %{HTTP_REFERER} !^http://(www.)example.com/.*$ [NC]
RewriteRule .(gif|jpg)$ http://www.example.com/angryman.gif [R,L]
Paste the above code into your .htaccess file to show a single image instead of all your hot-linked images.
Replace the first mention of example.com with your domain name, and the second instance with an image link. Whenever anyone tries to hotlink a file from your server, this is the image that will be displayed instead of the requested image. Select an image keeping that in mind.
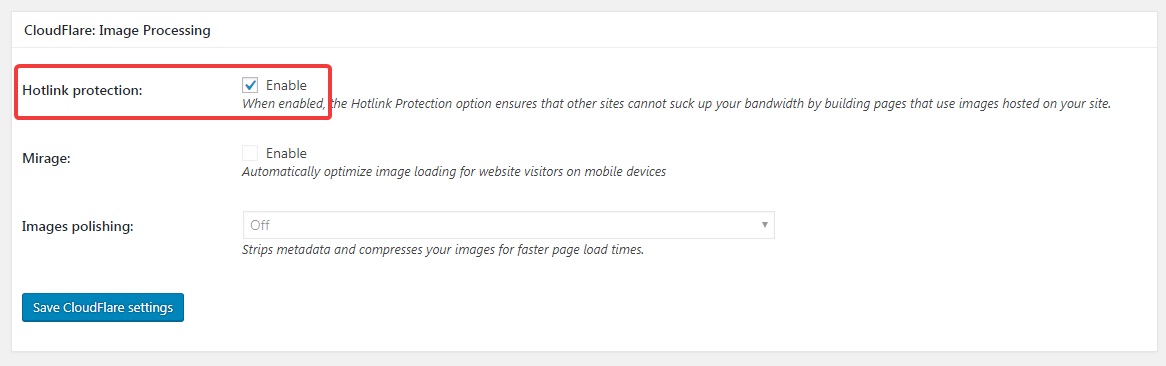
Disabling Hotlinking with CloudFlare
If you have setup CloudFlare (which you should), then disabling hotlinking is a matter of enabling a checkbox. The setting is available in W3 Total Cache > Extensions > CloudFlare > Hotlink Protection
47 Add Expires Header To Static Resources
One of the ways the browsers save bandwidth and reduce load time is by caching static assets. Static assets mean images, CSS files, and other assets which don’t change frequently.
When a user visits a page for the first time, many of these static assets are downloaded and cached. The next time the visitor visits the website, the browser just uses the cached files instead of downloading them again.
This is made possible by expire headers. Expire headers add a time-stamp to your assets which tell the browser for how much time the static asset will not change.
When a visitor re-visits a website, the browser checks the expire headers to determine if the static assets need to be downloaded or not.
By enabling and configuring expire headers correctly, you can save a lot of bandwidth and server resources.
<IfModule mod_expires.c> #If mod_expires is installed
  ExpiresActive on

  ExpiresDefault                          "access plus 1 month"

  ExpiresByType text/cache-manifest       "access plus 0 seconds"

  # Your html
  ExpiresByType text/html                 "access plus 0 seconds"

  ExpiresByType text/xml                  "access plus 0 seconds"
  ExpiresByType application/xml           "access plus 0 seconds"
  ExpiresByType application/json          "access plus 0 seconds"

  # Rss Feeds
  ExpiresByType application/rss+xml       "access plus 1 hour"
  ExpiresByType application/atom+xml      "access plus 1 hour"

  # Favicon
  ExpiresByType image/x-icon              "access plus 1 week"

  # Media: images, video, audio
  ExpiresByType image/gif                 "access plus 1 month"
  ExpiresByType image/png                 "access plus 1 month"
  ExpiresByType image/jpeg                "access plus 1 month"
  ExpiresByType video/ogg                 "access plus 1 month"
  ExpiresByType audio/ogg                 "access plus 1 month"
  ExpiresByType video/mp4                 "access plus 1 month"
  ExpiresByType video/webm                "access plus 1 month"

  # HTC files  (css3pie)
  ExpiresByType text/x-component          "access plus 1 month"

  # Don't forget Webfonts!
  ExpiresByType application/x-font-ttf    "access plus 1 month"
  ExpiresByType font/opentype             "access plus 1 month"
  ExpiresByType application/x-font-woff   "access plus 1 month"
  ExpiresByType application/x-font-woff2  "access plus 1 month"
  ExpiresByType image/svg+xml             "access plus 1 month"
  ExpiresByType application/vnd.ms-fontobject "access plus 1 month"

  # CSS and JavaScript
  ExpiresByType text/css                  "access plus 1 year"
  ExpiresByType application/javascript    "access plus 1 year"
</IfModule> #End if
Copy and paste the following code into your .htaccess file.
Configuring Expires with W3 Total Cache
You can also configure the expires headers inside W3 Total Cache. Both methods work in the same way, and you can use any method you prefer. Here is a direct link to the section that explains configuring expires with W3 Total Cache.
48 Preload, Prefetch, and Preconnect
One of the most significant challenges in reducing website load times is reducing latency. The challenge is hard to solve as you cannot optimize the time it takes for DNS lookups, TCP Connections, handover, and more.
But what if you could pre-load connections, DNS lookups, and other resources, without the user not even initiating it?
That’s what Preload, Prefetch, and Preconnect are about. Let us understand them in brief.
48.1 Preload
Preload is a new web standard which focuses on the elements in the current navigation. With Preload, it is easy to control and manage the order in which resources are fetched and rendered. The benefit of the Preload directive is that it does not interfere with the window’s onload event, and downloads the resources with high priority.
It’s generally a good idea to preload your images, Javascript, CSS, and font files. Here is an example of an image preload.
<link rel="preload" rel="noopener" href="image.png">
Use Case of Preload
Since you can manage the order of the elements loading in the current navigation, you can move you key assets up to improve the user experience. Here is an example.
<link rel="preload" rel="noopener" href="https://domain.com/fonts/currentfont.woff" as="font" crossorigin>
The code above will prioritize the loading of the font on the page. The cross-origin tag is needed when referencing an asset from another domain.
Here is another example of preloading a style using Javascript.
<script>
  var res = document.createElement("link");
  res.rel = "preload";
  res.as = "style";
  res.href = "css/cssfile.css";
  document.head.appendChild(res);
</script>
And another example of loading a stylesheet using markup.
<link rel="preload" rel="noopener" href="/css/cssfile.css" as="style">
Preload is supported in Google Chrome, Firefox, and Opera as of this writing. Support for Preload in Edge was announced but has not been confirmed yet.
48.2 Prefetch
Prefetch is a low priority directive which hints the browser to load assets in the background during idle time and save them in the browser’s cache. There are three types of Prefetch.
48.2.1 Link Prefetch
Link Prefetch is the simplest Prefetch directive which instructs the browser to download link based assets in the background and save them in the cache. If the user accesses the resources, it will appear as if the resource loaded instantaneously. Here is an example of an image Prefetch using Link Prefetch.
<link rel="prefetch" rel="noopener" href="image.png">
Most MyThemeShop themes also support Prefetching by default. You can navigate to Theme Options > Performance to find the Prefetch setting.
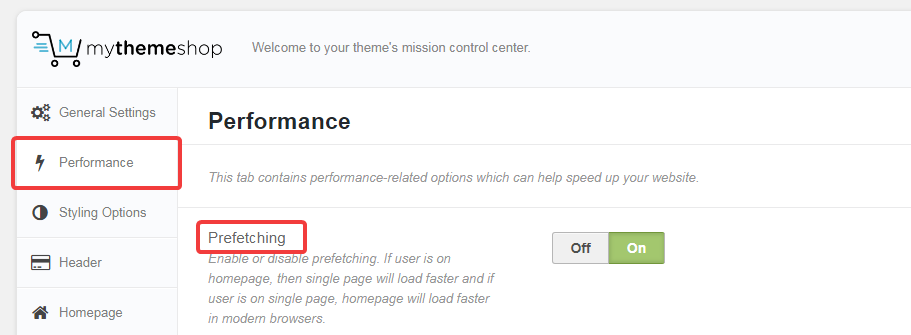
Link Prefetch is supported by most modern browsers except Safari, iOS Safari, and Opera Mini.
48.2.2 DNS Prefetch
DNS Prefetch is a directive that instructs the browser to perform DNS lookups in the background. This cuts down latency as the DNS is already resolved when the user clicks a link. Here is an example of a DNS Prefetch.
<!-- Prefetch DNS for external assets -->
<link rel="dns-prefetch" rel="noopener" href="//fonts.googleapis.com">
<link rel="dns-prefetch" rel="noopener" href="//www.google-analytics.com">
<link rel="dns-prefetch" rel="noopener" href="//cdn.domain.com">
If your use Perfmatters, then you can use DNS prefetch simply by entering the list of domains in their DNS Prefetch section.
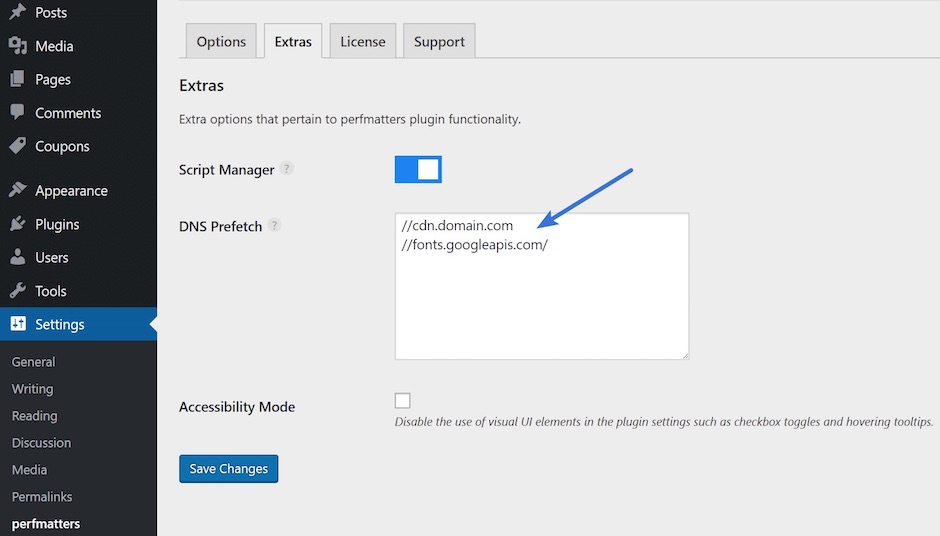
image source
If you don’t know which domains to prefetch, then Rober Went’s Website has a helpful list of commonly used domains. Here is the list of domains for your reference.
//twitter.com
//platform.twitter.com
//connect.facebook.net
//static.ak.facebook.com
//s-static.ak.facebook.com
//fbstatic-a.akamaihd.net
//apis.google.com
//ssl.gstatic.com
//oauth.googleusercontent.com
//accounts.google.com
//oauth.googleusercontent.com
//www.linkedin.com
//platform.linkedin.com
//static.licdn.com
//disqus.com
//go.disqus.com
//a.disquscdn.com
//juggler.services.disqus.com
//referrer.disqus.com
//subdomain.disqus.com
//www.google-analytics.com
//ajax.googleapis.com
//fonts.googleapis.com
//themes.googleusercontent.com
//maps.gstatic.com
//maps.google.com
//maps.googleapis.com
//mt0.googleapis.com
//mt1.googleapis.com
Add the above list inside Perfmatters’ DNS prefetch field.
Make sure that you replace subdomain.disqus.com with your website’s subdomain. Most modern browsers support DNS Prefetch except Opera Mini.
48.2.3 Prerender
Prerender is similar to prefetch with the exception that it instructs the browser to load the entire page in the background, including all the page assets.
Prerender is not commonly used as it is bandwidth-heavy and not supported by most modern browsers.
48.3 Preconnect
Preconnect is similar to DNS prefetch, but it takes a step further by setting up a connection even before a request is sent. This saves on the multiple round-trip requests that are needed even after a DNS lookup. Here is an example of a Preconnect for Google Fonts.
<link rel="noopener" href="fonts.gstatic.com" rel="preconnect" crossorigin>
This code needs to be present in the headers for Preconnect to work. Here is the Javascript code.
function preconnectTo(url) {
  var hint = document.createElement("link");
  hint.rel = "preconnect";
  hint.ref = url;
  document.head.appendChild(hint);
}
Add the above code inside your theme’s header.php file.
If you use the performance optimization plugin from Perfmatters, then you can enable Preconnect by simply entering the list of domains you want preconnected.

49 Disable Scripts on a Per-page and Per-post Basis
One of the most time-consuming elements on a page can be scripts. That is not because of their size, but because of how they are executed.
If not optimized, any script that the browser encounters will stop the page from rendering until the script is downloaded and executed. Apart from that, the more features and plugins you use, the more scripts will be added to your website. Most of these scripts are loaded on all the pages, whether they are needed or not.
To reduce the impact of these scripts, you can do two things.
- Make sure that the scripts do not interrupt the page load
- Make sure that only the required scripts load on the page
To achieve this, we’ll use the WP Script Optimizer Plugin.
- Install the plugin to get started.
- The plugin will add its settings to the WordPress Menu. Let’s look at the global settings first.

- Press the ‘Get/update Global Scrips/Styles’ Button to get the list of all enqueued scripts.
- Now you will see all the scripts and stylesheets that are loaded with your website. You can also check which scripts are loaded in the header or footer.
- For each script, you have three options. You can deactivate the script, move it into the header/footer, or change the conditions of its load.

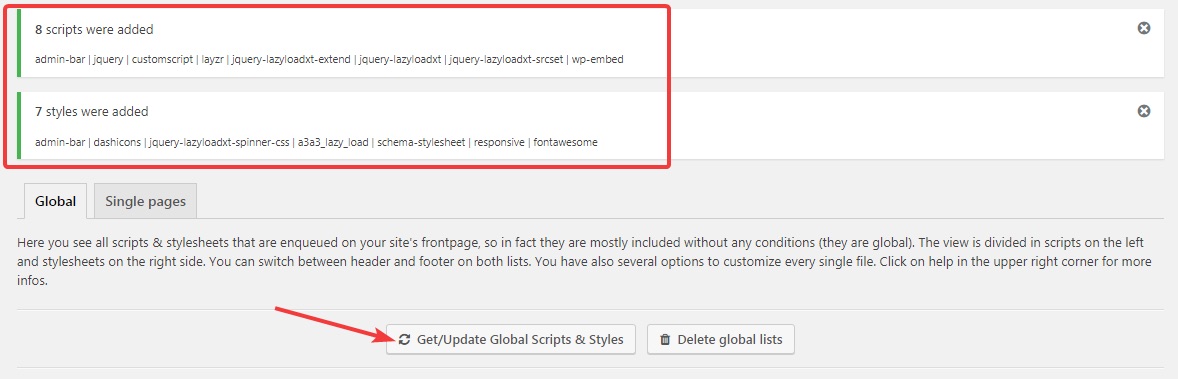
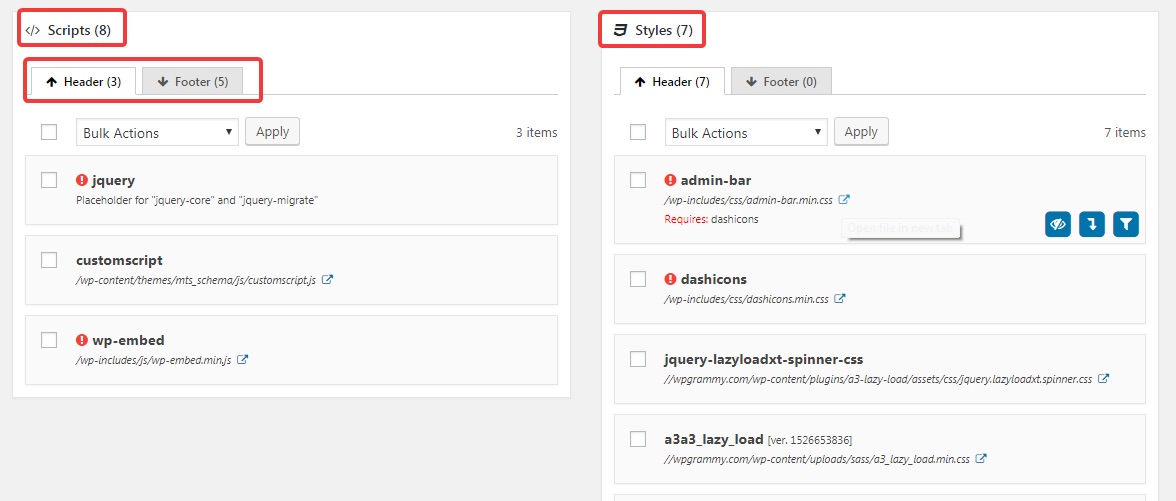
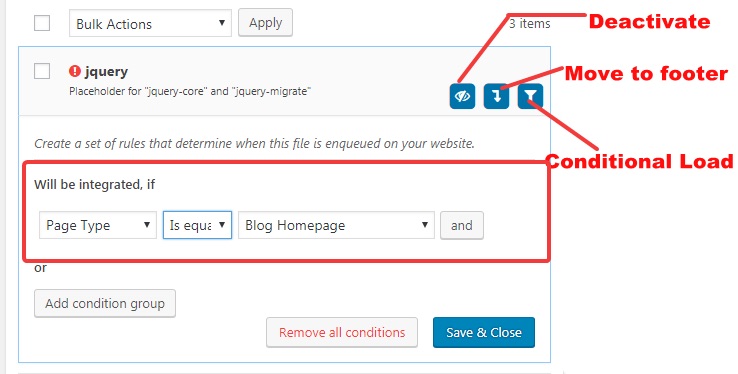
- You can also change the scripts on a per-page basis by going to the ‘Single Pages’ option.
- There you can enter the URL of any page on your website, and all the plugin will list all the scripts that load on the website.

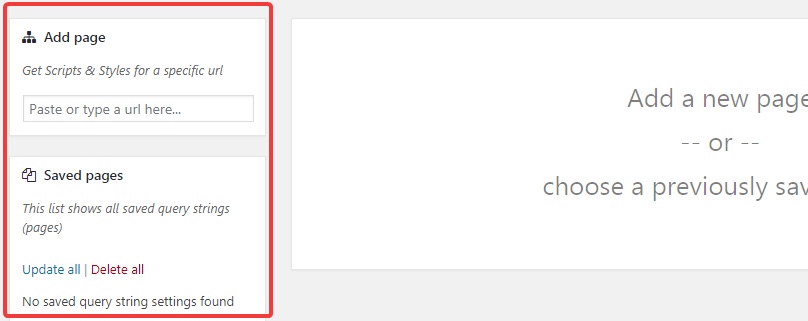
50 Switch to Nginx or Litespeed
Many types of servers can be used to power your website. The most common type is Apache, which is an open-source software.
But, Apache is not the only choice when it comes to servers. There are a few alternatives which perform even better than Apache and will take your website’s performance to the next level.
The two common alternatives to Apache are
Both have free versions available which come without support. The premium offerings come with support but also a decent price tag.
You might be thinking that changing the server is worth the performance? We can attest that it’s absolutely worth it. For some real-world benchmarks, see this load time comparison.
Now comes the installation part. Installing a complete server from scratch isn’t easy, and also will not fit the scope of this article. There are many helpful resources out there that will give you detailed instructions on how to go about it. Here is a guide to installing LiteSpeed.
For Nginx, the story is a bit different. Many hosts support Nginx out of the box and will set your website with Nginx if you ask. Our recommended host, Siteground, also supports Nginx. If you want to be sure if you host supports Nginx, it’s best to ask the support team.
Once your website is on Nginx, here are some helpful resources to get the best performance with Nginx.
- Nginx Performance Improvement Tips
- Install FastCGI cache for WordPress on Nginx
- Setup proxy caching with Nginx and WordPress
50.2 Configure Nginx Reverse Proxy
You can increase the performance of your website by implementing a reverse proxy. A reverse proxy is an additional server that sits in between the user and your actual server. The reverse proxy then caches all the elements that it can.
The advantage of that is when a user visits your website, most of the static content is served by the reverse proxy, even before the request reaches your server. This reduces the load on your server drastically and also saves on connection time.
To configure the reverse proxy, you can follow this in-depth tutorial.
51 Enabling Compression
Just like you can compress files on your computer to save space, you can also save bandwidth and load time on your server by enabling compression.
Servers usually use a compression known as gzip, which can compress the following file types.
- HTML (.html) but also all types of dynamic HTML (such as extension .php, .aspx)
- Textfiles (extension .txt)
- CSS and Javascript (extension .css and .js)
- Webservices, such as WSDL, REST and JSON
Turning on gzip compression can increase your website’s speed considerably as it is a powerful way to reduce the amount of data that needs to be transferred.
If you want to check if compression is turned on your server, and also how much smaller your page will become when you enable compression, you can visit this link.
Here is how our test website performed when we first did the test.
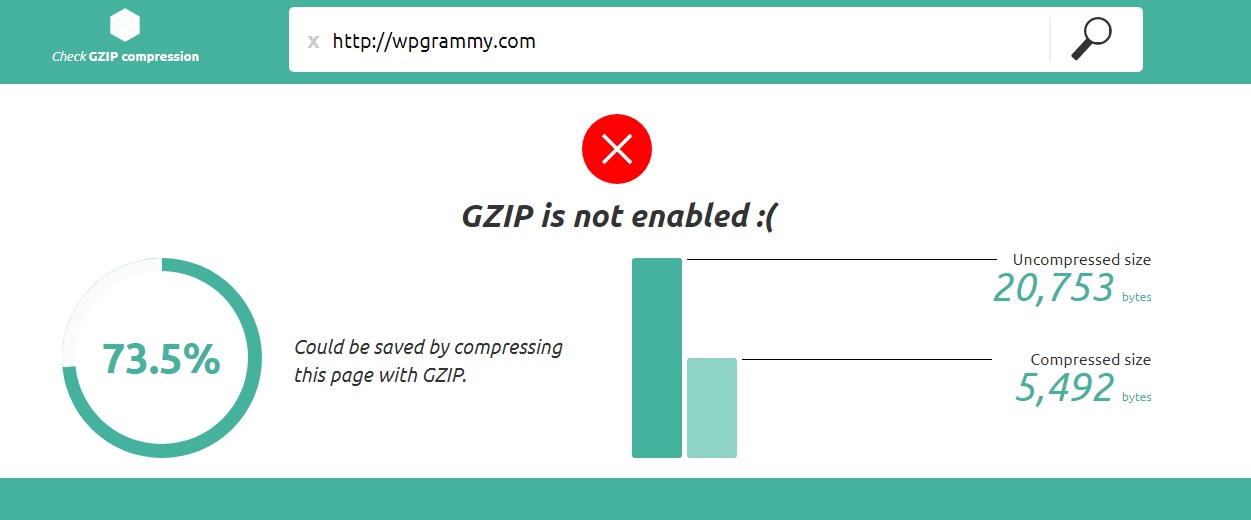
A whopping 75% savings in page size. That should be evidence enough to prove how powerful compression is.
To enable compression, you have to determine the kind of server your website is running on. The server is responsible for the compression and the browser then decompresses the files before displaying them.
Here we are sharing the code to enable gzip compression for Apache servers and Nginx Servers.
Apache Server
<IfModule mod_deflate.c>
  # Compress HTML, CSS, JavaScript, Text, XML and fonts
  AddOutputFilterByType DEFLATE application/javascript
  AddOutputFilterByType DEFLATE application/rss+xml
  AddOutputFilterByType DEFLATE application/vnd.ms-fontobject
  AddOutputFilterByType DEFLATE application/x-font
  AddOutputFilterByType DEFLATE application/x-font-opentype
  AddOutputFilterByType DEFLATE application/x-font-otf
  AddOutputFilterByType DEFLATE application/x-font-truetype
  AddOutputFilterByType DEFLATE application/x-font-ttf
  AddOutputFilterByType DEFLATE application/x-javascript
  AddOutputFilterByType DEFLATE application/xhtml+xml
  AddOutputFilterByType DEFLATE application/xml
  AddOutputFilterByType DEFLATE font/opentype
  AddOutputFilterByType DEFLATE font/otf
  AddOutputFilterByType DEFLATE font/ttf
  AddOutputFilterByType DEFLATE image/svg+xml
  AddOutputFilterByType DEFLATE image/x-icon
  AddOutputFilterByType DEFLATE text/css
  AddOutputFilterByType DEFLATE text/html
  AddOutputFilterByType DEFLATE text/javascript
  AddOutputFilterByType DEFLATE text/plain
  AddOutputFilterByType DEFLATE text/xml

  # Remove browser bugs (only needed for really old browsers)
  BrowserMatch ^Mozilla/4 gzip-only-text/html
  BrowserMatch ^Mozilla/4.0[678] no-gzip
  BrowserMatch bMSIE !no-gzip !gzip-only-text/html
  Header append Vary User-Agent
</IfModule>
Add the above code to your .htaccess file to enable gzip on Apache.
Nginx Server
gzip on;
gzip_comp_level 2;
gzip_http_version 1.0;
gzip_proxied any;
gzip_min_length 1100;
gzip_buffers 16 8k;
gzip_types text/plain text/html text/css application/x-javascript text/xml application/xml application/xml+rss text/javascript;
gzip_disable "MSIE [1-6].(?!.*SV1)";
gzip_vary on;
Add the above code to your nginx.conf file to enable gzip on Nginx.
52 Improve WordPress Search
Searching is one of the most strenuous activity for your server. Think about it. When you open a single page on your website, your server knows precisely what information is needed to display the page. This reduces the time and the resources needed to find and fetch the information.
Compare this to search. When a search is performed, your server has to search your entire website for even the tiniest result. Also, the bigger your website becomes, the more resource-intensive your search activity becomes.
For eCommerce websites, this is even more critical. Not only do they have hundreds, or thousands of pages, but the search is the primary way users look for products.
It is ideal to optimize the search activity to reduce the load on your server and give your users a great experience. There are many ways to achieve that, and we are going to share two ways to do it. One is a freemium hosted service, while the other is an open-source solution.
Freemium Solution
We recommend that you use Algolia Search. It’s hosted search platform used by big businesses like Stripe, Birchbox, and more. It’s a freemium offering, and the free version should be sufficient for small and mid-sized websites. The paid plan starts at $35/month, which is affordable as well.

Setting up Algolia is straightforward, and you can follow this step by step guide to make it even easier.
Open Source Solution
For the open-source solution, we recommend that you use Elastic Search. It’s another wonderful solution to help power up your WordPress search.
53 Use MariaDB Instead of PostgreSQL
We discussed using a high performing serve in one of the sections above. Apart from the server, another critical component of a website is its database. If the database is slow, then all the optimizations that we do will not yield desired results.
WordPress natively supports many database systems including MySQL, MariaDB, and PostgreSQL.
It has been our experience that using MariaDB is the best choice with respects to performance, and we recommend that you use it too.
To move from your existing database solution to MariaDB, you’ll have to contact your hosting’s support team. They will the access required to make the necessary changes to your server environment.
54 Convert all MyISAM to InnoDB Tables in your Database
We discussed database systems briefly in a section above. Specifically, we asked you to use MariaDB instead of other solutions.
You might be surprised to know that even within a database system, there are multiple ways in which data is stored, organized, retrieved and updated.
If your website is a few years old, then the chances are that your database is also using an inefficient storage engine.
We recommend that you switch from the less efficient MyISAM storage engine and switch to the faster, more efficient, InnoDB engine.
If you are interested in the technical advantages of InnoDB, here they are:
- InnoDB supports row-level locking while MyISAM only has full table-level locking
- InnoDB supports referential integrity and fully supports foreign keys in an RDBMS fashion while MyISAM does not (DBMS).
- InnoDB has transaction support which allows you to make changes, commit those changes, and roll back those changes. MyISAM does not have that.
- InnoDB uses transactional logs for recovery while MyISAM does not. This makes InnoDB more reliable
There are many other differences, but let’s stick to these for now.
What you should do is to check if your WordPress database is using MyISAM or an even older storage engine, and then change it to InnoDB. Here are the steps to achieve that.
Head over to your cPanel and look for phpMyAdmin.
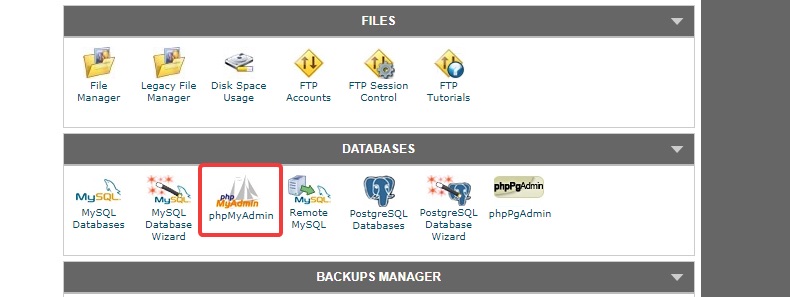
Once you are logged in, click the Databases tab.
Locate the database for your wp installation, and click it.
The details of the database will appear. You have to look for the ‘Type’ field in each row and make sure that its InnoDB.
In our case, all the tables are already InnoDB. If yours are not InnoDB, then click on the table’s name which does not have InnoDB. The table details will appear. Head over to the ‘Operations Tab.’
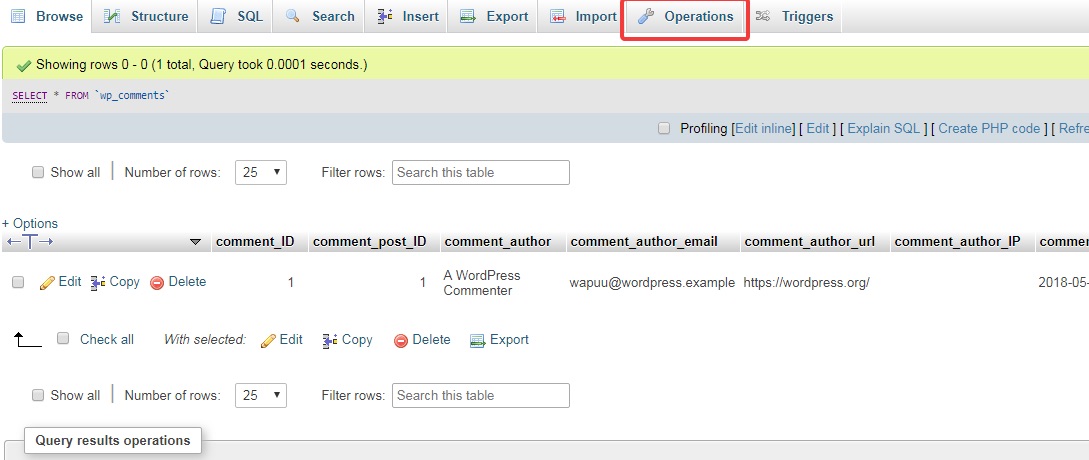
When the Operation page opens, look for the Storage Engine settings. Click on the drop-down menu, select InnoDB, and click Go.

You should see a confirmation message of the change.

55 Add a MySQL Index to WordPress wp_options Table
Over time, the wp_options table in your wp setup can become bloated. This process is accelerated if there are a lot of plugins that store session or transient data in the table. The bloatedness of the table starts to affect the performance of the database, and in turn your website. To optimize the performance of your website, it’s important to optimize the wp_options table.
There are a few ways to improve the performance, but the easiest way is to add an index to the table. This will be similar to an index in a book, which helps find information in a book faster.
By adding an index to the wp_options table, all the information in the table will be searchable faster, negating the adverse effect of the bloat in the table.
The first step is to find out if the index is already created. To do that, log into your PhpMyAdmin and run the following SQL query.
SHOW INDEX FROM wp_options;
If your result looks like the one below, then your wp_options table does not have an index set.
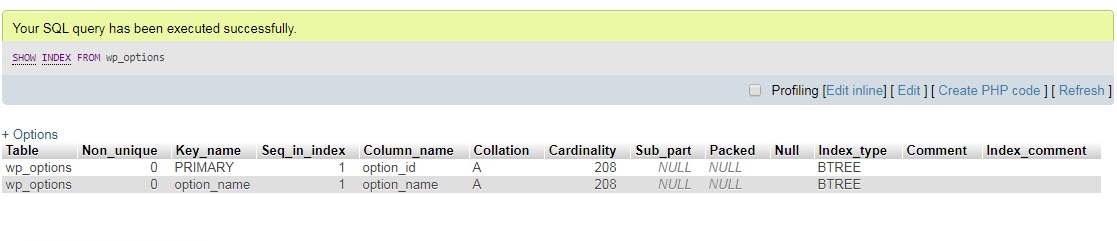
To add an index to the table, follow the steps in this tutorial.
56 Tuning Your MySQL Database
Just as your vehicle needs regular to run smoothly, your database also needs frequent tune-ups for optimal performance.
Unfortunately, giving any advice about tuning won’t be as useful as it is highly specific to your environment. We can, however, point you in the right direction and share a few resources with you which will help you tune your MySQL database.
Tuning Scripts
There are many scripts created by talented developers which will help you tune your database. One highly recommended and frequently updated script is available at MySqlTuner.com. Simply run the script on your server and let it do its magic.
An alternative script, which is also highly recommended is MySql Tuning Primer.
Resources
Here are a few resources that you can read up on and follow to tune your database.
- 101 Tips For MySQL tuning by Monitis
- 15 Performance Tuning Tips by TecMint
- Performance Tuning Docs by MySQL
We don’t need to tell you that you should only tweak your database if you know for sure what you are doing. Performing incorrect optimizations can have adverse effects on performance. When in doubt, contact a professional.
57 Configure Redis
Redis is a supercharged cache solution that can improve performance dramatically. It’s superior to Memcached, which is another popular caching solution.
When any page is loaded on your website, it triggers one or more database queries. Redis remembers these queries and caches them for future use. The result is a faster website which consumes fewer resources.
How you configure Redis will depend entirely on your server environment and how you decide to set it up. Therefore, any specific advice we give might be counter-productive. To avoid that, we recommend that you do your research and set up Redis for your website. Here are a couple of resources to get you started.
58 Use InstaClick
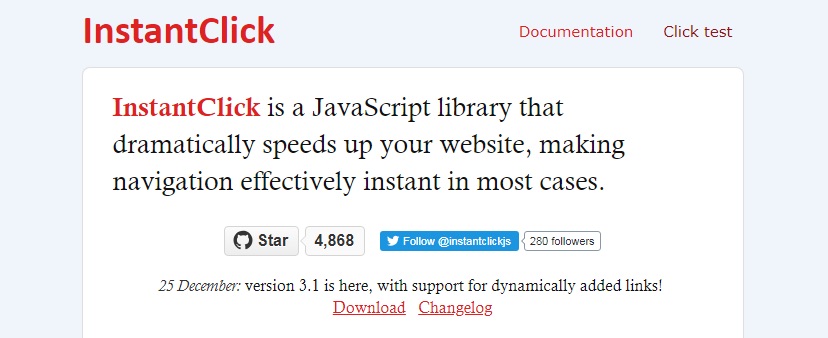
InstaClick is a Javascript library that drastically speeds up your website for your visitors by changing how the website is loaded.
Typically when a visitor clicks on a link on your website, the request is sent to the server, and then the page is loaded. InstaClick changes this by pre-loading pages in the background when the visitors hover over the link.
You might not realize this, but there is hundreds of milliseconds delay between the time a visitor hovers over a link and the user clicking the link. This is also true for mobile devices, and the delay might be even more there.
InstaClick uses this time to pre-load the page in the background. This gives the perception of a faster loading website.
Due to the nature of how this works, some pre-requisites need to be fulfilled before you can use them. You can find that information on the InstaClick website.
If your website is compatible and you wish to use InstaClick, then you can use the InstaClick WordPress Plugin.
59 Find Your Slowest Pages and Fix Them
If you want to optimize your website even further, then you can find the slowest pages on your website and fix them. You can find your slowest performing pages inside your Google Analytics account.
Navigate to Google Analytics > Behavior > Site Speed > Speed Suggestions.
Click the ‘Page Speed Suggestions’ to see the recommendations from Google. You can use any of the methods mentioned in this article to optimize the performance of the page. Here is a sample report.
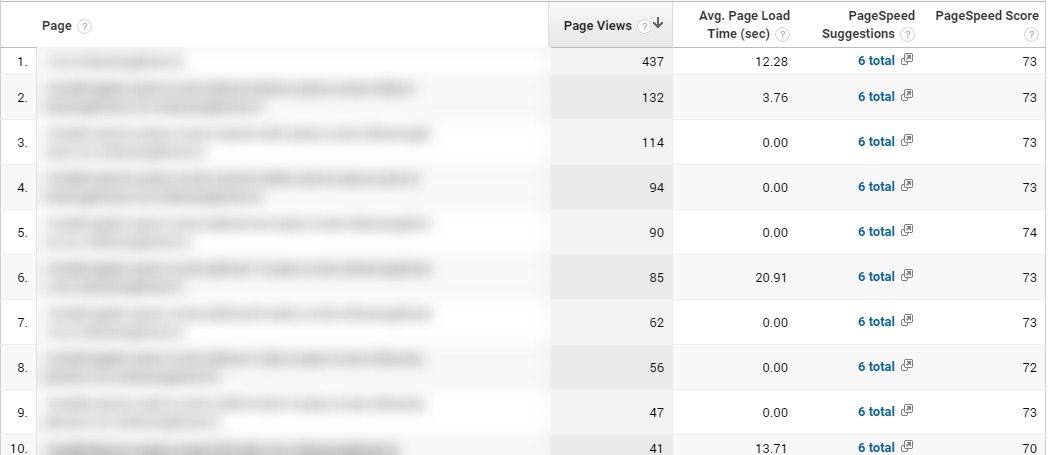
60 Find Bottlenecks by Deep-diving Into WordPress
If you want to squeeze even more performance out of your WordPress website, you can use the wp-cli package to find issues with your server and eliminate them.
Please be advised that installing and using this package is relatively technical and you should only attempt this if you believe that your website can still perform better even after all the other optimizations.
If you are interested in using this method, then follow this helpful guide.
Testing the Results of the Optimizations
After you’ve performed all these optimizations, it’s time to see the results. Head over to your favorite performance testing tool and test your website again. Here are our results.
Final Results on Google PageSpeed
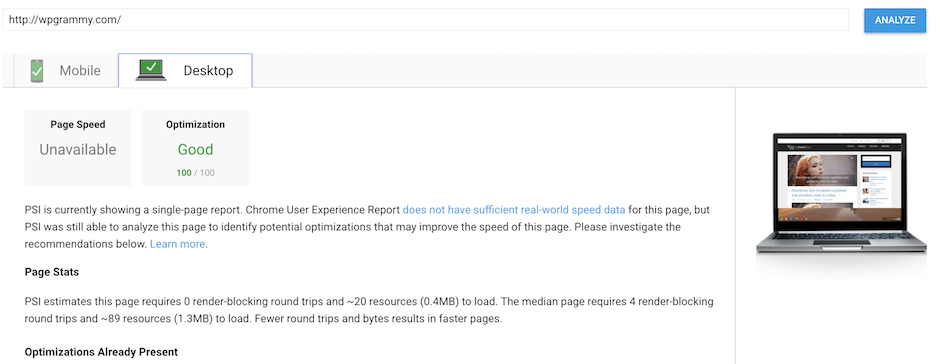
Final Results on Pingdom Tools
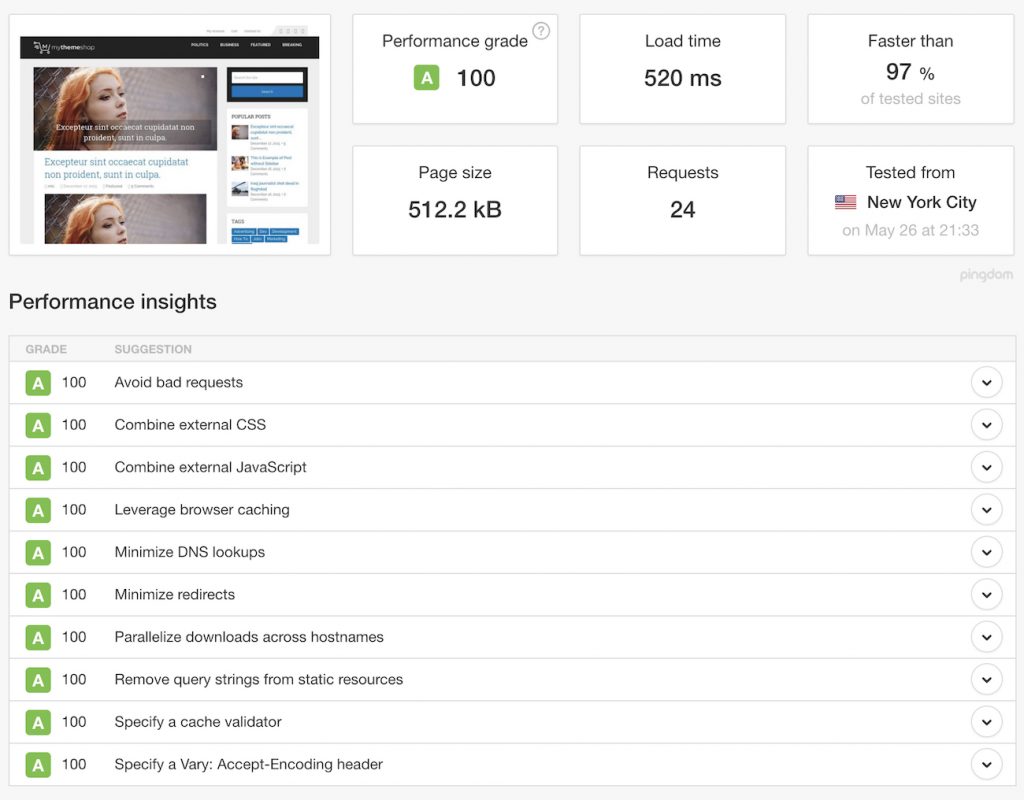
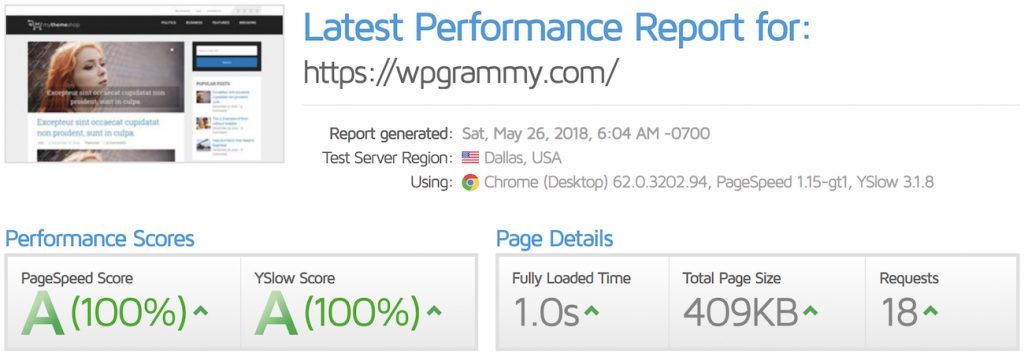
As you notice, not only has the load time of our website dropped dramatically, but we also achieved a 100/100 score on all the tools.
What results did your website achieve? Let us know in the comments below.
Conclusion: WordPress Speed Optimization
We hope you enjoyed this monster guide on improving your WordPress website’s speed and are receiving significant benefits from. Before we sign off, there are two things we would like to remind you.
First, optimization is a continuous process. You might hit a 100 score today, but after a while, the performance of your website might start falling back again. It’s important to keep a regular check on your website’s performance to pre-emptively identify issues and resolve them before they adversely affect performance.
Second, you can’t fix bad products. No matter how many optimizations you perform, if you are using a poor host, a poorly coded theme, or poorly coded plugins, your website will fall short of its maximum performance. You don’t even have to have all bad products, but because of how performance works, it all depends on the weakest link. A single lousy product on your website can put all your optimization efforts in vain. That is why it is critical that you choose high performing products. With MyThemeShop, you’re in good hands.
After you’ve performed these optimizations, we want to hear from you. We want to know which of these optimizations performed the best for you, and which did not perform as expected. We’ll be happy to see that the website is performing better. As always, if you have any questions, then feel free to leave them in the comments, and we’ll answer all of them.