You might have heard that making a membership website with WordPress is a great way to monetize your website or make money. But, do you know what a membership site is?
The obvious example in the real world is a club that offers a membership. It could be a health club, a sports club, even a cigar club.
If you think about it, you are surrounded by examples of memberships based businesses.
- Gyms are membership clubs
- Yoga classes are membership clubs
- Nightclubs are membership clubs
- Colleges are membership clubs
All the examples above are of offline membership-based businesses.
The digital world also has its fair share of membership clubs. We can guarantee that you are part of one of these clubs, even if you don’t realize it.
Let us ask you this. Have you ever shopped on Amazon.com? Can you tell us what Amazon Prime is? It’s Amazon’s monthly membership that gives you access to priority shipping and on-demand video streaming.
Have you ever watched a video on YouTube? Can you tell us what YouTube Red is? It’s a monthly membership that gives you access to premium content on YouTube.
Have you heard of Lynda.com? It’s a membership-based online course marketplace where you can find online courses about hundreds of different topics.
Have you ever read an article on Copyblogger? It’s a website that offers free content for copywriters while selling memberships for its premium training.
We at MyThemeShop sell WordPress Themes Basic working of S2 Member/Membership Websites in General and Plugins. But we also have a membership plan where we offer all our products for a low, yearly fee.
To summarize, membership is something people pay to get access. What they get access to depends on the type of membership. Usually, people join memberships to get four types of access.
- Goods (product or service)
- People
- Knowledge
- Status
Table Of Contents
- 1. What Type of Membership Site Should You Start?
- 2. Benefits of Creating A Membership site
- 3. Setting up a membership site with WordPress
- 4. Our Choice For Creating A Membership Website
- 5. Basic working of S2 Member/Membership Websites in General
- 6. Prerequisites – Before We Begin
- 7. Using S2member
- 8. Setting up S2 Member
- 9. Setting Up Payment Options in S2 Member
- 10. Setting Up Payment Buttons
- 11. Restriction Options
- 12. Download Options
- 13. API Options
- 14. Technical Setup Completed
- 15. Acquiring Customers For Your Membership Site
- 16. Conclusion
1 What Type of Membership Site Should You Start?
If you are considering starting a membership site, you have to decide which of the four types of access you can give to your potential customers.
- Are you a skilled artist who can make beautiful graphics?
- Choose Goods
- Are you well known in your field and believe people will pay to listen to your experience?
- Choose People
- Can you package your knowledge into digital content which people will pay to access?
- Choose Knowledge
- Can you provide exclusive access to people/knowledge/goods that people will pay for?
- Choose Status
You don’t have to select just one of the above to create a membership site. Depending on your strengths, you can choose two or more types of accesses to offer to your customers.
You know your strengths best. Choose the type of membership site that plays to your strengths.
2 Benefits of Creating A Membership site
There are plenty of benefits of running a membership site. They can be one of the most lucrative forms of online business for many reasons. We will list some of the benefits below.
- Consistent Revenue: Membership sites can generate a predictable income for you. Once you have attracted an initial base of users, you can predict how much revenue you will generate pretty accurately.
- No selling physical products: Physical products can be lucrative to sell, but they come with their own set of challenges like order management, inventory, shipping, and many more. Membership websites don’t have these challenges.
- Easy to start: A membership website is much easier to start than a regular business
- Revenue can build quickly: Even a small number of users can fetch you good revenue. If only 100 people pay $10 a month to access your site, you can generate a revenue of $1000 a month.
- Organic Growth: A good membership site will spread and grow organically. A good percentage of new users will come from referrals from your existing members.
- No reliance on SEO: If you have had sites in the past that relied on SEO for income, you know what we are talking about. Membership sites can surely benefit from SEO, but they don’t completely rely on them.
3 Setting up a membership site with WordPress
Setting up a membership site with WordPress is easy. If this is the very first website you are creating, you might find it challenging. That’s ok. Doing anything for the first time feels challenging. Just remember how tough it was to drive a car for the first time.
Even if you don’t have much experience, you will still be able to set up a membership site if you follow our instructions.
The easiest way to handle the technical aspects of a membership website is to use a plugin designed specifically for this purpose.
There are plenty of plugins available to create membership sites, and comparing them all would be out of scope for this article. However, a list of the popular ones is below.
4 Our Choice For Creating A Membership Website
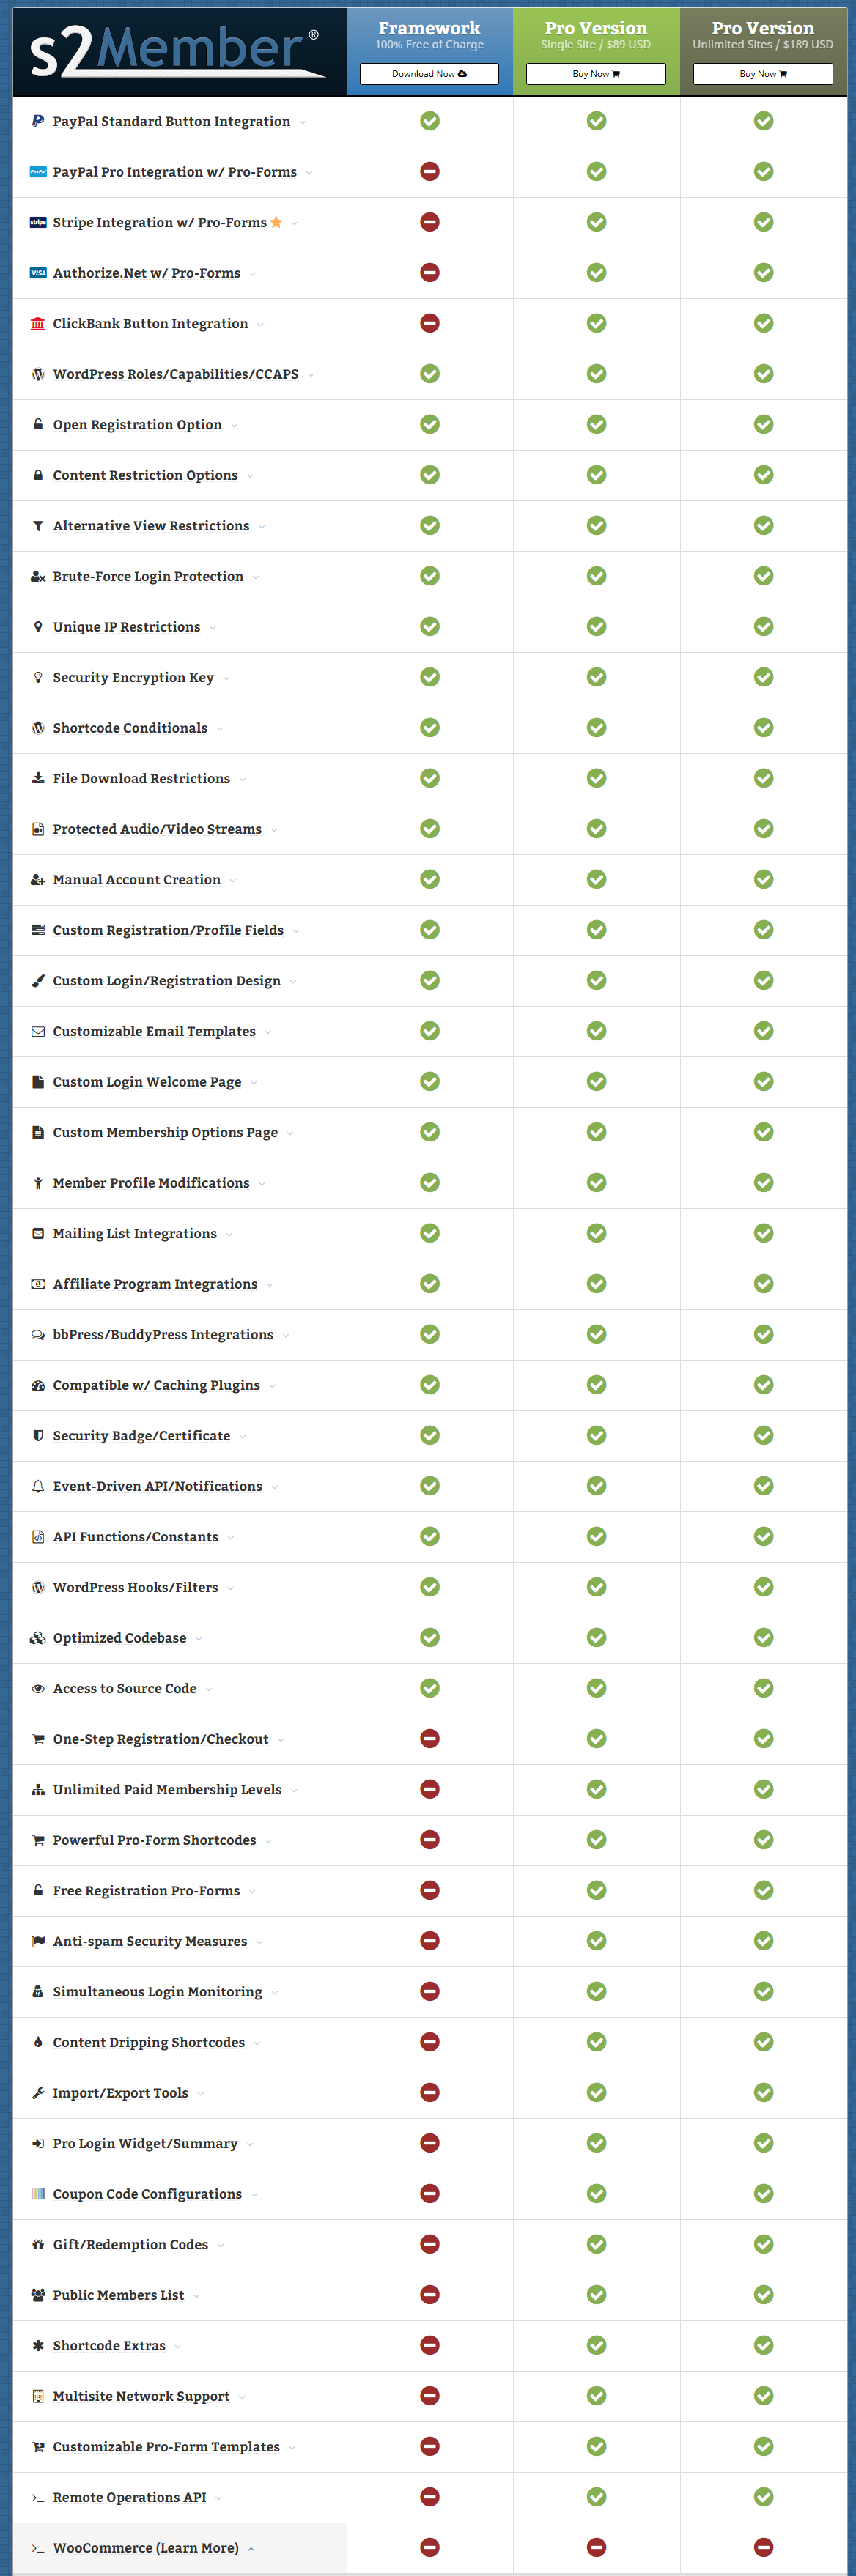
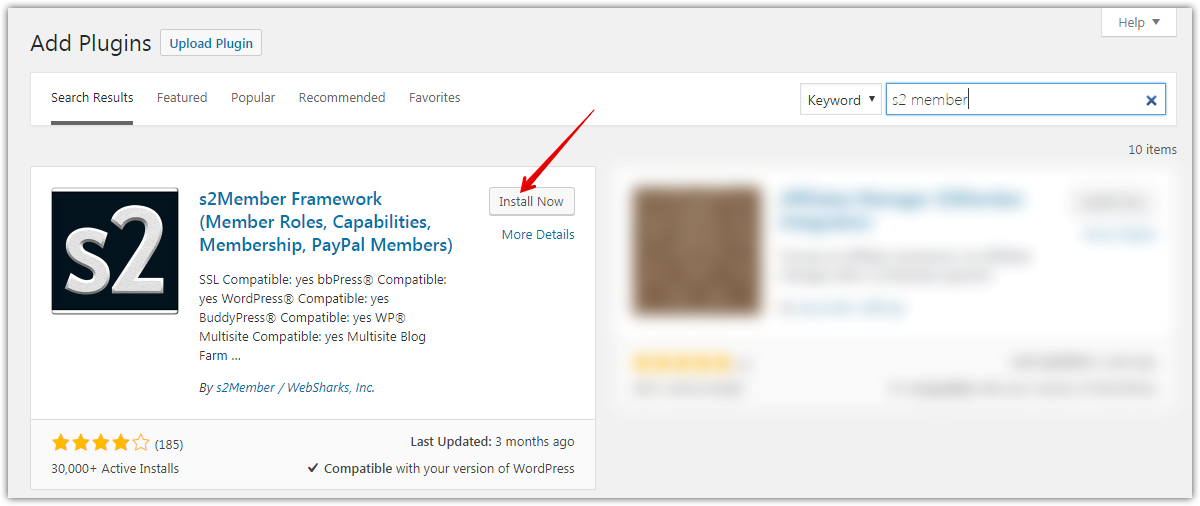
We recommend that you start with the S2 Member plugin. It’s available in the WordPress repository, and can also be downloaded from their website.
They have a free version and a premium version as well, but the free version is good enough when starting out. A detailed comparison of the free and premium version is below (taken from their website).
The free version also supports PayPal, Stripe, ClickBank, Authorize.net, and even Bitcoin to accept payments.
5 Basic working of S2 Member/Membership Websites in General
If you don’t know how membership websites work or make money, we will give you a brief understanding.
On a membership website, you have some content that is available only to paying members. You might give away some content to non-members to persuade them to purchase the membership.
If a user wants to access the full content, they have to become a member by paying the membership fee.
The fee and the tenure of the membership are decided by you. Once they pay, they can access the content till their membership expires. Customers will also renew their membership to have continued access to the content.
6 Prerequisites – Before We Begin
Before we start diving into the details of how S2 Member works, it’s important that you understand a few things.
- You will need a basic understanding of WordPress: We have tried to keep this article as beginner friendly as possible, but we do recommend that you understand and are comfortable with using WordPress. Otherwise, the level of detail in this article will be too much to understand.
- There are a lot of technical details in this article: Some of the details mentioned in this article may seem unnecessary, and you might be right. But we have included them to provide context. Maybe when you launch your first membership website, you won’t use all the specifics we mention, but just by knowing all the options you have to manage and restrict content on your website, you can develop better ways of growing your membership website.
7 Using S2member
Before installing S2 Member, you have to create two pages in WordPress.
- Subscribe Page: This page is where you will display all the subscription options
- Members Page: This is the first page that the members will see
If you are unfamiliar with how to create pages, here is how you do it.
Inside your WordPress admin, navigate to Pages -> Add New.
In the title, write ‘Subscribe’ without the quotes, and hit publish.
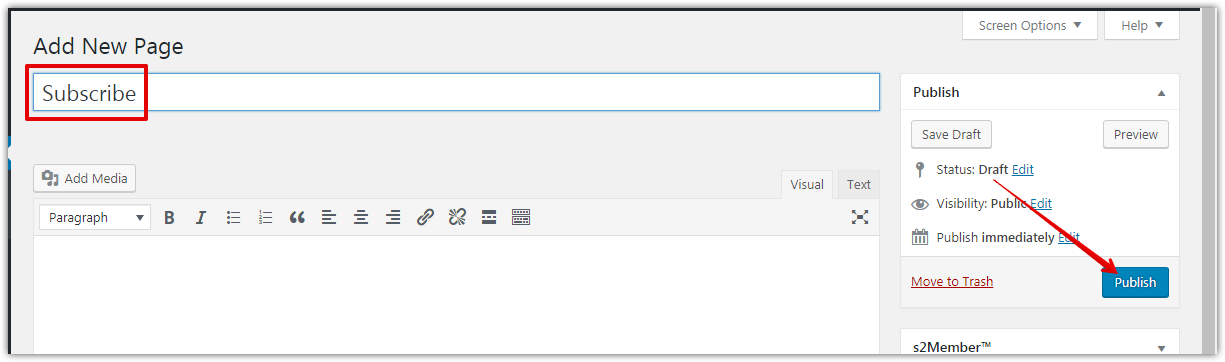
Repeat the same process for the ‘Members’ page. To confirm, visit the All Pages section in the WordPress admin and see if both the pages show up.

Now we will setup S2 Member by installing the plugin. You can download and install it from the WordPress repository or their website after creating an account.
Activate the plugin and head to its settings.
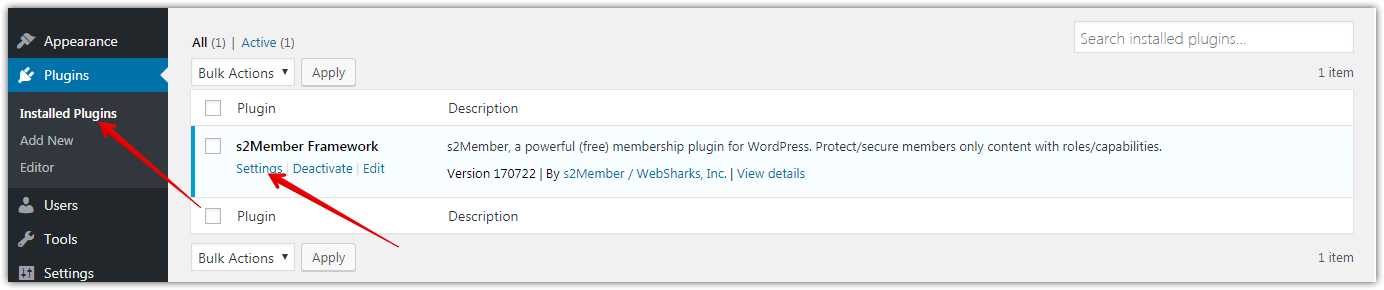
You will see a screen with a lot of options. Do not be worried; it’s not as hard as it looks. We will go through each of the settings in detail.
8 Setting up S2 Member
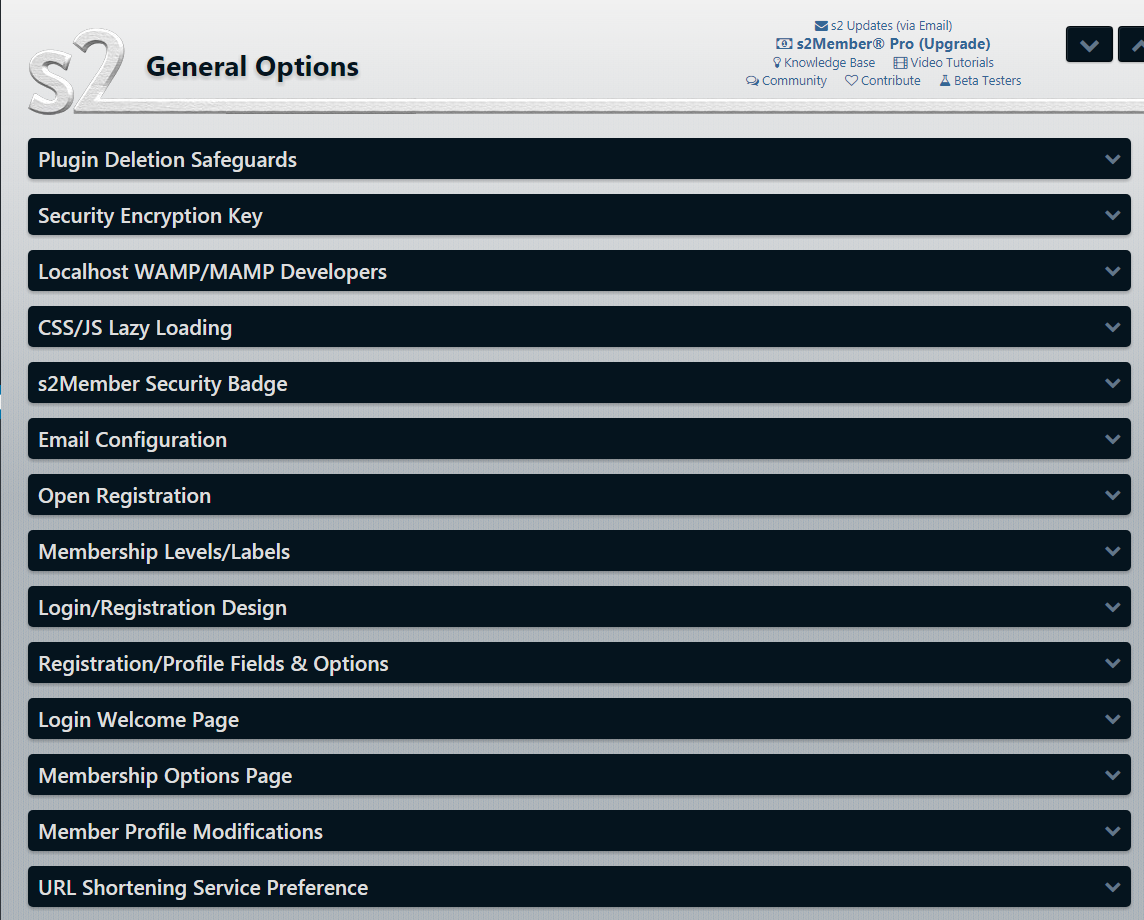
s2 General Options
- 1. Plugin Deletion Safeguards
- 2. Security Encryption Key
- 3. Localhost WAMP/MAMP Install
- 4. CSS/JS Lazy Loading
- 5. s2Member Security Badge
- 6. Email Configuration
- 7. Open Registration
- 8. Membership Levels
- 9. Login/Registration Design
- 10. Registration/Profile Fields and Options
- 11. Login Welcome Page
- 12. Membership Options Page
- 13. Member Profile Modifications
- 14. URL Shortening Service
8.1 Plugin Deletion Safeguards
This option retains the settings and configurations of S2 Member if you decide to delete it for some reason.
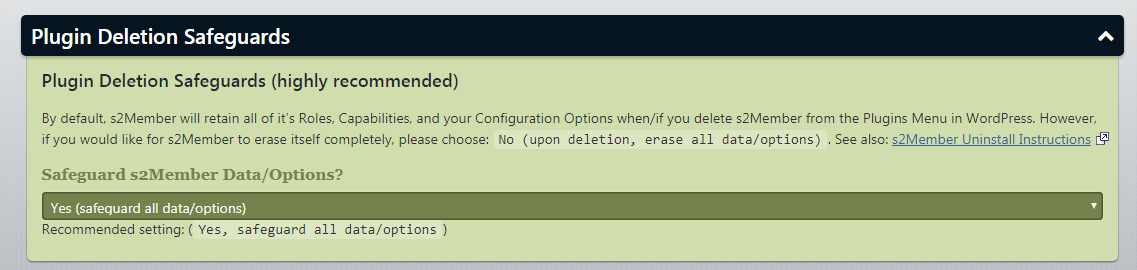
Recommended Setting: Yes (safeguard all data/options)
8.2 Security Encryption Key
This feature creates a secure encryption key, using which your website’s critical data is encrypted. This step is optional but highly recommended.
Since S2 member is free and open source, anyone can try to reverse engineer it and find vulnerabilities in its security. This could compromise your site if any security issues are found in S2 Member.
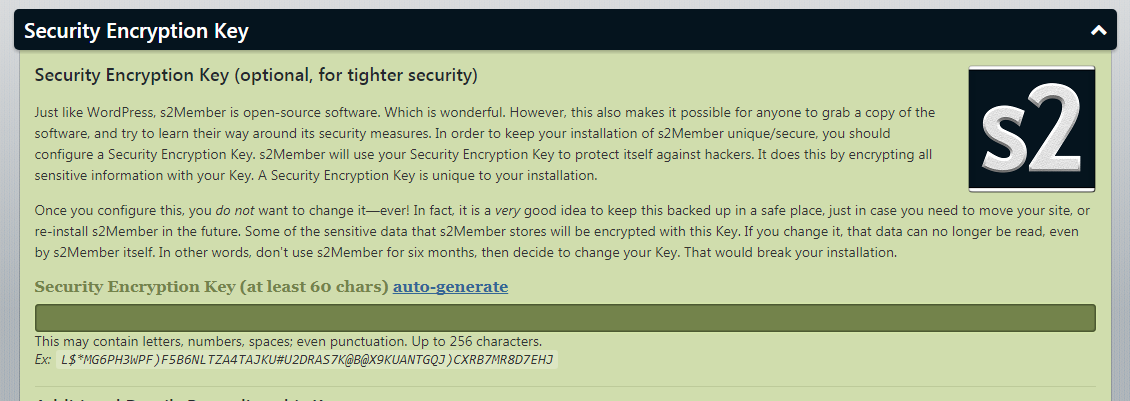
Generating this key encrypts some of your data and prevents hackers to gain access to your site.
If you decide to use this feature, you can auto-generate the key. Once generated, save the key in a safe place.
Important: The security key is like your house key, but without a spare. If you lose it, you will lose some of the data on your website, and the internal configurations of S2 Member could also get corrupted. It is critical to have the key stored in a safe and secure place.
8.3 Localhost WAMP/MAMP Install
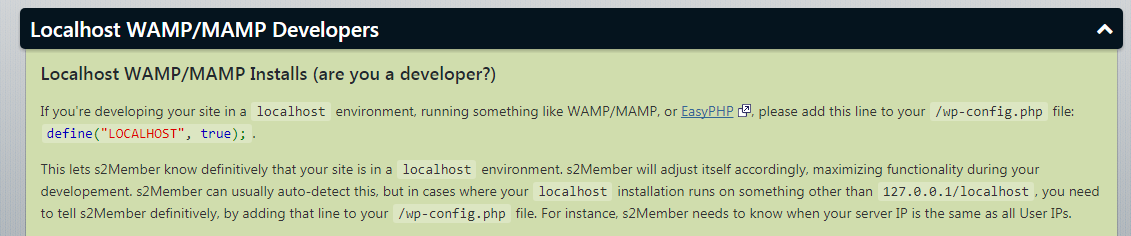
If you are testing S2 Member on a local WordPress Install (learn how to do it here), you should add the following line to your /wp-config.php file.
define("LOCALHOST",true)
If you are using S2 Member on a live website, you can ignore this.
8.4 CSS/JS Lazy Loading
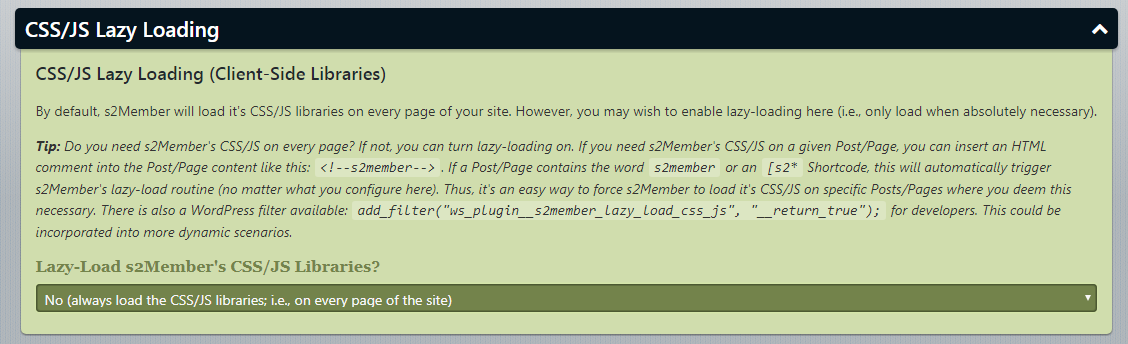
Unless you experience speed issues on your website, leave it at its default setting.
8.5 s2Member Security Badge
![]()
This setting is also optional. Enabling this displays a security badge for your website.
8.6 Email Configuration
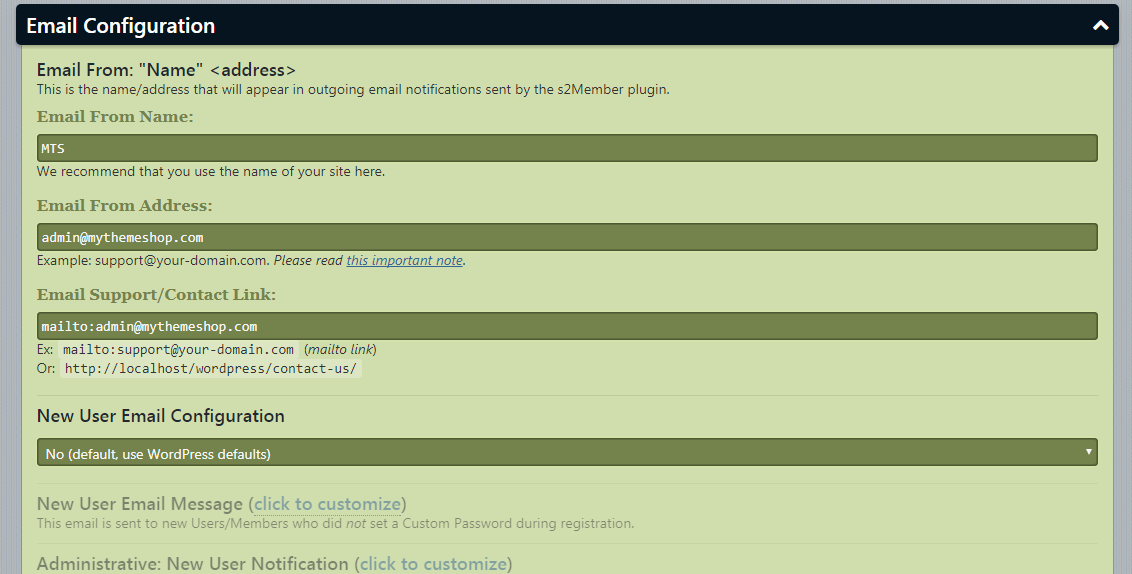
This is an important step. Here you configure the email addresses your users will receive emails from. Here is how you would configure it.
- Email From Name: The name your users will see in the email
- Email From Address: The email will be sent from this address. If you already have SMTP setup inside WordPress, set this field to the same email you have set up in SMTP, otherwise outgoing emails could fail to send
- Email Support/Contact Link: Enter the email to use for support emails
- New User Email Configuration: If you don’t want to send the default WordPress emails to each new person who registers, you can customize those emails. The emails to users, as well as to the administrators, both are customizable.
8.7 Open Registration
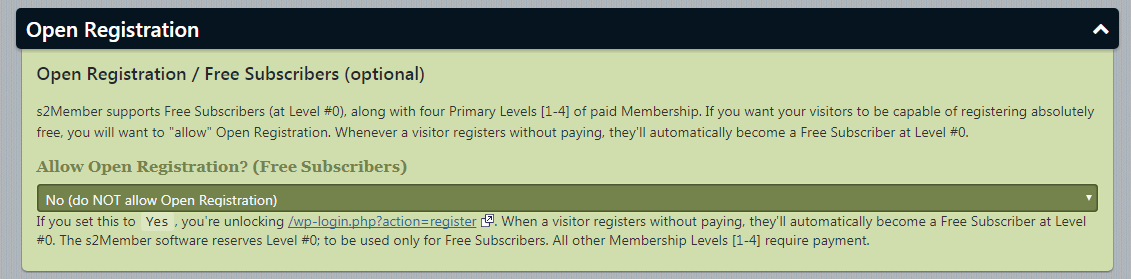
If you create a free level of membership, you can enable this setting. When enabled, all new users who register will automatically become a Level 0 subscriber. S2 Member reserves the Level 0 for free subscribers.
8.8 Membership Levels
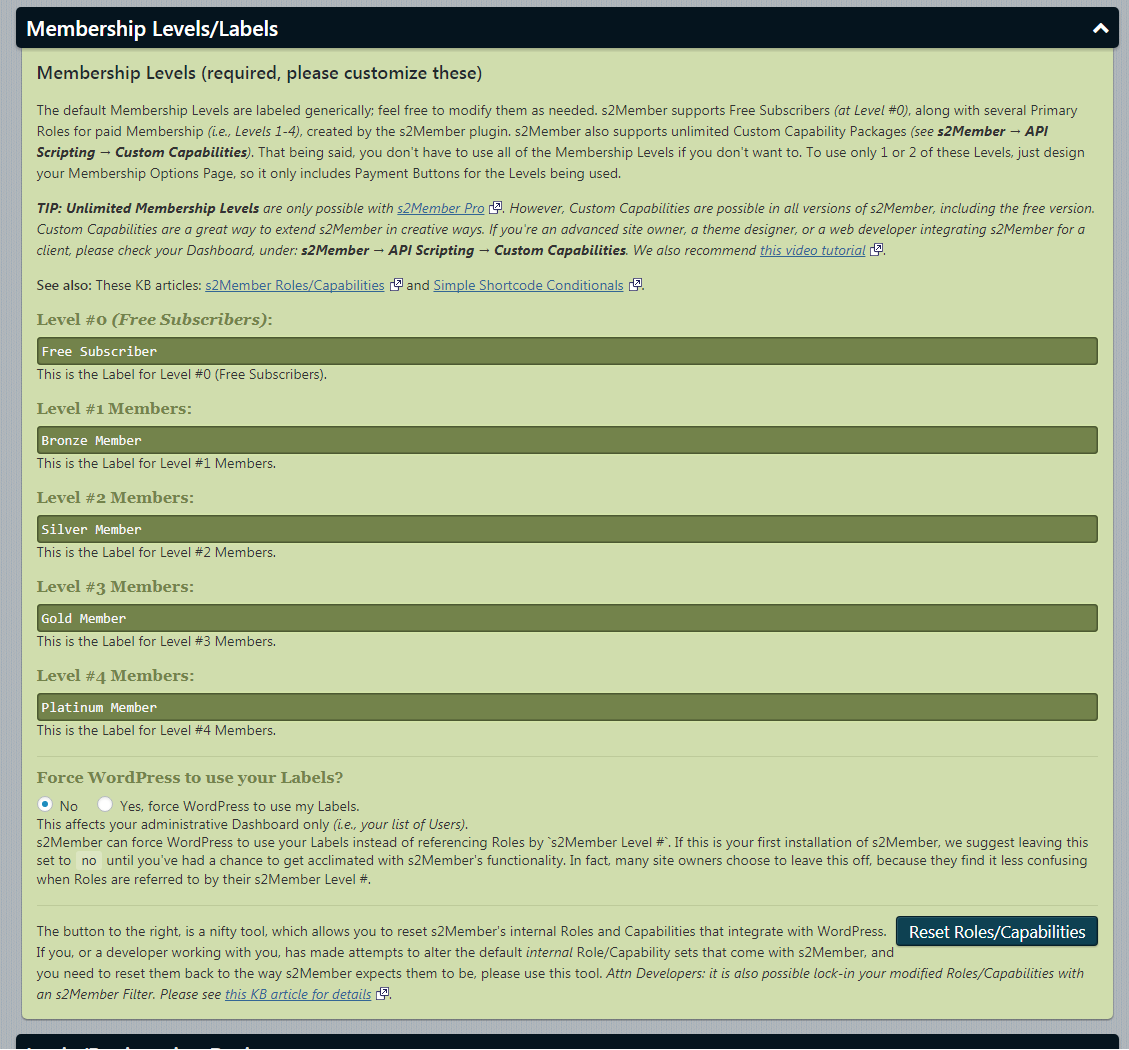
In the free version of S2 Member, there are five built-in membership levels.
- Level 0: Defaults as Free Member
- Level 1: Defaults as Bronze Member
- Level 2: Defaults as Silver Member
- Level 3: Defaults as Gold Member
- Level 4: Defaults as Platinum Member
In this section, you can customize the labels (bronze, silver, etc.) that your membership levels get. You can use the default ones as well.
You don’t have to use all the membership levels. Depending on your website, you might use only a few. When setting up payment, we will set up payment for only the levels that we require, and the rest will automatically not be used.
More membership levels are also supported in the premium version of S2 Member. The free version can also be extended to have more levels, but that is not recommended for beginners.
8.9 Login/Registration Design
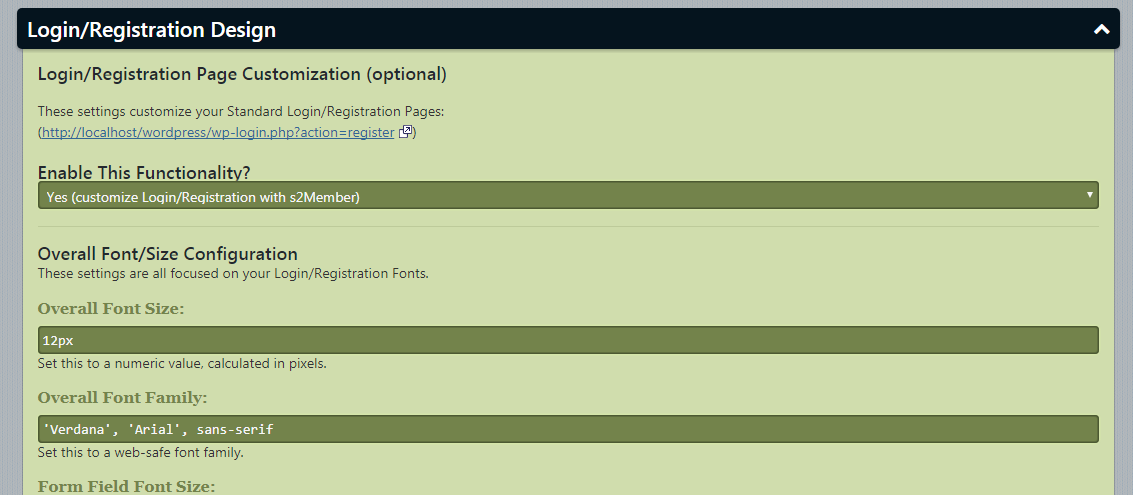
S2 Member uses the default WordPress registration page for registering new users. Using this setting, you can customize the page to your liking.
Once enabled, you can choose different fonts, font styles, customize logos, icons, and much more.
If you do not like the default Login URL, you can create a custom WordPress login URL as well so it is easy for your users to remember the URL where they can log in.
8.10 Registration/Profile Fields and Options
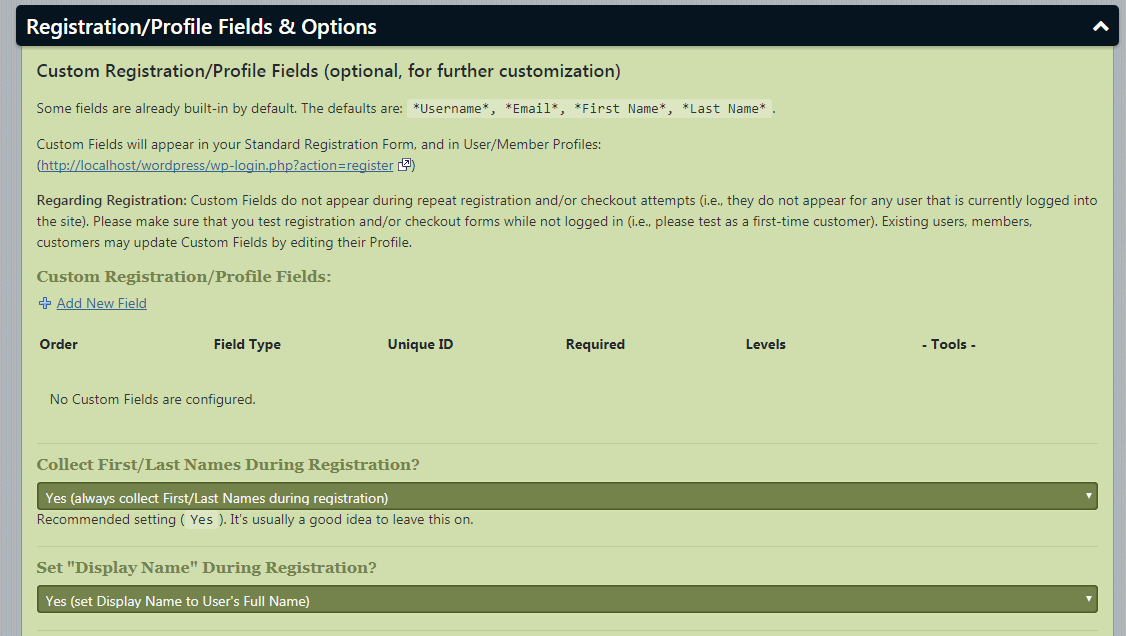
By default, S2 Member only captures the username, email, first name, and the last name of each member who registers.
In this section, you can add more fields that you would like new members to fill in. You can set some fields as required and also disable editing of some fields after registration.
There are some basic security settings in this section as well, but you can leave them at default values.
8.11 Login Welcome Page
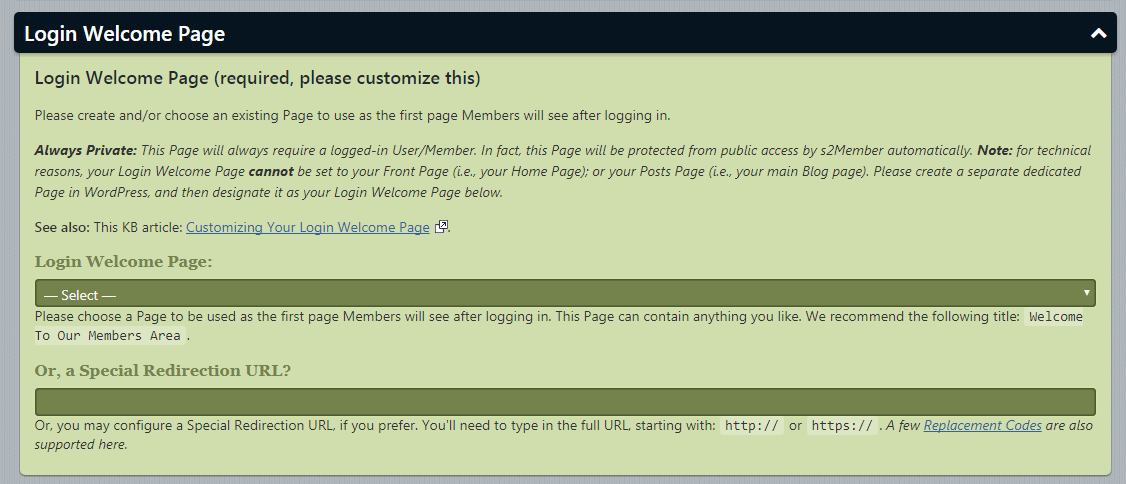
Here we will set up the page which new members will first see. We will select the ‘Members’ page that we created before we started setting up S2 Member.
8.12 Membership Options Page
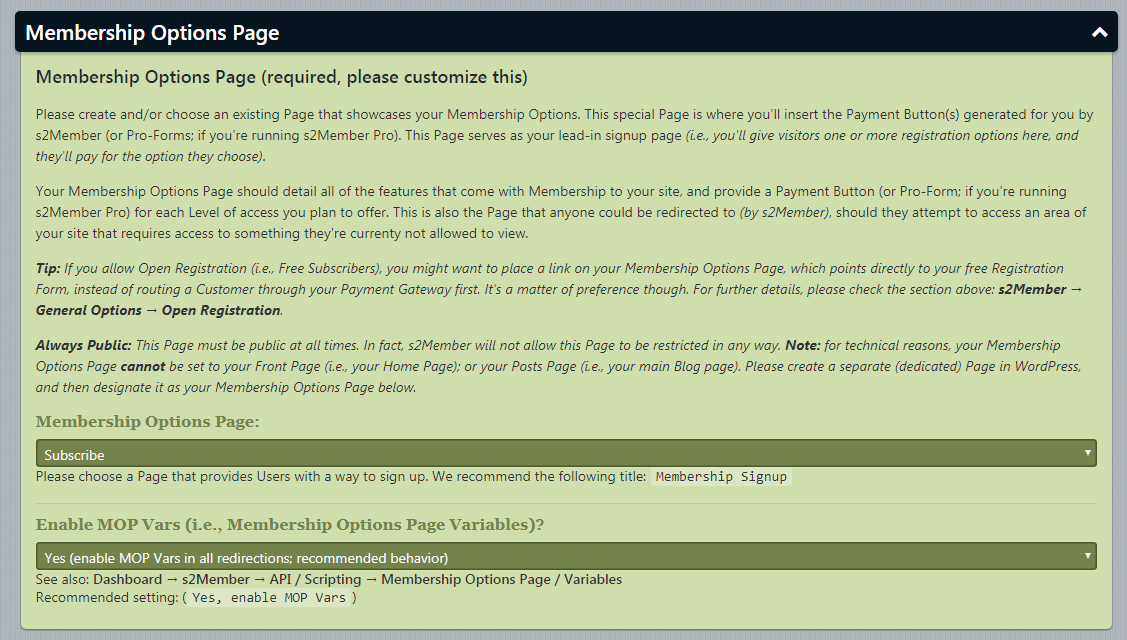
This is where we set up the membership levels that users can purchase. Here we will choose the ‘Subscribe’ page that we created.
8.13 Member Profile Modifications
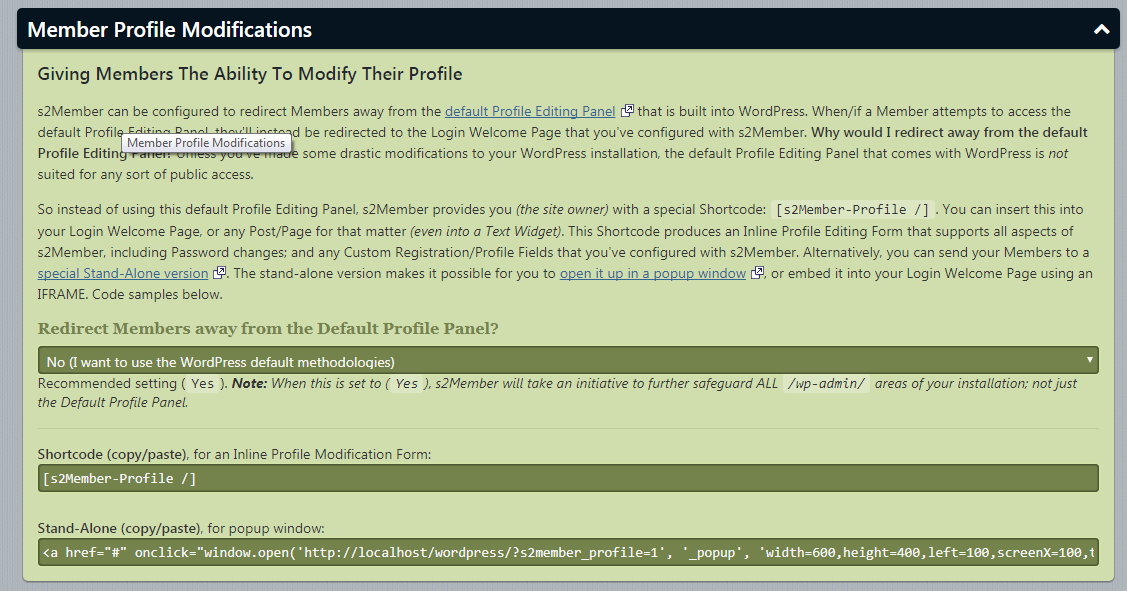
S2 Member, by default, uses the WordPress profile page to allow users to edit their profiles. It’s not recommended, and even S2 Member says you should change this behavior.
In this setting, we disable the use of the default WordPress profile page. Users will still be able to change their profile though.
S2 member creates a shortcode [s2Member-Profile]. Insert this shortcode in any page (ideally the member page), or even in a widget to enable users to edit their profile.
Recommended Setting: Yes (Redirect to Login Welcome Page; locking all /wp-admin/ areas)
8.14 URL Shortening Service
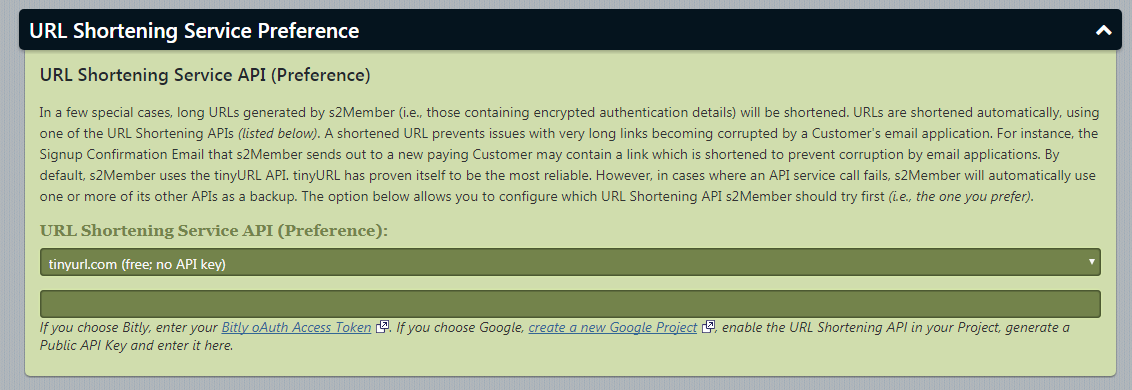
S2 Member shortens certain URLs to make it easy to use and prevent errors. For example, signup emails contain authentication keys that can cause issues. S2 member shortens those URLs to avoid this.
S2 Member is designed to use multiple URL shorteners. If the primary one fails, one of the others is used as a backup. Here you choose the primary service that S2 Member will use.
After completing this configuration hit the “Save all changes” button.
9 Setting Up Payment Options in S2 Member
Right now we have set up the general settings in S2 Member, but we still haven’t set up how users will pay. Now we will setup PayPal to allow users to purchase memberships to your site.
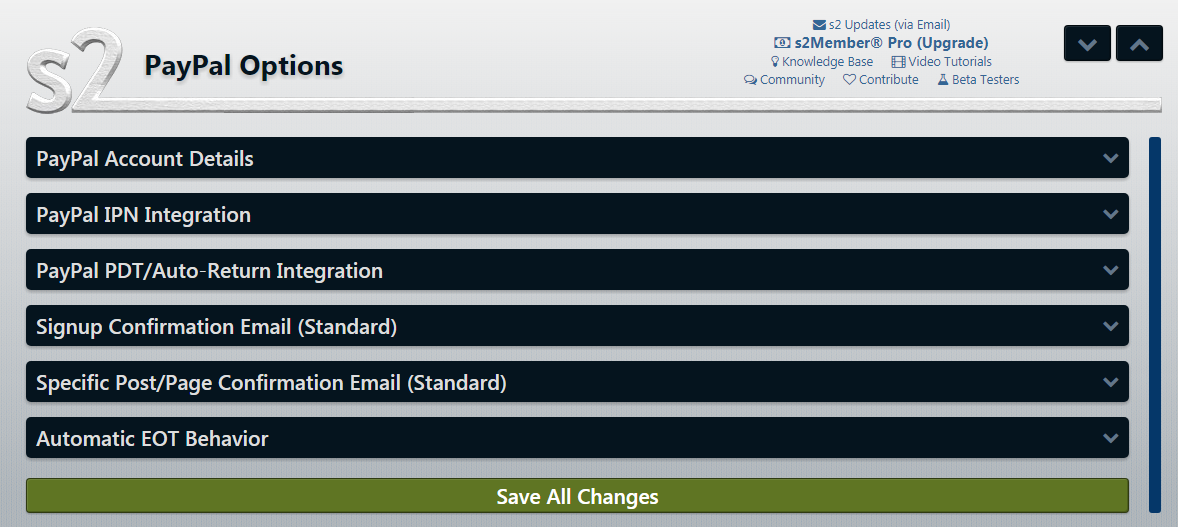
Head over to “Paypal Options” in the S2 Member settings.
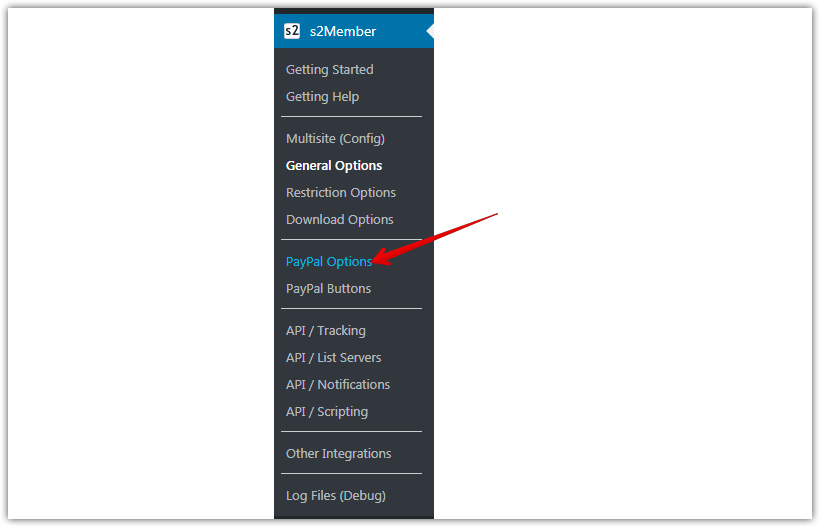
You will be presented with six different options. We will set up each of them quickly.
Please note that you will need a PayPal Business Account to accept payments. If you have a regular PayPal account, you can upgrade to a business account from your regular PayPal account easily.
Once upgraded, we can configure the PayPal settings.
9.1 PayPal Account Details
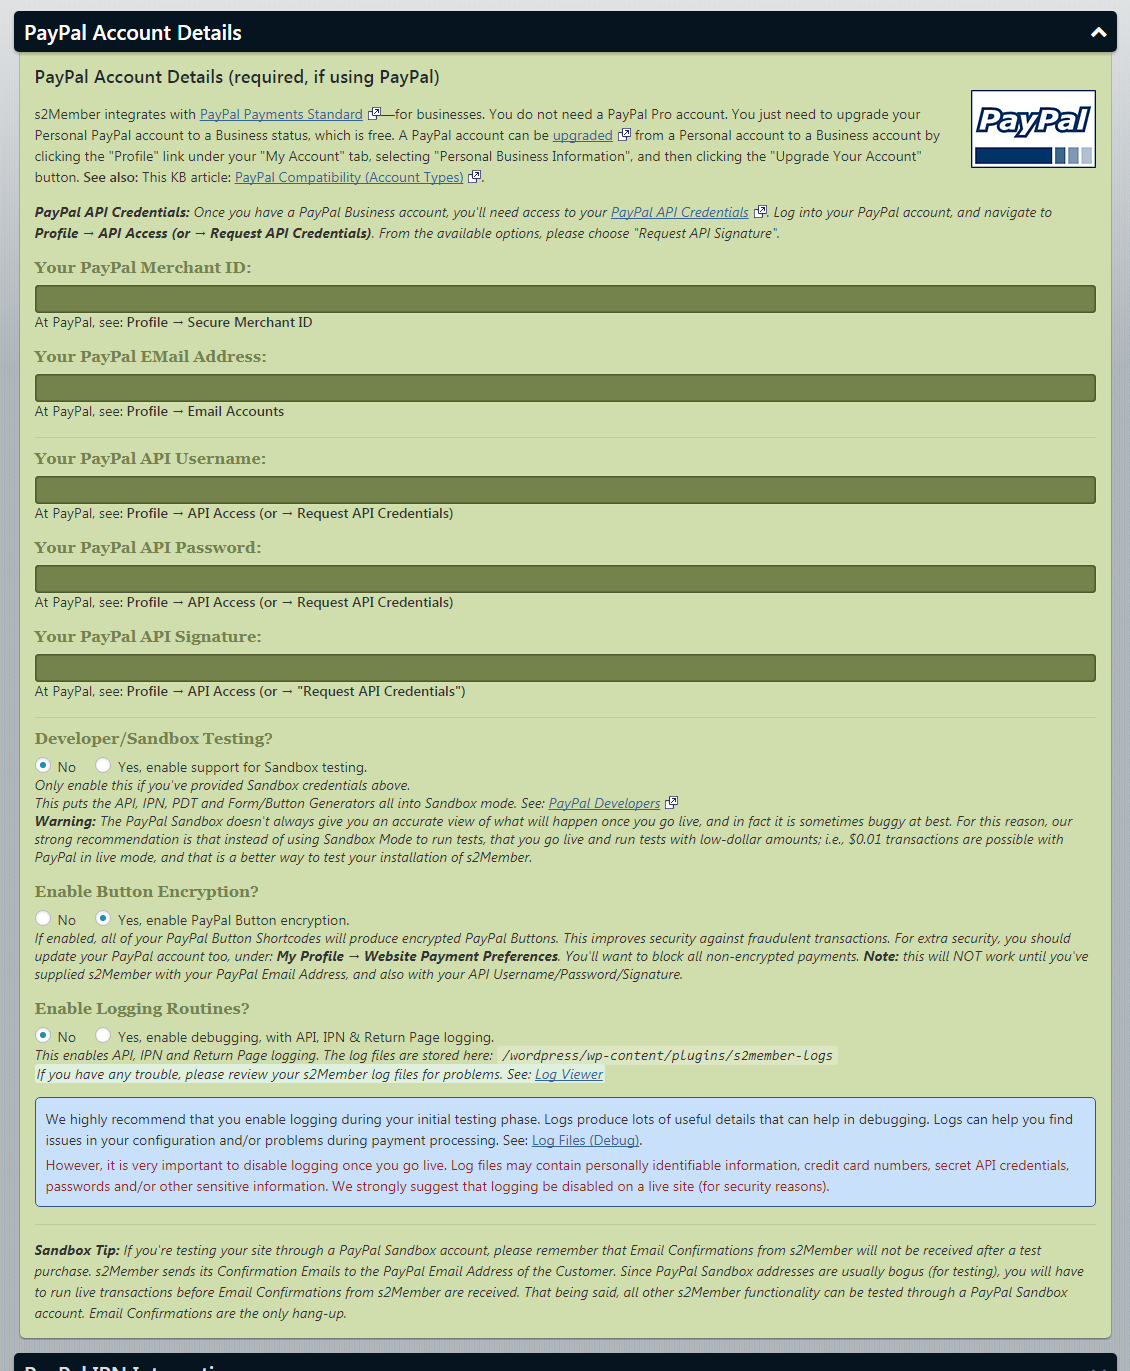
You will need to provide the following details to set up your PayPal account with S2 Member. All this information is present in your PayPal account. Refer to the list below to find the individual setting.
- PayPal Merchant ID: PayPal Profile -> Secure Merchant ID
- PayPal Email Address: PayPal Profile -> Email Accounts
- PayPal API Username: PayPal Profile -> API Access
- PayPal API Password: PayPal Profile -> API Access
- PayPal API Signature: PayPal Profile -> API Access
Developer/Sandbox Testing
If you just want to test out the PayPal integration with S2 Member, you can enable this setting. Make sure that you input the sandbox credentials in the settings above.
Also remember, that you will not receive transaction confirmation emails if you are in sandbox mode. To test the emails, use the live mode and do test transactions with a small amount of money ($0.01 is supported).
Enable Button Encryption
Keep this enabled. This helps prevent fraudulent transactions.
Enable Logging Routines
This will enable logging and debug mode. Enable this only if you are facing issues with your setup. Do not enable this on a live website as it logs may contain sensitive data.
9.2 PayPal IPN Integration
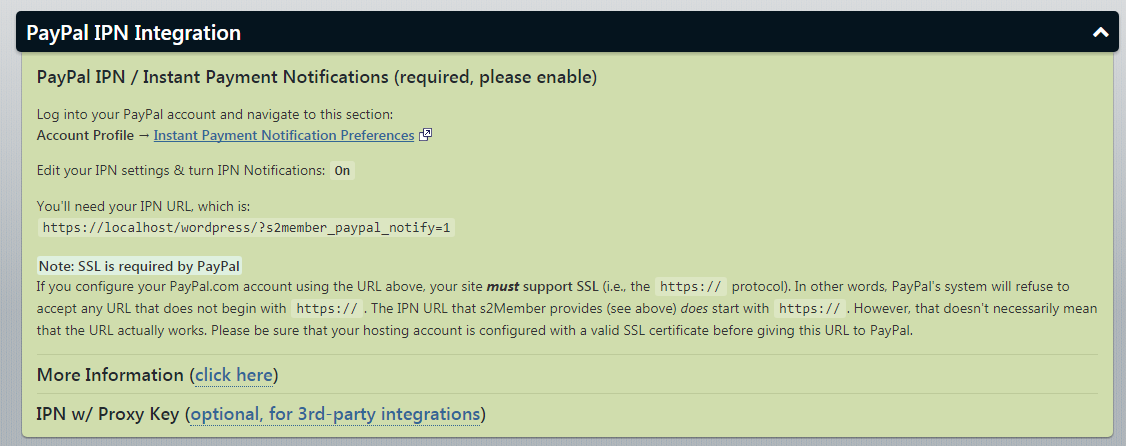
PayPal IPN is an instant notification service by PayPal. When enabled, PayPal will send payment confirmations immediately. This is required so you can provide access to your members as soon as they make a payment.
You need to enable IPN from your PayPal account. An SSL certificate is also required to use IPN.
When PayPal asks, you need to enter your IPN URL which will be “https://yoursite.com/?s2member_paypal_notify=1”. Replace “yoursite.com” with your URL. Notice that the URL starts with https, as SSL is required.
9.3 PayPal PDT/Auto-Return Integration
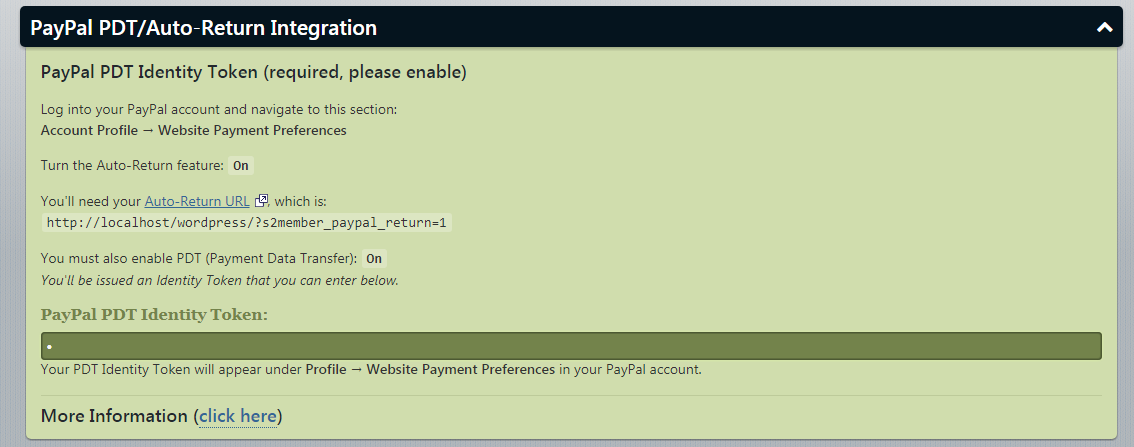
This is a similar service to IPN. S2 Member requires this to be enabled as well. Login to your PayPal account and visit Account Profile -> Website Payment Preferences. From there enable the ‘Auto Return’ feature. Copy the PayPal PDT Identity Token and paste it in the respective field.
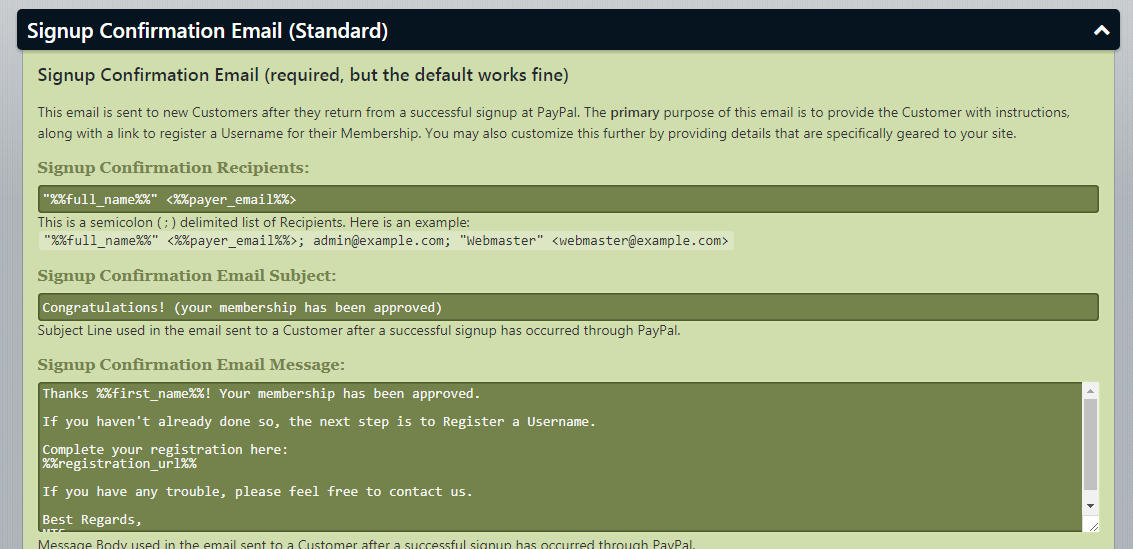
9.4 Signup Confirmation Email (Standard)
In this section, you can customize the email that is sent out to users who sign up for a membership. The default configuration works but you should customize and make it more personal.
9.5 Specific Post/Page Confirmation Email (Standard)
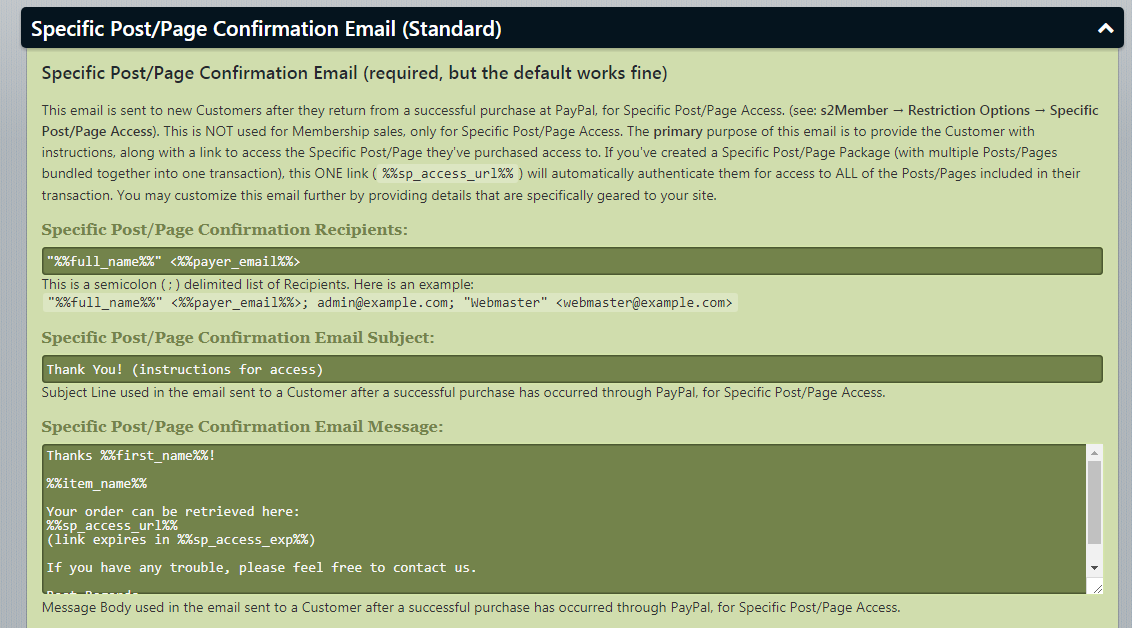
S2 Member has the functionality to restrict content to an individual post or page. Users will only be able to access the restricted page upon payment.
This section helps customize the email that is sent to users when they pay to access to a single page.
9.6 Automatic EOT Behavior
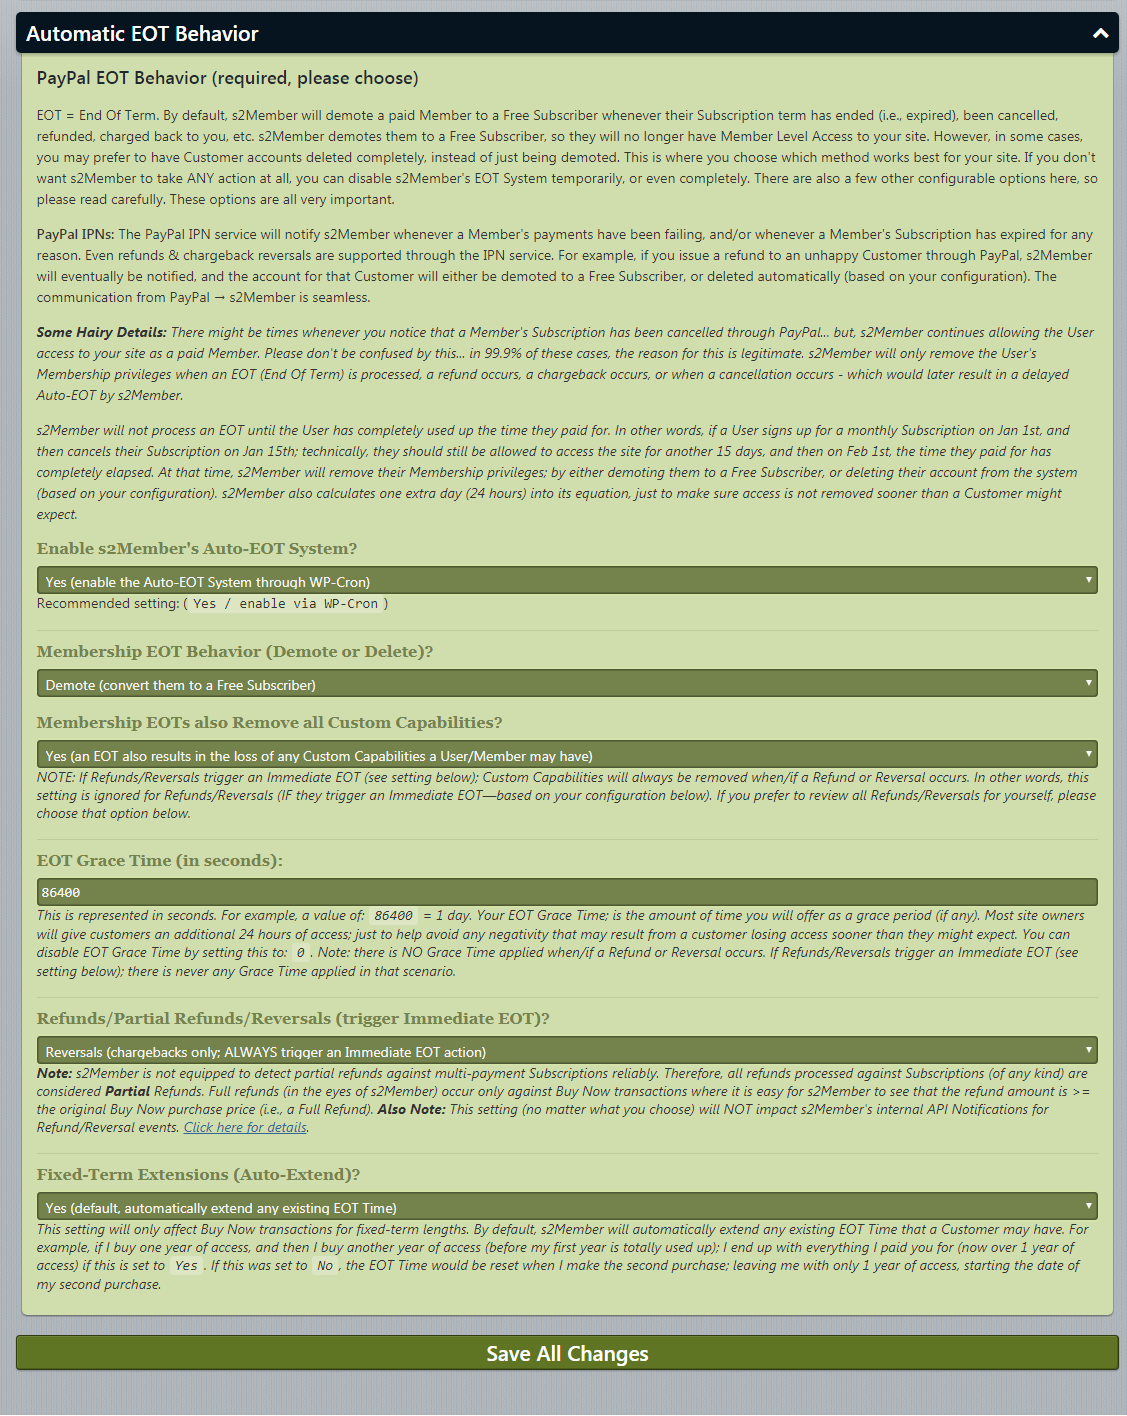
S2 Member has a security feature that restricts a user’s membership immediately if they issue a chargeback, start a dispute, or initiate a refund.
This feature also extends to membership cancellations, but it doesn’t work the same way. If a user decides to cancel, they will still retain access for the period they have already paid for.
For example, if a user has paid on the 1st of the month for 30-day access, and then they cancel on the 15th, they will still have access until the end of the month.
For starters, you can leave this section at default settings. If you have a large number of chargebacks/refunds, you can configure these settings differently.
10 Setting Up Payment Buttons
We’ve set up S2 member, we’ve set up PayPal, but we haven’t created a page where the users will see the payment options and pay for membership.
In this section, we are going to create the button code that we will place on the page/post for the users to pay from.
To set up payment buttons, navigate to S2 Member -> PayPal Buttons
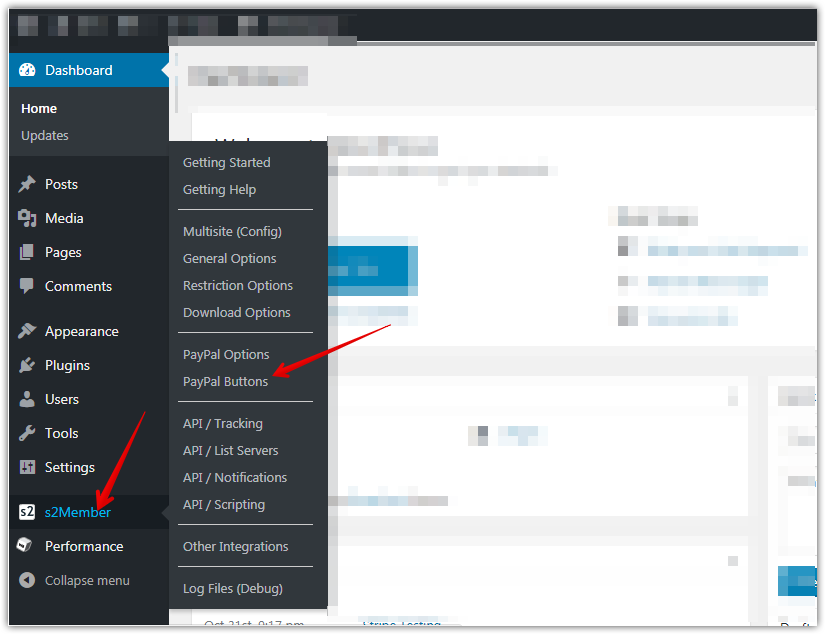
You will be directed to the following page.
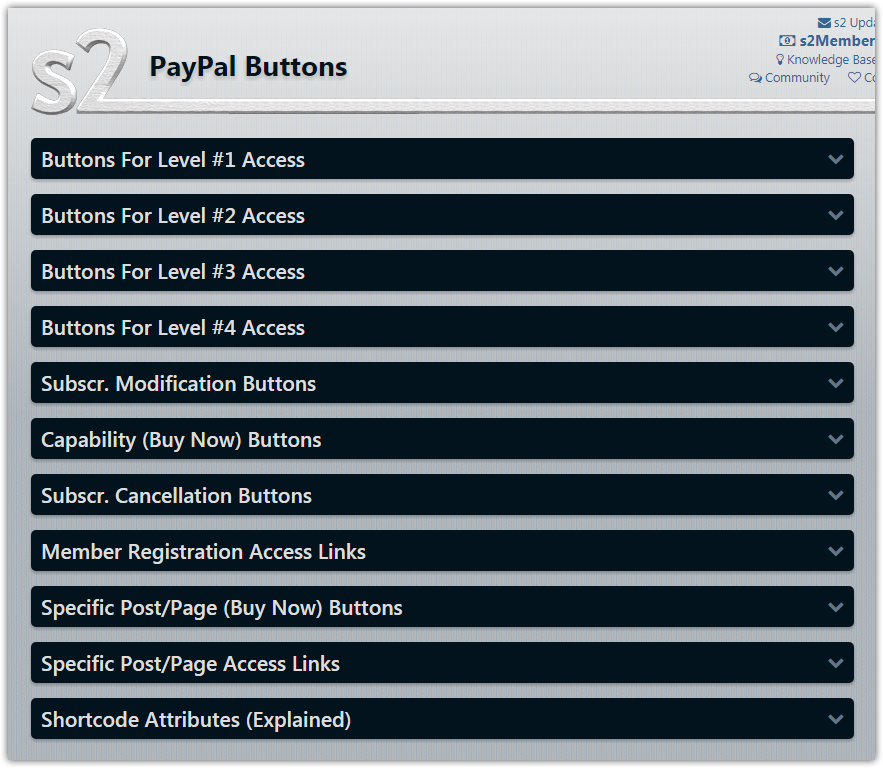
That’s a lot of options, but don’t worry. Each section is meant for a particular scenario. Let’s tackle them one by one.
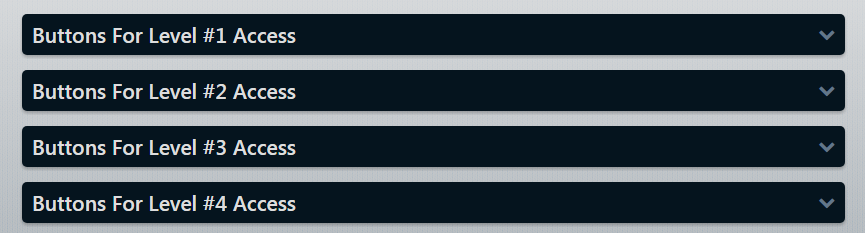
We mentioned earlier that S2 Member supports four level of memberships. These are the sections which help to create the payment buttons for each of these membership levels. You do not need to create buttons for all the levels, just for the levels you will use on your website.
All the four levels have a few options that you should understand. Here is how the details of the individual options look like.
10.1 Four Level of Memberships
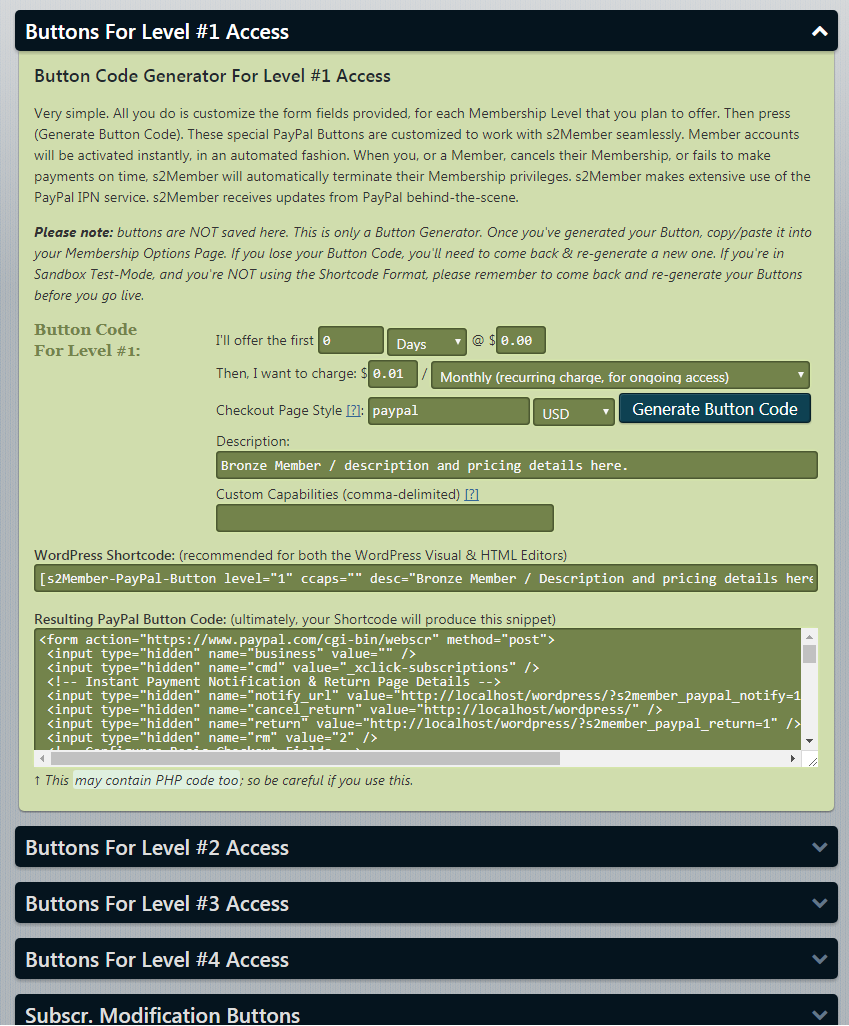
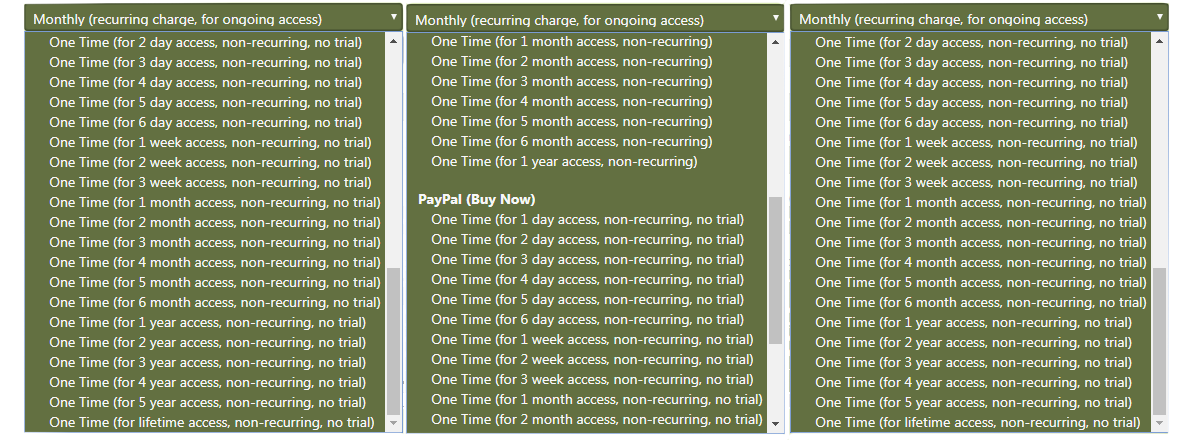
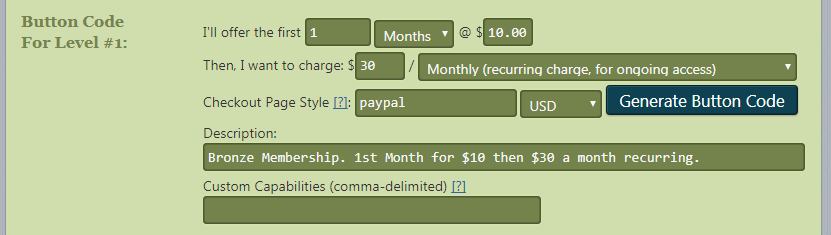
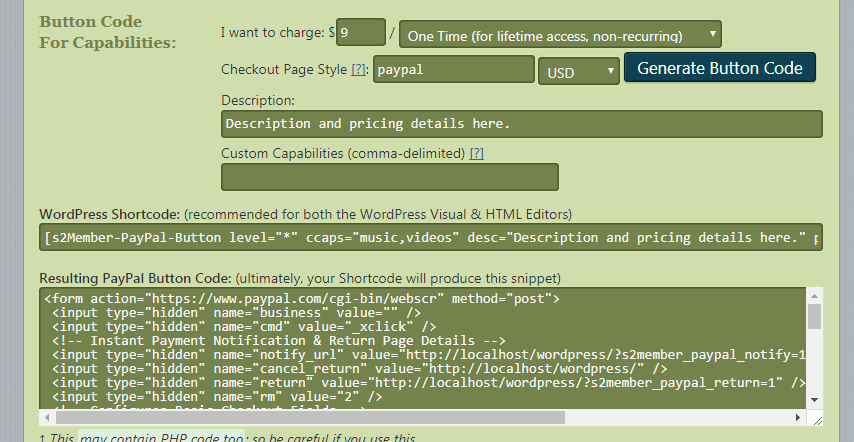
As you can see, you enter the price you want to charge for the first level of membership. There is also an option for adding a discount for the first transaction. Enter the price that you want to charge in the respective fields. In the example below, we are charging $1 for the first month; then it will be $30 a month.

Apart from a monthly subscription, you can offer multiple time periods to your customers as well. Some of these are recurring, while others are a one-time payment. The screenshot below should be self-explanatory.
In the description field, you add a description of the membership offered. Here you will enter the membership name and the pricing the users will pay for the membership. This will be shown alongside the PayPal button on your payments page. See the example text in the screenshot below.

The custom capabilities section is for advanced users only. If you have complex memberships that cannot be served with different levels alone, you will need to use this section to define the access levels the users will get.
After you have set up your pricing and added a relevant description for the membership, just click the “Generate Button Code” Button.
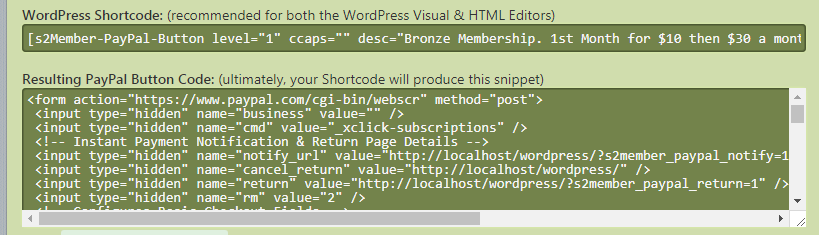
You will see a notification confirming that the button code has been updated. To integrate the button, you have two options. You can use the shortcode and just paste it on your page, or you can use the PHP code. For the easiest installation, using the shortcode is recommended.
It’s important to remember that this section only creates the buttons. Just because you created the buttons, that does not mean your potential customers will see it on the payments page. You will have to paste the shortcode on the appropriate page for the users to see the payment options.
Once you finish setting up this section, you will have created the payment buttons for one of your membership levels. You will have to repeat this process for each of your membership levels.
10.2 Subscriber Modification Buttons
The next option is the Subscriber Modification Buttons. In this section, we will create payment buttons for users who want to upgrade or downgrade their membership.

To set this section up appropriately, you have to understand how S2 Member handles payments and subscriptions for users.
When a user clicks a PayPal button to purchase a subscription, the button code shares information about the transaction with PayPal. This information includes the amount to charge, if the payment is recurring, and several other technical details.
PayPal has capabilities to change user subscriptions by itself. When a user clicks a PayPal button to upgrade/downgrade from one membership level to another, the actual change happens within PayPal.
To explain further, when a user clicks an upgrade/downgrade button and visit PayPal, the button code shares the details about the transaction with PayPal. PayPal interprets the data and asks the users to confirm the change to their subscription. If the user confirms, PayPal stores the new membership level and communicates with S2 Member to change the user’s access.
Due to the nature of how this works, you will need to create a separate button for each upgrade/downgrade operation possible.
Let’s take an example. If you supported three membership levels on your website, you would have to create the following buttons.
- Level 1
- Upgrade to Level 1 (from Level 0, or free)
- Downgrade to Level 1
- Level 2
- Upgrade to Level 2
- Downgrade to Level 2
- Level 3
- Upgrade to Level 3
There will be no downgrade to Level 3 as that is the highest level for this example.
The more levels you support, the more buttons you have to create to support all the possible upgrades and downgrades.
For this example, we will share how to configure or a create a button for a user who is upgrading their membership from Level 1 to Level 2. The settings for that button will be as follows.
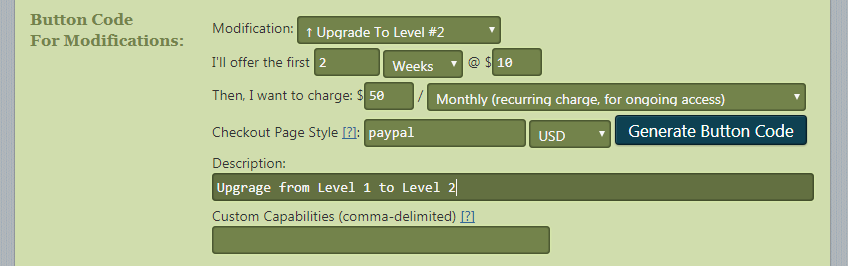
After entering the appropriate settings, we click the “Generate Button Code” button and then paste the shortcode on the relevant page.

Important Note About Upgrade Downgrade Buttons
Since the ability to upgrade or downgrade their membership level is only useful for existing members, you should share these buttons on a page that is accessible by existing members only. To use the upgrade/downgrade functionality, the user should also be logged in to their account on your website.
If the user is not logged in, and they use any of the created buttons to upgrade or downgrade their account, S2 Member will fail to recognize their account completely.
To avoid this scenario, make sure that you share these buttons in locations that are accessible only by existing customers only when they are logged in.
The simplest way to achieve that is to restrict the page access to members only. Later in this post, we will cover some other methods to achieve this as well.
10.3 Capability (Buy Now) Buttons
The next option is Capability (Buy Now) Buttons.

This is an advanced capability of S2 Member. What this allows you to do is sell an independent portion/capability of your website separately from your memberships.
For example, let us assume that you run a membership website about graphic design, and have multiple membership levels with different content. If you wanted to sell some graphic design assets which were not part of any memberships, you would use this feature.
You might think that this can also be achieved by using another membership level. Technically, it is possible, but it is not the ideal solution.
Memberships are hierarchical, while individual elements are, individual. A user with a higher membership level will always have access to content at a lower level. Individual content has no structure similar to this.
Just for example, here is a sample configuration for a button. Please note that you will have to define a custom capability apart from the regular settings to use this feature. After configuring the button, press the button that says “Generate Button Code” and paste the shortcode on the appropriate page.
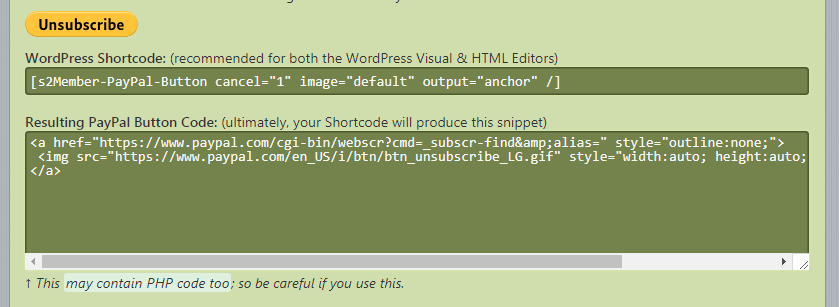
10.4 Subscriber Cancellation Buttons Configuration
Next is the Subscriber Cancellation Buttons configuration.

The cancellation process in S2 Memeber is pretty simple compared to the other operations. As we mentioned above, the actual subscriptions are managed within PayPal, and S2 Memeber only reflects them.
Technically, a user can log into their PayPal account and see all their subscriptions, and even can cancel the ones they don’t want to continue anymore. Not all users know that this is possible, that is why it’s easier to provide cancellation buttons to users.
Similar to subscription change options, cancellation buttons should only be shown to existing members who are logged into their account. To avoid any issues, always include cancellation buttons inside a page that is accessible only by logged in users.
There is no configuration necessary for cancellation buttons. Just copy the cancellation button shortcode and paste it on the appropriate page on your website.
How cancellations and memberships work
It is important to understand how cancellations work with PayPal and S2 Member to avoid confusion.
The membership fee is charged based on how you configure your membership plans. It can be a day, a week, a month, or even a year long. When a user cancels a subscription, their membership access is not revoked immediately.
Once a customer has made a payment for a specific term, he/she will always have access for that time, even if they cancel. If they cancel, they are not refunded, and they retain access to their membership till their term ends.
For example, if a customer bought a three-month membership on 1st of January and canceled on 15th of February, they will still have access to the membership area till the end of their membership term, i.e., 31st of March.
A refund or chargeback is handled differently. In those cases, the membership is immediately suspended and converted to a free account, if that exists.
In certain cancellations, S2 Member adds another day before revoking access completely to account for time differences. In the above cancellation example, a user might retain access to the membership area till 1st of April based on certain factors. This is handled automatically and needs no configuration.
10.5 Member Registration Access Links
The next section is for Member Registration Access Links.

This section helps to create registration access links. These are special links that contain keys that define the level of access the user is granted on the website.
These links are created automatically for each user when they pay. The link is also included in a confirmation email that is sent to them. However, if due to any issues the user lost their links, you can use this section to create another link for them.
The following information will have to be filled by you to generate the access link.
- Paid Membership Level: Select the membership level you want to create the link for
- Paid Subscriber ID: This is a unique string that represents the account, the customer, and the subscription. You will find this information in your PayPal account by navigating to your History tab. Copy and paste the string here.
- Custom String Value: This is a string that starts with your domain name. You can add more variables to this string by using the “|” character. It is not clear whether you can use the additional variables for analytics or not. If you are unsure, just leave your domain name there.
- Custom Capabilities: This is the same as the Custom Capabilities present in the other sections. Here you can specify additional sections your user will have access tSpecific Post/Page (Buy Now) Buttonso.
- Fixed Term Length: This is used if the buyer used a buy now transaction instead of a subscription. If that is the case, you can enter the term they have bought the access for. S2Member will automatically revoke their access once they are past that term.
The following notation is used in this field.
- 1 D = 1 Day
- 1 W = 1 Week
- 1 M = 1 Month
- 1 Y = 1 Year
- 1 L = Lifetime
You can use these in combination to specify the exact duration that your customer will have access to your site’s membership area.
Here is a screenshot of some sample settings.

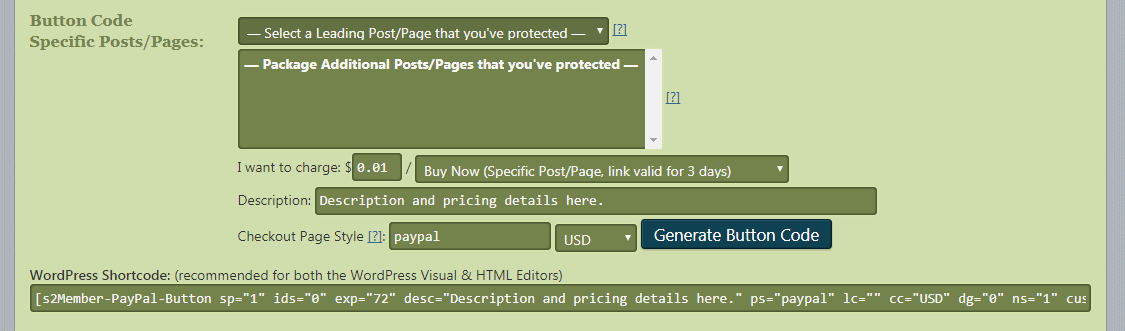
10.6 Specific Post/Page (Buy Now) Buttons
The next section is Specific Post/Page (Buy Now) Buttons.

We mentioned that S2 Member also has the ability to sell a single post or page as well. This section helps in creating buttons to achieve that.
Remember, you will have to create separate buttons for each post or page that you are going to sell.
In the drop-down, select the page or post that you would like to give access to. In the second selection window, you can select additional pages that you would like to give access to with the current page.
The rest of the settings are similar to the other ones we have done before. Enter a price you want to charge along with the amount of time you would like to give access to. Add a description if you like, and click the “Generate Button Code” button. Copy the generated shortcode to the page of your choice to restrict it.
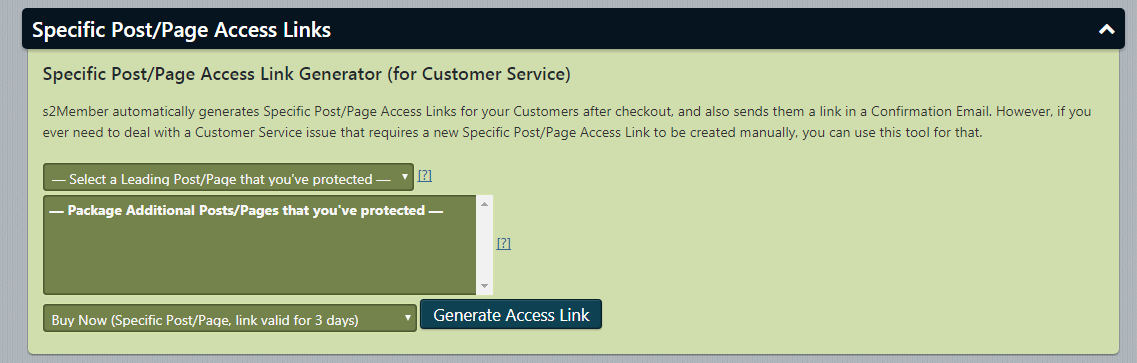
10.7 Specific Post/Page Access Links
The next section is the Specific Post/Page Access Links.

This feature works similar to the Member Registration Access Links discussed above, but for individual posts.
Just to refresh your memory, the Member Registration Access Links section helped to create a link that would allow the users to access the membership area. This link is emailed to the customer upon registration, but this section exists just in case if there are issues.
The Specific Post/Pages Access Links section does the same for specific post and pages only. If your customer bought access to a specific page or post and lost their access link for some reason, you can create a link to give them access.
Setting up this section is simple. Select the page/post that you want to give access to. You can also add additional pages or posts to add to the bundle. Set the time you want the access to be active for and click “Generate Access Link”.
10.8 Shortcode Attributes
The next section is the Shortcode Attributes.

When you generate any button in any of the sections above, you do it by pasting the relevant shortcode on the relevant page. The shortcode has many variables in it that define its behavior.
This section defines what each of the variables does. There is nothing to configure in this section. Even accessing this section is optional. Unless you are curious about understanding what the variables mean, leave this section as it is.
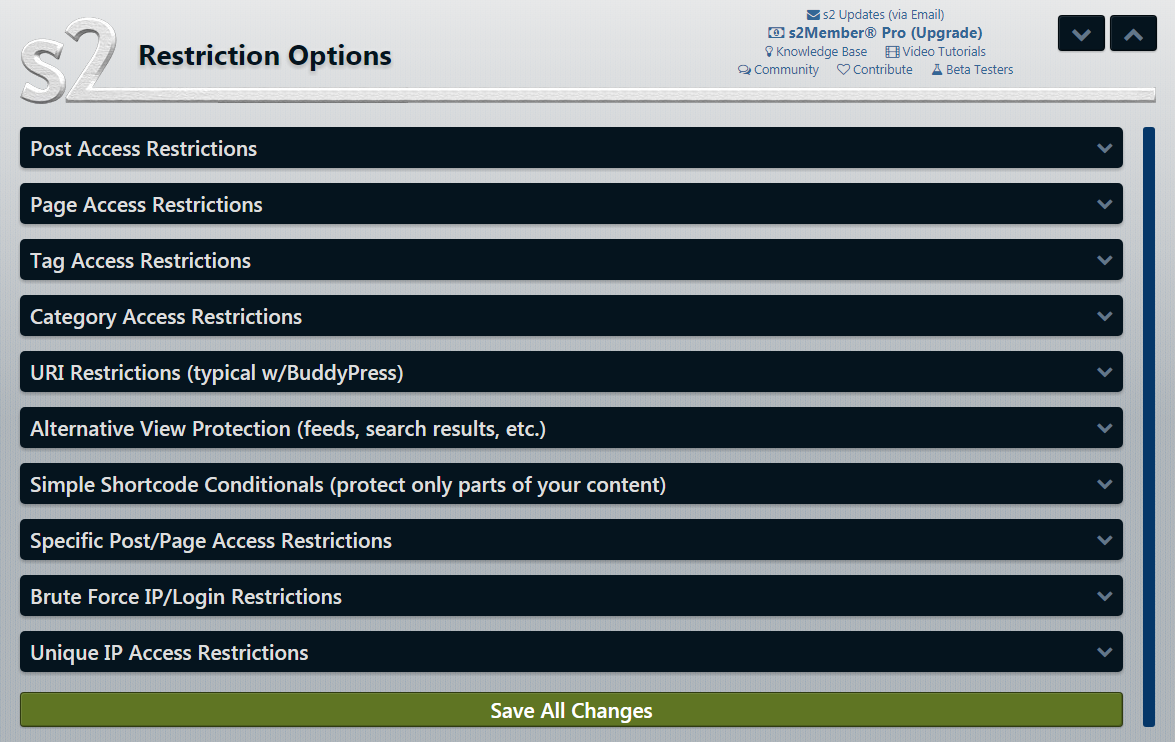
11 Restriction Options
Now that you’ve setup S2 Member and also created payment buttons, it’s time to understand the next step, restricting content. Restriction means locking or restricting access to certain content for certain users. In this case, this would be your paying members.
This section deals specifically with setting up restrictions. There are plenty of options in this section as well, but understanding all of them in detail is not necessary. We will explain the important features in detail.
Before we explore the restriction options, we would like to tell you the simplest way to restrict content it S2Member.
In the WordPress admin, open the post you want to restrict. On the right of the post, you will see the S2Member restriction options. Simply select the restriction level you want to set and update the post. The post will now be accessible only to paying members.
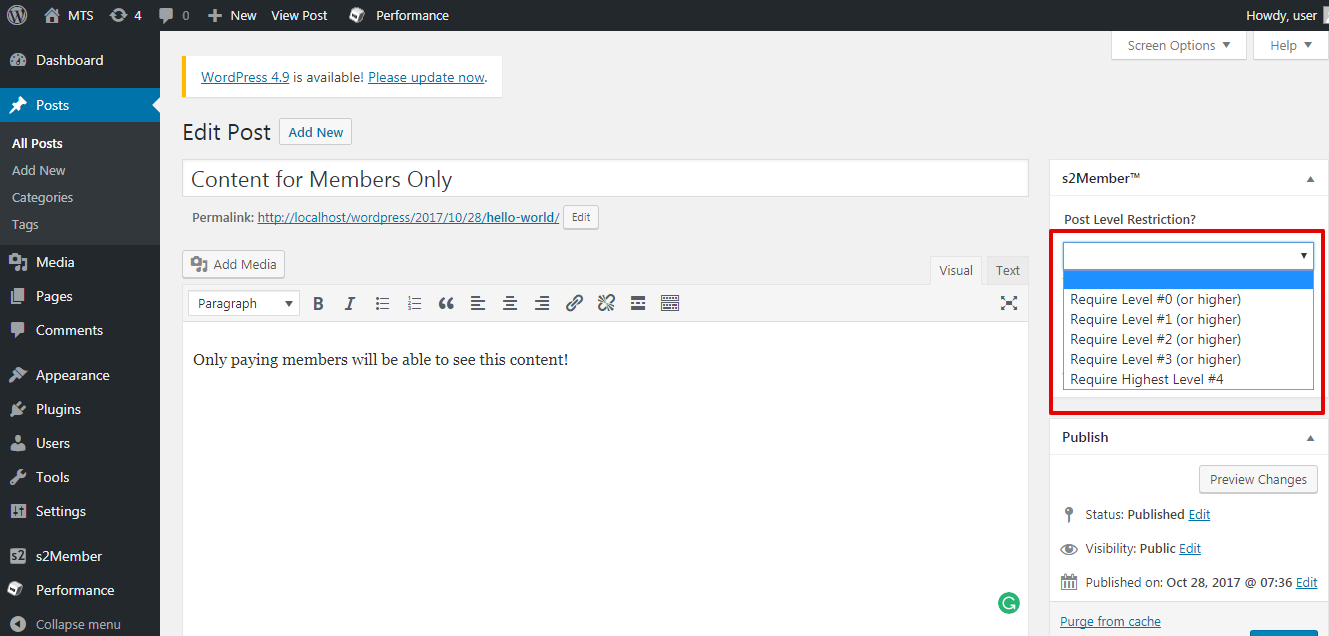
You might be thinking, if restricting content is so simple, why is there a full section dedicated to it?
That is because the above method is useful only when your site is small with limited posts. Imagine having over a thousand posts on your site. Is it practical to restrict each post manually?
Also, what if you want to restrict a certain category instead of individual posts? The restriction options section has solutions to these kinds of problems. Let us explore the various options.
s2 Restriction Options
- 1. Post Access Restrictions
- 2. Page Access Restrictions
- 3. Tag Access Restrictions
- 4. Category Access Restrictions
- 5. URI Restrictions
- 6. Alternative View Protection
- 7. Simple Shortcode Conditionals
- 8. Specific Post/Page Restrictions
- 9. Brute Force IP/Login Restrictions
- 10. Unique IP Access Restrictions
11.1 Post Access Restrictions

If you already have a lot of content on your website, restricting the content one by one will be a time-consuming task. This section can help you restrict your content in bulk and save time.
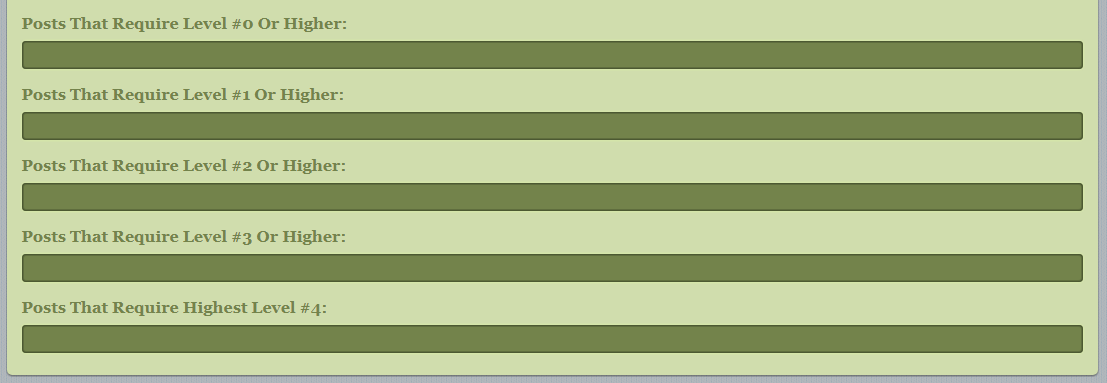
There are four fields in this section. To restrict a piece of content, enter the post ID in the relevant field. You can add more post IDs in a comma separated format to restrict all of them.
- Posts in the Level #0 field will be accessible by everyone
- Posts in the Level #1 field will be accessible by Level 1 members and above
- Posts in the Level #2 field will be accessible by Level 2 members and above
- Posts in the Level #3 field will be accessible by Level 3 members and above
- Posts in the Level #4 field will be accessible by Level 4
If you use custom posts, you can enter the name of the custom post in the field as well.
Please note that this protects the content based on its URL only. Depending on your theme, some of the content may still be visible to all users. Common places where this would happen would be homepage excerpts, category pages, and search pages.
There are ways to restrict the content completely, and we will cover those methods in the sections below.
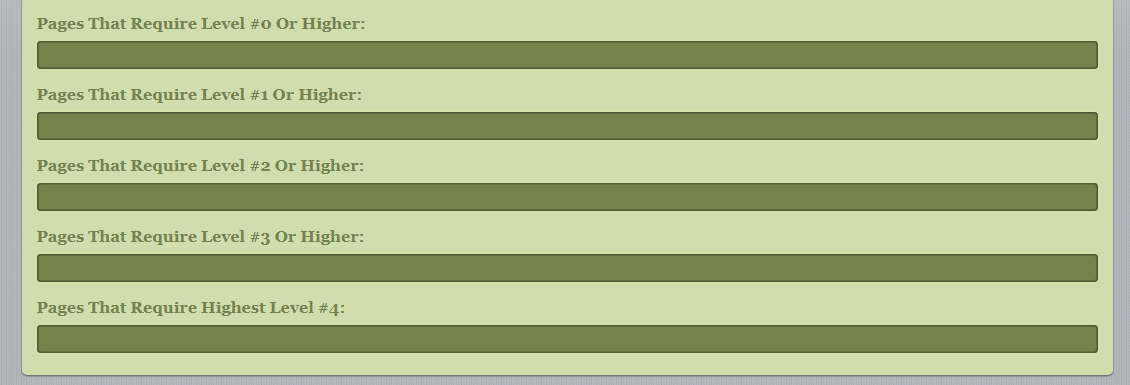
11.2 Page Access Restrictions

This section is identical to the section above. The only difference is that this section restricts pages, not posts.
To restrict pages, enter the page ID’s in the respective fields. You can add multiple IDs in a comma separated format to restrict them all.
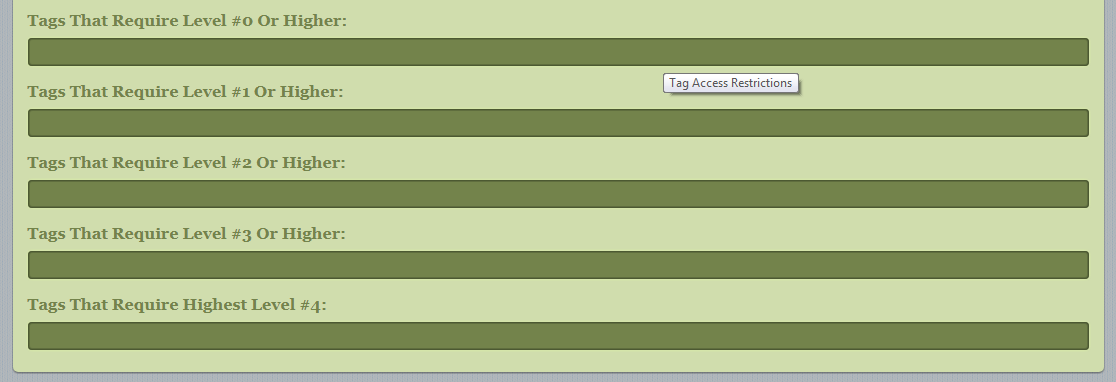
11.3 Tag Access Restrictions

If you use tags to manage content on your site, then you can use this section to restrict content using tags.
Restricting a tag will restrict all the posts that have the tag, even if the post has other tags. Only use tags if you have structured your content with tags keeping this functionality in mind. Tags are also case sensitive, so the tag MyThemeShop is different from mythemeshop.
To restrict tags, enter the comma separated tag list in the appropriate field.
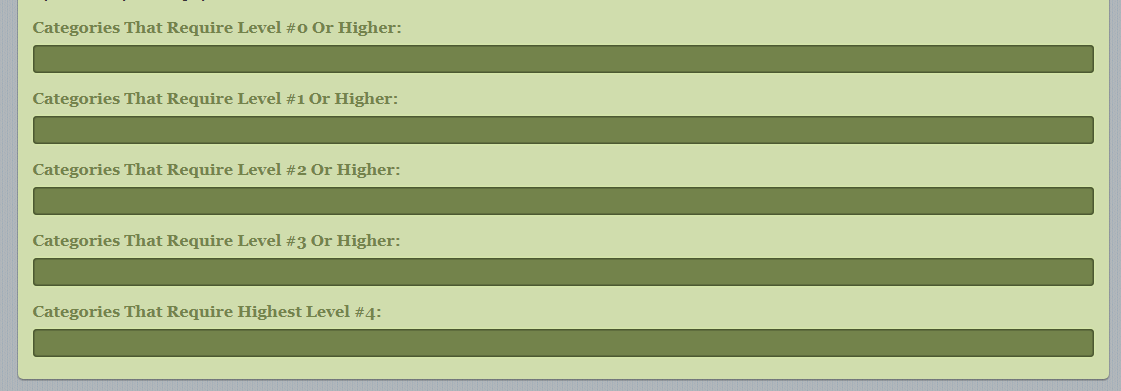
11.4 Category Access Restrictions

This will be the most commonly used method to restrict content on most sites. In this section, you can restrict content based on the category the content is in.
Category Access Restrictions gives you a powerful way to manage your restricted content. But it is easy to accidentally restrict a lot of content. To avoid this, you should understand exactly what content will be restricted with a category based restriction.
When you restrict a category, all of its subcategories are restricted as well. Along with this, all the archives of the category and the archives of all the subcategories are restricted as well.
To restrict categories, enter the category IDs in the respective field. You can also enter comma separated values to restrict more than one category.
11.5 URI Restrictions

This section helps restrict content based on the URI of the field and even parts of it. This section is meant for advanced users only and we would not recommend that you use this method. The other restriction methods discussed are much easier and safer to use.
11.6 Alternative View Protection

Even if you restrict your content using one of the above methods, there will still be some leakage of content. That means that some content or parts of content will still be accessible to all users.
The common places where this happens are search results, feeds, comment feeds, archive pages, author pages, posts by date, XML feeds, and more. Depending on how important it is for you to restrict the content, you can configure S2 Member to block content even from these pages. S2 Member achieves this by checking the database queries that fetch the content.
Configuring this section is easy. If you would like to enable alternative view protection, enable the Filter “All WordPress Queries option”. Alternatively, you can select only the views that you prefer.

11.7 Simple Shortcode Conditionals

Until now you have seen how you can restrict your pages, posts, tags, categories and more. But what you haven’t seen is the ability to restrict only parts of content. S2 Member has the functionality to restrict parts of content and even show different parts of the page to different membership levels.
This section mentions that restricting parts of a page or showing different information to different membership levels is possible, but doesn’t tell us how. The specifics on how to achieve that are in a different section, which we will cover below.
11.8 Specific Post/Page Restrictions

You might remember that with S2Member, you can sell access to individual pages or posts as compared to a membership. This section lets you restrict those pages that you want to sell individually.
Important Note: Make sure that any pages/posts you restrict using this feature is not protected twice. If you restrict a post here which is already part of a membership, that will create a conflict. In that case, users who purchase access to the post will be unable to access it without purchasing a membership.
To restrict pages and posts with this feature, enter the IDs of the pages and posts in the text field (comma separated).

11.9 Brute Force IP/Login Restrictions

This section deals with basic security measures and prevents malicious users from gaining access to your website. The default settings are good for most websites.

11.10 Unique IP Access Restrictions

This is another security measure that protects against account sharing. Account sharing is a scenario where a user purchases a membership on your site and then shares the username and password with multiple people. With this feature, you can protect your content from unauthorized access.
There are two settings to configure. The first one configures how many IP addresses a user is allowed to access your website from. The second one configures a penalty in case a breach happens.
It’s important not to be too restrictive with these measures. Today most people own multiple devices and access the internet from multiple places throughout the day. Making the restriction too tight might penalize and annoy legitimate users as well.

This concludes the Restriction Options section.
There are still some sections that remain unexplored, but those are meant for advanced users. You can safely ignore them and continue to have a successful membership site. We will give you a brief explanation about the sections to keep you informed.
12 Download Options
The download options is another feature to restrict content. This section deals specifically with managing and restricting file downloads.
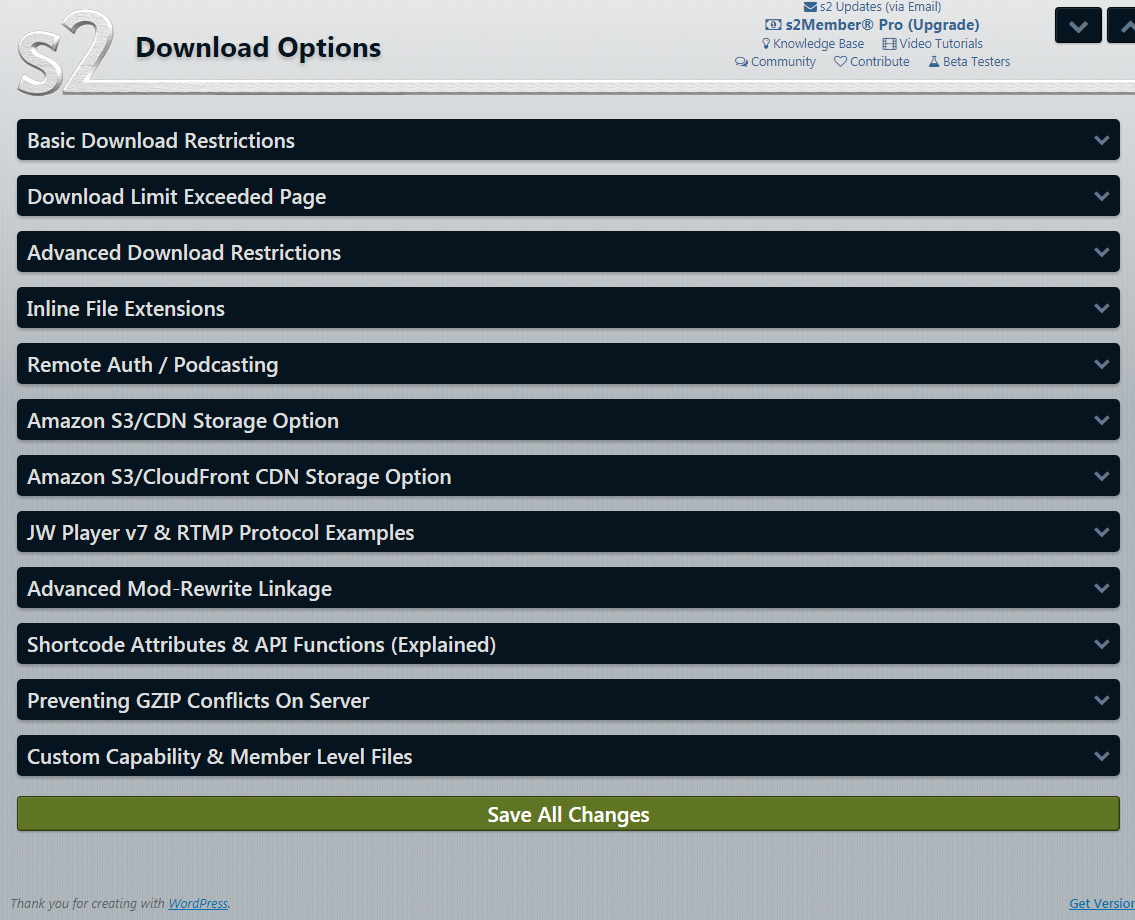
There are plenty of sub-settings which give you precise control over file downloads.
Since these settings serve a specific use case, we won’t be covering these settings in detail.
13 API Options
The API options have four different settings.

All of these settings use the S2Member API. By using the API, you can enforce restrictions in precise detail while also dealing with complex scenarios which cannot be dealt with easily.
The brief description of the API settings is below.
- API Tracking: This section covers settings which help in configuring affiliate tracking. If you have an affiliate program through which you acquire users, this section would be helpful to you.
- API List Servers: This section helps in configuring email lists and the various options associated with them.
- API Notifications: This section is an extension of the API tracking section. If you have services connected to S2 Member, you can use this section to automate backend tasks.
- API Scripting: This section gives you access to the advanced features of S2 Member. Because of the nature of the functionalities, they have to be used in the form of scripts. These are meant for advanced users, and you should ignore them when starting out. However, there is one functionality which is easy to use and pretty useful. It’s called the Simple Shortcode Conditionals, and we will cover that in detail.
Simple Shortcode Conditionals

The Simple Shortcode Conditionals section gives you granular control over the restrictions by giving you access to powerful shortcodes. Using these shortcodes, you can create complex restrictions which are not possible otherwise.
An example of a complex restriction would be a single post with content for all membership levels. The reader will be able to see only the data he/she has access to.
It’s important to understand how S2 Member gives you this functionality to understand its full potential. Understanding this section can be difficult, but we will try to keep things as simple as possible.
S2 Member has many shortcodes that can fetch information about the current visitor. Using this information, you can give access or restrict access to the post or parts of it.
Some of the information that you can fetch about the user is:
- Is the user logged in?
- What is the user role?
- Does the user have access to custom capabilities?
- What is the user’s membership level?
And many more.
Based on this information, you can restrict certain content on the page. Let us explain this with a few examples.
[s2If is_user_logged_in()]
Logged in members will see this, regardless of membership level
[/s2If]
The “[s2If is_user_logged_in()]” shortcode determines if a user is logged in to your website. Content inside this shortcode will be visible only to users who are logged in. This specific shortcode does not check if a user is a paying member or not.
[s2If !is_user_logged_in()]
Content inside this shortcode will be visible to the public
[/s2If]
The above code is similar to the first code segment, except the “!” sign. The “!” is used for negation. The content inside this shortcode is visible to all users.
[s2If current_user_can(access_s2member_level1)]
Content meant for members with at least level 1 membership
[else]
Content visible to everyone
[/s2If]
The above code checks the membership level of the current user and gives access to the content if the user has a membership level of 1 or above. If the user does not have a membership, the content in the [else] segment is displayed. Please note that [else] tag is only supported in the Pro Version of S2Member.
If you understood the examples above, you would have no trouble understanding the code segment below.
[s2If current_user_is(s2member_level2)]
Premium content for Level 2 Members.
[/s2If]
[s2If current_user_is(s2member_level3)]
Premium content for Level 3 Members.
[/s2If]
[s2If current_user_is(s2member_level4)]
Premium content for Level 4 Members.
[/s2If]
3
Apart from the examples above, S2 Member supports many other shortcodes which can check a variety of information about the user. The combination of these shortcodes make membership sites of all complexities possible. To understand the various shortcodes, read this Knowledge Base article.
14 Technical Setup Completed
This concludes the technical setup for your membership site. We know that it seems like a lot of work, but it shouldn’t be hard if you follow along. Now we will talk about the business aspects of running your website.
15 Acquiring Customers For Your Membership Site
Just like any business, acquiring paying customers is what makes everything work.
There are unlimited ways to get customers for your website, and we will discuss a few ideas here as well. But the most important thing to remember is that your creativity is the most important asset.
Marketing and customer acquisition are two fields that are constantly evolving, and keeping up with the latest trends can give you a lot of ideas about acquiring customers yourself.
Following are few of the ideas that you can use to acquire customers for your membership site.
15.1 Freemium Model
The freemium model is when you offer some content on your website for free. For accessing all the content, a membership is required. Even S2 Member works on a similar model. The software is free to use, but users who want to use the advanced features have to pay.
This model is massively successful when done right. Most of the mobile games today work on the freemium model. The game itself is free, but users can pay to get additional features like removing ads, or access to premium content.
To achieve this in S2 Member, you can create a free, or Level 0 membership and offer some good content at this membership level. Set it up in a way that users have to sign up (for free in this case) to access the membership content. This way you can get their contact information and promote your paid membership.
15.2 Partnerships
Partnerships are the way to go when you have some existing relationships in the industry you are starting a membership site in. These relationships can be with two kinds of people.
One would be with people who operate websites in similar niches as your membership site. The second would be professionals in the niche your membership site is in.
For the first kind of relationship, there are many ways of attracting customers to your membership site that are mutually beneficial. Here are some of the ideas that you use:
- Exclusive discounts: You can offer exclusive discounts to readers of your partner’s website. This will give you the initial traction of users.
- Exclusive Content: If your partner has readers that can be valuable for your website, you can create an amazing piece of content and share it with them exclusively. This will instill trust in your membership website.
- Limited free content: You can lure in potential customers by offering them some of your premium content for free. The premium content can be shared with them permanently or for a limited time.
In the second type of relationships, your partner should have some authority in the profession. Whether they own and operate a website is not necessary. For example, if you run a membership site with content about steel and metal forging, a plant owner or manager would be an ideal partner.
The idea behind this partnership is borrowed authority. Since you are just starting out and don’t have much authority, a recommendation by an authoritative person can lend you some authority and jumpstart your membership website.
15.3 Testimonials
Getting testimonials is a great way to build credibility and trust amongst potential customers.
Obviously, this strategy won’t be effective when you are starting out, as you would have a small number of customers. But, as you grow and get a few customers, getting their testimonials and displaying them on your website is sure to increase conversions.
To use testimonials to get more customers, you can either create landing pages or use the most visited pages on your website. Make sure to insert testimonials in the beginning of the page for most effectiveness.
You can also use the testimonials in your ads, which we will cover later in the post.
15.4 Sponsorships
Sponsorships are a great way to reach out to your target audience. This marketing strategy is very popular on YouTube these days.
Sponsorship is when you sponsor a piece of content on someone else’s web property (blog, website, YouTube, social media) for a price. In exchange, your website gets a mention in the content.
The great thing about this strategy is that you can reach a very targeted audience.
On a platform like YouTube, you can also estimate the reach of a channel by looking at their subscribers and their average views per video. You can also understand how engaged their audience is by looking at the comments on their videos.
Since sponsors will get a very brief mention in the actual content, it’s a good idea to have a strong call to action in the mention. Try to offer a limited time offer or a discounted price to the first few signups to give the viewers a push to sign up early.
15.5 Social Media
Social Media is a general purpose customer acquisition strategy. Having an active social media presence is valuable for any business, and your membership site will surely benefit from it as well.
It’s important to create an effective strategy for social media rather than just posting randomly. Check out the popular social media pages in your field and analyze their top performing posts with a tool like Buzzsumo. This will give you a clear picture of what type of content has maximum engagement. Use this data to craft your own strategy to grow your business with social media.
15.6 Outreach
Outreach works best when you have some proof of your membership website generating value for customers.
Outreach is the technological version of door-to-door salesmanship. The difference is that instead of selling your product to the end customer, you are trying to “sell” your product to an influencer.
The “sell” here is important, as you are not looking to make a sale to the influencer, but sell them the idea of promoting your membership website to their audience.
Before conducting outreach, you have to think to yourself that why would an influencer promote your website. The value proposition for the influencer has to be clear for your outreach to be effective.
In the digital world, there are many ways to contact an influencer, but here are some examples.
- Email – Email is one of the oldest and effective ways to communicate with influencers. Make sure to test which approach works best to keep outreach effective.
- Social Media – It’s one of the fastest ways to find and communicate with influencers. However, due to the sheer amount of noise on social media, you might have to work hard to grab their attention.
- Website comments – Leaving insightful comments on their website is one of the best ways to get on the radar of an influencer. To use this strategy, try to be in the first few people to comment, as they get the most attention from the authors.
- Phone – Although a little aggressive, picking up the phone and calling an influencer is a sure-shot way to get an influencer’s attention. However, this strategy’s success depends completely on your pitch. If your value proposition is weak and you called them to discuss, not only will you get rejected, you will also hurt chances of working with them in the future.
Those were ways to communicate with influencers, but you also need to think about how to pitch your website. Every person has a different motivation and appealing to that will increase your chances of successful outreach. Here are a few common motivations.
- Helping their audience – If a person runs a free blog on a topic, that means they want to genuinely help their audience. By offering something of value to their readers, your pitch is likely to be accepted.
- Financial benefit – Money is a big motivator for many online entrepreneurs. By offering financial gain, you can lure many online influencers to partner with you.
- Authority – Offering an authority boost to a potential partner is another way to get them on board. This method works well if you have some excellent content (massive eBook, online course, webinar) and you ask your potential partner to help promote it.
15.7 Guest Blogging
Guest blogging is a low-cost strategy that is sure to give you good results. It’s also a strategy you can use to acquire your first few customers without spending any money.
If you don’t know what guest blogging is, let us explain it briefly.
Many websites have trouble creating content on a regular basis. To fill this gap, they allow other people (guest bloggers) to post content on their sites in exchange for a link or mention.
This is a win-win situation for both parties. The website owner gets a piece of content while the guest bloggers get exposure to the audience.
To find websites that accept guest articles in your niche, you can use the following search queries.
- “niche” + “write for us”
- “niche” + “submit a post”
- “niche” + “guest post guidelines”
You will find many websites that accept guest posts. Contact some websites and understand their content requirements. Different websites have different needs and tailoring your content to their needs will increase your chances of being accepted.
Most websites that publish guest posts will allow you to leave a link to your website. It might be in the author box or even in the content. Make sure the text surrounding the link pushes the reader to click and sign up on your website.
15.8 Advertising
Advertising is a powerful and fast way to acquire customers, but the prerequisite for that is that you should know how to make it work. In any paid advertising, understanding the numbers is important.
On top of that, you should also be experienced with the traffic source where you will run your ads. One of the most popular platform to run ads is Facebook. It’s precise targeting options, and detailed reporting makes it a dominant platform in digital advertising.
Even if you are not familiar with advertising, spending some money on growing your audience is worth it. Even if you don’t get direct sales, you can easily develop a following for your fan page, which will become a long-term asset in your marketing funnel.
16 Conclusion
We hope that after reading our guide, you agree that starting a membership site can be a very lucrative opportunity to make money. Some of the world’s biggest companies use membership in one way or another to attract customers or increase loyalty towards their brands. By deciding to start a membership-based website, you will follow their footsteps.
While the opportunity with membership websites is great, it’s not without its downsides. Creating and configuring a membership site can be a daunting task, even for seasoned WordPress users. But with this in-depth guide, we hope that we’ve put those concerns to rest.
We hope that after reading our guide, you understand how membership sites work from a business perspective and a technical perspective, and you also feel confident in starting your own website.
We understand that this guide covers a lot of technical details, so if you have any questions about anything discussed in the article, or about membership sites in general, feel free to leave a comment below. We will try to answer all your questions to the best of our abilities.