Amazon is one of the biggest eCommerce platforms which sells a wide variety of products through its online platform.
It has brought a major revolution in the digital scape by providing door to door service of goods and physical products.
This has changed the conventional system of buying products from a physical store.
Apparels, household items, electronic items or gadgets, on Amazon you can find nearly any product which you need.
Apart from delivering physical products from business to customers, it also hosts a very popular affiliate program known as the Amazon Associate Program.
Using this affiliate program, you can promote products from the Amazon’s catalog of items and earn commissions when someone buys the products through your referral links.
You can even set up your online store using the WooCommerce plugin and sell products.
Every product in your online store will have your unique Amazon ID using which you can track your sales and manage your commissions from Amazon.
In this post, we will tell you how to set up your online store and host Amazon products on that using the free WooCommerce plugin.
We will use a simple WordPress site for setting up our online store
After setting up your WordPress website, the second most important thing is to have a neat and professional eCommerce theme.
In the below tutorial, we have used our latest, professionally designed, eCommerce theme for setting up eCommerce stores.
Let us first see how to set up the WooCommerce plugin on our WordPress website:
1 WooCommerce Plugin Installation Guide:
1.1 Step 1: Add New Plugin
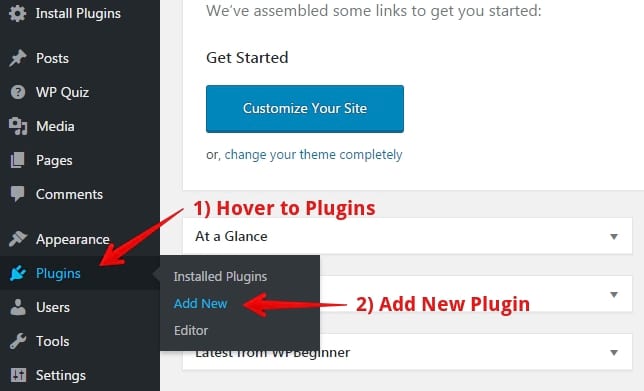
- In your WordPress Dashboard, hover to “Plugins.”
- Click on “Add New” to add a new plugin to your WordPress system.
1.2 Step 2: Install and Activate WooCommerce Plugin

- Search for the “WooCommerce” plugin in the search area.
- Install and activate the WooCommerce plugin.
Your online shop is ready. You can now add the affiliate products from Amazon and start promoting them through your online store.
Let’s begin with the tutorial and learn how to add the Amazon affiliate products to WooCommerce and start selling through our online shop.
2 How To Add Amazon Affiliate Products To WooCommerce
We hope you are ready with your WordPress website and installed the WooCommerce plugin as directed above.
So are you excited to add your first product? Let us see how to do that in the below steps.
2.1 Step 1: Find products on Amazon
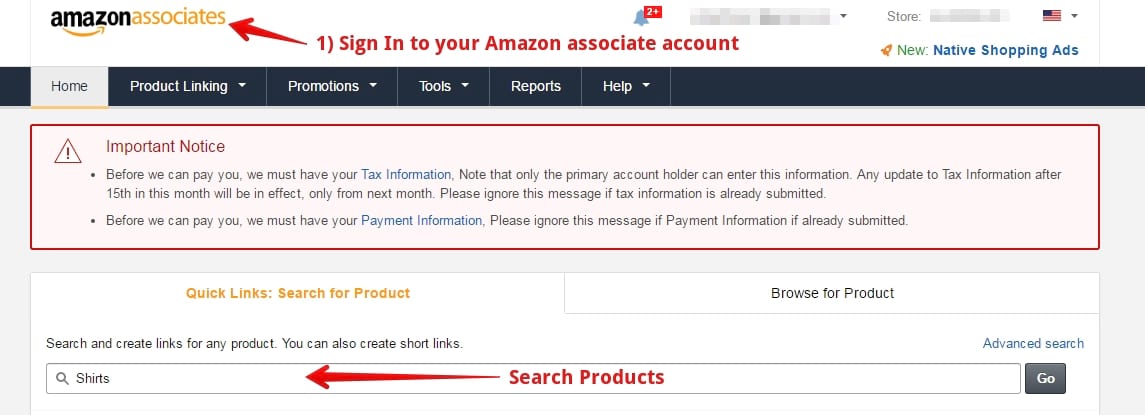
- Log in to your Amazon Associate Dashboard to start your search for products which you want to promote on your online store.
- Search products and click on the “Go” button
2.2 Step 2: Choose a Product
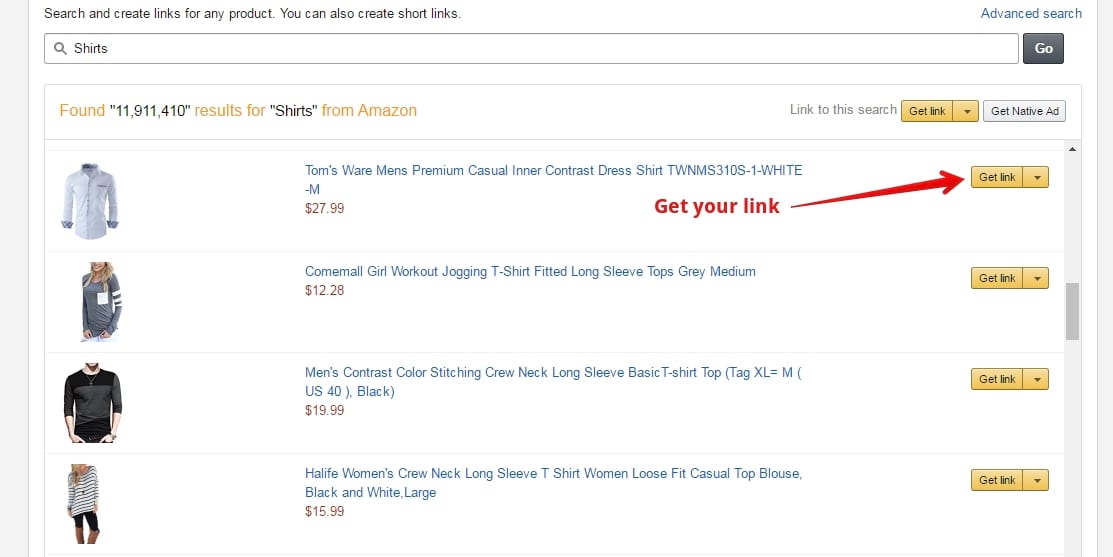
If you have searched for a generic term like “shirts” in the above example, you will get various products in a list.
Choose a relevant product that you want to add and click on the “Get link” button to get your affiliate product link.
2.3 Step 3: Get Product Link
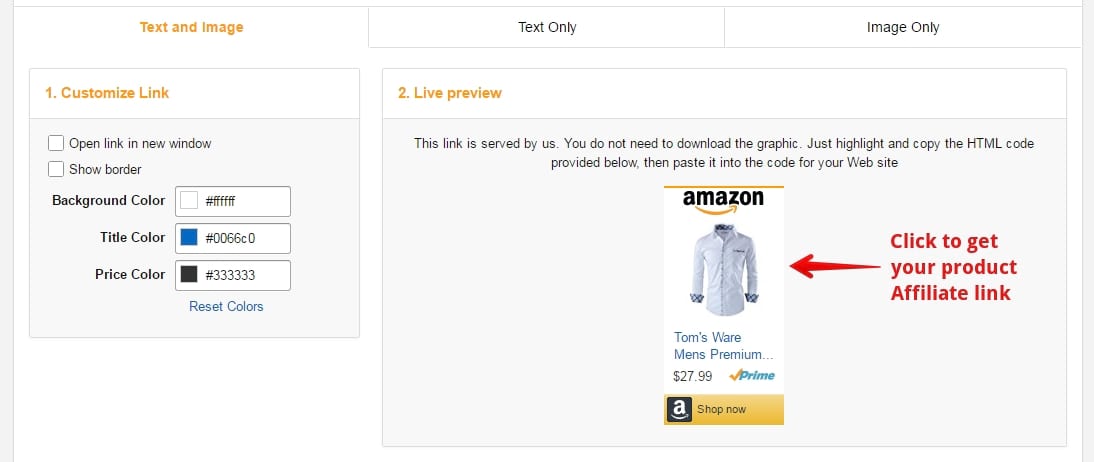
Now, you can select a relevant product link. This section is especially useful for those who are promoting the products as banners on their website.
We are adding the product to our store so; we need more product details.
The best option is to click on the text and image link which will lead you to the official product page on Amazon.
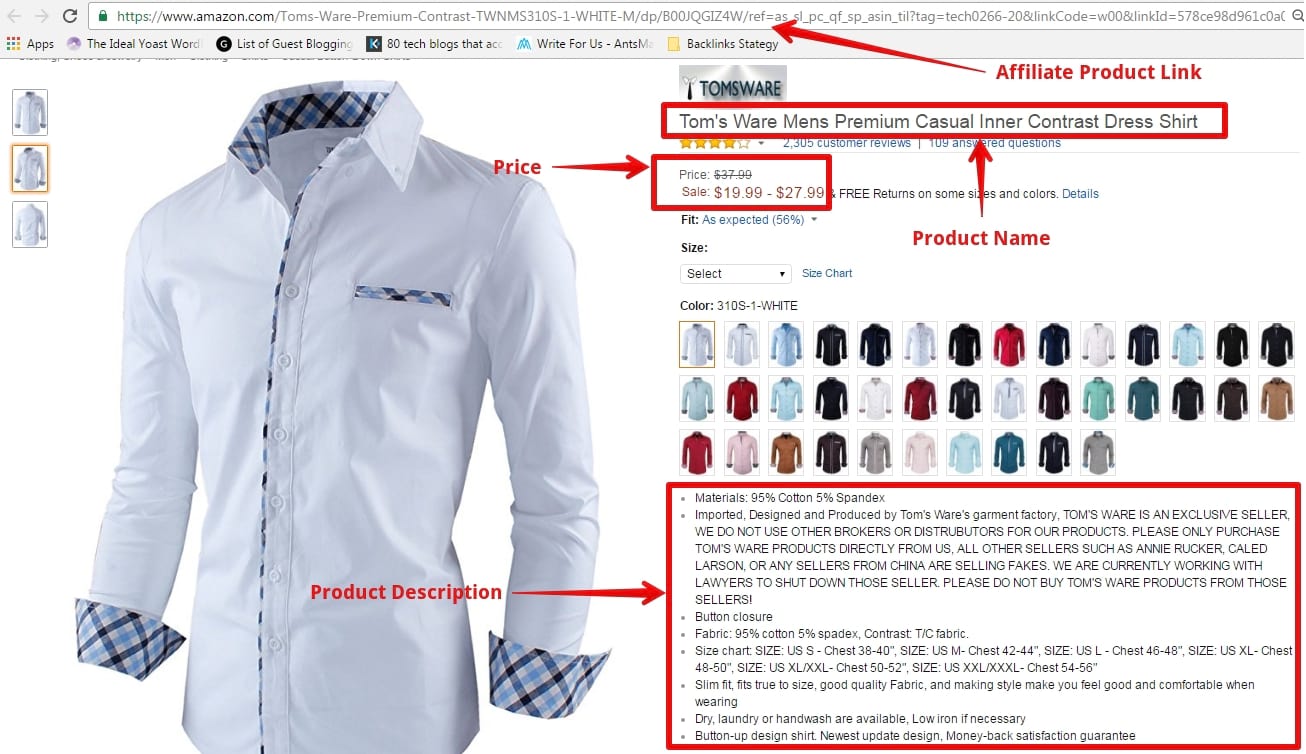
You can see in the picture itself; we have all the necessary product details that we need to add this product to our online store.
2.4 Step 4: Add Product to WooCommerce
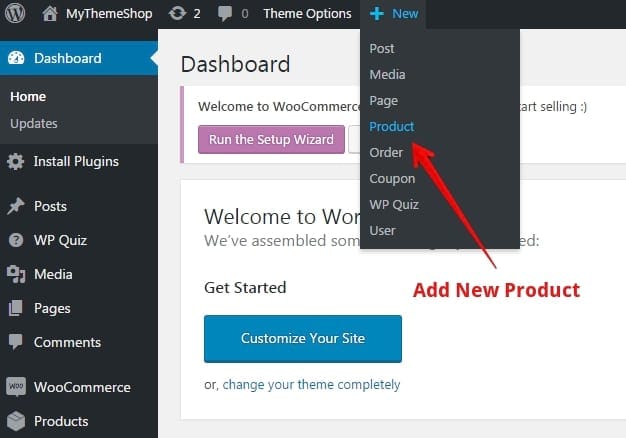
To add a new product, hover to the drop-down menu “New” and click on “Product.”
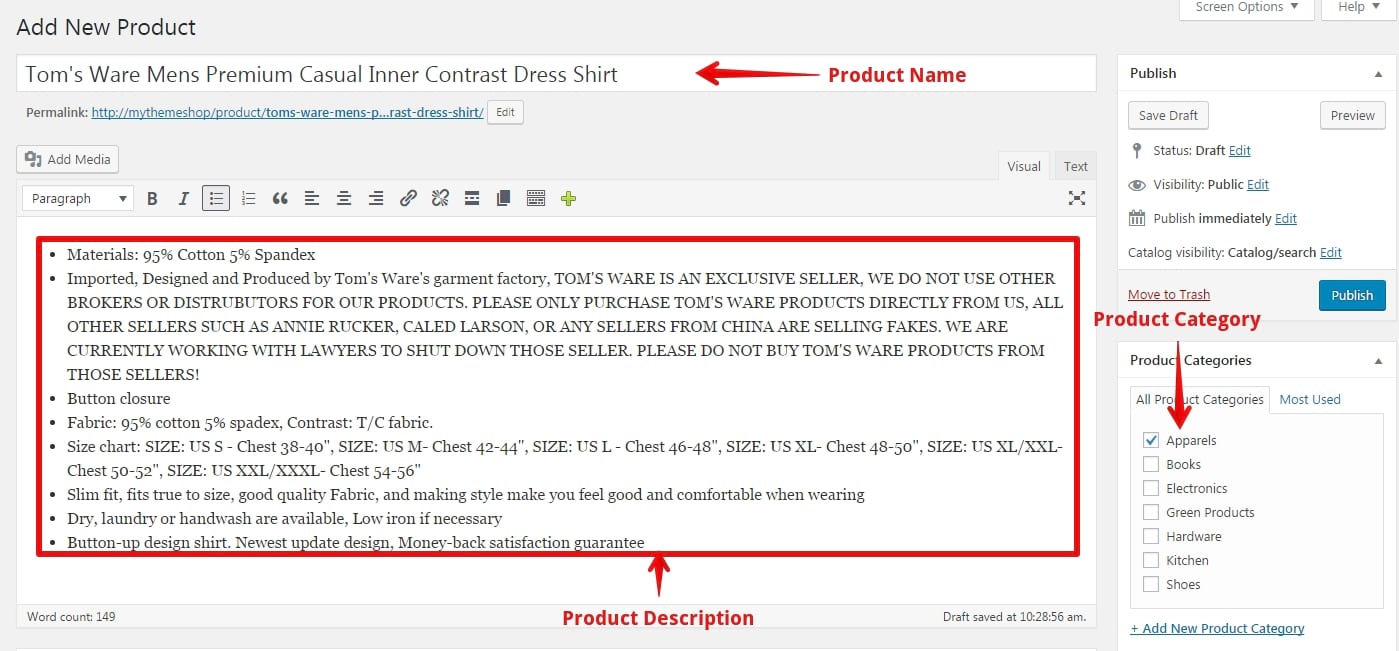
You will be directed to a screen similar to the one in the above image.
Enter the relevant details that you had noted in Step 3 in the mentioned fields.
- Enter the name of the product that you are promoting.
- Enter the product description.
- Choose an appropriate Product Category. In the above example, we have selected “Apparels” as we are promoting a shirt.
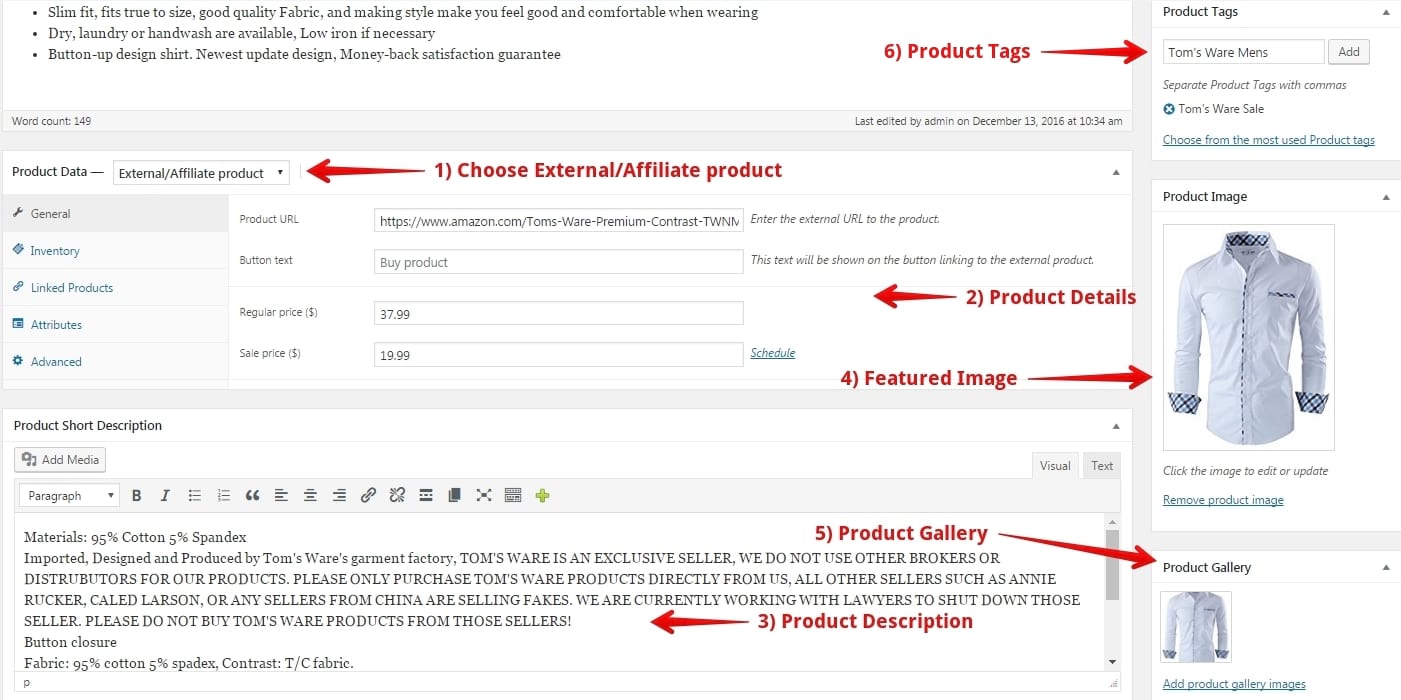
Now, scroll down to add some more details.
- From Product Data, choose the option “External/Affiliate product” as we are promoting an affiliate product from Amazon.
- Enter the details such as product URL and price. Product URL is the same Affiliate Product Link that we had noted in Step 3.
- In the Product Short Description, you can add the same product description from Step 3.
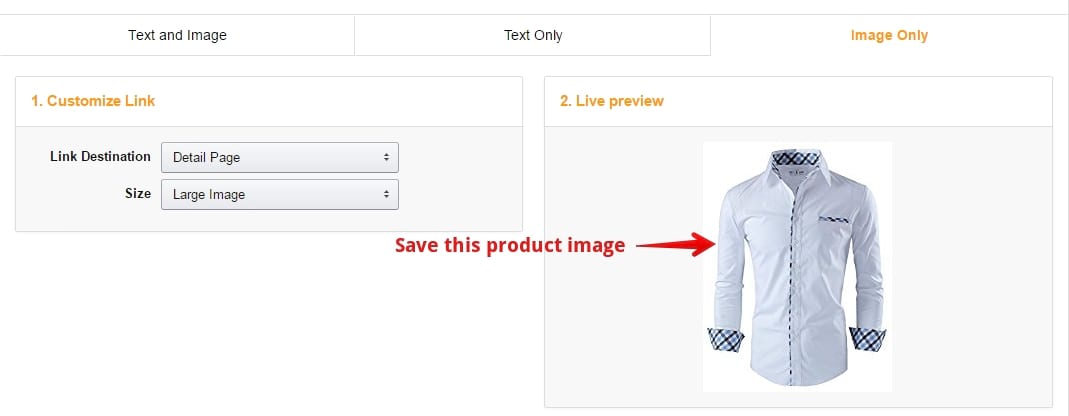
- Featured Image is like the cover page of a magazine. You should use a neat and professional image of the product. We would suggest you save the picture of the product from your affiliate account. Refer to the below image for guidance.

- Product gallery consists of the images of the product from different angles. This helps the customer to understand the product better.
- Lastly, use the appropriate tags that define the product. This is same as what you give while writing a blog post on WordPress.
2.5 Step 5: Publish the Product
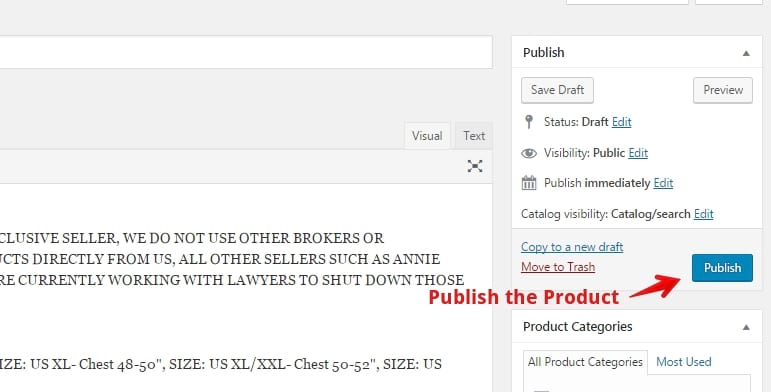
In the end, you need to publish the product to make it live on your online store.
After posting the product, you can check it on your website.
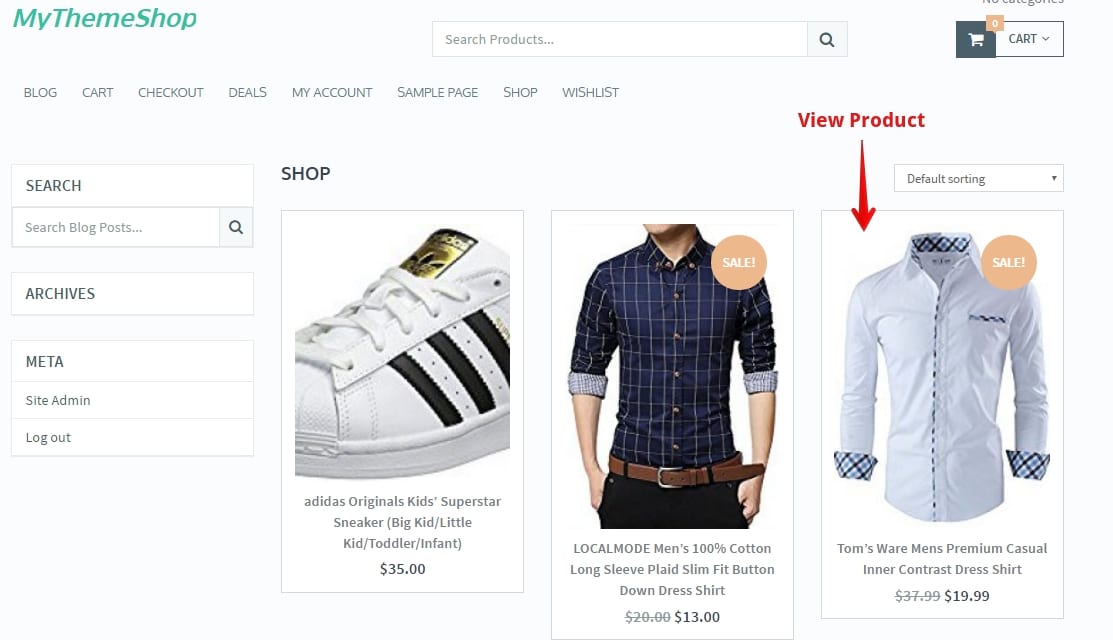
Similarly, you can add more products to your online store and earn good commissions by promoting them.
To conclude in the end, we would just want to point some minute details you should pay heed while adding and publishing affiliate products from Amazon.
Believe us, setting up an eCommerce store is not that difficult. The WooCommerce plugin has made it possible for anyone to set up their online store. In the end, who doesn’t want to earn money!
Do share your views about the above tutorial. We would be glad to see you succeed.
