Keeping track of your website is crucial if you want to improve your website’s visibility on the search engine and generate more leads from it.
Google Analytics is a free tool which helps you to analyze the behavior of your WordPress Blog. The tool gives you accurate stats about your website’s page views, user engagement, bounce rate, analytics of posts and much more.

While running a blog or a website, you should keep track of all such important details which would help you to optimize your website for the user.
Table Of Contents
- 1. Installing Google Analytics on WordPress
- 2. Part 1: Generating the Google Analytics Code
- 2.1. Step 1: Sign In Using Your Google Account
- 2.2. Step 2: Sign Up to create a Google Analytics Account
- 2.3. Step 3: Enter Your Website Details
- 2.4. Step 4: Get Google Analytics Code
- 3. Method 1: Using Headers and Footers Plugin
- 3.1. Step 1: Add a New Plugin
- 3.2. Step 2: Install and Activate the Plugin
- 3.3. Step 3: Configuring the Plugin
- 3.4. Step 4: Implement the Analytics Code
- 4. Method 2: Using header.php file (Not Recommended for Beginners)
- 4.1. Step 1: Go to Theme Editor
- 4.2. Step 2: Find header.php file
- 4.3. Step 3: Pasting the Google Analytics code
- 5. Method 3: Use Themes from MyThemeShop (Recommended)
Most of the newbies focus only on keeping track of the number of page views on their website, although they miss the central part- does the user even stay on the website or not?
1 Installing Google Analytics on WordPress
We have divided the whole installation process into two different parts. In the first part, we will see how to generate the Google Analytics code for your website.
In the second part, we will be primarily focussing on implementing the analytics code on your WordPress website.
2 Part 1: Generating the Google Analytics Code
2.1 Step 1: Sign In Using Your Google Account
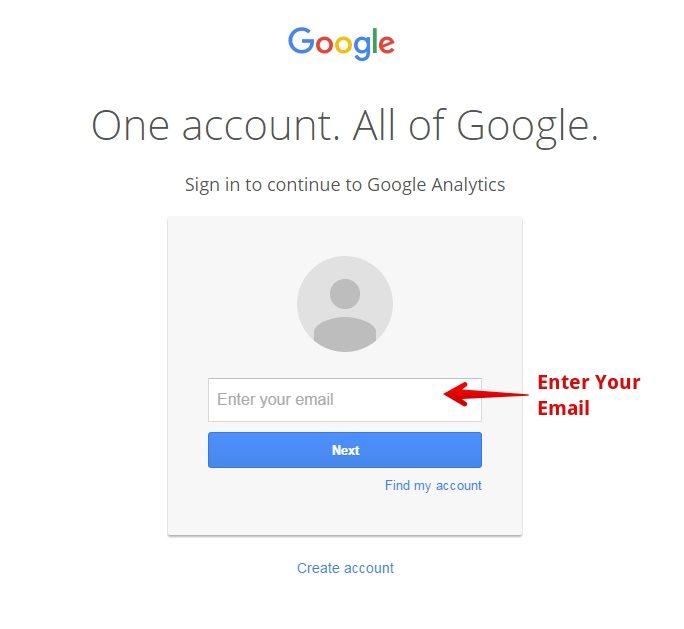
To use Google Analytics, you should have a Google Account.
Sign in using your Google Account or create one if you don’t have it. It would hardly take 5 minutes.
2.2 Step 2: Sign Up to create a Google Analytics Account
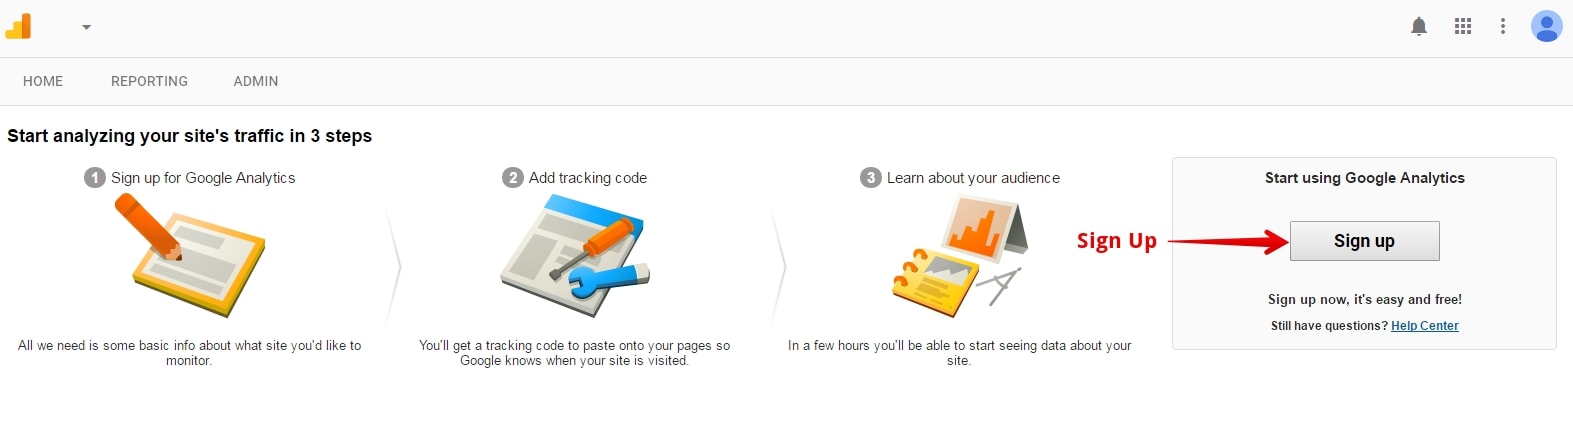
After Signing In using your Google Account, you will get a screen like above. Click on Sign Up. Accept the Agreement and you will be successfully signed in to your Google Analytics account.
2.3 Step 3: Enter Your Website Details
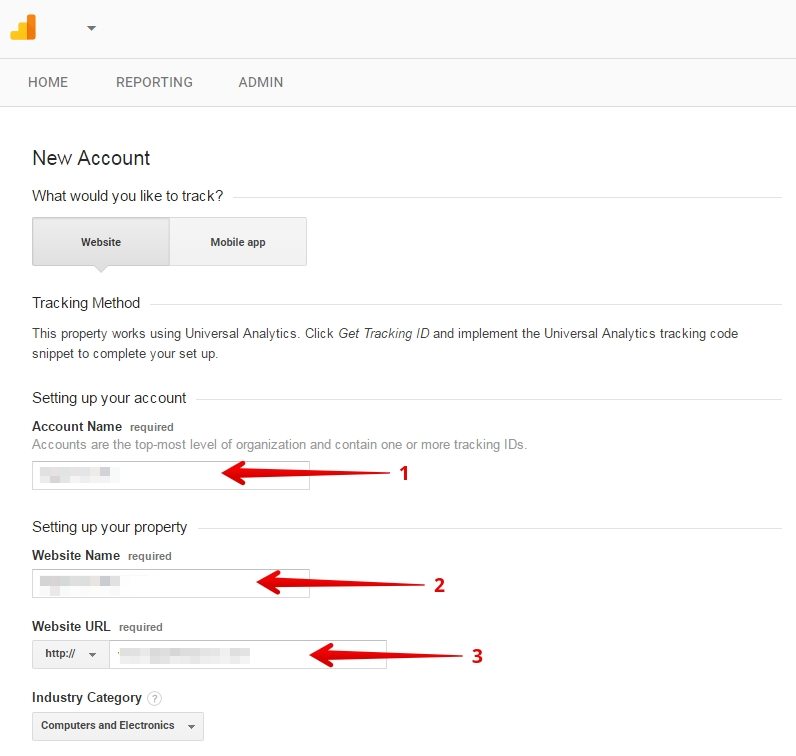
After accepting the terms and conditions, you will be redirected to a new page where you will need to fill in the appropriate details about your website. Select among Website and Mobile App. In this tutorial, we are installing the analytics code for a website.
- Account Name: This can be anything. If you are working for an organization, then enter the name of the organization. If you are working solo, you can give in any suitable name. With an account name, you can keep the visibility of the account singular, or you may even share the account with your team or department if you are working for an organization. You can read more on the Google Support regarding this.
- Website Name: Enter the name of the website for which you want to track the details.
- Website URL: Enter the complete website URL. Eg: http://www.WebsiteName.com. You can also click on the checkboxes if you want to share your site statistics with Google.
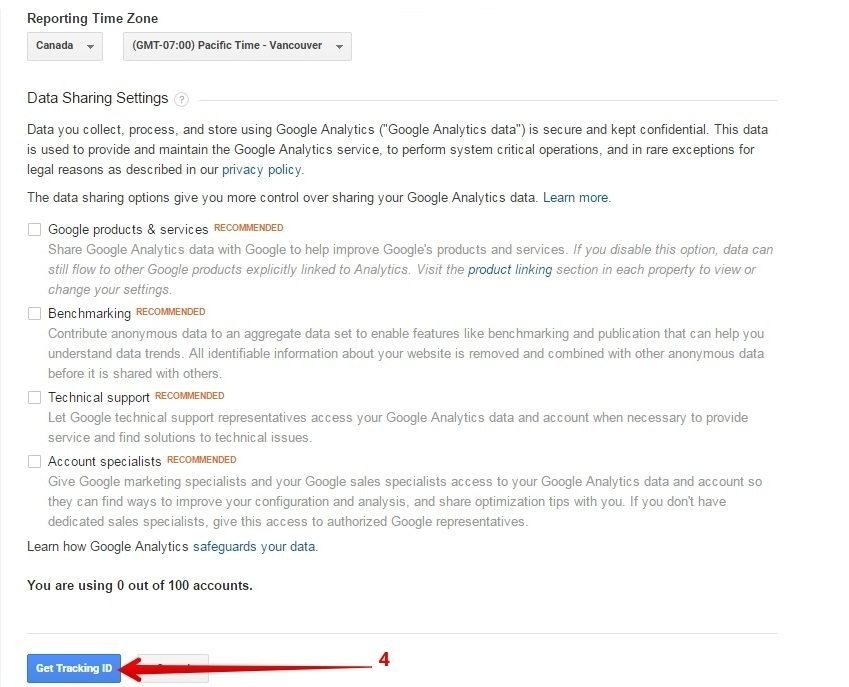
- Generate Tracking ID: After filling in the details, just go through it once again. Click on “Get Tracking ID” to get the Analytics code.
2.4 Step 4: Get Google Analytics Code
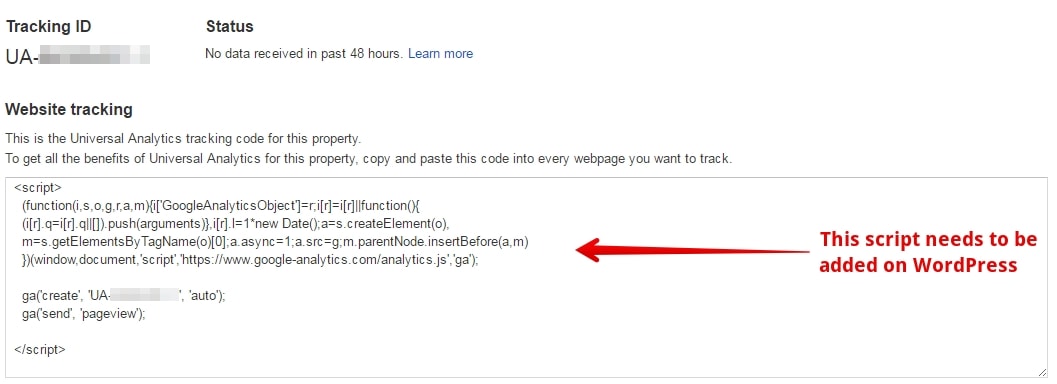
After successfully filling up all the necessary details in Step 3, it will generate a Tracking ID along with the Analytics code. This Analytics code is needed to be applied on your WordPress website.
You can implement the Google Analytics code on your WordPress website in three different ways:
3 Method 1: Using Headers and Footers Plugin
If you haven’t added any custom code to your WordPress website before, don’t worry. Implementing a code on a WordPress website is easy. All you need to do is follow these four steps.
3.1 Step 1: Add a New Plugin
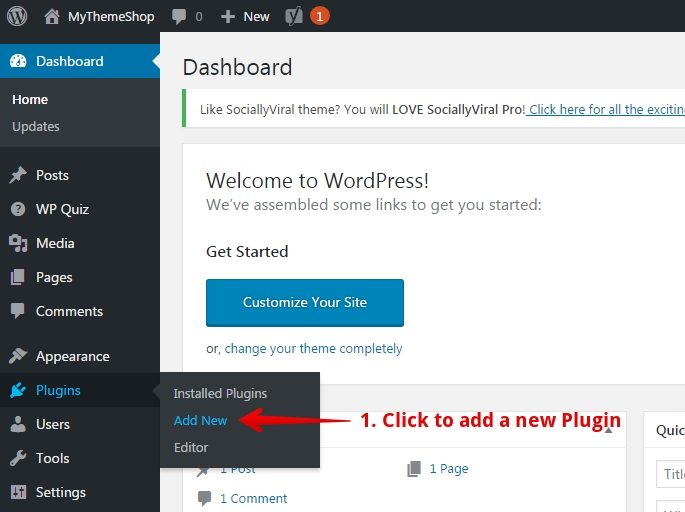
- In your WordPress dashboard, hover to Plugins -> Click on “Add New.”
3.2 Step 2: Install and Activate the Plugin
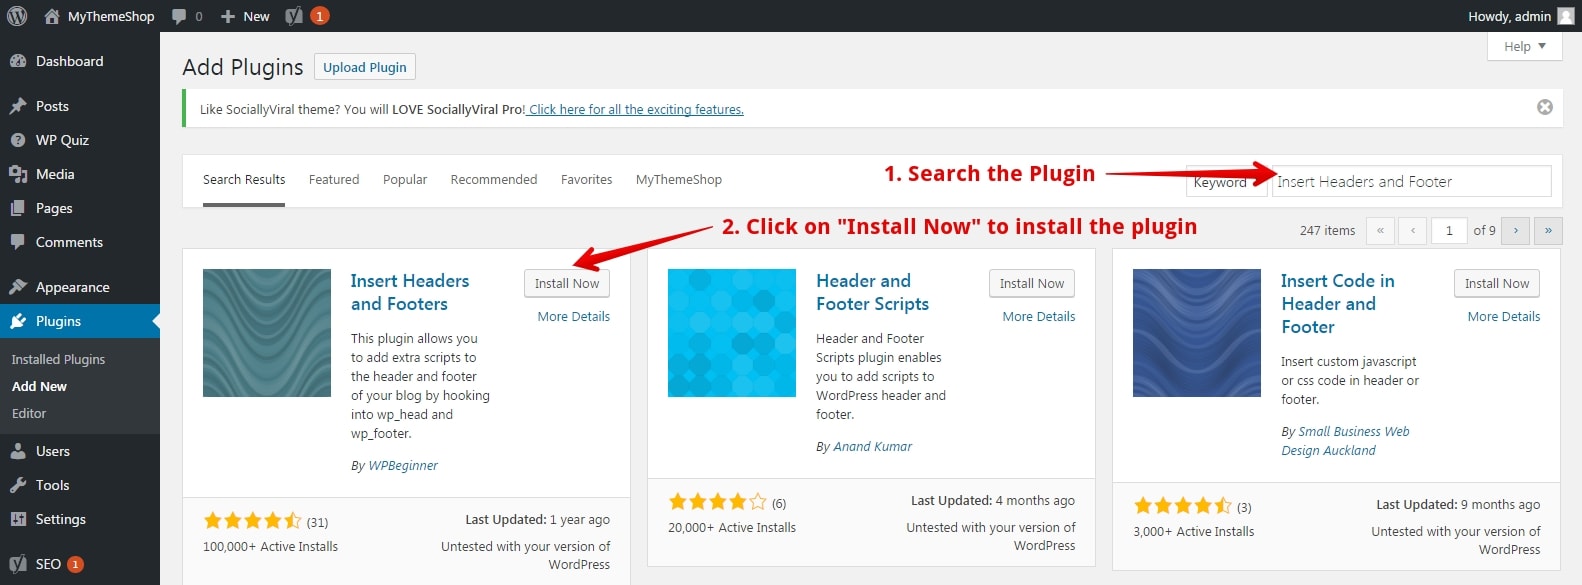
- Search “Insert Headers and Footers” in the search box and press ENTER.
- Install the plugin by WPBeginner and Activate it.
3.3 Step 3: Configuring the Plugin
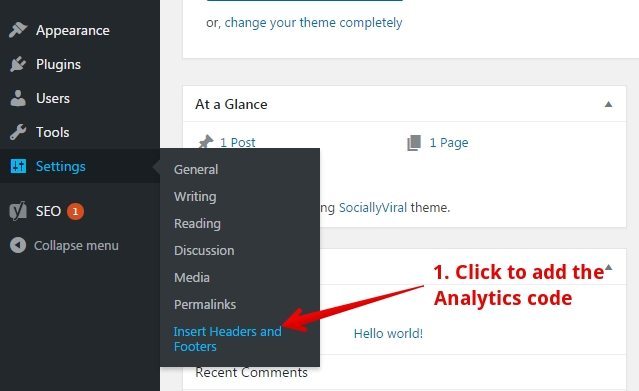
- Hover to Settings -> Click on “Insert Headers and Footers” to change its setting.
3.4 Step 4: Implement the Analytics Code
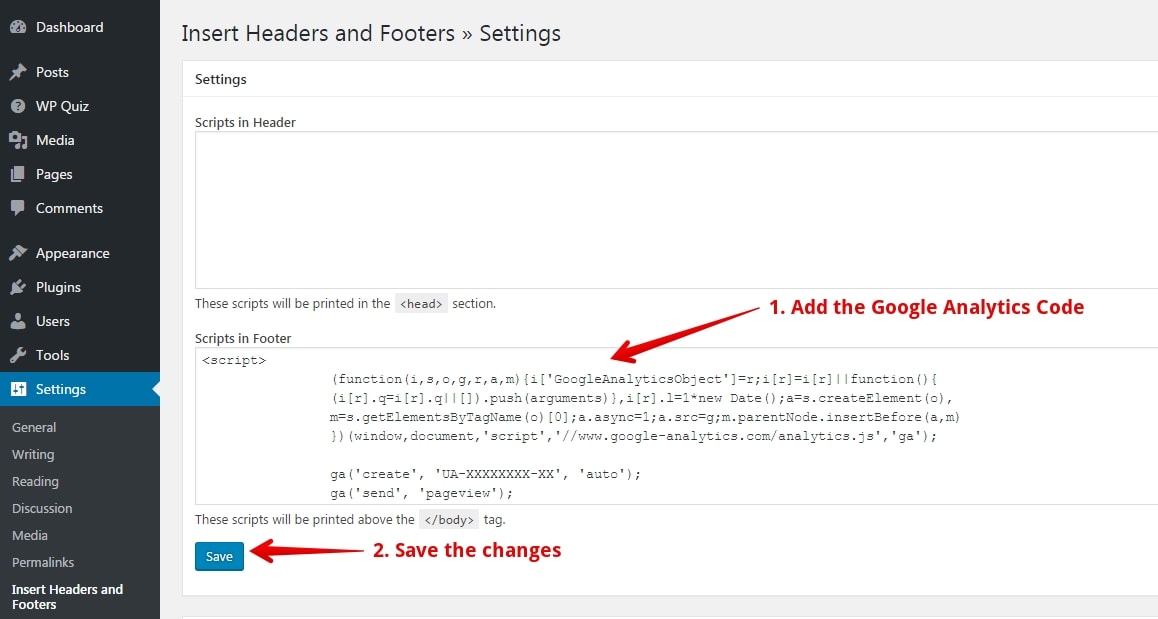
- After clicking on “Insert Headers and Footers,” you will be directed to the plugin settings. Here you can paste the code that was generated during Step 4. Paste the Google Analytics code in “Scripts in Footer.” This is because you need to implement the analytics code on each page of your website so that it can track the details correctly. While pasting the code, ensure to select and paste everything between and including the <script> and </script> tag.
- Save the settings.
You have now successfully added the Google Analytics code on your website. It might take some time to show your accurate details on the Google Analytics Page.
Now, let us look at the second method.
4 Method 2: Using header.php file (Not Recommended for Beginners)
You can also paste the Google Analytics code manually on your website. However, we would not recommend this method to beginners and newbies.
We would recommend you to take the backup of your website before implementing this method. Use our free backup plugin to be on a safer side if something goes wrong while editing the code.
4.1 Step 1: Go to Theme Editor
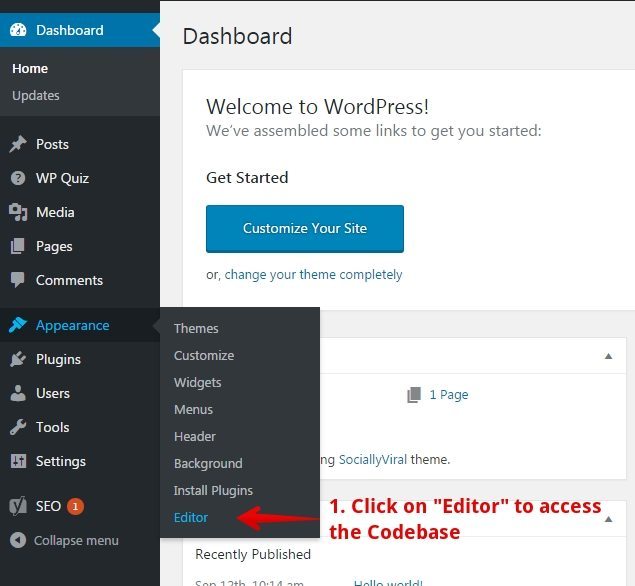
- Hover to Appearance -> Click on “Editor” to access your Theme Codebase.
4.2 Step 2: Find header.php file
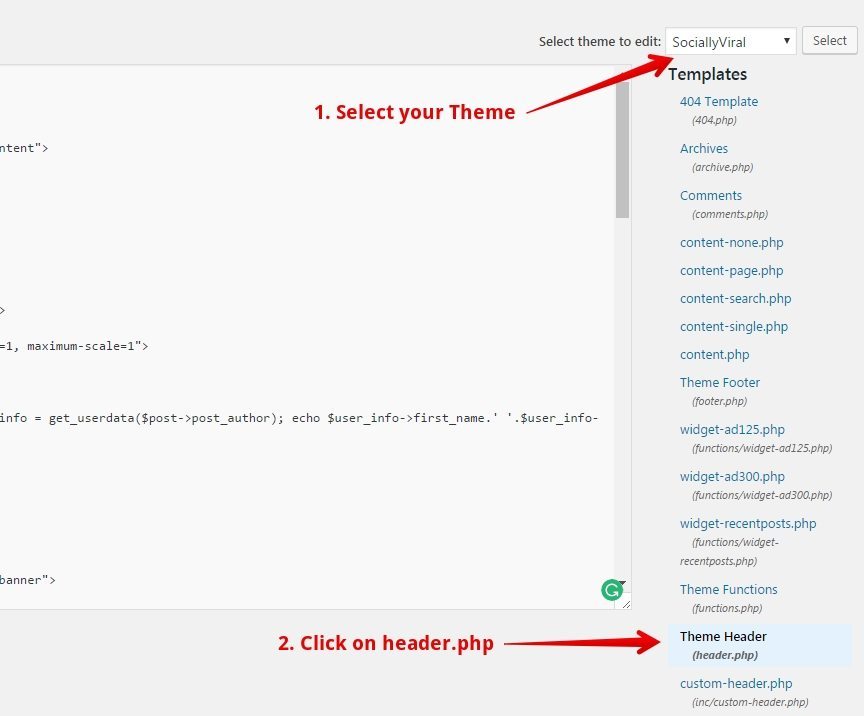
- From the left dropdown menu, choose your Theme to access its code. In above, we are using the ultrafast SociallyViral Theme.
- After selecting your theme, find the header.php file and click on it.
4.3 Step 3: Pasting the Google Analytics code
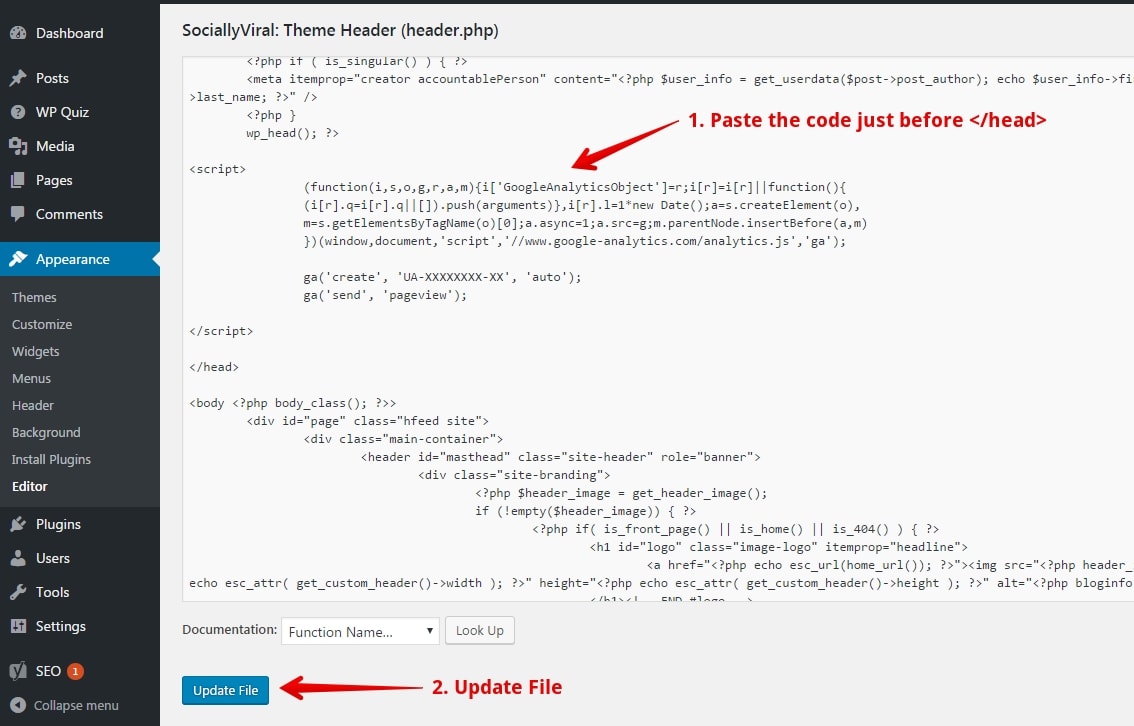
- In your header.php file, paste the Google Analytics code including the script tag just before the </head> tag. In the above, use the tracking id that was generated in Step 4 instead of ‘UA-XXXXXXXX-XX.’
- Click on “Update File” to save the changes.
You have successfully linked your WordPress website with your Google Analytics account. You may have to wait a while to get the exact metrics of your website on Google Analytics.
Let’s move on to the last and the easiest method to implement the Google Analytics Code.
5 Method 3: Use Themes from MyThemeShop (Recommended)
MyThemeShop provides you the advantage to apply the Google Analytics Code on your WordPress powered website without any hassle.
5.1 Step 1: Go to Theme Options
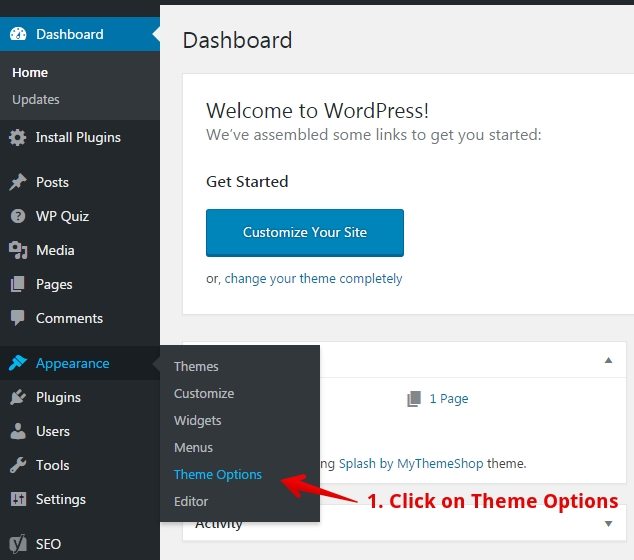
- Hover to Appearance -> Click on “Theme Options.” Theme options is an exclusive option provided in all the premium WordPress Themes provided by MyThemeShop so that you can customize the theme and add functionalities to your website with ease.
5.2 Step 2: Insert Google Analytics Code in Footer
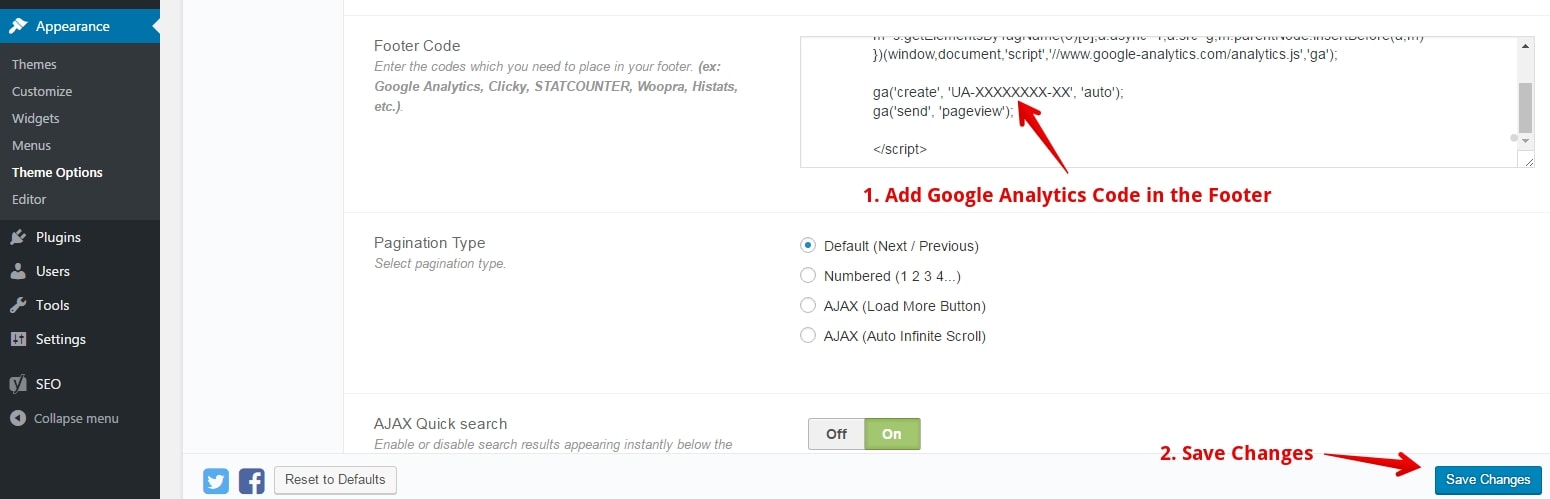
- After clicking on the Theme Options, you will be directed to General Settings. Scroll down to find the Footer Code. Paste the Google Analytics Code that you had generated earlier in Step 4. Include the <script> and </script> tag and the code between them.
- Save the changes.
Congratulations! You have successfully implemented Google Analytics on your WordPress website. You might have to wait for a few hours to get the relevant details about your website on the Google Analytics page.
Wasn’t it so easy to implement the code inside a MyThemeShop Theme?
Apart from this, all MyThemeShop Themes support easy customization so that you have full freedom to change and modify your website according to your need. Due to these features and outstanding customer support, the result is – more than 650,000 Happy Customers.
Use Google Analytics to monitor the performance of your website. The tool can be utilized by anyone to improve their site visibility, gain more viewers, check new functionality, improve the bounce rate and much more.
So, that was all from our side to make you implement the free Google Analytics tool on your WordPress website.
Were you using any Analytics tool till now? What according to you is the easiest way to implement Google Analytics on a WordPress Website? Do share your views in the comment section below.