When I was first getting started with a WordPress Blog, it was only just starting to gain popularity with the masses, and there really wasn’t much out there when it came to learning the ins and outs of the WordPress.
Over the years, though, I’ve learned a few tricks of the trade that just about everyone should know to help them utilize their website better.
Table Of Contents
- 1. Change the author of a post
- 2. Distraction free writing
- 3. Keyboard Shortcuts
- 4. Keyboard Short Cuts For Comment Moderation
- 5. Built-In Shortcodes
- 6. Make a post sticky
- 7. Scheduling a post
- 8. Quick Edit Posts
- 9. Create your own permalink structure
- 10. The Plain Text pasting option
- 11. 3 hyphens (-) make an em dash (—)
- 12. Auto embed certain types of content
- 13. Get comment notifications
- 14. Drag and drop photos into editor
- 15. Import Data
Below are 15 features inside of WordPress that you may not have known were there the whole time.
1 Change the author of a post
To start off our list, is this small but helpful feature that few people may know of.
The chances are that you’ve seen blogs where the blog owner publishes a post linked to their name even though they state at the beginning that the article was written by someone else.
This may have been intentional, but it may have also been that they didn’t know that they could switch the attribution to another author/user without logging out of their admin account and logging into the person’s account.
The secret to this is rather simple, assuming that the person who has written the post for you has a user account on your blog.
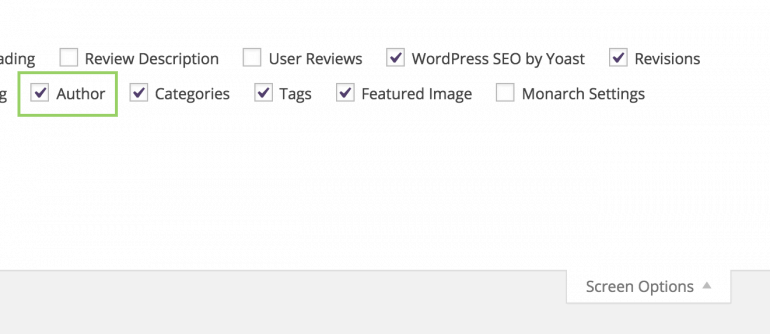
From your Post Editor, you can navigate up to the top right corner where you will see a small box that says, Screen Options. Clicking on that tab will open a hidden menu full of boxes that can be checked or unchecked.
In that menu, you will see an option called Authors. Check the box next to that and then scroll down to the bottom of your screen to find the new Author box that is there. You can also learn about how to manage user roles on your WordPress website. this would help you in the longer run.
Click the drop-down menu and then select the author/user to whom the post belongs and then update your post.
Now the post will be published under the correct author attribution and will show their author bio at the bottom of the post if they have information to display.
2 Distraction free writing
Being productive while you’re working in any capacity is important and trying to be productive while writing in WordPress is just as important for many of us who make a living doing so.
However, staring at a screen full of cluttered menu options and other distractions can affect just how focused we are while working.
Wouldn’t it be great if there was a way to eliminate those visual distractions? Well, after one of the newer updates to WordPress (4.1 update), there is a great feature called Distraction Free Writing.
If you’ve updated to the newest WordPress Core software, then this want to be displayed is available for you to start using.
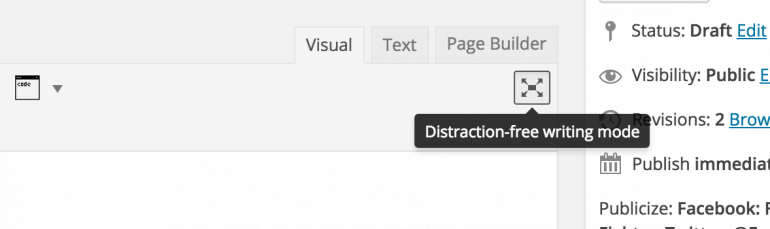
When you’re in the Editor of either a page or post, the button for activating the Distraction-Free Writing Mode is slyly tucked under the Visual and Text tabs.
Clicking that will make all the other unessential elements of the post editor disappear and you will be left with a clean writing surface that you creatively explode onto.
If you want the menu options back, simply move your mouse over to the far left or far right and they will all appear again.
3 Keyboard Shortcuts
Writing in WordPress is one thing, but editing — well, editing is another thing entirely.
Before I knew about this handy feature, my editing days were full of what seemed like endless and tedious mouse clicks, but then I discovered WordPress’ Keyboard Shortcuts.
Many of these shortcuts are generic and perform the same function when you using a code editor for editing the code of your website.
The Keyboard Shortcuts are just what you would expect them to be: essentially, a combination of keystrokes that initiate a result.
For example, after you write a heading for a section in your post, instead of highlighting the section and then going through the heading options and clicking the one you want you can simply click Command + 2 (or Ctrl + 2 if you’re using a Windows based computer) to make that sentence a Heading 2 tag.
This isn’t the only editing hack available in the post editor.
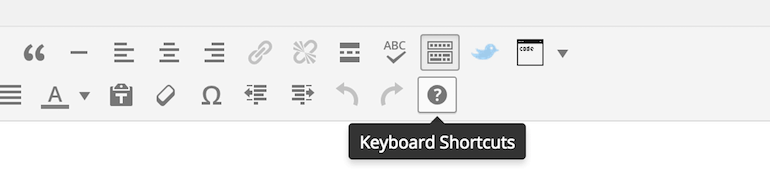
For an entire list of the keyboard shortcuts that you can use, click on the Toolbar Toggle to open the editor’s kitchen sink and then click on the click on the Question Mark. This will open a small window that lists all the shortcuts that you can use in the editor.
You’ll be happy about these, trust me.
4 Keyboard Short Cuts For Comment Moderation
Not only does WordPress have a set of shortcuts that can be used to speed up editing your posts, they also have a set off for comment moderation.
If you’re a web admin, then you know just how irritating and tedious moderating comments can get. Thankfully, there is a way to speed through all of this.
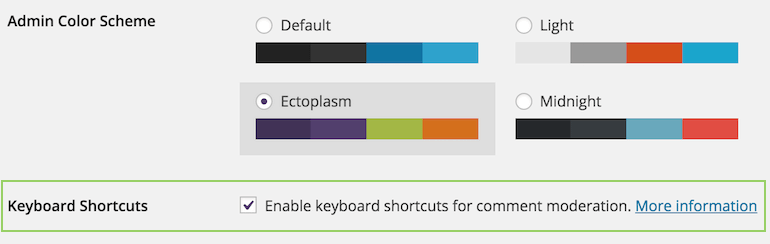
If you go to Users —> Your Profile, one of the first options you will find is a checkbox for Keyboard Shortcuts.
Checking that box and will enable the shortcuts that can be used to for moderating your comments in the back-end of WordPress.
You can find a full list of all the shortcuts that can use on the WordPress Codex.
5 Built-In Shortcodes
If you’ve been around the WP world for a little bit, then you’ve likely heard of shortcodes.
What you may not know is that you may not need to use a plugin to use and style certain elements using shortcodes because WordPress already has some built right into the software.
Here are the WordPress Shortcodes that you can use.
As a note, I had to write the above shortcodes in two brackets so that they would appear in the post. If you are going to use them in WordPress, just use one bracket on either side of the code.
The only downside to these shortcodes is that they don’t work within sidebars so just keep that in mind when you’re using them.
6 Make a post sticky
As you’ve probably figured out by now, when you start to publish content on your WordPress site, WordPress displays your most recently published content at the top of the blog and pushed the rest of the content down the page.
This means that only your most recent posts will be displayed on your front page. This feature is theme independent as it is valid when you are using a free or premium WordPress themes.
But what if you want to keep or put an older post on display above the fresh content? Is there a way to do that.
There sure is!
It’s called a Sticky Post and it’s very easy to do.
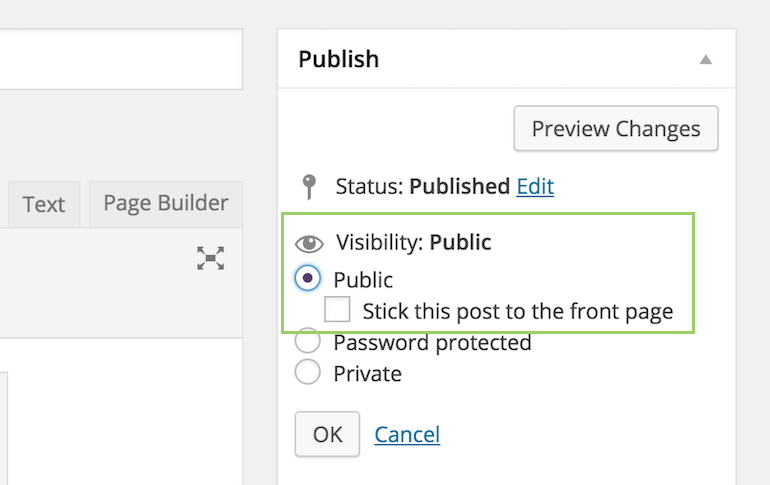
Simply go to the post that you want to be displayed and navigate over to the Publish box on the screen.
Next, you will see an eye icon next to the title Visibility and an option to Edit. Click on Edit to open up additional options.
One of the options there will say, “Stick this post to the front page.” Check that box and then update it, and your post will now be stuck at the top of the front page.
7 Scheduling a post
On occasion, there may a situation that will come up where you want to publish a post on a different day then the day you finished it. Is there a way to do that without a plugin? Yup!

In the Publish box that is off to the right of your Post Editor, you will see that WordPress automatically sets your posts to be published as soon as you press Publish.
However, if you click the Edit button next to that option, you will open up an additional option for changing the time and date when your post will go live.
Set the day and the time you wish to publish your post and then click OK.
The Publish button will then change to say Schedule.
Press that and your post will be scheduled to publish on you defined date.
8 Quick Edit Posts
If you’d like to consolidate your editing efforts across all the posts on your site, then you should be sure to make a mental note of the Quick Edit option in the All Posts area of your dashboard.
While in the All Posts area, you can hover over the title of a post to make some hidden options appear under it. One of those options will say Quick Edit.
Pressing that will open a new set up options for that post (see picture above). The Quick Edit option has some nice editing options including some of the ones we’ve mentioned above:
- Edit your Title, Slug, and the Author
- Change the Category of the post
- Add more tags
- Change the permissions of comments and pingbacks on a case by case basis
- Make a post sticky
- Password protect or make a post private
If you have a few posts that need some quick changes that you want to take care, then using the Quick Edit option can just speed things up a bit.
9 Create your own permalink structure
By now you should know that you should never, ever, EVER use the default permalink structure that is in WordPress. It’s ugly and not at all SEO friendly.
What you may not know, though, is that you don’t have to stick with the options that are given; you can create your own permalink structure in order to make something unique or closer to what you may need for your site.

If you go to Settings —> Permalinks, you will see an option towards the bottom that says, Custom Structure.
There you will find a box where you can enter various options to create a custom URL structure. These are the options that you can enter into that field:
There you will find a box where you can enter various options to create a custom URL structure. These are the options that you can enter into that field:
- %year%
- %monthnum%
- %day%
- %hour%
- %minute%
- %second%
- %post_id%
- %postname%
- %category%
- %author%
This may seem like a bunch of jargon, so let me explain how these work.
Let’s say that you have a post titled, “5 Ways To Create a Squeeze Page with WordPress.” However, you want the URL to include the month that post was created and to include the category that you posted it in.
If that was the case, then you would define your Custom Structure like this:
/%postname%/%monthnum%/%author%/
But, if you wanted the Author name and Month to be displayed before you Post Name, then you would change the structure to look like this:
/%monthnum%/%author%/%postname%/
You don’t have to go crazy here, but if you want something a little different for your URL structure then just know changing it up isn’t all that difficult.
You can find a full list of explanations for what each of these structure tags mean and how to go about using them on the WordPress Codex in the Using Permalinks section.
10 The Plain Text pasting option
Don’t you just hate it when you’re trying to (legally) copy and paste something from a web page or external writing software to your post only to find that is it all messy looking and doesn’t fit with the rest of your post and site styling?
How irritating!
Don’t get too worked out about this because there is a way that you can copy something to and paste it into your post without all that baggage. The solution?
The Plain Text posting option.
This handy feature is also tucked away in your post editor.
To find it, click the Title Toggle to open up the other options in the kitchen sink. There you will find a button shaped like a clipboard with a T on it.
When you’re about to paste something into the Visual editor, click that button and you can then paste you content as plain text with no screwy code that mess with your formatting.
11 3 hyphens (-) make an em dash (—)

It seems like such a petty feature, but it’s a feature nonetheless. In case you don’t know where the em dash is located on your computer keyboard, you can easily create one in your post by stringing together 3 hyphens.
Writing tip: use hyphens only to connect (hyphenate) words like “back-end” or “Spider-Man”. Use an em-dash to make something in your sentence stand out. (For example: “They all had one thing in common—they loved WordPress.”)
12 Auto embed certain types of content
Not too long ago, embedding content like YouTube videos or Tweets was a bit of a hassle, but since the new updates that WordPress has been rolling out, embedding this type content is now super easy. No, you don’t need premium WordPress plugins to do that.
To automatically embed something like a tweet, YouTube video or even a Vine video (new to WordPress 4.1) all you have to do is copy the link and paste in your post.
How To Fix Image Upload Issue And Broken Image Error In #WordPress? – Video #Tutorial – https://t.co/vz9AEfHnrD
— MyThemeShop (@MyThemeShopTeam) February 13, 2019
For example, the Tweet you see above is not a photo but is actually the URL of a tweet by MyThemeShop which I copied and pasted in the post. The Auto Embed feature of WordPress did the rest and generated the result you see.
You can do the same thing with a YouTube or Vine video. While you can use the shortcodes to do this, it’s much easier to simple copy and paste, however, it doesn’t work with every site and service out there.
You can see a full list of all the sites that you can use that WordPress can auto embed including sites like Instagram and Hulu.
13 Get comment notifications when away from your computer
Let’s get real for a second — most of us can’t (and none of us should) sit in front of a computer 27/4. It’s not exactly healthy and we all have lives to live off of the internet. However, if you’re a blog owner then staying on top of comments on your site is pretty important.
If you like to know who is commenting on your site right as it happens, then you may be happy to know that you can receive email notifications to your smartphone via your email.

To turn on this option in WordPress, go to Settings —> Discussion and check the box that says, “Email me whenever anyone posts a comment.”
Now you’ll be ready to keep track and even respond to comments while you’re away from your computer.
This system is quite useful when you are using a WordPress eCommerce theme for your online store. People love to post comments regarding the product and services that you are providing through your website. Getting the comment notifications is a much-needed option in this case.
Alternatively, if you have the Jetpack plugin installed on your site, you can turn on the Notification Module and then sign into to your site on your phone using the WordPress App and receive banner notifications like you would from Facebook or any other Social Media directly on your phone or another mobile device.
It’s pretty handy.
14 Drag and drop photos into editor
Uploading photos to WordPress used to take quite a few steps to get it from your media file and into your post. However, recently, WordPress got an added feature that allows you to drag and drop pictures from your computer and into your post.
In case you’re wondering if it’s that simple, go ahead and give it a try. Once you drop your photo into your into your post editor, WordPress will upload it to your media file.
15 Import Data
Looking to move your blog from a different platform to a self-hosted WordPress site or from one WP site to another?
It may sound pretty complicated to do, but if you use the Import option in your WordPress dashboard, then importing and moving your blog content over to your new site is a snap.
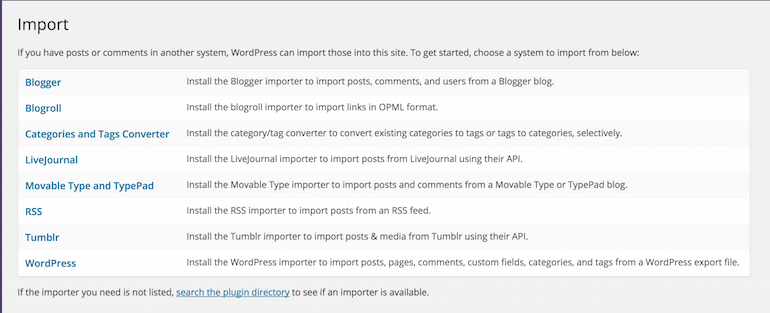
Go to Tools —> Import. There you will find a list of options like the one you see above.
If you’re going to be moving your site from someplace like Blogger, then you would select the option titled Blogger to install the correct plugin that will help you import all of the content from your blogger site on to your new WordPress site.
The same steps would be true if you wanted to import from Tumblr or if you were going to be moving from a WordPress.com install to a self-hosted WP site.
Wrapping it up
Those are just 15 handy little tricks and features tucked away in your WordPress site. To make your blog awesome and stunning you should try WordPress blog themes to suit the niche of your website.
I have yet to find any more hidden features, but that doesn’t mean they’re not there. Did I miss anything? Comment below and let me know.