Creating a WordPress website is a big task. You give hours and hours to develop it, to make it look perfect from every corner. It hurts to see the footer when you find something written like this ‘Powered by WordPress | Theme by Company X’.
You put your money and efforts to make your website look as professional as you can, but this single line steals all the credit from you and makes it look naive.
Because of these small things, your WordPress website looks dull. If you are a company, then it might have a very negative impact on your clients and customers. Therefore, it is something that needs to be removed.
Now a number of questions will come to your mind, “how can I do that?”, “how much time would it take?” “is there a Wordpress plugin for that” and so on.
In this article, you will get answers to all your queries with screenshots after every small step which will help you to remove the footer credits.
So today, in this post, we will help you to make your website look more professional by removing that line.
Before starting, we would like to answer a very popular question that we encounter a lot.
1 Is it legal to remove WordPress footer credit links?
Yes, it is absolutely legal to do that. WordPress is open-source software; in other terms, it allows you to use, modify and redistribute the CMS according to your requirements.
Any WordPress theme or plugin that you download from the WordPress directory, and even most commercial WordPress themes are all open source.
So, you have full rights to do what you want with your website, including removing the footer credit links.
2 Removing and Editing WordPress Footer Credits
There are a bunch of ways in which one can remove the footer credits, but we will only recommend the following three ways.
The first two ways are very easy to implement, which is why they are highly recommended. The third one is a little complicated and risky as well, as it requires you to edit the code of your website.
2.1 Theme Settings Page
Most theme creators and developers know that their users want to get rid of that unprofessional-looking credit line in the footer. So, most of the themes have the option of editing and removing footer credits.
There are thousands of themes available on WordPress, and most of them have this setting available under different sections. But the first place you should start looking for it is inside the WordPress theme customizer (Appearance » Customize).
For instance, the GetNoticed theme gives all users an option to customize the footer text as well as to disable those credit links.
For a better understanding, you can follow the image given below.
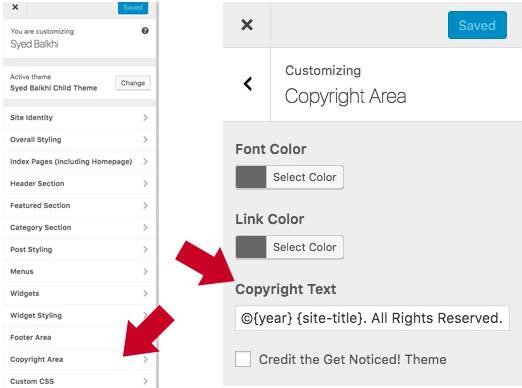
You can simply uncheck the box at the bottom of this page if you only remove the footer. To have a customized footer you can rewrite in the ‘Copyright Text’ box. Enter the current year and the title of your website in the space given for them respectively.
You may not find this option at this place in every theme, but if you don’t, then search on the theme’s options pages or inside the Widgets section.
If your theme does not have this option only, then you should go for the next recommendation as it is a little complex. Don’t worry; we have tried our best to simplify it for you.
2.2 By Using ‘Remove Footer Credit’ Plugin
This is the best and easy way to remove footer credits. It is so because it takes the least time and does not require coding skills as well.
All you have to do is to download the ‘Remove Footer Credit’ plugin and employ it on your website.
Click here to download the plugin.
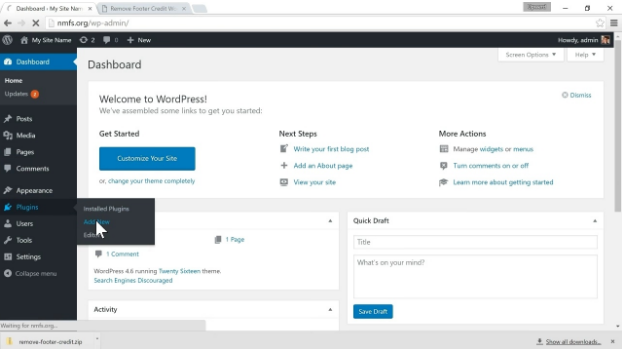
After downloading the plugin, go to your WordPress dashboard, open the menu on the left-hand side, then click on plugins and then click on ‘Add New.’
For a more interactive explanation follow the screenshot image below.
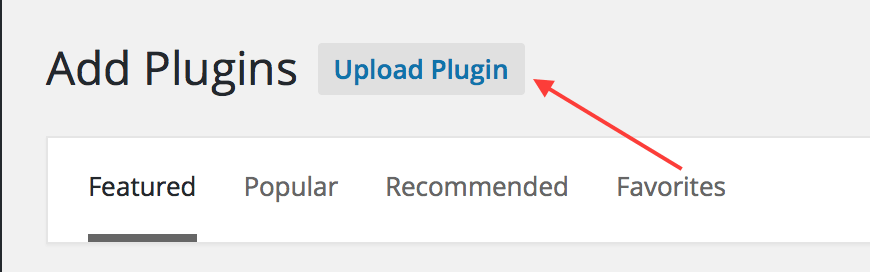
After clicking the ‘Add New’ button, Click on ‘Upload Plugin’ and then on ‘Choose File’. Now you have given the command to add a new plugin in your website.
You have to select the file (plugin) that you have just downloaded using our link, and then you have to click on ‘Install Now’. To activate the plugin, you have to click on ‘Activate Plugin’ button.
Once the plugin is activated, go to your dashboard, click on tools, and in the end, you will find a button with the name of our plugin. Click on that. After clicking on it, you will see something like this.
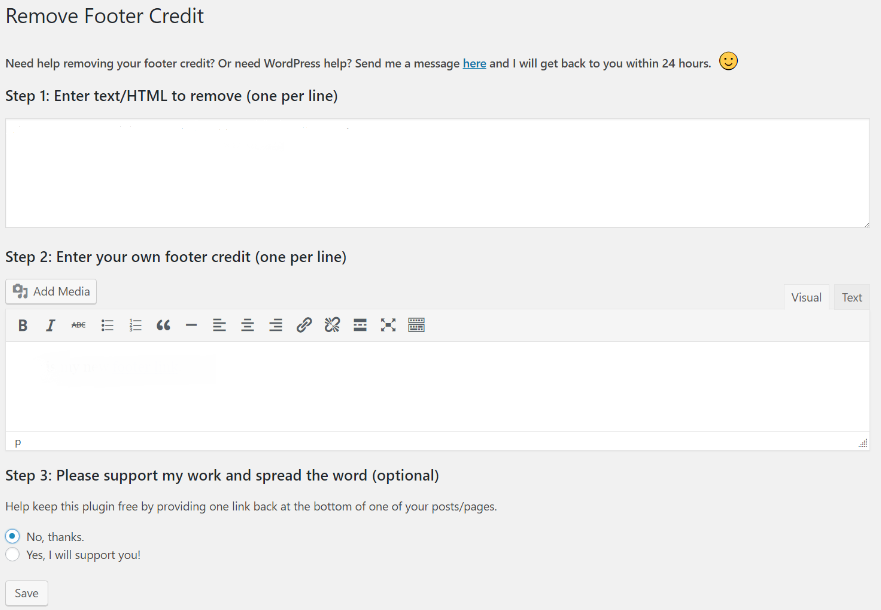
Now you can see that there are two sections. One, in which you have to enter the code that you want to remove, and in the other, you will write the edited code.
Everything on your website has a code linked back to it. So, in this case, you will find the code that belongs to the footer credits and paste it in the top box and edit it in a way to display something of your choice. But to do all this, you first need to access the source code.
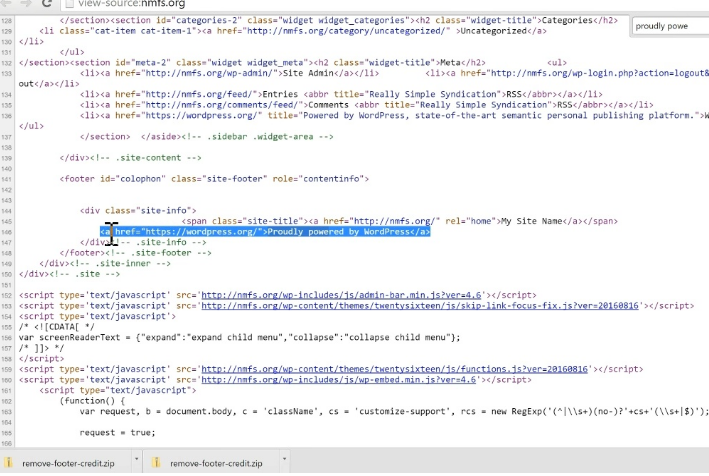
Now to access the code, all you have to do is to right-click anywhere on your website and then click on ‘view page source’. After doing so, you will see the mind-boggling amount of HTML coding.
Don’t worry. You don’t have to do much with the codes here. Search for ‘Powered By WordPress’ in the source file and copy the line highlighted in the following image. That’s the line that is responsible for the message that you see in the footer. This is the line of code we have to play with.
Copy this line of code and paste it in the upper and lower section of the ‘Remove Footer Credit’ Plugin, we previously talked about. Keep the code line as it is in the upper section.
In the lower section, you will have to edit this code line. Replace the URL of the WordPress website with your website’s URL and rewrite “Powered by WordPress” as something like “All Rights Reserved | Your-Website-name”. You can write anything you want.
2.3 By Editing the Footer.php Code
As the name suggests, the footer.php code consists of information about the footer of the website.
It’s good to know how to code for a website, but coding is not a necessary skill for you to have to edit the footer.php code. That’s because you have to replace a few words in the code simply.
Now there are two things involved in this, first it to access the code; second is to edit or remove it. So to access the code follow these instructions.
- Log-in to your WordPress Admin dashboard.
- Click on the left-hand menu, go to Appearance >> Editor. Click on Editor.
- On the right side of the list of theme files, search for the file named Theme Footer (footer.php). Click on it.
You can open this file in a text editor to edit it in suitable ways. As we said it earlier that you don’t need to be a coder to modify this code as you can edit it very easily.
The code looks like this for the default twenty-sixteen theme of WordPress.
<div class="site-info">
<?php
/**
* Fires before the twentysixteen footer text for footer customization.
*
* @since Twenty Sixteen 1.0
*/
do_action( 'twentysixteen_credits' );
?>
<span class="site-title"><a href="<?php echo esc_url( home_url( '/' ) ); ?>" rel="home"><?php bloginfo( 'name' ); ?></a></span>
<a href="<?php echo esc_url( __( 'https://wordpress.org/', 'twentysixteen' ) ); ?>"><?php printf( __( 'Proudly powered by %s', 'twentysixteen' ), 'WordPress' ); ?></a>
</div><!-- .site-info -->
You can either remove or edit the highlighted text in the code.
For instance, you can replace the link of your own website, or some other site with the hyperlink of WordPress. You can also write the name of your website where ‘WordPress’ is written.
3 Conclusion
We hope now you can easily remove the “Powered By” footer link from your WordPress site as we have tried our best to put everything in the simplest words possible.
All you need to do is follow any one method correctly, and replace the dull links with your own customized ones.
If you still face any problem, then do let us know in the comments section below.