When creating websites, it is hard to know how the site will fair in the upcoming days.
Sometimes it may not be viable to carry on maintaining both websites or you want to merge a website that you’ve recently acquired with your main website in order to reap the SEO benefits. If so, this guide is for you.
We’ll walk you through the entire process of merging two WordPress sites together while all while ensuring that SEO isn’t an afterthought.
Right before we jump in, some of you might be wondering. Why and when would you even want to merge two websites?
Why Merge Two WordPress Sites Together?
There can be many reasons why you would want to do it. For example, you would want to start as a blogger and want to merge the old content. This way you can keep your content in one location.
There are a number of valid reasons why someone would want to merge two of their websites together. But just to name a few for those of you who’ve considered it, merging your sites together might make sense if:
- One of your blogs isn’t performing as you’ve expected so you’re considering merging its content with one of your primary blogs.
- You’ve accidentally neglected one of your older websites for a while so it is no longer performing well and would no longer like to deal with the hassle of managing multiple WordPress websites.
- You’ve just strategically acquired another website or blog and want to move the content from their website over to yours in order to reap the SEO benefits.
As a blogger myself, I always consider whether it makes sense to merge two WordPress websites together before I even consider setting up a new blog as this allows me to keep my project in check and make sure that I don’t waste all of the time, effort and money that was invested into the old content.
So now, without further ado – let’s jump right in and take a look at how you can merge your two WordPress websites together today:
Step 1: Export the old WordPress site content
The first step is to export the WordPress site content as an XML file.
It can be done using the export feature present within WordPress. To do so, you first need to go to the old website dashboard.
From there, go to “Tools,” and then select, “Export.”
Now, you need to choose which content you want to export. We recommend checking the “All content” option. The option will export posts, pages, layouts, projects, and media.

Once you click the “Download Export File,” you will be able to start the process. After the process is done, you will get an “Extensible Markup Language(XML)” file. The XML file contains all the stripped-down versions of all your content. However, it doesn’t contain images. Do not worry, as we will go through the image backup later.
Step 2: Importing the newly created XML file
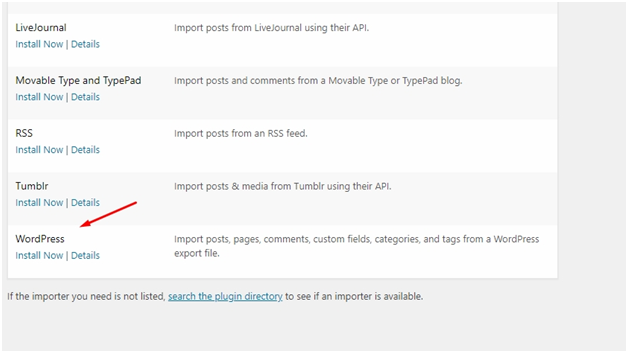
The next step is to import the newly created XML file to your new WordPress blog/website. To do so, you need to go to “Tools” and then “Import” tab. There you will be able to see the “WordPress” option. All you need to do is click on the “Install Now” option.

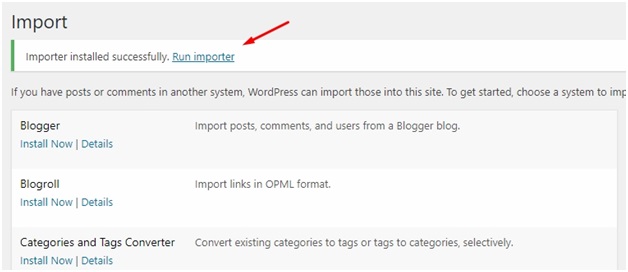
After that, you will get a new line popup saying “Importer installed successfully. Run Importer”

Now, you will be asked to choose a file. As you can see in the image below, it will import all the text related content including posts, custom fields, categories and so on.

Click on “Choose File” and then click on “Upload file and import.” If everything goes right, you will be redirected to a new page where you will be asked to assign a new user.
Step 3: Assigning the new user
As the content that is uploaded to the new WordPress blog should have an author or user associated with it, WordPress will ask you to assign one for it.
It is a mandatory step. You can either need to assign all the new content to an existing user or create an original author and then assign the content to him.
The Assign Author prompt will only be asked once. If you are not sure what to do, we recommend to assign to your admin account, and later change it to a new user later on, if you want to keep it separate for editing purposes.
Also, if you decide to keep the original author details intact, do not assign a new author and it will keep all the information as needed.
Step 4: Setting up URL Redirects
The next step is to set up proper URLs redirects for all the imported content. This is needed as it will enable the old content searches from Google to the new website. As we are writing the guide with SEO in mind, this step is very important and should not be skipped. If you do not do proper URL redirect, you will lose potential traffic, but also lose the SEO ranking associated with the content.
To get started, all you need to do is use an FTP client such as FileZilla. Once done, go to the root directory of your old WordPress blog and find the .htaccess file.
Now, open up the .htaccess file and copy and paste the below code.
#Options +FollowSymLinks
RewriteEngine on
RewriteRule ^(.*)$ http://www.newwordpressblog.com/$1 [R=301,L]
The above code implements 301 redirections. With 301 redirections, you will not lose SEO rankings. However, you might see a slight dip to the overall ranking of your website.
In the above code, make sure that you change the website URL to your new WordPress site. Once done, you are all set, and your old website traffic will now be redirected to your new site.
Step 5: Importing Images
The last step is to import images. Here’s a manual way to get that done.
To do so, you need to download all the media files via FTP tool such as Filezilla. You will have to locate the root directory. You can locate it by the usual name public_htmlor www. Next up, find the media content that would be required for upload.

The media content that would be required for upload can be found in wp-content/uploads directory. Next, you need to upload the files to your new blog. The downloaded files will now be uploaded to the FTP client.

Now its time to fix your image URLs by replacing the links. To help you in the quest of replacing links, we suggest you choose the “Search and Replace” plugin. It will help you quickly get up with the whole process.

That’s it! You have successfully merged two WordPress sites together without losing SEO.
So, what do you think about the tutorial? Were you able to successfully merge your WordPress blogs? Comment below and let us know. Also, do not forget to share the content with your peers.


