WordPress is one of the most famous content management systems used to create websites, so much that it empowers around one-third of the total new websites and blogs which are built every day. Creating a WordPress blog is a task of just a few minutes.
But, as we say, with great power comes great responsibility, there are of course some things even this highly developed content management system directly doesn’t allow you to do. One such thing is the ability to have a custom WordPress Login URL.
There are mainly two types of WordPress login URLs, one which ends with “/wp-admin/” and the other that ends with “/wp-login/”. You would agree that these URLs are pretty obvious and very easy to remember, which translates into high-security risk. WordPress doesn’t have the option to customize the Login URL, but, you can use the procedure listed in this post to create a custom WordPress Login URL for your website.
When you are thinking of changing the login URL, that means you are worried about the security of your WordPress-powered site against a brute force attack. In addition to protecting your website from such attack, creating a custom login URL allows you to hide the WordPress vulnerabilities and also allows you to entirely rebrand the Login Screen which makes visiting your login page a treat for the users that use your website.
We would also suggest you keep a complete WordPress backup of your WordPress blog in case if something goes wrong and your website suffers an unauthorized intrusion.
Previously, we have shown you how to find out or remember your WordPress login URL. In this post, we will take it a bit further and will be covering everything you need to know about creating a Custom WordPress Login URL so that you don’t have to remember a pre-prescribed URL to access your own website’s admin section.
Video Tutorial On Creating the Custom Login URL for WordPress Blog
Why Changing the WordPress Login URL is a Good Idea?
Before showing you how to create a custom WordPress login URL, it is essential to know a few reasons as to why you might even want to change it and not use the default one. There are many reasons that motivate developers or website owners to change the login URL and below we have listed some of the most important ones.
Protection from Brute Force Attacks
Brute force attack is a type of cyber-attack where a software is employed by hackers to enter the variation of spinning characters to find out the password of your website.
By using a customized Login URL, you are actually bypassing the whole process because the hackers can’t even find the login URL, let alone try software generated password combinations. Moreover, even if you have changed the username to something unique or tried a very hard password when hackers use this brute force attack, it takes away a lot of your server’s resources by eating up your bandwidth which eventually leads to slowing down or even crashing of your website. So all in all, using a different login URL not only gives the hackers a very hard time but also protects your website from unnecessary clutter.
So all in all, using a different login URL not only gives the hackers a very hard time but also protects your website from unnecessary clutter.
To Conceal That You Are Using WordPress
There is no doubt that WordPress is among the top contenders for website development out there. This is especially because of the great support and talented developers that are working tirelessly and continuously to find any vulnerabilities. But, it is no surprise that sometimes even WordPress faces some vulnerabilities despite all the developers and support it enjoys. So, whenever there is a little discrepancy with WordPress, the malicious hackers take advantage of these vulnerabilities and use them to their advantage and hack into your website. Using a custom Login URL is one of the simplest ways to eliminate attacks under such conditions because it is hard for hackers to find out that you are using WordPress. They can still check the meta generator tag but
Whenever there is a little discrepancy with WordPress, the malicious hackers take advantage of these vulnerabilities and use them to their advantage and hack into your website. Using a custom Login URL is one of the simplest methods to eliminate attacks under such conditions because it is hard for hackers to find out that you are using WordPress. They can still check the meta generator tag but hiding that is easy as well.
To Make your Login Screen More Appealing
In case you are running a WordPress-powered membership website, you might want to greet your visitors/customers with a more aesthetically appealing login screen than the usual run-of-the-mill, mundane login URL. Creating a custom branded page with a unique URL gives your website an edge over other Orthodox sites, makes your customers feel more valued and hides the fact that you are using a free CMS.
Although you can design the main site using various free WordPress themes and premium plugins, redesigning the login page will give you an edge over other websites.
Changing The WordPress Login URL
Creating a Custom WordPress Login URL is pretty simple and it is mostly done using easy-to-install WordPress plugins. All of these plugins are free to install. Some worth mentioning here are: Custom Login URL, WPS Hide Login and more.
For the sake of this tutorial, we will show you how to use the WPS Hide Login plugin as this is the most accurate and simplest plugin using which you can create custom login URL for your WordPress website. Additionally, it is frequently updated as well. To use this plugin for the purpose of creating custom login URL- follow the steps listed below:
Step 1: Add New Plugin
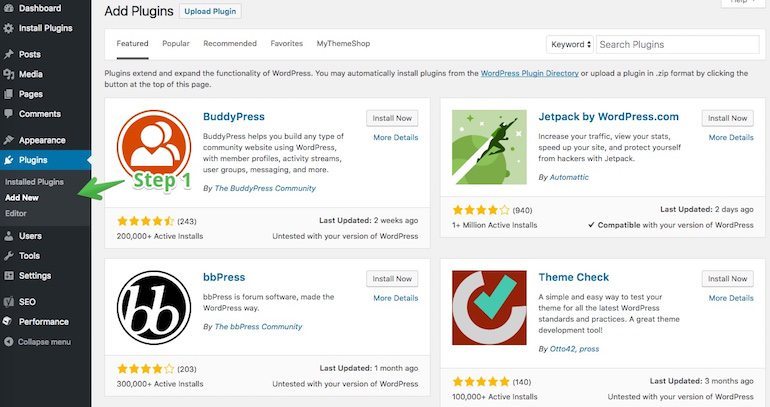
After you have logged into your WordPress dashboard, head over to the Plugins button located on the left-hand side of the dashboard and then click on Add new from the drop down box.
Step 2: Search and Install the Plugin
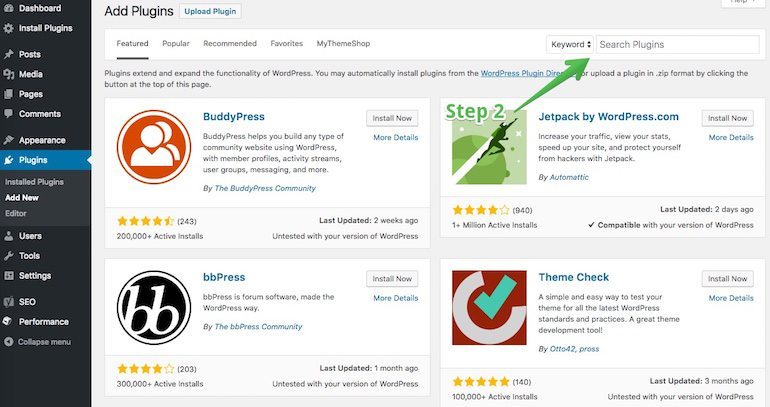
You can then search for the WPS Hide Login from the upper right-hand corner of the plugins page. Download the plugin.
Step 3: Activate the Plugin

When the installation is complete, click on Activate Plugin link to make the plugin workable.
Step 4: Configuring Settings
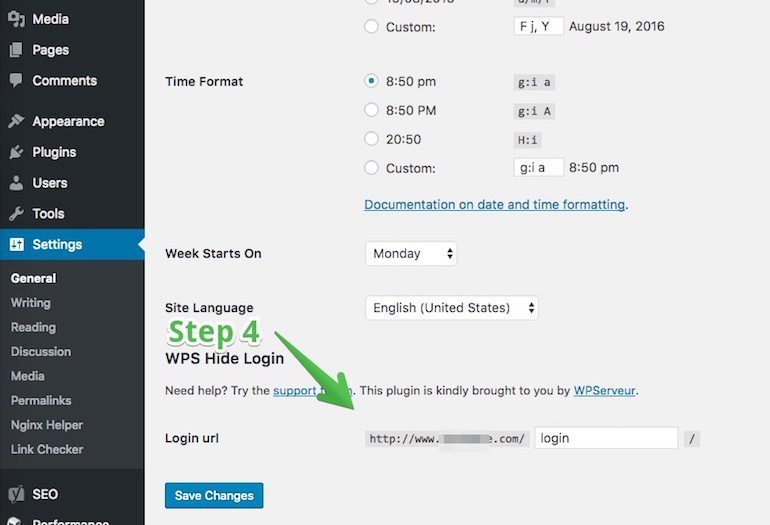
Next, you need to head over to the Settings page of your website by clicking on the Settings button from the left-hand side of the dashboard. Click on General under the Settings button. Scroll all the way down until you find the Login URL field. This is where you will have to enter the New Custom Login URL for your WordPress-powered site’s login page.
Use your imagination to set the URL so unique that it would be hard for anyone to guess the URL. Also, make sure that you remember this URL. Just to be on the safer side, Bookmark the new Login URL so you don’t have to worry about forgetting it or manually typing it every time you want to access the dashboard. This can be done by going to the options of your browser and then clicking on Bookmarks and then choosing Bookmark this Page from the drop down box that appears.
Add More Security to Your Website
We had mentioned earlier that changing the Login URL of your website makes it safer against the attack of hackers, but, it does not mean that you can lay back and be satisfied by just changing the URL and feeling safe as there are bad guys out there who won’t leave any stone unturned to get access to your website. To ensure an even stronger security for your WordPress powered site, we suggest you use the one pack solution that not only allows you to change the login URL but also allows you to do a lot more on
To ensure an even stronger security for your WordPress powered site, we suggest you use the one pack solution that not only allows you to change the login URL but also allows you to do a lot more on the security front. The name of this awesome plugin is iThemes Security Lite and it is free too.
This software can be searched, installed and activated by using the same procedure as we showed you for WPS hide login. After the activation is complete, you will see a newly created menu item on the left-hand side of the dashboard that reads Security. Hover your cursor over it and then Click on Settings from the drop down box that appears. Scroll all the way down to the Hide Login Area section. Check the “Enable” the hide backend feature box to expand the section. In the Login Slug field, write your new custom login URL. You should also leave the Enable Theme Compatibility box checked – it does exactly as the name implies! Finally, click the blue “Save All Changes” button.
We would suggest you use our premium WordPress themes to keep that extra layer of security over your WordPress website.
Final Thoughts
At the beginning of this article, you were just wondering how to create a Custom WordPress Login URL, but now we are sure you are surprised to know how easy and painless this process is.
You simply need to install the right plugin, type in the new login slug and that’s it. You have your very own unique login URL for your WordPress powered site.
We hope that you will implement the above steps and add the extra layer of security on your WordPress website.
Do share your comments in the comments section below.

