The .htaccess file is a configuration file that is located in the root of your WordPress installation. This file can be used to override the general settings of your WordPress installation, .htaccess is an abbreviation of term ‘Hypertext Access’. There is a period that precedes the file name ‘.htaccess’ which simply means it is a hidden file. You are not likely to see .htaccess file on your browser.
You can implement a number of changes on your site by editing. .htaccess. The changes include; redirecting URLs, protecting your images from hotlinking, preventing access to site folder or blocking IPs from accessing your site.
In this post, we will look at how to edit .htaccess and how you can use .htaccess to override the other settings on your site.
- 1. Precautions of Editing .htaccess
- 2. How to Edit WordPress .htaccess File
- 3. Understanding Contents of .htaccess
- 4. Writing .htaccess Comments
- 5. How to create .htaccess File in WordPress
- 6. Ways of Editing .htaccess File
- 7. How to Edit .htaccess File from cPanel
- 8. How to Edit .htaccess file from WordPress Dashboard
- 9. How to edit .htaccess file from FTP Client – Filezilla
- 10. Useful Tricks for editing .htaccess
- 11. Basic WordPress .htaccess Edit
- 12. Tricks of Editing WordPress .htaccess
- 13. How to Restrict Access to WordPress wp-config.php
- 14. How to Restrict Access to Your .htaccess file
- 15. How to Stop WordPress Directory Browsing
- 16. How to Stop Image Hotlinking
- 17. How to Stop Access to WordPress Admin
- 18. How to Ban IPs and Bots from Your WordPress site
- 19. How to Limit WordPress File Uploads Size
- 20. How to Optimize WordPress Site with GZip Compression
- 21. How to limit WordPress login by IP Address
- 22. How to Redirect Visitors to Maintenance Page in WordPress
- 23. How to Create 301 Redirects for old URLs in WordPress
1 Precautions of Editing .htaccess
When you are editing .htaccess it’s important to exercise maximum caution since errors on .htaccess file will cause your site to crush. Locating the .htaccess can also be difficult; here are two precautions to guide you when you edit .htaccess:
- Show Hidden Files – when editing .htaccess in the cPanel, you need to check the setting ‘Show Hidden Files’ for you to view and edit .htaccess. In some web hosting you may be required to change the permission settings to view the .htaccess file.
- Backup .htaccess – creating a backup copy of the .htaccess file is the most important precaution when editing .htaccess file. This backup copy is used to restore back the site to the original status if something goes wrong when editing .htaccess file.
2 How to Edit WordPress .htaccess File
WordPress .htaccess file comprises of directives to your server on how to handle various scenarios. These instructions to the server will have a direct impact on your website.
It is, therefore, necessary you exercise maximum caution when editing .htaccess to prevent crushing your website. The most common instructions you will find in a WordPress .htaccess file are redirects and rewriting of URLs. WordPress has a set of instructions on the .htaccess that control how WordPress sites behave. The basic .htaccess in WordPress contain the following content:
Basic WordPress .htaccess
RewriteBase /
RewriteRule ^index.php$ – [L]
RewriteCond %{REQUEST_FILENAME} !-f
RewriteCond %{REQUEST_FILENAME} !-d
RewriteRule . /index.php [L]# END WordPress
3 Understanding Contents of .htaccess
WordPress basic .htaccess contains a number of lines of code and you can also add your own instructions to manipulate Apache server in your hosting. Before you can write any rules, it is important you begin by understanding what these lines of code mean. There are instructions and comments in the .htaccess; the latter helps you understand instructions to the server. The other lines of code are instructions to the server on how to carry out certain functions.
4 Writing .htaccess Comments
When you look at .htaccess file you are likely to see lines that are preceded by a hash sign. These lines are referred as comments and as stated above they help you understand the code.
Writing comments in .htaccess requires you to add a hash sign (#) before you write the comment. Here are two examples of .htaccess comments:
# Redirects 301
# 404 Errors Pages
5 How to create .htaccess File in WordPress
You can create .htaccess by simply opening a text editor and adding the content of .htaccess and saving the file as .htaccess. If you don’t have a .htaccess in your site, you can create one and upload it to your server through the cPanel or FTP client.
6 Ways of Editing .htaccess File
There are different ways you can use to edit .htaccess file that include:
- cPanel .htaccess edit
- WordPress Dashboard .htaccess edit
- FTP Client .htaccess
The quickest way to edit .htaccess file is through the cPanel, this article will explain each of these ways of editing .htaccess.
7 How to Edit .htaccess File from cPanel
It is possible to easily edit .htaccess from your hosting cPanel. Before you can edit the .htaccess in your hosting cPanel, you need to locate it first. Here are the steps you should take:
- Log into hosting cPanel
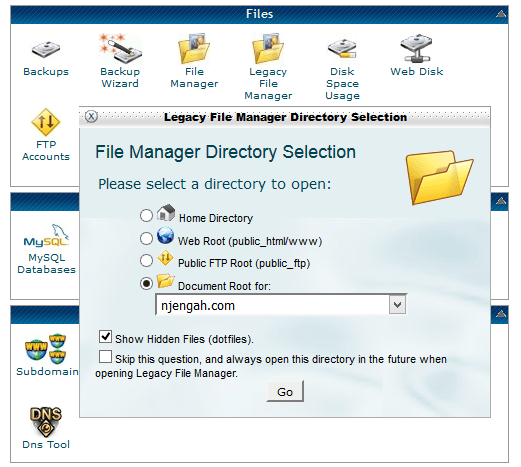
- Locate the File Manager or Files Icon as shown below:
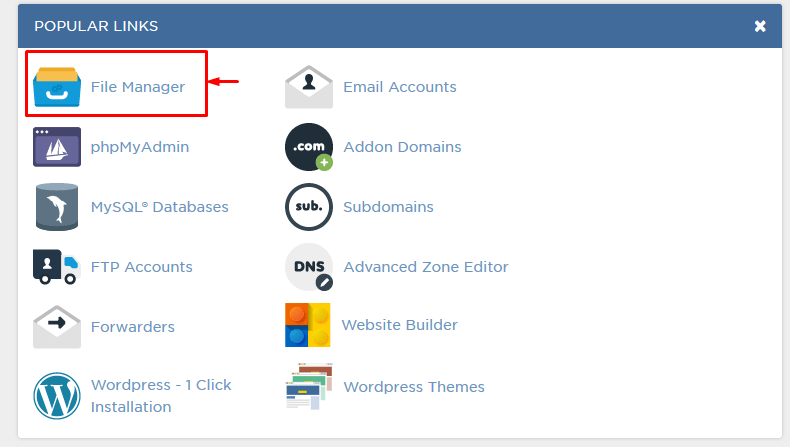
- Click the option to view the Document Root for the domain you want to edit .htaccess
- Choose the option to shown hidden files.
- When you open the File Manager, locate the .htaccess file and right click on it to edit.
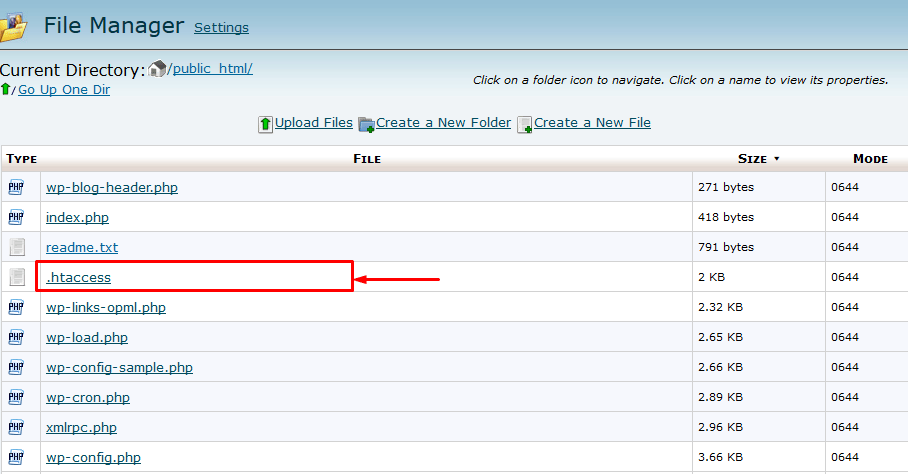
- Copy the contents of the .htaccess before you begin editing and save a backup copy.
- Open the .htaccess file after creating a backup and add your instructions. Save the file and refresh your site to check for the changes.
8 How to Edit .htaccess file from WordPress Dashboard
Editing .htaccess from the dashboard is the best solution if you do not have FTP access or cPanel logins. There is no inbuilt WordPress feature that enables you to edit .htaccess from the dashboard. Nevertheless, there are plugins that are used for editing WordPress .htaccess from the dashboard.
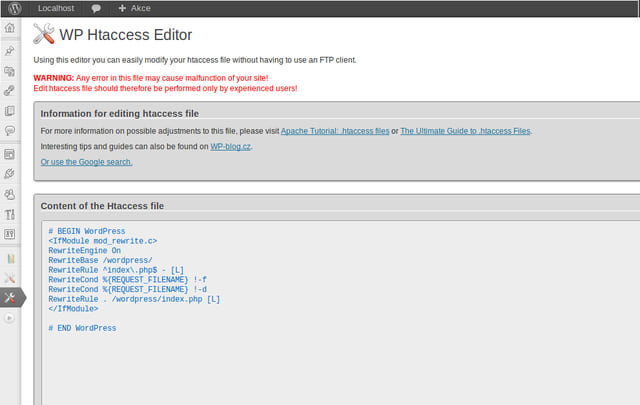
WP .htaccess Editor is the best plugin for editing .htaccess from WordPress dashboard. This plugin is awesome since it also has a feature to allow you to restore a backup just increase anything goes wrong.
WP .Htaccess Editor Plugin is free and can be downloaded from WordPress repository. To edit .htaccess from WordPress dashboard, install this plugin and activate it.
 Another plugin that has .htaccess edit functionality is Rank Math SEO. Rank Math SEO is the one of the most popular WordPress SEO plugin, if you have it installed go to General Setting on the main menu and then click `Edit .htaccess`.
On the .htaccess editor you can add any instructions as shown in the image below:
![]()
After making the changes to your .htaccess file and save your changes and visit your site to see the changes.
9 How to edit .htaccess file from FTP Client – Filezilla
Editing .htaccess file from FTP requires you to first login to your File Transfer Protocol client like Filezilla. The FTP logins can be obtained from your hosting cPanel where you can also reset the password.
The most common challenge when editing .htaccess from FTP client is locating the .htaccess.
You should navigate to the server on the main menu and ensure the ‘Force Showing Hidden Files’ option is checked.
After locating the .htaccess file download it and make a backup copy before you can begin editing it.
10 Useful Tricks for editing .htaccess
As mentioned above, there are a number of rules that you can implement in the .htaccess to change how your WordPress site works. I will explain how to implement each of these rules in your .htaccess file.
11 Basic WordPress .htaccess Edit
When you are editing WordPress .htaccess, you will notice the start and the end have comments as shown below:
# BEGIN WordPress
# .HTACCESS Rules
# BEGIN WordPress
You should avoid adding any new directives within these two lines of comments since it may overwrite the existing rules.
12 Tricks of Editing WordPress .htaccess
Before you edit any .htaccess, it is always advisable you begin by creating a backup copy. After the backup copy, you can implement the following hacks in your .htaccess.
13 How to Restrict Access to WordPress wp-config.php
There is always an eminent danger of getting hacked if you are running a WordPress site. The best way to safeguard your site from hackers is to tighten security in all your WordPress installation files. Of particular interest is the wp-config.php file that stores the values of your database name and the password. It connects your WordPress installation to the database. You need to restrict its access using the following code in your .htaccess file:
#restrict access to wpconfig.php
<files wp-config.php>
order allow,deny
deny from all
</files>
14 How to Restrict Access to Your .htaccess file
The second most important file that is vulnerable to exploit by hackers in your WordPress installation is the .htaccess. WordPress .htaccess file controls how the site behaves and if it is not safe new rules can be added that will have a negative impact on your site. We need to protect the .htaccess file using the code below:
# restrict access to .htaccess
<files ~ “^.*.([Hh][Tt][Aa])”>
order allow,deny
deny from all
satisfy all
</files>
15 How to Stop WordPress Directory Browsing
Apache Web server allows people to access files on your site through the browser; you need to protect your WordPress installation files by stopping people from directory browsing. The access of your WordPress uploads folder can lead you to lose your images and other content in that folder and therefore it is necessary we stop the directory browsing using the following code in your .htaccess:
Options –Indexes
16 How to Stop Image Hotlinking
Some people are likely to use your images by directly hotlinking. There are a variety of ways to stop images getting hotlinked among them is a cPanel feature to stop hotlinking. Another simple way to stop it is to add the following code in your WordPress .htaccess file.
#How to stop hotlinking in WordPress
RewriteEngine on
RewriteCond %{HTTP_REFERER} !^$
RewriteCond %{HTTP_REFERER} !^http(s)?://(www.)?yoursite.com [NC]
RewriteCond %{HTTP_REFERER} !^http(s)?://(www.)?google.com [NC]
RewriteCond %{HTTP_REFERER} !^http(s)?://(www.)?feeds2.feedburner.com/yoursite [NC]
RewriteRule .(jpg|jpeg|png|gif)$ – [NC,F,L]
You need to edit and replace the URL part with your domain before you can save the settings in your .htaccess.
17 How to Stop Access to WordPress Admin
Allowing access to your WordPress admin can lead to your site getting vulnerable. You need to stop access to WordPress admin by editing .htaccess and creating an .htpasswds file that you should place in your root WordPress installation. In most cases you should place it in the public_html folder. You should now use the following code in the .htaccess to restrict access to WordPress admin area by creating an additional layer of security.
AuthName “Joe Admin Only allowed to login”
AuthUserFile C:xampphtdocs.htpasswd
AuthGroupFile /dev/null
AuthType basic
require user Njengah
<Files admin-ajax.php>
Order allow,deny
Allow from all
Satisfy any
</Files>
For this illustration I used my local server, you should replace the authentication name user and the path with your respective site’s values. When someone tries to visit your WordPress admin page, they will be prompted to add a username and password as shown in the image below:
18 How to Ban IPs and Bots from Your WordPress site
One of the best ways to stop spam comments from bots is to block the IPs. This is also useful for blocking access for people who try to hack your site. You can edit .htaccess and block users based on their IP. Adding the following code to your .htaccess blocks users by IP:
#Banning WordPress site access by IP
<Limit GET POST>
order allow,deny
deny from xxx.xxx.xx.x
deny from xxx.xxx.xx.x
deny from xxx.xxx.xx.x
deny from xxx.xxx.xx.x
allow from all
</Limit>
You should replace the XXXX with the respective IPs addresses that you want to ban from accessing your site.
19 How to Limit WordPress File Uploads Size
Limiting the file upload size is a very important measure for membership sites. Members should only upload certain size files to save your memory and help your site maintain the loading speed. You can edit .htaccess to limit the size of the upload using the following code in your .htaccess:
# Limit file uploads to 20MB LimitRequestBody 20240000
This limits the upload sizes for files to 20 MB
20 How to Optimize WordPress Site with GZip Compression
Saving your WordPress site bandwidth will certainly improve your page loading speed. Page loading speed has become a ranking indicator that Google uses to rank sites. GZip compression allows you to compress files and significantly improve your page load speed. Fortunately, you can implement GZip compression by editing the .htaccess file. Here is an example of code you can use in your .htaccess file.
<IfModule mod_deflate.c>
AddOutputFilterByType DEFLATE text/html text/plain text/xml text/css application/x-javascript
BrowserMatch ^Mozilla/4 gzip-only-text/html
BrowserMatch ^Mozilla/4.0[678] no-gzip
BrowserMatch bMSIE !no-gzip !gzip-only-text/html
</IfModule>
It is also possible to do Gzip compression using WordPress plugins available but the .htaccess GZip compression rids your site of unnecessary plugins.
21 How to limit WordPress login by IP Address
Securing your WordPress site from hackers is the most important measure when you have a thriving WordPress site that is earning you some good income. The possibility of having your WordPress site hacked is eminent especially if you have not taken measures to stop hackers. Another way of adding a security layer in your WordPress site is to prevent other people from logging by limiting logins to certain IPs only. This is a foolproof way of ensuring that only you and whitelisted people can login to your site.
# Limit WordPress login admin by IP
# This goes in the /admin folder NOT root folder .htaccess
AuthUserFile /dev/null
AuthGroupFile /dev/null
AuthName “WordPress Admin Access Control”
AuthType Basic
<Limit GET POST PUT>
order deny,allow
deny from all
allow from xx.xx.xx.xx //( your static IP)
allow from xx.xx.xx.xx //( Whitelist IP)
allow from xx.xx.xx.xx //( Whitelist IP)
allow from xx.xx.xx.xx //( Whitelist IP)
allow from xx.xx.xx.xx //( Whitelist IP)
allow from xx.xx.xx.xx //( Whitelist IP)
</Limit>
You should replace the XXX.XXX with the respective IPs that you have whitelisted. All other IPs will be blocked from accessing your WordPress logging and thereby safeguarding your site from hackers.
22 How to Redirect Visitors to Maintenance Page in WordPress
If you are maintaining sections of your site, you can quickly redirect visitors to you maintenance page by editing the .htaccess file. Use the following code in your .htaccess to create a redirect to your maintenance.html page on your server.
RewriteEngine on
RewriteCond %{REQUEST_URI} !/maintenance.html$
RewriteCond %{REMOTE_ADDR} !^123.123.123.123
RewriteRule $ /maintenance.html [R=302,L]
23 How to Create 301 Redirects for old URLs in WordPress
Old URLs that are broken in your site will have a negative effect on your ranking. It’s advisable that all the old URLs are redirected to new URLs after changing the URLs structure. The easiest way to redirect URLs is using the .htaccess; the following is an example on how to create URLs redirect using .htaccess:
Redirect 301 /oldurl/ http://www.yoursite.com/newurl
Redirect 301 /category/health/ http://www.yoursite/category/health/
From the .htaccess code above you can see the first redirects the old URLs to the new one. The second line redirects the WordPress categories to the new category.
This is how you can access and edit the .htaccess file for performing different functionalities on your website. Just to make sure you do not land up in trouble, always keep the backup of your site and the .htaccess file.
If learned to edit correctly, .htaccess can be used for advanced settings of your website.