Facebook is one of the most popular social media sites with over 2 billion monthly active users. It’s not just an online platform to make friends anymore, but instead, it’s a multi-dimensional social platform for connecting, advertising, gaming, and much more.
Facebook has made it to our computers, tablets, and phones. And, now it’s shaping how we find customers, sell a product, or get hired in today’s world.
One of the main reasons for Facebook’s success is the ease to do certain things which didn’t exist before. For instance, you can connect with old friends, interact with people, and respond to others’ content.
For most of us, it’s easy on the eye how social media is opening up new opportunities for everyone around. But a vast majority of the internet users who aren’t capitalizing this powerful attention-seeking tool available at our disposal.
Facebook advertising is a solution that is effective and yet the majority of us aren’t tripling down on the very idea.
Facebook envisioned a lot of ideas; some of them are doing extremely well, for example, Facebook ads, video, groups, pages, and chatbots have been fantastic products of Facebook.
As Facebook grew over the last decade, they kept on improving not just their community-building features, but also the business side of the platform.
Facebook may be a platform for gaming or posting photos for a lot of people, but it’s true that millions of businesses grew because of Facebook.
People write reviews about the restaurants, advertise through their pages, sell products in the marketplaces, and build communities in the groups.
The innovation doesn’t stop here if you’re a business. The Facebook Pixel is the prime example of that innovative approach.
It’s a revolutionary advertising feature that millions of Facebook advertisers are using every day.
If you haven’t had a chance to study or use Facebook Pixel so far, then you’re about to discover something sensational from sales and marketing standpoint that would certainly boost your conversions. Let’s dive deep and find out what the Facebook Pixel really is.
1 What’s the Facebook Pixel?
The Facebook Pixel is a piece of code that Facebook provides to the advertisers, which goes into their website code for targeting the visitors on Facebook through Facebook ads.
This means the advertiser installs this code into the website to reach out the visitors on Facebook.
How this code works is quite interesting; when a visitor lands on the specific page or the website with Pixel installed on it, it gets easier for Facebook to identify the same visitor on Facebook.
As a result, Facebook advertisers embed the Facebook Pixel code into their website codes and target the same visitors on Facebook through Facebook ads.
Have you ever noticed you visited an online store, looked through the products, and the same products’ ads appear on Facebook? It happens because of the Facebook Pixel.
Those online stores do exactly what you’re going to learn in this tutorial. It’s not something surreal; other advertising platforms also offer such features. It’s called retargeting in the online advertising world.
2 How to Install the Facebook Pixel in WordPress?
It’s not rocket science, but it could be complicated if you’re a rookie when it comes to inserting or editing the code. We highly recommend understanding the process before you generate or install the Pixel code.
If you’re a WordPress user, it might get a little easier even if you aren’t an expert in WordPress. Pay close attention to the steps of installing the Facebook Pixel.
Here’s the step-by-step guide to installing the Facebook Pixel in WordPress:
2.1 Create the Facebook Pixel Code
To get started with the Facebook Pixel, you must first create your Pixel code on Facebook. To do so, go to “Manage Ads” option on Facebook.
Open all tools tab from the drop-down menu in the Facebook ads section and go to the “Pixels and Conversions” option to create your Pixel code.
![]()
The next step is to begin the pixel creation process. Click on the “Add New Data Source” option on the left side of the page. Once it’s opened, choose the Facebook Pixel option to move further.
It’ll open up a popup box which would require you to enter the name of the pixel and the URL of the website where you’re going to add the pixel code to.
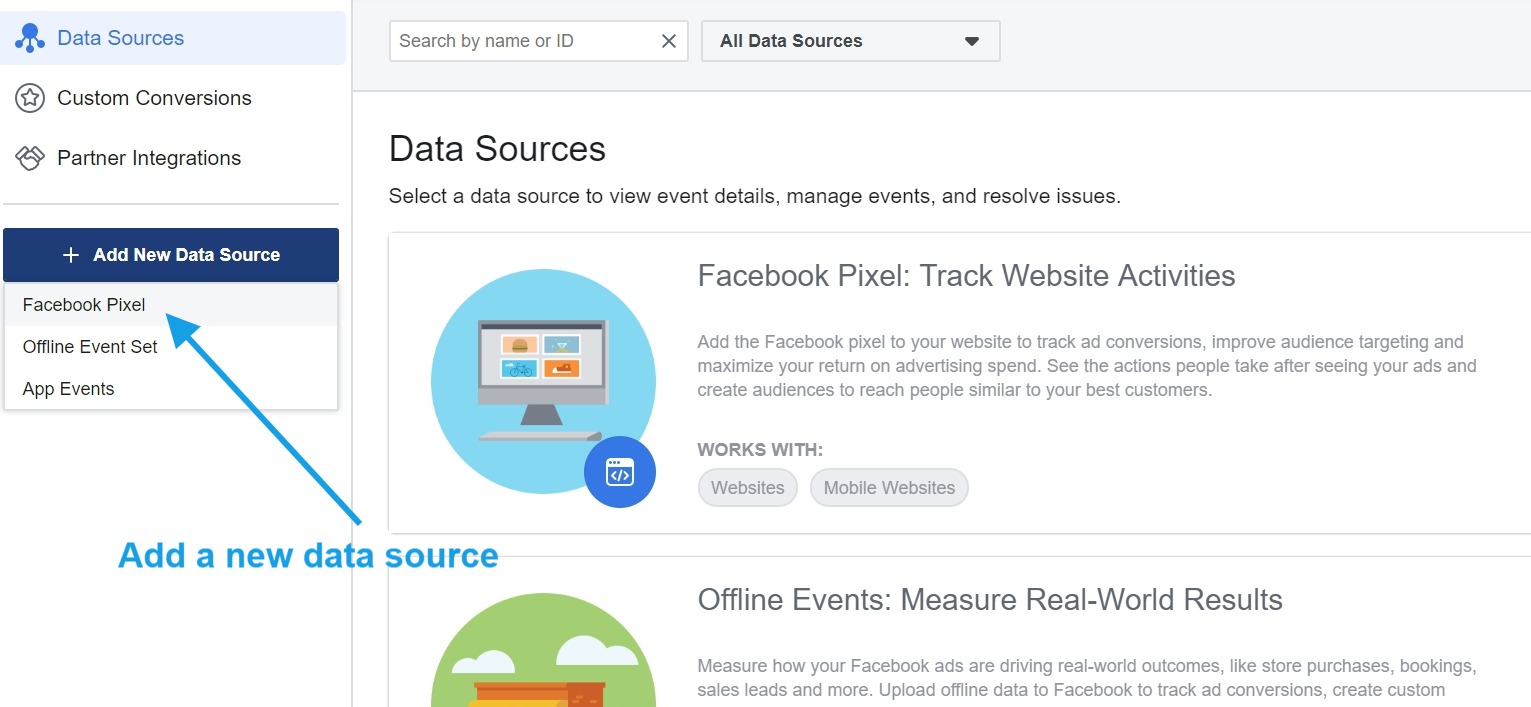
Now, name the pixel and mention the website URL to proceed. Once you write both these things, click on the create button to move forward.
![]()
Once you proceed after writing the pixel name and your website URL, you’ll see the following confirmation window on your screen.
![]()
Now, you’ve successfully created your Facebook Pixel code. So half the job is done, and now you have to insert the Pixel code into your website. There are two simple methods to do so; we’ll show you both of them.
2.2 Opting the Content Management System
Installing the Facebook Pixel means integrating the Facebook ads with your website. To make this happen, you need to insert the Pixel code into your website’s code.
Once you successfully generate the Pixel code, Facebook would ask you how you’d like to add Pixel code to your website.
![]()
You might want to pick WordPress here because the whole point of this article is to install Pixel to your WordPress site. So select the “WordPress” and click on the “Set Up Partner” button against the WordPress option.
![]()
Head over to the next step for installing the Pixel plugin in WordPress for connecting your Facebook ad account to your WordPress site.
2.3 Installing the Facebook Pixel Plugin
It’s time to download the Facebook Pixel plugin and install on your WordPress site to connect the site with your Facebook ad account.
Facebook makes it easier for you by providing the download link of this official plugin.
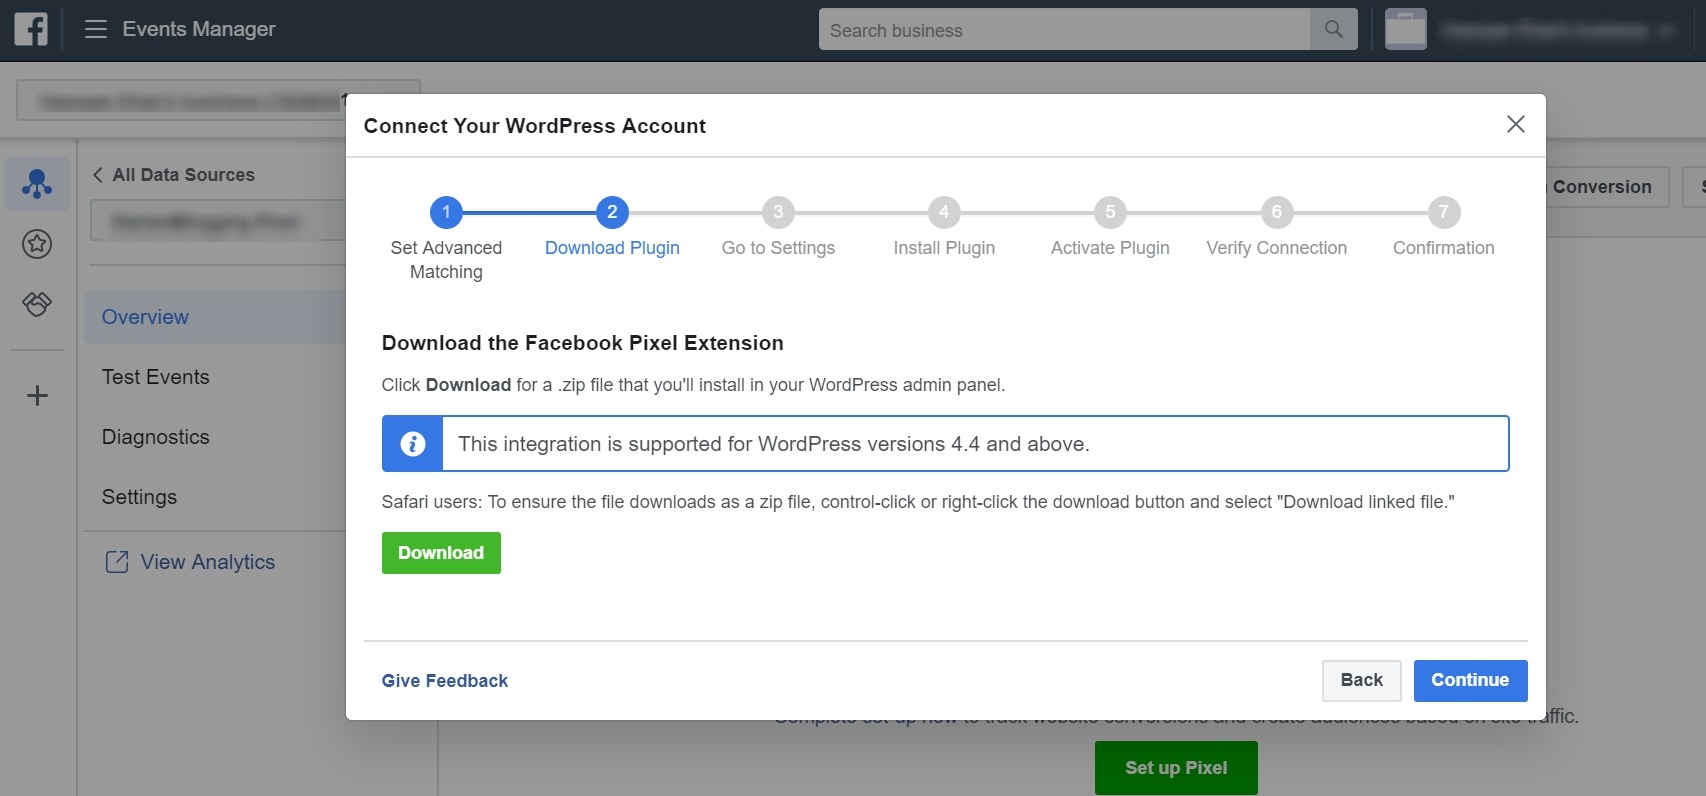
Now, download the plugin and move forward to activate the plugin. To install the downloaded plugin to your WordPress site, go to the plugins section of your site.
Click on to the “Add New” option to get started with the plugin installation process. Look at the screenshot below for clarification:
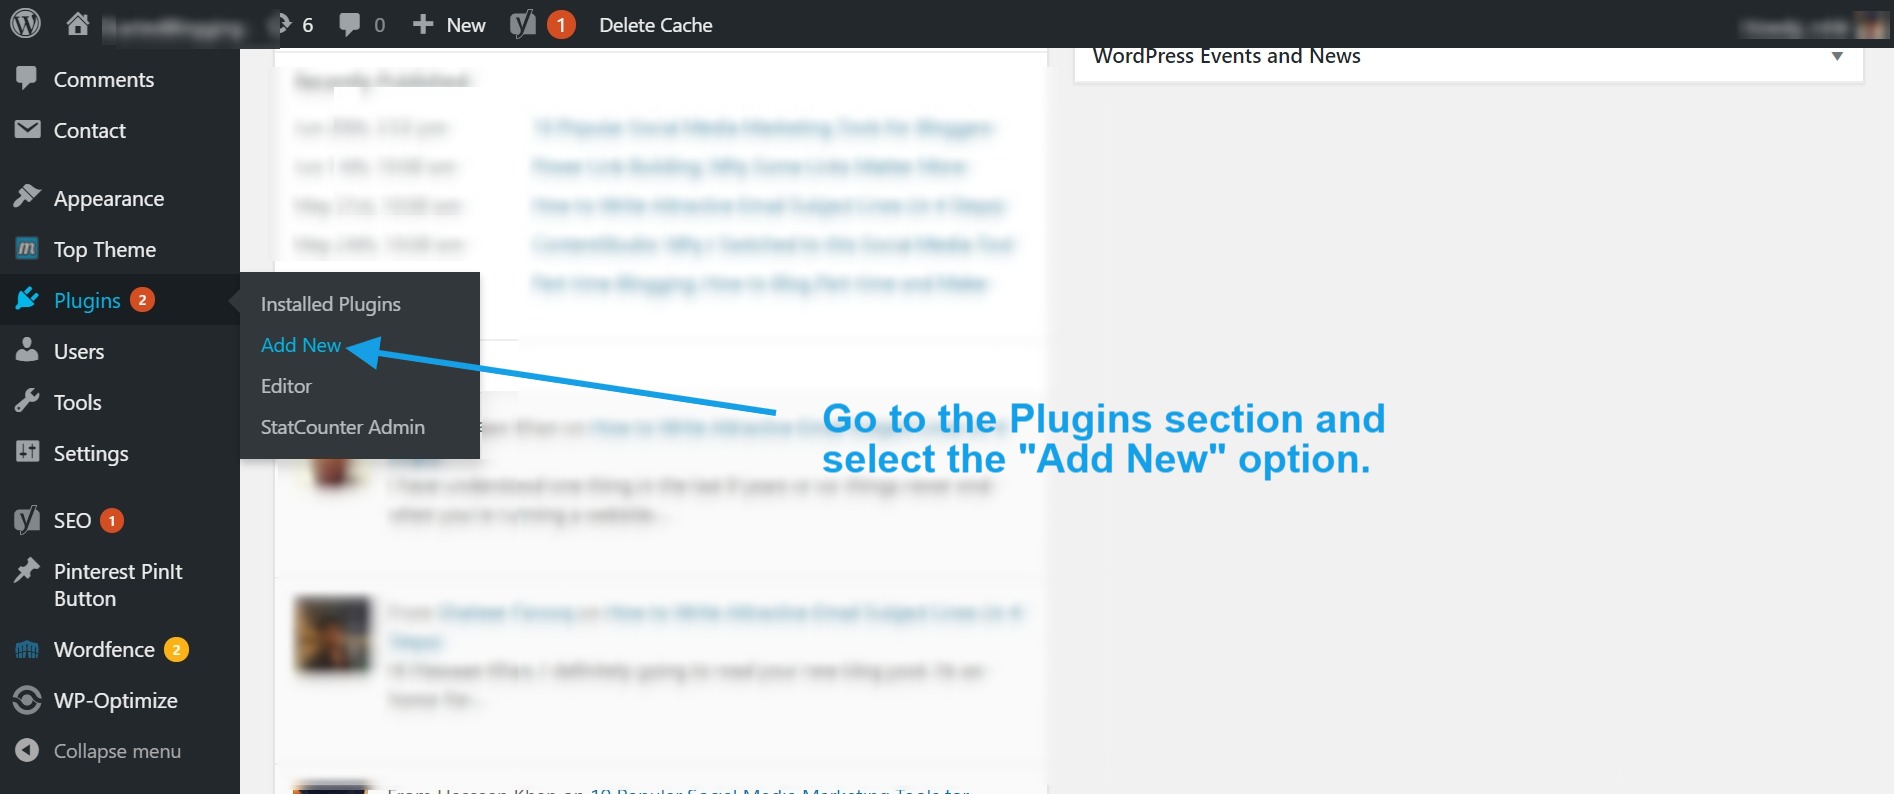
Now, you have to upload the Facebook Pixel plugin that you just downloaded into your computer. Don’t hesitate to install this plugin, in case, you haven’t installed a WordPress plugin before.
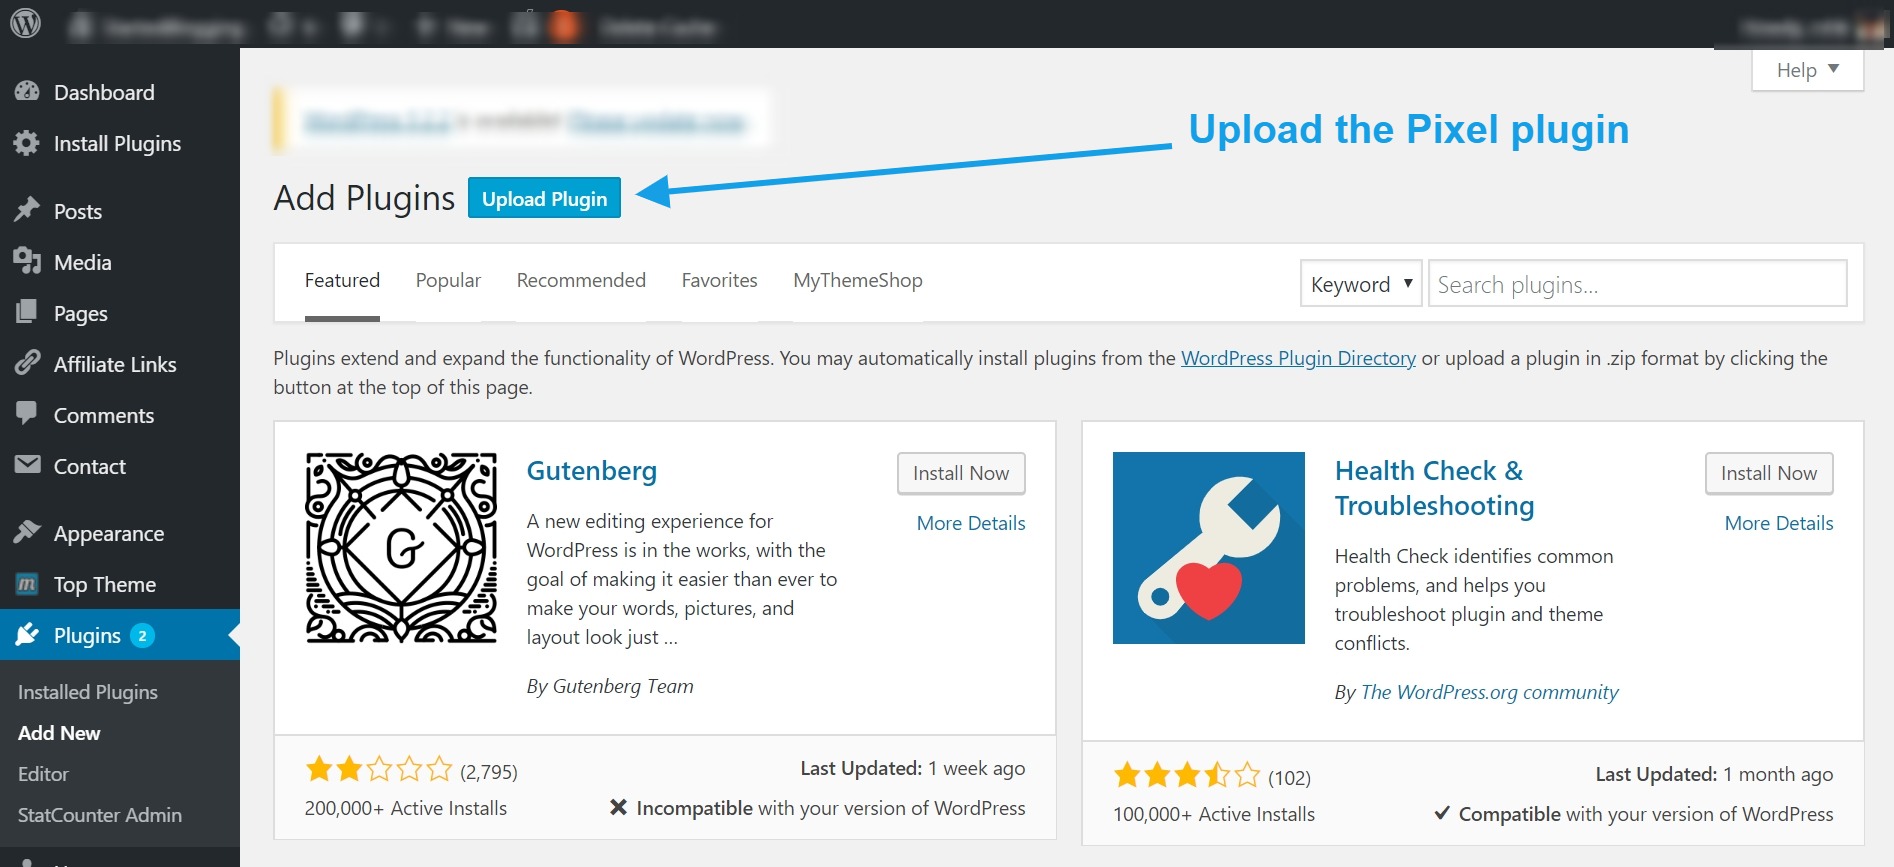
So click on the “Upload Plugin” button to navigate to the directory where you downloaded the plugin on your computer and finally upload it. Once you finish uploading the plugin, the following screen would appear.
![]()
Now click on the “Activate Plugin” button to activate it. Once it’s activated, go to Facebook and proceed with the setup. You’d have to verify the pixel code to confirm whether or not it’s working properly.
![]()
Once you’d verify that, it must show the “Setup complete” screen.
![]()
Remember that Pixel would take some time to start recording the activities. So don’t rush into creating a custom audience or analyzing the performance of your Facebook pixel. It’s obvious that it’d be too early to start capitalizing the Pixel.
There is an alternative plugin called PixelYourSite that can help you manage your Facebook Pixel and Google Analytics codes with no coding skills required. You can also add the Pinterest tag to your site using this plugin.
Once you install this plugin, you’d have to connect it to your Facebook ad account using the Pixel ID from Facebook. Go to your Data Sources section in the Facebook ad account and look out for the Pixel ID.
![]()
Once you find it, put the Pixel ID into your General section of the settings. Make sure you enable the Facebook event setting in the plugin and you’re good to go.
![]()
3 The Alternative Method: Installing the Facebook Pixel Manually
The alternative to adding a WordPress plugin or other extension is installing the Facebook Pixel through the code.
You must have the Admin-level access to your WordPress dashboard to manually install the code into your WordPress site.
Select the manual method while creating the Facebook Pixel. Here’s the screenshot of the popup window where you’d have to make a decision of whether you’d like to go manually or choose a WordPress plugin.
In this case, you’ll be clicking on the “Set Up Manually” button to get started with adding the code to your site.
![]()
Once you click on that button, a new popup window would appear with the code to install on your WordPress site. It’d also help guide you on where to put that code in your site.
![]()
Now you might want to copy the code and paste into the header section of your WordPress site. Make sure to paste the Pixel code betweenandsection of the code. To add the code, go to your WordPress Editor.

Now locate the header.php file to finally add the code. Paste the code in between theandtags.
![]()
After pasting that code, save the file. Now, you have successfully added the Pixel code into your site.
![]()
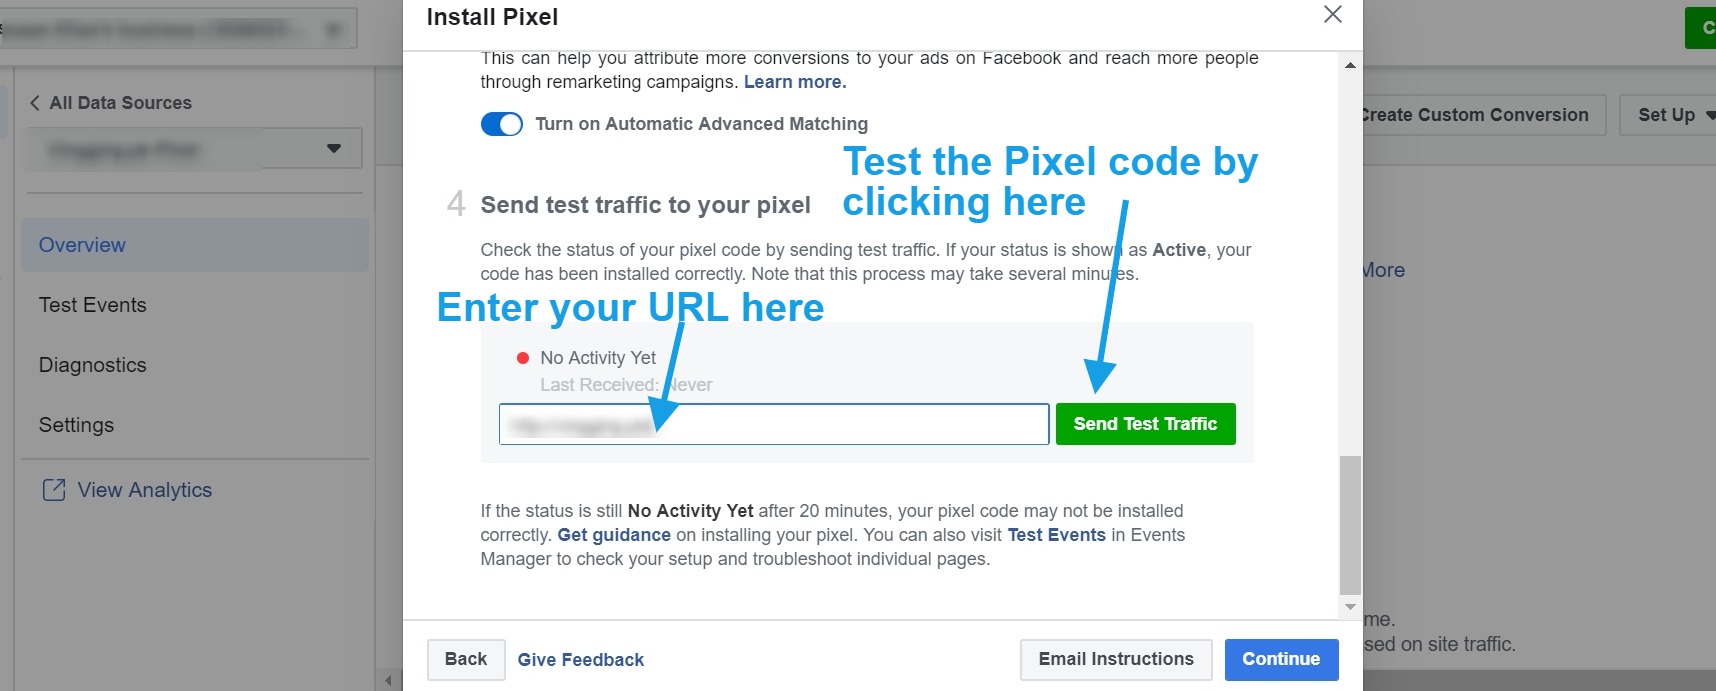
Now you can go back to your Facebook ad account and verify that your Facebook Pixel has been perfectly added. Just put the URL and send the test traffic to your site. It’ll open your website in the browser.
4 What’s the point of this tutorial?
We shared how you can install the Facebook Pixel code on your WordPress site. It’s a simple procedure; many beginners find it difficult to pull this off.
Perhaps they aren’t aware of Facebook ads much, which is why they find it difficult to generate and insert the Pixel code. Some of them don’t even know about it.
Now we’re pretty sure that you’d be able to generate and use your Facebook Pixel code in your WordPress blog. In case, you feel stuck at some point, don’t hesitate to write us back in the comments section. We’ll be more than happy to respond to your queries.
This piece of content is not just about educating you on how to insert the Facebook pixel code into your WordPress blog, but also to emphasize on exploring new things.
If you belong to digital marketing or software tech industry, you’d know that billion-dollar companies are being built and sold based on the greatest ideas and their execution.
Facebook has been one of the most innovative internet companies in this day and age. It’s not just dominating the internet, but it’s also teaching us an entrepreneurial lesson on how to move forward into the tech world.
If you want to learn something from Facebook’s success, then elicit the audacity of trying out new things without the fear of failure.
Lastly, don’t hesitate to ask questions about installing the Facebook pixel. It’s understandable that if you aren’t familiar with the Facebook ads, it could be tricky for you to install the Pixel. We tried to explain what Facebook Pixel is in the easiest way possible.
What else would you like to know apart from installing the Facebook Pixel?
