At times you would want to ensure that only a particular set of groups of people can access all or part of your WordPress website and the WooCommerce Store, the thought that strikes the mind is to password protect WordPress.
This may sound somewhat tricky and geekish to some of you, but we bet, by the end of reading this post, you would be able to do some amazing things on your website. Be it protecting your whole WordPress site or protecting certain sections of posts, pages and content or maybe password protecting your WooCommece based store or individual products.
All this with a few clicks and sometimes using certain WordPress plugins to make our life easy.
The best use of these features would be on the website where you would want to maintain segregation between your free and paid users.
You can show the free posts, pages, categories, or content to all the users. However, you can password protect some key valuable posts, pages, categories, or sections of content and keep them to be accessed by only your premium users.
In this post, we’ll tell you how you can protect your entire site or just a few posts and pages and make them password protected.
Table Of Contents
- 1. Password Protecting WordPress Posts
- 2. Password Protecting Your Entire WordPress Website
- 3. Password Protecting your WordPress categories
- 4. Password Protecting certain sections of WordPress post
- 5. Password Protecting your WooCommerce Store
- 6. Password Protecting individual WooCommerce Products
- 7. Final Thoughts
1. Password Protecting WordPress Posts
WordPress has an inbuilt option to make posts password protected. Using this feature, you have the freedom to share posts with only a certain set of audience.
This feature could be used if you want to share the content, let’s say, only with your friends, family, or website subscribers.
We’ll show you how to use this feature step by step:
On your WordPress site, you get an option to choose the visibility for your site. By default, this is set to “public” which means that once this post is published, anyone can access it using the URL of the post.
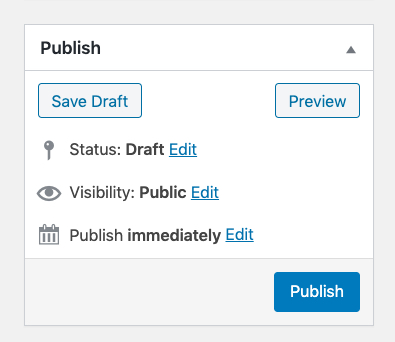
Apart from this default setting, when you click on “edit”, you’ll get an option to change the visibility to “Private” or make it “Password Protected.”
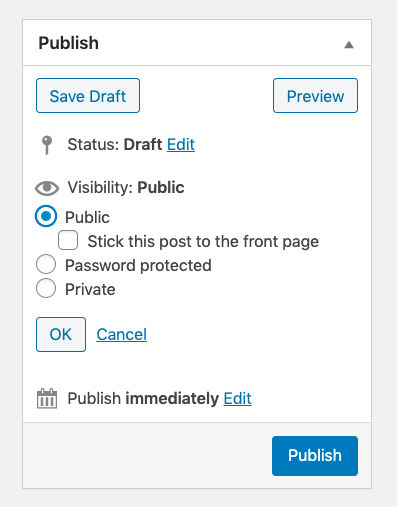
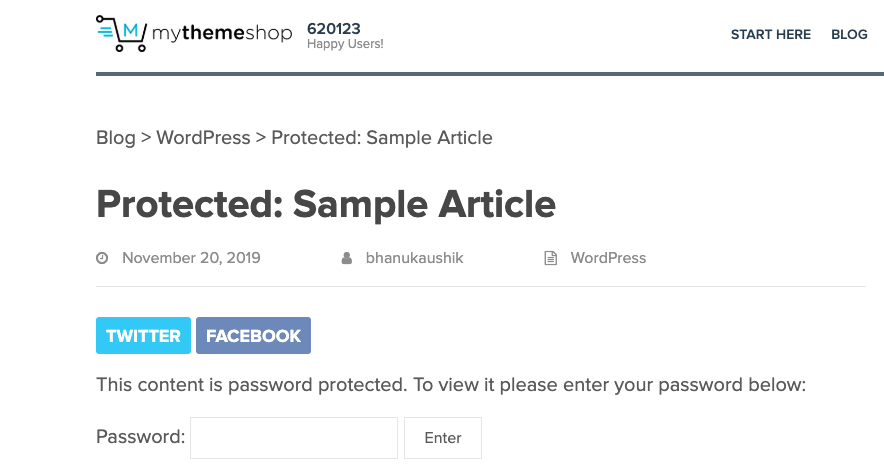
Once you choose the “Password Protected” option, enter the password, click on “Publish.” Voila! You have enabled the password protection on your WordPress post.
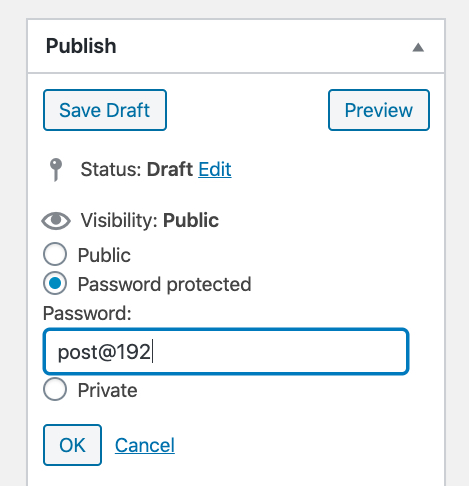
Now, when a user tries to access that post, they’ll have to enter the password to view it.
Isn’t it pretty simple?
Coming to the other option i.e. making the post as “Private”, it would simply restrict the content to the person who has created that post or, anyone who is logged into the site with Administrator or Editor access.
2. Password Protecting Your Entire WordPress Website
Unfortunately, there isn’t any feature in WordPress yet using which you can password protect your entire site.
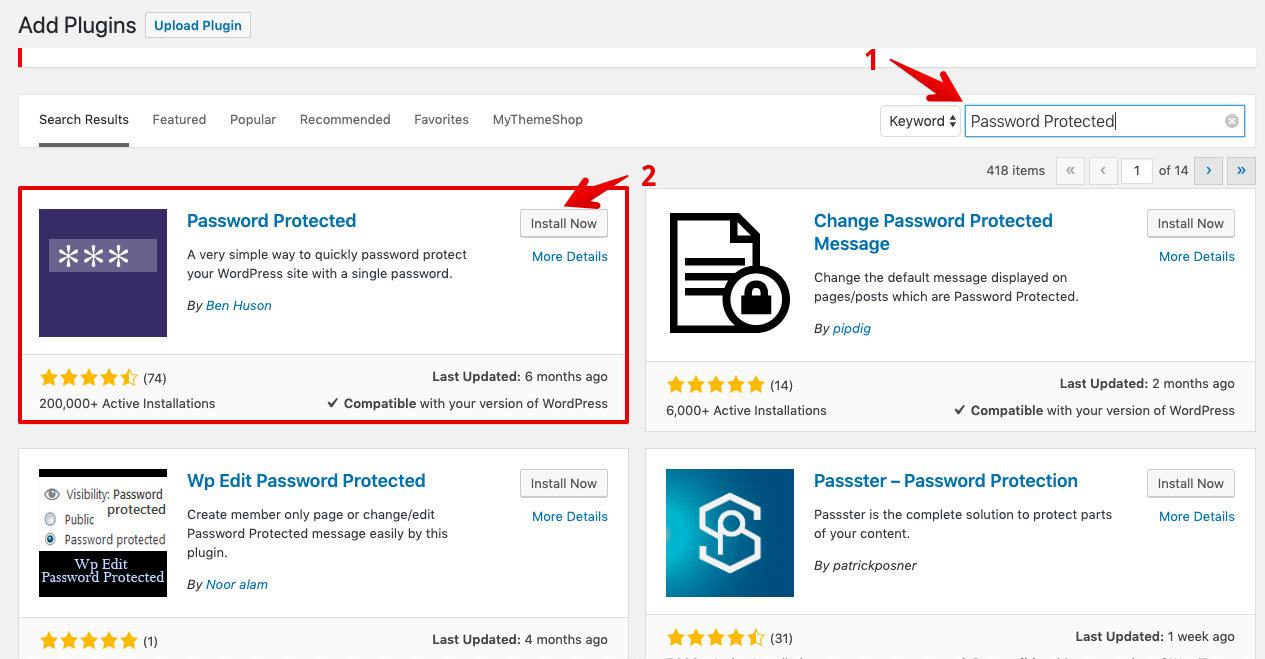
For protecting your entire site, you’ll have to use a third-party plugin. We suggest you use the plugin – Password Protected by Ben Huson.
Though there are other WordPress plugins as well, which can solve the purpose, we picked the above as it has got more than 200,000 installs with a majority of 5-star ratings.
Let’s check how to password protect WordPress now:
Step 1: In your WordPress Dashboard, hover to Plugins -> Click on Add New
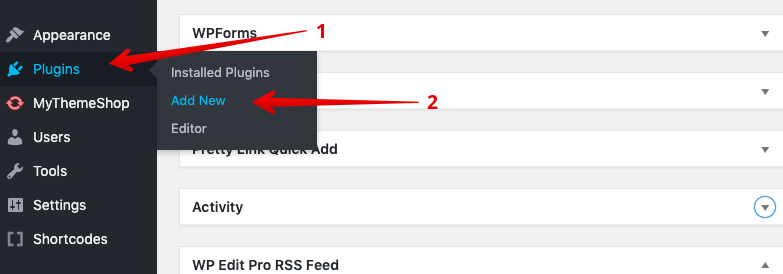
Step 2: Search for the “Password Protected” plugin, install and activate the same
Step 3: After activating the plugin, head to Settings and click on “Password Protected”. You’ll now have to configure the same.
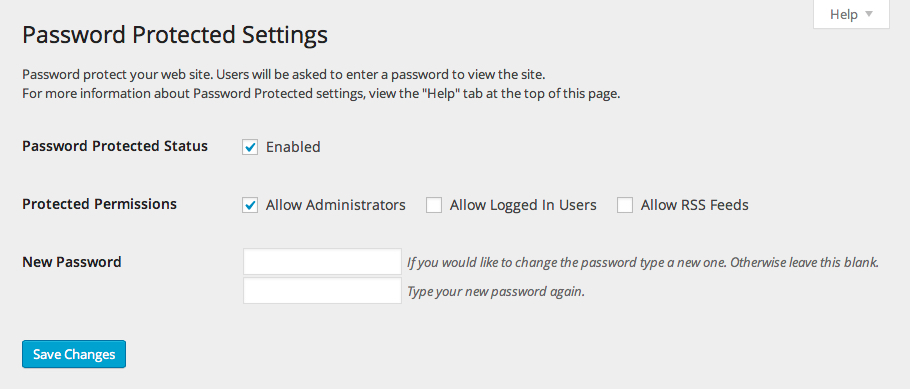
You’ll find different options:
- Password Protected Status – This makes your website password protected once enabled.
- Protected Permissions – Using this, you can assign users with these permissions to see your site like normal without entering any password.
- New Password – Enter the password which you want to use for authentication.
- Allow IP Address – By mentioning the IP Address, you can allow the users using that particular IP Address to view the site without entering any password.
On clicking “Save changes”, the option which you select will be saved and enabled. This is how it will look once you enable password protection:
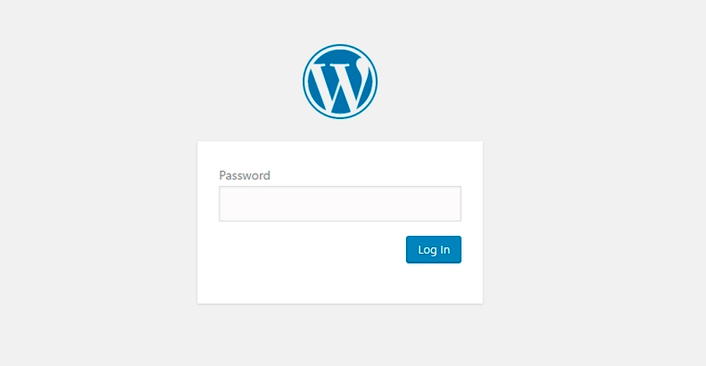
Note: This would pass protect your entire WordPress site. Though, anyone having the direct link to the media files would still be able to access it.
3. Password Protecting your WordPress categories
At times, you would only want to password protect certain sections of your WordPress website rather than doing it for an entire site.
The best way to do that is by applying password protection on the specific categories of posts on your website.
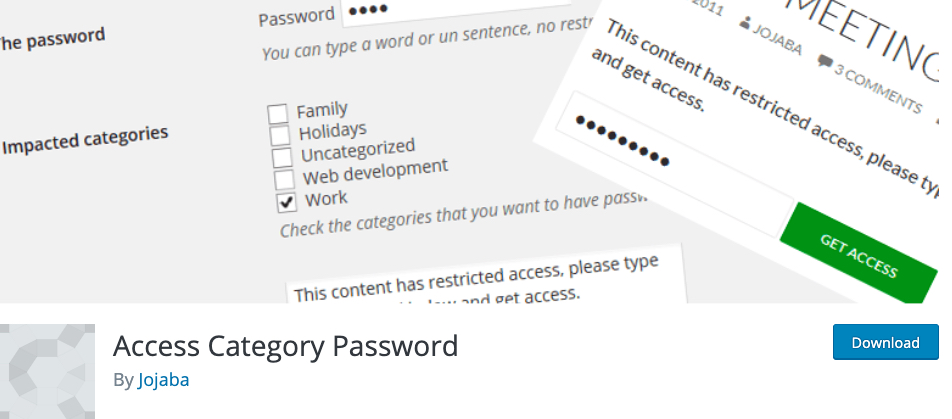
The simplest way to do that is by using the WordPress plugin – Access Category Password
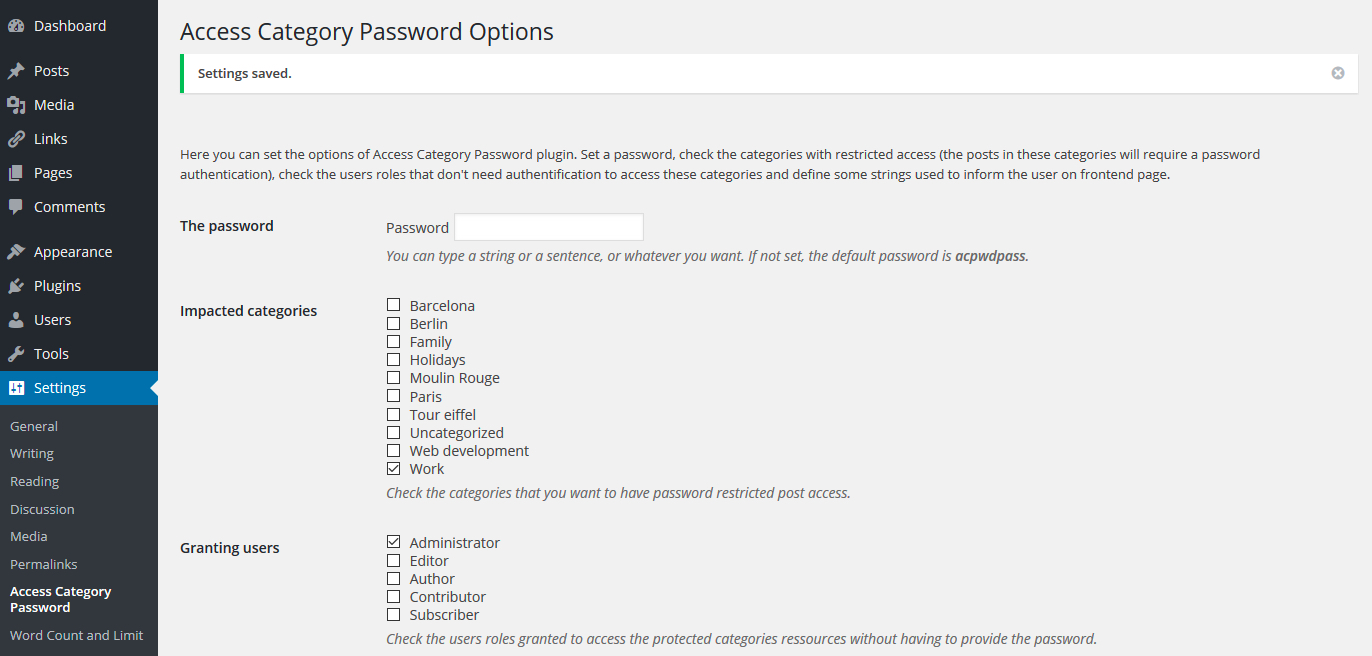
Download and activate the plugin as we have discussed above. Once the plugin is activated, go to the Settings → Access Category Password.
The plugin settings are fairly simple to understand, and there is only one page of settings tweaking which you can apply passwords to the specific categories on your website.
Here is how to choose the settings:
- The password – This is the password that you would decide that will allow only authenticated users to access the restricted categories on your WordPress website.
- Impacted categories – Here, you will select the respective categories which you would want to password protect.
- Granting users – These specific WordPress user roles would have access to the categories without using the password.
- Only single post – On checking this option, the post content would still display on your homepage or archive pages. It would only keep single posts page of posts in the restricted website categories password protected. By default, it is suggested to leave this option unchecked.
Apart from the above options that we have discussed, you can also configure the messages that you would want to appear on the Enter password form. This is what the users will see if they try to access a post from the restricted category.
4. Password Protecting certain sections of WordPress post
We have already learned about protecting categories, posts, and the whole WordPress website. What if we just want to protect certain segments inside a WordPress post, which is publicly available?
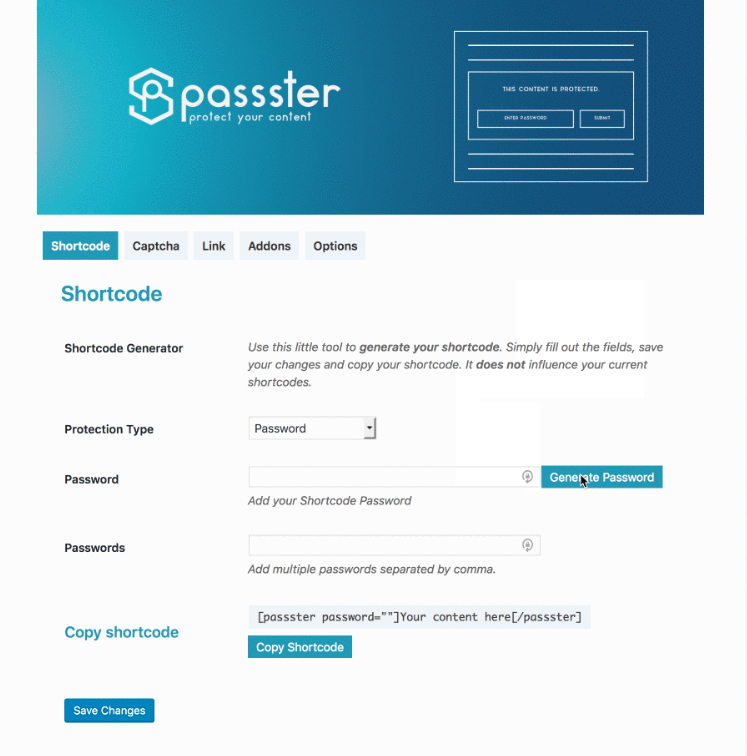
The simplest way is by using the Passster – Password Protection WordPress plugin. Using it, you can:
- Restrict certain sections of the content with a password
- Restrict content and its sections with a captcha
- It is easily customizable with the WordPress Customizer
- Generate a shortcode and implement password protection
- Use cookies for providing access for a longer duration
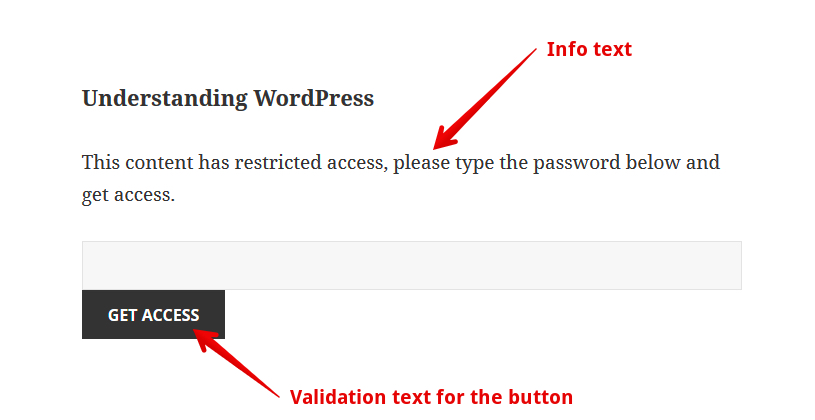
- Easily customize the instruction text, headline, placeholder and the button label per shortcode
The plugin also supports page builders like Elementor, Beaver Builder, and WPBakery Page Builder.
Now, let us see the exact working of the plugin:
Download, install, and activate the plugin, as explained earlier. Once activated, go to Settings → Passster. Here you can create a password or use an auto-generated password.
Now, you can head over to the WordPress Editor and open the post in which you want to password protect a certain section of the content. Then, simply paste the shortcode that you had earlier generated and voila! Your content is now password protected.
5. Password Protecting your Woocommerce Store
Since WordPress is no more only a content-based platform, you can start your very own ecommerce store using the WooCommerce plugin. In this section, we would tell you how you can password protect your WooCommerce store by following some simple and easy steps.
If you only want your store to be accessed by approved customers or maybe you want to put your store on hold, for both, you can use the WooCommerce Private Store. It is a paid plugin that you can buy to password protect your entire WooCommerce store.
What it does, it hides all the shopping related sections on your website without affecting your homepage or blog page. It hides the WooCommerce widgets as well. Using this, you can hide the navigation links and only show them to people who have logged into your website.
How to do that?
Once you activate the plugin, you can head to WooCommerce -> Settings and click on the Private Store.
This where you will add the license key and can change the plugin settings.
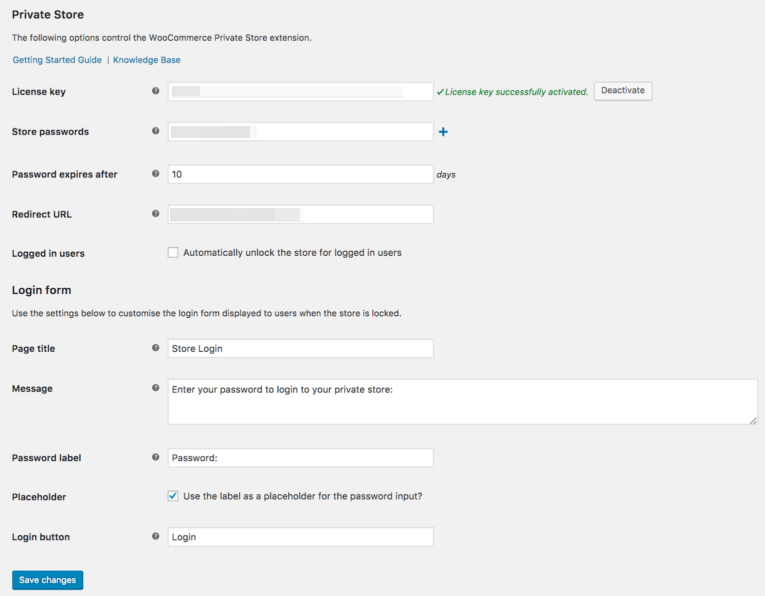
Once saving the setting, only the authenticated members would be able to view your store.
6. Password Protecting individual WooCommerce Products
Just like you can password protect the WordPress pages and posts. You can use the built-in WooCommerce features to secure individual products in your store.
- Go to the WooCommerce product page, which you want to secure using a password.
- In the Publish box, Click on ‘Edit’ just next to the Visibility option.
- Select the option ‘Password protected.’
- Enter the pass, click Update/Publish
Here’s a catch, the above won’t affect the visibility of that particular product as they would be visible in the Shop and category pages. The only thing is, the customer would only be able to buy that particular product by entering the right password.
The only glitch is, if you have multiple products that are password-protected, every time the user tries to add them into their cart, they would have to enter the password every time they add a password-protected product to the cart.
Final Thoughts
These were six different ways to implement WordPress password protection on your website as well as the WooCommerce store.
We have discussed multiple ways to implement password protection on your website. It feels lucky to be using a system where you could implement such tricky and amazing features by just a few clicks without writing all that hard and technical code or without knowing any programming.
Do share your views in the comments section below.